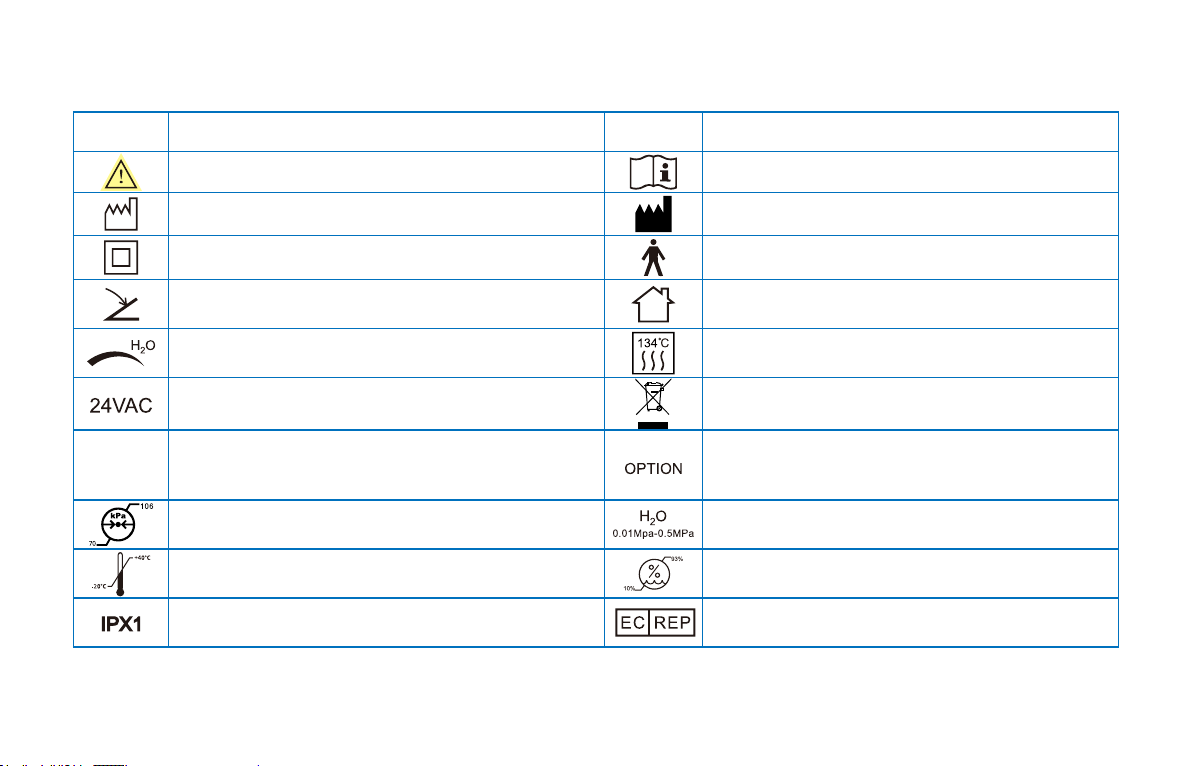
Refine DS7 User manual

D7L-M003-1.0 20210418
( DS7 / DS7+ )


Contents
1 Product introduction ···························································································································1
2 Installation and adjustment ···················································································································3
3 Function and Operation························································································································6
4 Instruction for main components of detachable handpiece (showed in picture 2) ·············································7
5 Cleaning, disinfecting and sterilizing ······································································································8
6 Transportation, Storage And Maintenance································································································9
7 Trouble shooting ································································································································9
8 Environmental protection···················································································································· 11
9 EMC - Declaration of conformity ·········································································································· 11
Attachment. Table of operating power of the tips (Compatible with SATELEC) ··························································· 16

Safety Precautions
WARNING: If you neglect these safety precautions, you may cause personal injury such as electric shock, re or
damage to the product.
1.Use a separate, grounded power outlet. Never use wet hands to unplug the power cord.
2.Please put the power plug into the socket easy to pull out, to make sure it can be pulled out in emergency. Please do not use
other than the specied voltage.
3.Do not damage, modify, pull, over bend or twist the power cord, do not place heavy objects on the power cord.
4.Do not place the product on unstable workbenches, such as shaky tables, bevels, or vibrations.
5.Keep the scaler clean before and after operation. The scaling tip, wrench and handpiece (detachable) must be sterilized before
each treatment.
6.The tip must be tightened to the handpiece with torque wrench. While scaler is working, the heat of scaling tip may become
higher if there is no water owing out, make sure the irrigation is good.
7.Don't twist or rub the tip. Change a new one when the tip is damaged or worn excessively.
8.Don't screw the scaling tip while stepping on the foot switch.
9.Don't use impure water source, and be sure not to use normal brine instead of pure water source.
10.If use the water source without hydraulic pressure, the water surface should be one meter higher than the head of the patient.
11.Don't knock or rub the handpiece. Do not pull the cable while the device is working, to avoid damage to the cable.
12.After operating, turn o electrical source, and then pull out the plug.
13.The screw thread of the scaling tips produced by other manufacturers is maybe coarse, rusty and collapsed, which will
damage the screw thread of the handpiece irretrievably. Please use our scaling tip.
14.This equipment is only applicable to the corresponding type of power adapter produced by our company.
15.As a professional manufacturer of medical instruments, we are only responsible for the safety on the following conditions:
• The maintenance, repair and modication are made by the manufacturer or the authorized dealer.
• The changed components are original of our company and operated correctly according to instruction manual.
16.This product is intended for use in hospitals and dental clinics only. The user must be professionally trained and qualied dentists.
17.Indicator light: Other colours: Meaning other than red, yellow, or green, indicated the device ready for use.
18.Statement: the third conductor in the POWER SUPPLY CORD is only a functional earth.

Symbol instruction
Symbol Instruction Symbol Instruction
Warning, Caution and Important! Check the
Instruction Manual Consult the accompanying documents
Date of manufacture Manufacturer
According to the type of protection against electric
shock: CLASS II EQUIPMENT
According to the degree of protection against
electric shock:Type B applied part
Foot switch interface Used indoor only
Adjustment for the water ow Can be autoclaved
24VAC power supply socket Appliance compliance WEEE directive, Dispose
of as required by the law.
220VAC
110VAC
220VAC power supply socket
110VAC power supply socket Function selection
Atmospheric pressure for storage Water entrance pressure:0.01MPa-0.5MPa
Temperature limitation for storage Humidity limitation for storage
Protected against dripping water European authorized representative

1
1 Product introduction
1.1 Product overview
Guilin Refine Medical Instrument Co.,Ltd. is a professional manufacturer to research, develope, produce and sell ultrasonic
scalers. The product is used for teeth cleaning and also an important device for teeth disease prevention and treatment. The
Ultrasonic scaler is composed of main unit, handpiece, cable, water pipe, tip, torque wrench, foot switch, and power supply.
The ultrasonic scaler has following features:
1.1.1 Detachable handpiece can be autoclaved under 134°C and 0.22 Mpa.
1.1.2 Automatic frequency tracking ensures that the device always works on the best frequency, stable and ecient performance.
1.2 Contraindications:
1) The hemophilia patient is forbidden to use this equipment.
2) The patients or doctors with heart pacemaker are forbidden to use this equipment.
3) The heart disease patient, pregnant woman and children should be cautious to use the equipment.
1.3 Equipment safety classication
1) Operating mode: Continuous operation
2) Type of protection against electric shock: Class II
3) Degree of protection against electric shock: Type B applied part
4) Applied part of the equipment: Tip
5) Degree of protection against harmful ingress of water: Ordinary equipment
6) Degree of protection against harmful ingress of water: protection degree against water (used on foot switch ):IPX1
7) Degree of safety of application in the presence of a ammable anesthetic mixture with air or with oxygen or nitrous oxide:
Equipment can not be used in the presence of a ammable anesthetic mixture with air or with oxygen or nitrous oxide

2
1.4 Model and technical Parameters
Parameters DS7 DS7+
Size (mm) 180mm*180mm*150mm 180mm*180mm*150mm
Weight of main unit 1.59kg 1.59kg
Weight of power supply ---- ----
Rated input 220VAC 60Hz 220VAC 60Hz
Input Power 38VA 38VA
Fuse of main unit T0.5AL 250V T0.5AL 250V
Fuse of power supply ---- ----
Primary tip vibration excursion <90μm <90μm
Tip vibration frequency 28kHz±3kHz 28kHz±3kHz
output power of tip 3W-20W 3W-20W
half-excursion force 0.5N-2N 0.5N-2N
Water entrance pressure 0.01MPa-0.5MPa 0.01MPa-0.5MPa
Handpiece model HS-7H (Without LED lamp, Detachable) HS-7L (With LED lamp, Detachable)
Function setting G, P, E G, P, E
Touch control YES YES
Water bottle With With
Note 1: In addition to the above, the electronic components used to clarify their electrical properties are exactly the same.
Note 2:Function Annotation:“G”means “Scaling mode” ; “P”means “Periodontal mode” ; “E”means “Endodontic mode”
Note 3: Do not replace the fuse of main unit nor the power supply, to avoid safety risks.

3
1.5 Working condition
1) Environment temperature: +5°C-+40°C
2) Relative humidity: 30%-75%
3) Atmosphere pressure: 70kPa-106kPa
4) Temperature of the water at the inlet: not higher than +25°C
2 Installation and adjustment
2.1 Product installation steps
2.1.1 Unpack the package, make sure that all the parts and accessories are complete according to the packing list, take the
main unit out of the box, and put it on the stable plane facing to the operator.
2.1.2 Turn the water control knob to the max, Do not screw it over tight in case of damage.
2.1.3 Insert the plug of the foot switch to the socket.
2.1.4 Connect one end of the water pipe to the water entrance, and the other end to the clean water source.
2.1.5 Connect the handpiece (detachable) to the cable.
2.1.6 Install the tip on the handpiece and turn on the power switch to start operation.
2.2 The function instructions and the connection diagram
2.2.1 Power adjustment: The models with potentiometer are adjusted by potentiometer, turn on/o the potentiometer to adjust
the power; for the models with touch panel, power can be adjusted by nger touch.
2.2.2 Water adjustment: Water is adjusted by touch panel.

4
LN
Picture 1 The front view of the main unit ( DS7,DS7+)
2.3 Instruction for main components of handpiece (showed in picture 2).
Picture 2-A The handpiece without LED lamp Picture 2-B The handpiece with LED lamp

5
2.4 Instruction for using the wrench to install tip
Picture 3
Picture 4
a) The torque wrench’s structure is designed in special way which can control the strength of the scaling tip installation properly

6
and correctly. It also can guarantee the operator screw or unscrew the scaling tip eectively and keep their hands away from being
scratched.
b) Operation
•Take the tip into the torque wrench then install or uninstall the scaling tip as picture 3 showed.
•Installation: Hold the handpiece and turn the tip toward clockwise direction with the torque wrench. Turn one more circle when
the tip stops, then the tip is installed.
•Uninstallation: Hold the handpiece, turn the wrench toward anti-clockwise direction.
Note: The connection of handpiece (detachable) and the plug must be kept dry.
3 Function and Operation
3.1 Scaling & periodontal treatment function
3.1.1 Turn on the power switch, the power indicator lighted and the machine is ready for work.
3.1.2 Choose the scaling tip according to the requirement, and x the scaling tip with the wrench. ( see picture 3) Please select a
suitable power when using dierent type of tips (refer to "TABLE OF OPERATING POWER OF THE TIPS").
3.1.3 The handpiece can be handled in the same gesture as a pen in hand.
3.1.4 Vibrating intensity: Adjust the vibrating intensity according to your need, usually adjust to the middle grade, and adjust the
vibrating during the clinical treatment according to the patient's sensitivity and the rigidity of the tartar.
3.1.5 Step on the foot switch, the tip begins to vibrate, and the LED lamp (model with LED) on the top of the handpiece lights up.
Release the foot switch, the LED lamp keep shining for 10 seconds.
3.1.6 Under normal working condition, the frequency of the tips is very high, light touch and a certain to-and-fro motion will
eliminate the tartar without obvious heating, overexertion and overstay are forbidden.
3.1.7 Water volume adjustment: Step on the foot switch, and the tip begins to vibrate, then turn the water control switch to ne
spray to cool down the handpiece and clean the teeth.
3.1.8 After nishing operation, keep the machine working for 30 seconds with the water supply to clean the handpiece and the
tip.

7
3.1.9 Unscrew the scaling tip and sterilize it.
Note: Be sure not to make the end of the tip touch the teeth vertically, and not use too much force when the tip touching the
surface of the teeth, in case of hurting the teeth and damaging the tip.
Note: Don't screw the scaling tips when stepping on the foot switch, while the machine is working.
Note: When the water is lower than water level lower limit, please open the lid, ll the bottle with adequate puried water and
cover the lid.
3.2 Endo function (Root canal treatment)
3.2.1 Fix endochuck to handpiece by endo wrench (See Picture 4).
3.2.2 Unscrew the screw cap on the endochuck.
3.2.3 Put the ultrasonic le into the hole in the front of endochuck.
3.2.4 Screw the screw cap with endo wrench to tighten up the ultrasonic le.
3.2.5 Press option key, turn to endo function.
3.3.6 When ultrasonic scaler turns into endo function, only the rst power indicator is on and the power is at the lst grade. Put
the ultrasonic le into the patient's root canal slowly, step on the foot switch to start endo treatment. During the treatment, turn up
the power gradually according to the needs.
Note:
a) When xing endochuck,it must be screwed down.
b) The screw cap on the endochuck must be screwed down.
c) Don't press it too much when the ultrasonic le in root canal.
d) Don't step on the foot switch until the ultrasonic le is in root canal.
e) The power range of endo treatment is advised from the lst to the 5th grade.

8
4 Instruction for main components of detachable handpiece (showed in picture 2)
a) Cap: The Cap can be removed. You can screw out the Cap and clean the pole with alcohol termly.
b) Decorative ring: can be disassembled and cleaned with alcohol regularly, can be autoclaved under the high temperature and
pressure.
c) Handpiece: The main part of the whole handpiece, can be autoclaved under the high temperature and pressure.
d) Symbol: Autoclaved (134°C, 0.22MPa)
e) The connector of the cable: Connect the handpiece with the water source and power supply of the main unit.
f ) LED lamp, Light conductor (The models that the handpiece with LED lamp): Clean them with puried water and sterilize them
under the high temperature of 134°C and high pressure of 0.22Mpa.
Note: The connection of handpiece and the plug must be kept dry.
5 Cleaning, disinfecting and sterilizing
5.1 Please conform to the recommendations of the manual "Reprocessing Instructions of Cleaning, Disinfecting And Sterilizing"
delivered with your product regarding the procedure of cleaning, disinfecting, sterilizing and packing of the components.
5.2 The handpiece (detachable), scaling tips, endochuck, torque wrench, endo wrench, LED lamp and Light conductor (the
handpiece with LED lamp) can be sterilized.
Notice:
a) Clean the handpiece (detachable) with compressed air before sterilization.
b) Be sure that the scaling tip has been unscrewed from the handpiece and it cannot be sterilized with others.
c) Please notice whether the outer of the handpiece is damaged during the treatment and sterilization. Don’t smear any
protective oil on the surface of handpiece.
d) There are two waterproof “O” rings at the end of the handpiece. Please lubricate them with dental lube frequently, as
sterilization and repeated pulling and inserting will reduce their using life. Change a new one once it is damaged or worn

9
excessively.
e) The following sterilizing methods are forbidden:
•Boil in water.
•Dip in iodine, alcohol and glutaraldehyde.
•Bake in oven or microwave oven.
Notice: We are not responsible for any damage caused in the above items.
6 Transportation, Storage And Maintenance
6.1 Transportation
6.1.1 Excessive impact and shake should be prevented in the transportation. Lay it carefully and lightly and don’t invert it.
6.1.2 Don’t put it together with dangerous goods during transportation.
6.1.3 Avoid solarization and getting wet in rain or snow during transportation.
6.2 Storage
6.2.1 Don’t store the machine together with the articles that are combustible, poisonous, caustic, or explosive.
6.2.2 This equipment should be stored in a room where the relative humidity is 10%-93%, atmospheric pressure is 70kPa-
106kPa, and the temperature is -20°C - +40°C.
6.3 Maintenance
6.3.1 The equipment should be handled carefully and lightly. Be sure that it is far from the vibration, and installed or kept in a
cool, dry and ventilated place.
6.3.2 Please turn o the electrical source if not use it, if not use for a long time, please make the machine get through to the
power and water once 3 months for ve minutes.

10
7 Trouble shooting
Fault Possible cause Solutions
The scaling tip doesn't vibrate and there is
no water owing out when stepping on the
foot switch.
The power plug is in loose contact. Make the plug insert to the socket well.
The foot switch is in loose contact. Insert the foot switch to its socket tightly.
The fuse in the main unit is broken. Contact our dealers or us.
The scaling tip doesn't vibrate
but there is water owing out when
stepping on the switch.
The tip is in loose contact. Screw the tip on the handpiece tightly
(See Picture 3).
The connect plug between the handpiece
and the circuit board is in loose contact. Contact our dealers or us.
Something wrong with the handpiece. Send the handpiece to our
company to repair.
Something wrong with the cable. Contact our dealers or us.
The scaling tip vibrates but there is no
spray when stepping on the foot switch. The water control knob is not on. Turn on the water control knob [note 1].
The vibration of the tip becomes weak.
The tip hasn't been screwed on to the
handpiece tightly.
Screw the tip on the handpiece tightly
(See Picture 4).
The tip is loose because of vibration. Screw on the tip tightly (See Picture 4).
The coupling between the handpiece and
the cable isn't dry. Dry it by the hot air.
The tip is damaged [note 2]. Change a new one.
There is water seeping from the coupling
between the handpiece and cable. The waterproof "O"ring is damaged. Change a new waterproof "O"ring.
There is water owing out when turn
o the power. There is impurity in the solenoid valve. Contact with the local distributor or
manufacturer.

11
Fault Possible cause Solutions
The handpiece generates heat. The amount of spouting water is too little. Turn the water control switch to a higher
grade [note 1].
The potentiometer is broken. Change a new one.
The amount of spouting water is too little.
The water control knob is a low grade. Turn the knob to a high grade [note 1].
The water pressure is not enough. Enhance the water pressure.
The water pipe is jammed. Clean water pipe with multi-function
syringe [note2].
The vibrating intensity control knob
seizes up. The potentiometer is damaged. Contact with the local distributor
or our company.
The u-le doesn't vibrate. The screw is loose. Tighten it.
Endochuck is damaged. Change a new one.
There is noise coming from the endochuck. The screw is loose. Tighten it.
LED light don't work
(Handpiece with LED lamp)
Poor contact Contact tightly
Something wrong with LED light Change a new one
There is no water coming out from the
handpiece (automatic water supply mode). There is air in the water pipe. Turn the water control to the Max, reinsert
the bottle.
If the problem still can't be solved, please contact with local dealer or manufacturer.
8 Environmental protection
Please dispose according to the local laws.

12
9 EMC - Declaration of conformity
The device has been tested and homologated in accordance with EN 60601-1-2 for EMC. This does not guarantee in any way that
this device will not be eected by electromagnetic interference. Avoid using the device in high electromagnetic environment.
Guidance and manufacturer’s declaration - electromagnetic emissions
The Ultrasonic scaler are intended for use in the electromagnetic environment specied below. The customer or the user of the Ultrasonic scaler
should assure that it is used in such an environment.
Emissions test Compliance Electromagnetic environment - guidance
RF emissions CISPR 11 Group 1 The Ultrasonic scaler use RF energy only for its internal function. Therefore, its RF emissions are very
low and are not likely to cause any interference in nearby electronic equipment.
RF emissions CISPR11 Class B
The Ultrasonic scaler are suitable for being used in domestic establishment and in establishment directly
connected to a low voltage power supply network which supplies buildings used for domestic purposes.
Harmonic emissions lEC
61000-3-2 Class A
Voltage uctuations
/ icker emissions
lEC 61000-3-3
Complies
Guidance & Declaration — electromagnetic immunity
The Ultrasonic scaler are intended for use in the electromagnetic environment specied below. The customer or the user of the Ultrasonic scaler
should assure that It is used in such an environment.
Immunity test IEC 60601 test level Compliance level Electromagnetic environment - guidance
Electrostatic discharge (ESD)
lEC 61000-4-2
±8 kV contact
±2 kV, ±4 kV, ±8 kV,
±15 kV air
±8 kV contact ±2
kV, ±4 kV, ±8 kV,
±15 kV air
Floor should be wood, concrete or ceramic tile. If oors are covered with
synthetic material, the relative humidity should be at least 30%.
Electrical fast transient/burst
IEC 61000-4-4
±2kV for power supply
lines
±1 kV for Input/output
lines
±2kV for power
supply lines ±1kV
for interconnecting
cable
Main power quality should be that of a typical commercial or hospital
environment.

13
Surge
lEC 61000-4-5
±1 kV line to line
±2 kV line to earth ±1 kV line to line Main power quality should be that of a typical commercial or hospital
environment.
Voltage dips, short
interruptions and voltage
variations on power supply
input lines
IEC 61000-4-11.
<5 % UT
(>95% dip in UT.) for
0.5 cycle
40 % UT
(60% dip in UT) for 5
cycles
70% UT
(30% dip in UT) for
25 cycles
<5% UT
(>95 % dip in UT) for
5 sec
<5 % UT
(>95% dip in UT.)
for 0.5 cycle
40 % UT
(60% dip in UT) for
5 cycles
70% UT
(30% dip in UT) for
25 cycles
<5% UT
(>95 % dip in UT)
for 5 sec
Main power quality should be that of a typical commercial or hospital
environment. If the user of the Ultrasonic scaler requires continued
operation during power mains interruptions, it is recommended that the
Ultrasonic scaler is powered from an uninterruptible power supply or a
battery.
Power frequency (50/60 Hz)
magnetic eld
lEC 61000-4-8
30A/m 30A/m Power frequency magnetic elds should be at levels characteristic of a
typical location in a typical commercial or hospital environment.
NOTE UTis the a.c. mains voltage prior to application of the test level.
Guidance & Declaration - Electromagnetic immunity
The Ultrasonic scaler are intended for use in the electromagnetic environment specied below. The customer or the user of the Ultrasonic scaler
should assure that it is used in such an environment.
Immunity test IEC 60601 test level Compliance level Electromagnetic environment - guidance

14
Conducted RF
lEC 61000-4-6
Radiated RF lEC
61000-4-3
3 Vrms
150 kHz to 80 MHz
3 V/m
80 MHz to 2.5 GHz
3 Vrms
3 V/m
Portable and mobile RF communications equipment should be used no closer to any
part of the Ultrasonic scaler, including cables, than the recommended separation
distance calculated from the equation applicable to the frequency of the transmitter.
Recommended separation distance
d=[3,5/V1]×P1/2
d=1.2×P1/2 80 MHz to 800 MHz
d=2.3×P1/2 800 MHz to 2.5 GHz
where P is the maximum output power rating of the transmitter In watts (W)
according to the transmitter manufacturer and d Is the recommended separation
distance in meters (m).
Field strengths from xed RF transmitters, as determined by an electromagnetic site
survey,ashould be less than the compliance level in each frequency range.b
Interference may occur In the vicinity of equipment marked with the following
symbol:
NOTE 1 At 80 MHz end 800 MHz. the higher frequency range applies.
NOTE 2 These guidelines may not apply in all situations. Electromagnetic propagation is aected by absorption and reection from structures,
objects and people.
a Field strengths from xed transmitters, such as base stations for radio (cellular/cordless) telephones and land mobile radios, amateur radio, AM
and FM radio broadcast and TV broadcast cannot be predicted
theoretically with accuracy. To assess the electromagnetic environment due to xed RF transmitters, an electromagnetic site survey should be
considered. If the measured eld strength in the location in which the Ultrasonic scaler are used exceeds the applicable RF compliance level
above, the model Ultrasonic scaler should be observed to verify normal operation. If abnormal performance is observed, additional measures may
be necessary, such as reorienting or relocating the Ultrasonic scaler.
b Over the frequency range 150 kHz to 80 MHz, eld strengths should be less than 3V/m.

15
Recommended separation distances between
portable and mobile RF communications equipment and the Ultrasonic scaler
The Ultrasonic scaler are intended for use in electromagnetic environment in which radiated RF disturbances is controlled. The customer or the
user of the Ultrasonic scaler can help prevent electromagnetic interference by maintaining a minimum distance between portable and mobile
RF communications equipment (transmitters) and the Ultrasonic scaler are recommended below, according to the maximum output power of the
communications equipment.
Rated maximum output power
of transmitter
W
Separation distance according to frequency of transmitter
m
150kHz to 80MHz
d=1.2×P1/2
80MHz to 800MHz
d=1.2×P1/2
800MHz to 2,5GHz
d=2.3×P1/2
0.01 0.12 0.12 0.23
0.1 0.38 0.38 0.73
1 1.2 1.2 2.3
10 3.8 3.8 7.3
100 12 12 23
For transmitters rated at a maximum output power not listed above, the recommended separation distance d in meters (m) can be estimated using
the equation applicable to the frequency of the transmitter, where P is the maximum output power rating of the transmitter in watts (W) accordable
to the transmitter manufacturer.
NOTE 1 At 80 MHz and 800 MHz. the separation distance for the higher frequency range applies.
NOTE 2 These guidelines may not apply in all situations. Electromagnetic propagation is aected by absorption and reection from structures,
objects and people.
The normal function of the Serial 6 / Serial 5 Ultrasonic scaler may be disturbed by strong Electro Magnetic Interference. If so, simply reset
the product to resume normal operation by following the instruction manual. In case the function could not resume, please use the product in other
location.
Without the express consent of manufacture, unauthorized alteration or modication of the equipment may cause electromagnetic compatibility
problems of the equipment or other equipment.
Warning: this device should not be used close to or stacked with other devices. If it must be used close to or stacked, it should be observed
and veried to work normally under the conguration used.
This manual suits for next models
1
Table of contents
Popular Media Converter manuals by other brands

Ganz
Ganz PixelPro GXi Series installation guide

ICP DAS USA
ICP DAS USA tM-7565 user manual

Solid State Logic
Solid State Logic MADI OPTI-COAX quick start guide

YOKOGAWA
YOKOGAWA JUXTA VJB3 user manual

Telco Systems
Telco Systems Metrobility T3 2115-23-01 Installation & user guide

NeoMedia
NeoMedia Encoder PDF417 installation guide