Reina TM-GL Manual

TM-GL Installation and User Guide, December 2019
Reina Imaging 6107 W. Lou Ave., Crystal Lake, IL 60014 800-752-4918 www.reinaimaging.com
Page 2 of 15
Table of Contents
i
Intended Use
3
ii
Safety and Compliance
3
iii
Warranty
4
1
About This Manual
5
1.1
Disclaimer
5
1.2
Additional Information Concerning Risks
5-6
1.3
Changes to This Manual
6
2
Product Description and Specifications
6
2.1
Product Description
6
2.2
Product Specifications
6
3
Required Tools and Equipment
6
3.1
Uncrating
6
3.2
Assembly
6
4
Uncrating the Device
7
4.1
Uncrating –Two People to Remove from Pallet
7
4.2
Removing Cardboard Container
7
5
Installing the D-EVO GL Panel, Grid and DR Panels
8
5.1
Safety Screw Removal
8
5.2
Landscape Position
8
5.3
Mounting the D-EVO GL Panel
8
5.4
Mounting the Grid
9
5.5
Mock-Up Grid
10
5.6
Securing the D-EVO GL Panel and Grid
10
5.7
Moving the Device
11
6
User Operations: Height Adjustment and Rotation
12
6.1
Height Adjustment –Force Required
12
6.2
Height Adjustment of D-EVO GL Panel
13
6.3
D-EVO GL Panel Rotation
13
6.4
Patient Position
14
7
Product Maintenance
14
7.1
Maintenance
14
7.2
Cleaning
14
8
Changes to This Document
15

TM-GL Installation and User Guide, December 2019
Reina Imaging 6107 W. Lou Ave., Crystal Lake, IL 60014 800-752-4918 www.reinaimaging.com
Page 3 of 15
i. Intended Use
The TM-GL Mobile Trans-Former (Model# TM-GL) is designed to hold and position the
D-EVO GL Long-Length DR Panel for use in general radiography.
ii. Safety and Compliance
Precautions!
•The unit is pre-assembled but take care in uncrating, as the device is very heavy.
•Follow any warning labels on the unit and these instructions.
•Do not attempt to adjust the Detector Mount height prior to reading the
instructions.
•Failure to adhere to the Precautions listed herein may result in injury to user or
patient!
Compliance
The TM-GL Mobile Trans-Former is a Class 1 Medical Device (510k exempt) in the USA
and is registered to:
Reina Imaging
6107 W. Lou Avenue
Crystal Lake, IL 60014 USA
Phone: 800-752-4918
The TM-GL Mobile Trans-Former has been labeled and declared:
This model has been classified as a Class 1, Annex VII device.
European Authorized Representative:
Pinchet Rx SRL
Contact: Paolo Pinchet
Via Don Gnocchi 24 20148 Milano Italy
Phone: 02 / 48707603

TM-GL Installation and User Guide, December 2019
Reina Imaging 6107 W. Lou Ave., Crystal Lake, IL 60014 800-752-4918 www.reinaimaging.com
Page 4 of 15
iii. Warranty
Reina Imaging warrants to the Original Purchaser that this product will be free from
defects in its workmanship and materials, under normal use and service conditions, as
described herein. “Defects” as used in this warranty, is defined as any imperfections
which impair the use of the product. The company will repair or replace, at its option,
without charge to the original purchaser only, the defective products or parts for a
period of 1 year from the date of purchase and while owned by the Original Purchaser.
Should any component fail under normal use during this period, it is the buyer’s
responsibility to contact customer service at 800-752-4918.
Not Covered Under this Warranty
Damage caused by user abuse, misuse, negligence, accidental misuse and normal wear
will not be covered under this warranty. Users are responsible for reading all
instructions prior to using the product(s).

TM-GL Installation and User Guide, December 2019
Reina Imaging 6107 W. Lou Ave., Crystal Lake, IL 60014 800-752-4918 www.reinaimaging.com
Page 5 of 15
1. About This Manual
1.1. Disclaimer - This manual was written to provide proper guidelines for using
the TM-GL Mobile Trans-Former. Using the TM-GL Mobile Trans-Former in a
manner other than detailed in this manual can be dangerous and can cause
serious property damage and injury. The user accepts all risks and Reina
Imaging shall not be responsible for any liability caused by improper use.
Reina Imaging assumes no responsibility to assess the user’s technical ability
or clearance to operate the TM-GL Mobile Trans-Former. Use of the TM-GL
Mobile Trans-Former constitutes the user’s acceptance of all responsibility
for liability caused by its use.
1.2. Additional Information Concerning Risks - Throughout this manual additional
information is presented to the user to aid in understanding of risks during
certain operations. This additional information is not comprehensive of all
risks assumed by the user and this product should only be operated by
trained persons possessing the technical expertise required for safe
operation.
There are three types of additional risk-related information presented to the
user:
•Caution –Cautions in this manual contain information to help the user
avoid minor risks such as product problems due to improper assembly or
usage. Failure to heed this level of warning may result in product failure,
minor product damage, unusable product, property damage and the like.
The user or patient may also experience minor injuries.
The Caution Symbol
•Warning –Warnings in this manual contain information to help the user
understand substantial risks. Failure to heed this level of warning could
result in serious product damage and serious property damage.
The user or patient may also experience serious injuries that would likely
require medical attention.
The Warning Symbol

TM-GL Installation and User Guide, December 2019
Reina Imaging 6107 W. Lou Ave., Crystal Lake, IL 60014 800-752-4918 www.reinaimaging.com
Page 6 of 15
•Dangers –Dangers defined in this manual contain information to help the
user understand extreme risks. Failure to heed this level of warning
could result in total product destruction and catastrophic property
damage.
The user or patient may also experience grievous personal injury
resulting in hospitalization or death.
The Danger Symbol
1.3. Changes to This Manual - User manuals are updated from time to time to
offer information about product improvements, to reflect engineering
changes, general workflow and the like. As these updates are released they
will be made available for download by users. It is the user’s responsibility
to consult our website or call our support line for the latest materials
regarding this system prior to use. Users should check back periodically for
updates and checking before installation of the product(s) is recommended.
2. Product Description and Specifications
2.1. Product Description - The TM-GL Mobile Trans-Former is designed to hold and
position the D-EVO GL Long-Length DR Panel and an Anti-Scatter Grid for use in
general radiography. It is mobile with a wheeled base and features a lift-assist
mechanism and a rotating detector mount.
2.2. Product Specifications
Weight (with D-EVO GL Panel and Grid mounted)
155 pounds
Dimensions (lowest portrait position)
55H x 24W x 22D inches
Total Vertical Stroke
22 inches
Max. Height Active Imaging Area - Portrait
73.5 inches
Min. Height Active Imaging Area - Portrait
2.5 inches
Max. Height Active Imaging Area - Landscape
58 inches
Min. Height Active Imaging Area - Landscape
9.75 inches
3. Required Tools and Equipment
3.1. Uncrating –Philips screwdriver, razor knife
3.2. Assembly –No tools required

TM-GL Installation and User Guide, December 2019
Reina Imaging 6107 W. Lou Ave., Crystal Lake, IL 60014 800-752-4918 www.reinaimaging.com
Page 7 of 15
CAUTION!
The device is heavy. Take care to move it with caution. Separate uncrating
instructions are attached to the crate.
4. Uncrating the Device
4.1. The device comes fully assembled and can be lifted off the pallet by two people
4.2. Cut the packing tape connecting the lid and box and remove the box top.
Remove the remainder of the box from the pallet. Remove all bracing and
strapping.
Removing Cardboard Container
Figure 4.2
Installation Precautions:
•The unit is pre-assembled but take care in uncrating, as the device is heavy.
•Follow all warning labels on the unit and these instructions.
•Do not attempt to adjust height prior to reading the Warnings and instructions
for mounting the D-EVO GL Panel.
•Do not remove red safety screw near release pin in the right-side handle until
instructed to do so in Section 5.
•Failure to adhere to the Precautions listed above may result in injury to user!

TM-GL Installation and User Guide, December 2019
Reina Imaging 6107 W. Lou Ave., Crystal Lake, IL 60014 800-752-4918 www.reinaimaging.com
Page 8 of 15
WARNING!
The device’s lift-assist mechanism employs a forceful coiled spring. Attempting to
adjust the height of the Detector Mount before installing the D-EVO GL Panel and the
anti-scatter grid could cause the top of the Detector Mount to be driven upward with
high force and velocity, possibly causing injury to the torso, arms, neck, face or head of
the user. Do not actuate the release pin prior to reading the instructions in Section 5.
Remove the red safety screw only after reading the complete instructions.
CAUTION!
Before rotating the Detector Mount to the landscape orientation to install the D-EVO
GL Panel and Grid, remove the red safety screw and raise the Detector Mount about
halfway or the Detector Mount can hit the floor when rotated. See Section 6 for full
explanation of controls before performing these operations.
NOTE: Some images in this manual do not reflect the D-EVO GL Long-
Length DR Panel product, however, the work instructions are the same.
5. Installation of D-EVO GL Panel and Grid onto the Detector Mount
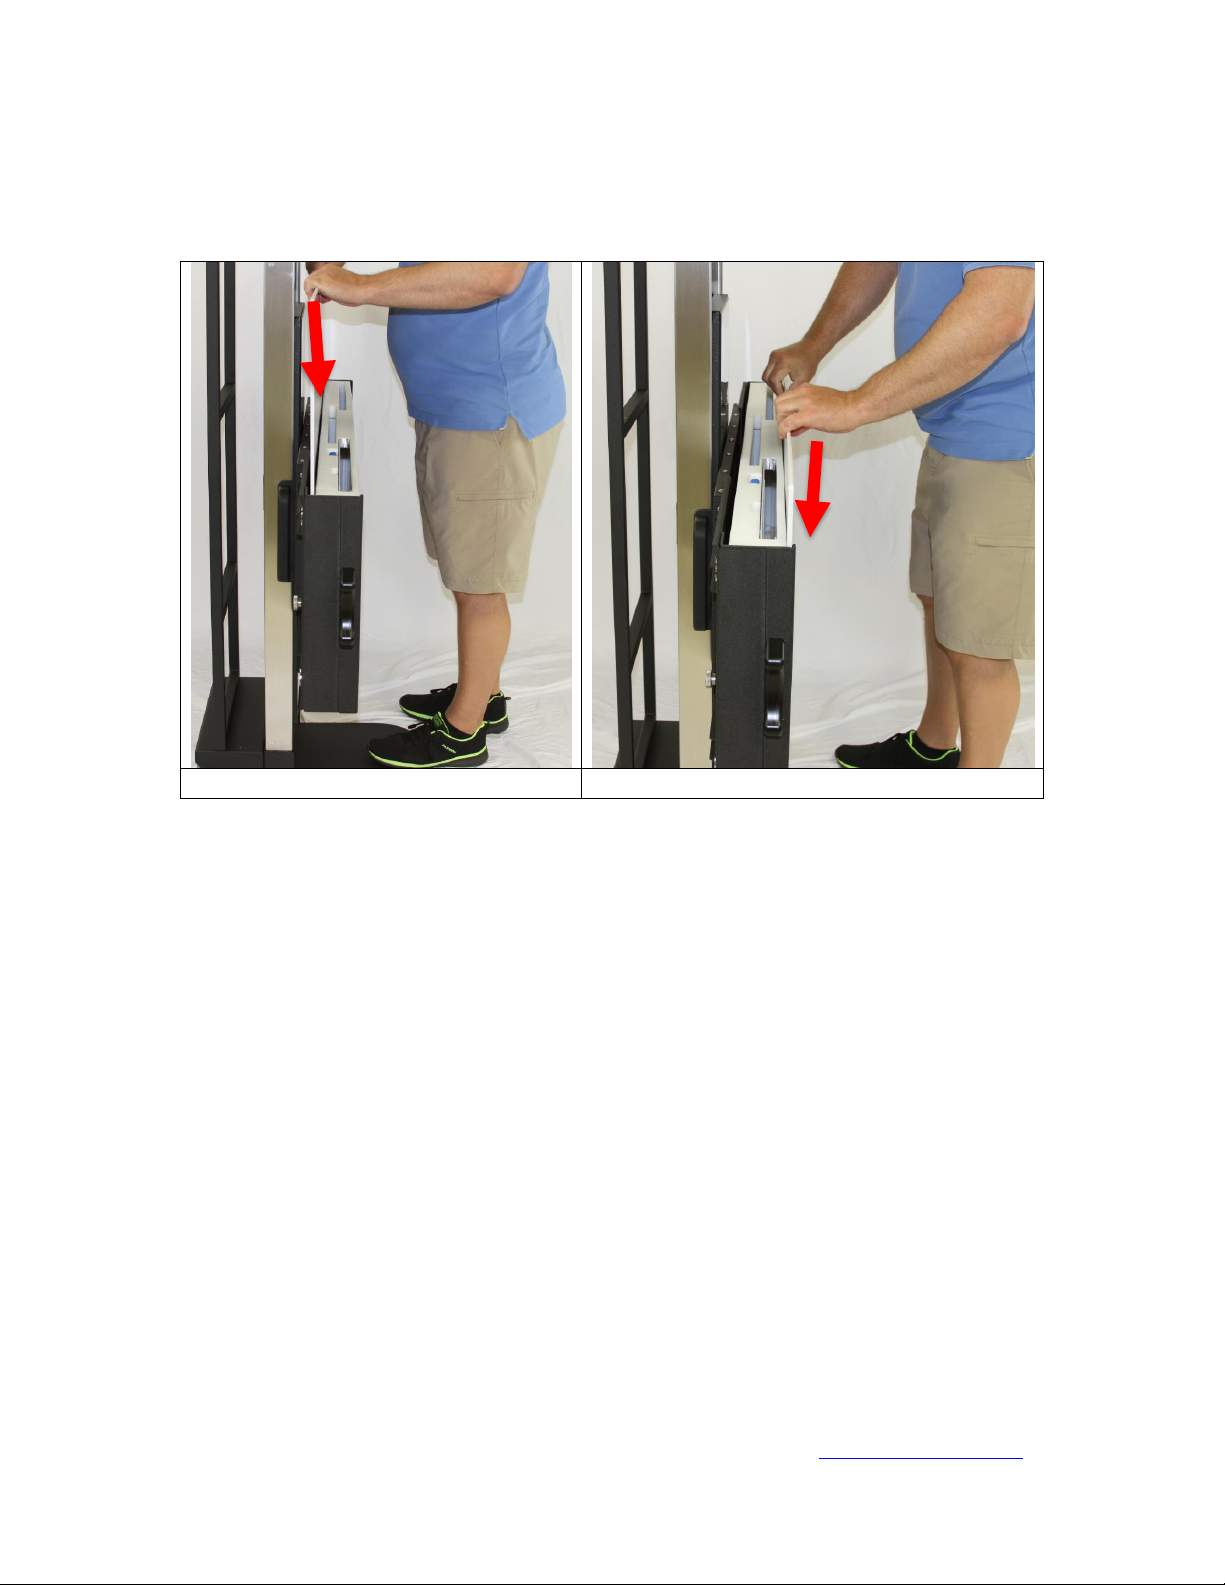
5.1. Remove Safety Screw and Raise Detector Mount –Remove the red safety screw
from the right side support rail. Raise the Detector Mount about halfway by
placing your left hand on the top center of the detector mount (red oval, Figure
5.2) and maintaining control of the lift-assist force by applying firm downward
pressure before pulling the release pin located inside the right side handle
opening (red arrow). Allow the Detector Mount to rise about halfway then let
go of the release pin to allow it to lock. Keep your head away from the top of
the Detector Mount.
5.2. Landscape Position - Rotate the Detector Mount anti-clockwise into the
landscape position by holding the top and bottom and applying pressure until
the unit rotates. It will automatically snap into the 90-degree detent.

TM-GL Installation and User Guide, December 2019
Reina Imaging 6107 W. Lou Ave., Crystal Lake, IL 60014 800-752-4918 www.reinaimaging.com
Page 9 of 15
Raising and Rotating Detector Mount
Figure 5.2
5.3. Installing the D-EVO GL Panel –Make sure the tensioner knobs are fully
loosened by turning them clockwise until they stop (see Figure 5.6 for
reference). Install the D-EVO GL Panel into the Detector Mount by sliding it
between the support guides in the landscape orientation and carefully lowering
it until it is fully seated against the stops.
Mounting the D-EVO GL Panel
Figure 5.3

TM-GL Installation and User Guide, December 2019
Reina Imaging 6107 W. Lou Ave., Crystal Lake, IL 60014 800-752-4918 www.reinaimaging.com
Page 10 of 15
5.4. Installing the Grid - Install the Grid in either the storage position (behind the D-
EVO GL Panel –left image) or in the clinical use position (in front of the D-EVO
GL Panel –right image) by sliding it into the Detector Mount, taking care to keep
it straight so it slides easily into position.
Mounting the Grid
Figure 5.4
5.5. Mock-up Grid –If the TM-GL is ordered without an Anti-scatter Grid, it will ship
with a mock-up grid that simulates the weight and dimensions of the Anti-
scatter Grid. The TM-GL is a mechanical device that requires a constant load in
the Detector Mount to maintain a “zero gravity” feel for the user. The mock-up
grid must be installed into the Detector Mount behind the D-EVO GL Panel. If at
any time the end user requires a Grid for clinical use, the mock-up grid may be
discarded and replaced with a live anti-scatter Grid and proper counterbalance
will be maintained.
5.6. Securing the D-EVO GL Panel and Grid - Tighten the two tensioner knobs on the
rear of the Detector Mount by turning them anti-clockwise until tight. The Anti-
scatter Grid can be mounted in front of the D-EVO GL Panel for clinical use or
stored behind it when not in use. To maintain proper performance tuning, the
Anti-scatter Grid must always be mounted in the Detector Mount either in front
or behind the D-EVO GL Panel.

TM-GL Installation and User Guide, December 2019
Reina Imaging 6107 W. Lou Ave., Crystal Lake, IL 60014 800-752-4918 www.reinaimaging.com
Page 11 of 15
Tightening the Tensioner Knobs
Figure 5.6
5.7. Moving the TM-GL –Lower the Detector Mount to its lowermost position. Hold
the frame from the rear near the top, place foot on bottom of frame and tilt the
device back toward you. It will then be riding on the wheels.
Moving the Device
Figure 5.7
CAUTION!
This device is designed to have articulating movement with a wide range of motion.
There are no sensors, limit switches or physical stops to avoid collisions with walls,

TM-GL Installation and User Guide, December 2019
Reina Imaging 6107 W. Lou Ave., Crystal Lake, IL 60014 800-752-4918 www.reinaimaging.com
Page 12 of 15
floors, objects in the room or people. The device itself or the D-EVO GL Panel may be
damaged by collisions. User or patient injury could occur if proper care is not taken
while moving and positioning the device. Avoid pinching, squeezing, crushing or
collision by moving the device slowly and carefully during operation.
CAUTION!
This is a mechanical device that relies upon coil springs and pulleys to control the
height adjustment movements. The unit will move very easily near the center of its
stroke. Extra effort is required to reach the uppermost and lowermost positions. To
reach the uppermost position, use both handles to pull upward. To reach the
lowermost position place your left hand on top of the Detector Mount and apply
downward pressure.
6. User Operations: Height Adjustment and Rotation
6.1. Height Adjustment Force –The area marked in green has nearly zero-gravity
balance. The areas marked in yellow require additional force to be applied by
the user to achieve positions near the limits of vertical travel.
Height Adjustment Force
Figure 6.1

TM-GL Installation and User Guide, December 2019
Reina Imaging 6107 W. Lou Ave., Crystal Lake, IL 60014 800-752-4918 www.reinaimaging.com
Page 13 of 15
6.2. D-EVO GL Panel Height Adjustment - To actuate the Detector Mount’s lift-assist
mechanism and raise or lower the height, pull the release pin in the right-side
handle and raise or lower the Detector Mount.
Adjusting Height of D-EVO GL Panel
Figure 6.2
6.3. D-EVO GL Panel Rotation - To turn the D-EVO GL Panel from portrait to
landscape orientation, rotate the Detector Mount anti-clockwise into the 90-
degree detent taking care not to hit the floor or other objects. To turn back to
portrait orientation, rotate the Detector Mount clockwise into the 0-degree
detent.
Rotating the D-EVO GL Panel
Figure 6.3

TM-GL Installation and User Guide, December 2019
Reina Imaging 6107 W. Lou Ave., Crystal Lake, IL 60014 800-752-4918 www.reinaimaging.com
Page 14 of 15
CAUTION!
Always make sure the patient is standing on the tongue of the TM-GL before
performing a radiographic examination. If the patient is not standing on the tongue,
the main body could move during the examination, potentially causing a patient to
lose balance or fall, or create motion-induced blurring in the resultant image.
6.4. Patient Position –The patient should stand on the tongue of the TM-GL to
stabilize the device.
Standing on the Tongue, PA/AP
Figure 6.4
7. Maintenance & Cleaning
7.1. Maintenance - The unit does not require maintenance under normal operating
conditions, although tightness of all fasteners should be routinely inspected and
should be retightened if they become loose. If the unit is not performing as
expected, contact Reina Imaging for assistance.
7.2. Cleaning - Surfaces can be cleaned using standard disinfection products. Do not
submerge components. Do not autoclave components.

TM-GL Installation and User Guide, December 2019
Reina Imaging 6107 W. Lou Ave., Crystal Lake, IL 60014 800-752-4918 www.reinaimaging.com
Page 15 of 15
ALL QUESTIONS AND CONCERNS SHOULD BE FORWARDED TO:
REINA IMAGING
6107 W. LOU AVE., CRYSTAL LAKE, IL 60014
800-752-4918
www.reinaimaging.com
Changes to this document:
09.30.19
DRAFT
Released DRAFT version
Table of contents
Other Reina Industrial Equipment manuals