Reliable 2000FR User manual

CORDLESS CLOTH CUTTER INSTRUCTION MANUAL
2000FR

1
CONGRATULATIONS
We would like to thank you, and congratulate you for purchasing
the 2000FR cordless cutting knife from Reliable.
The Reliable 2000FR can cut from a single ply of fabric right up
to 1” thick, making it a very versatile, lightweight machine. Ideal
for sample making or other light-duty operations.
For your safety and to fully enjoy the advantages of this product,
please take a few minutes to read all of the important safeguards
and care instructions. Keep this manual handy for your reference.

INSTRUCTIONS
A. Lithium Battery Installation
1. Before installing the lithium battery, please keep the power switch in
the "O" position and install the lithium battery into the battery slot
of the cutting machine. Please pay attention to the insertion
direction of the battery.
B. Turning on the Cutting Machine
1.The power switch is located below the handle.
2. On in the "I" position and off in the "O" position.
3. Double click the "speed" button to start the blade.
C. Setting the Speed
1. Adjust the speed using the multifunction key above the finger-
operated handle.
2. Speed can be set to five levels. 800/950/1100/1250/1400RPM.
j
B
C
Figure 1.
Figure 2.
2
IMPORTANT: Check blade screw before use. If blade is loose, see section G to
reset the blade

D. LED Light Function
1. Press the speed button (as labeled "C" above) for 3 seconds to turn
on the LED. Hold for another 3 seconds to turn off.
** Before cutting, connect the battery to the machine and sharpen the knife-edge
by pushing the spring loaded projection-grinding switch several times. **
E. Cutting
1. Ensure the power is in the off "O" position.
2. Pull the knife protector to the appropriate position, start the cutting
knife and adjust it to the desired speed.
F. Charging the battery
1. Insert the charger into the appropriate power socket.
2. A green light will show that the charger is powered and ready.
3. Insert the battery into the designated socket.
4. 120 minutes of charging time is required for a full charge.
5. Unplug when complete.
G. Replacing the Blade ** remove the battery first **
1. Remove the 3 screws on the cutting shield and remove the shield
(Figure 3).
2. Align the positioning holes on the blade with the positioning holes
on the back cushion (Figure 4).
3. Insert the inner hexagonal wrench into the blade and the hole of the
rack plate, lock the blade, then insert the butterfly wrench into the
locking nut, loosen the nut counterclockwise and remove the old
blade (Figure 5 & 6).
4. Install the new blade. Please note that the blade positioning groove
matches the blade positioning tip.
Figure 3.
Figure 4.
Figure 5.
Figure 6.
3
4
CAUTION: For safety purposes remove the battery and retain the knife guards at
the lowest possible location while the machine is not in use. Also keep the guard
as close as possible to the fabric while cutting.
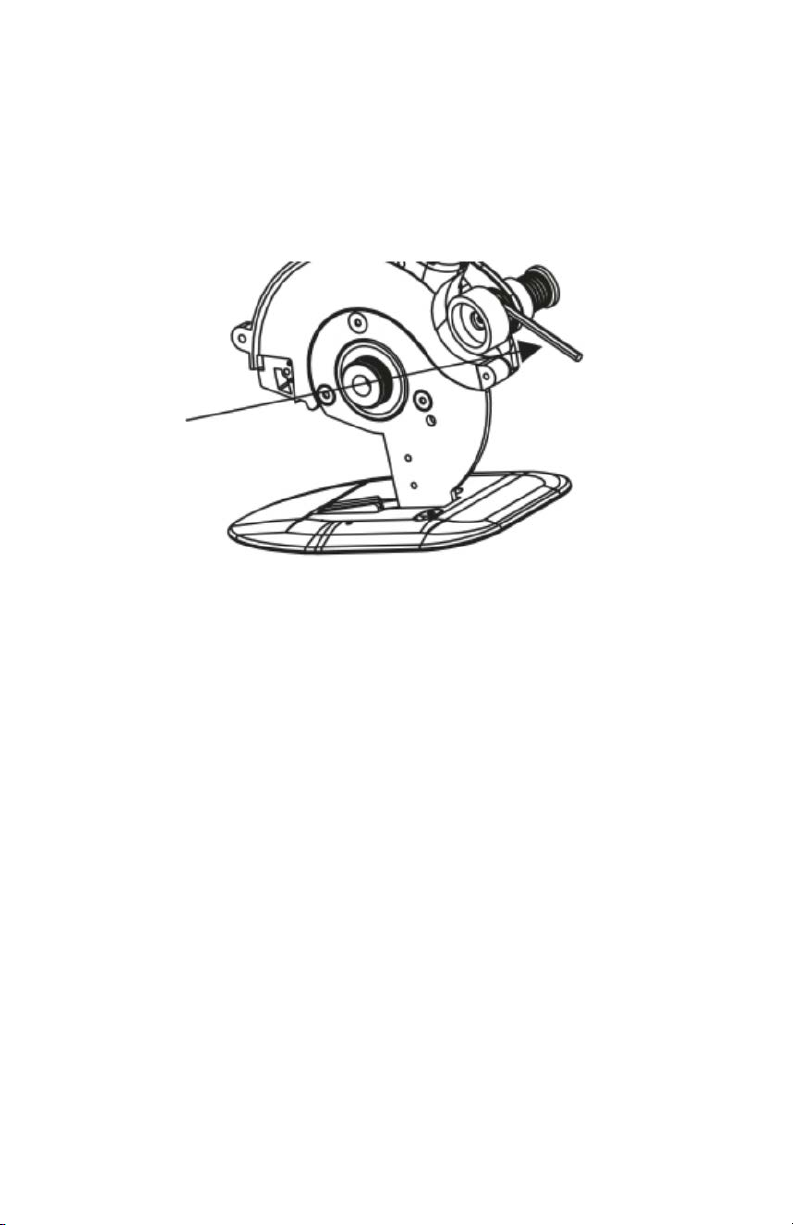
H.Replacing the Grinding Wheel *remove the battery first **
1. Hold the grinding wheel's outer circle with your hand, insert the bolt
into the positioning hole on the shaft, lock the wheel, then rotate in
the direction indicated by the arrow.
2. Remove the old grinding wheel and replace it with with the new one.
Figure 7.

GRINDING WHEEL REPLACEMENT GUIDE
Hold the grinding wheel by hand. Insert the attached lock shaft to the hole
provided in the grinder shaft and turn to arrow indiation. Remove used wheel and
replace with a new one.
GRINDERSHAFT
LOCK SHAFT
ALLEN KEY
EMERY WHEEL
FASTEN
LOOSEN
5

MAINTENANCE
A. Oil Injection
1. In order to ensure the best performance and life of the cutting
machine, please always keep the lubricating oil pot in an oily state.
2. Inject oil every 30-40 hours of use.
B. Grinding Wheel
1. When more oil pollution deposits on the contact surface of the
grinding wheel, it affects the grinding function.
2. Remove the grinding wheel and use grinding paper to clean (refer to
grinding wheel removal)
C. Installation Screw Inspection
1. In order to ensure the best performance and operating safety of the
cutting machine, it is necessary to check whether the installation
screw is tightened properly.
2. If the screw is loose, it should be tightened again immediately.
SAFETY
1. Workplaces should be kept clean and tidy.
2. The blade is sharp. Please ensure the blade is kept in the off "O" position and
that the battery is removed when not in use. Keep away from children.
3. When the machine is not in use, the cutter protector should be kept in the
lowest position
4. Before using the cutting machine, inspect it before every use. Double check
the installation screw and blade are safely secured.
5. If the cutting resistance is strong and the cutting is not smooth, the cutting
force should not be pushed hard. Double check the sharpness of the blade
and the type of material being cut.
6. Before maintenance, please ensure the battery is removed and the power
supply is cut off.
7. Connect the ground wire to ensure safety.
6

7
SPECIFICATIONS
KNIFE SIZE
KNIFE SHAPE:
CUTTING CAPACITY:
NET WEIGHT:
VOLTAGE:
POWER:
SPEED:
110MM
OCTAGON
25MM (1")
2KGS
120V
150W
800/950/1100/1250/1400 RPM
8
1
2
3
4
5
6
7
8
9
10
11
12
13
14
15
16
17
18
19
20
21
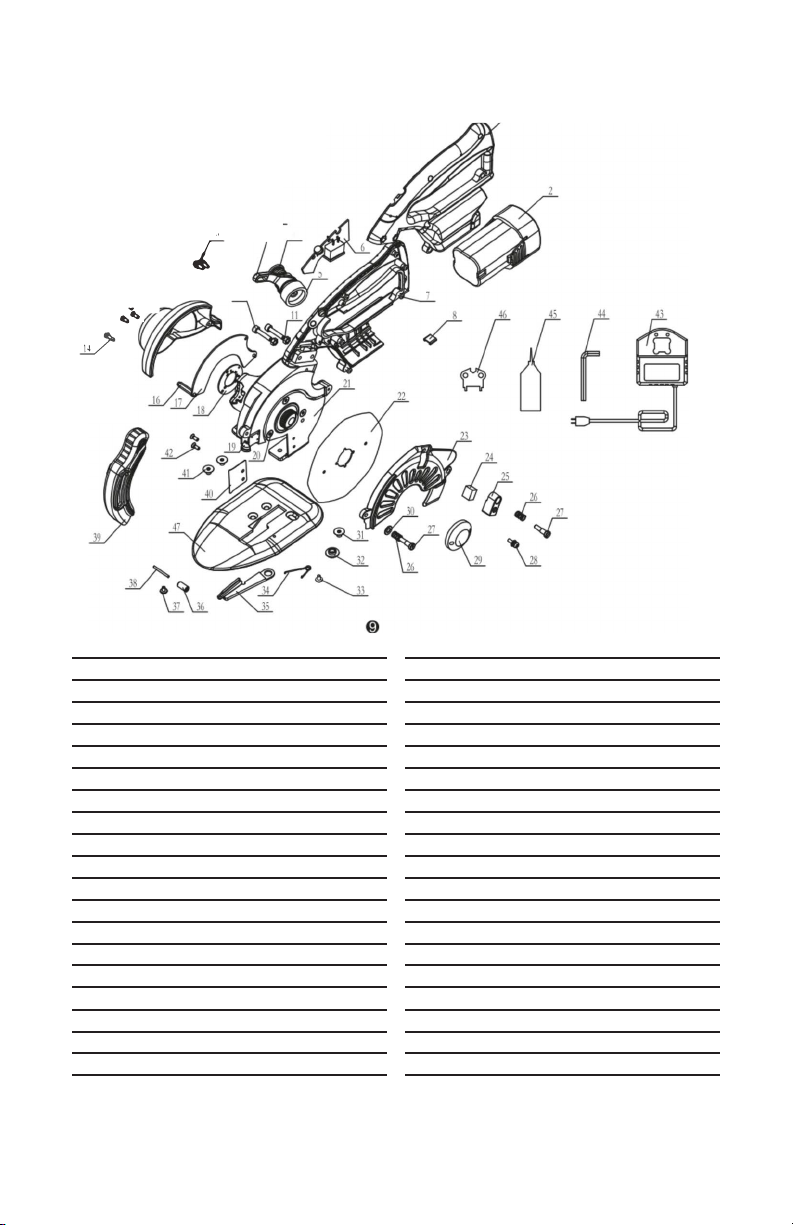
DRIVE HANDLE
LI-ION BATTERY
SHARPENER FRAME
PRESSURE SPRING
GRIND WHEEL
BUTTON PANEL
SELF-TAPPING SCREW
SOCKET CONNECTOR
COMBINATION SCREW
INNER HEXAGON SCREW
M4NUT
28LABLE
M3*8*4 SCREW
M3*10 SCREW
COVER
M3*26HEXAGON SCREW INSULATED COL.
MAIN CONTROL PANEL
HALL PANEL
LED LIGHT
M4*8 SCREW
STANDARD
22
23
24
25
26
27
28
29
30
31
32
33
34
35
36
37
38
39
40
41
42
KNIFE
SHIELD
OIL FELT
KINFER OILER
PRESSURE SPRING
SCREW FOR OILER
COMBINATION SCREW
BLADE PRESSURE PLATE
4.5*9*0.8 TERMINAL PLATE
INNER HEXAGON SCREW
TWO STEPS NUT
M3*6 STEP SCREW
UNDER KNIFE SPRING
UNDER KNIFE
ROLLER
M3*5 SCREW
ROLLER SHAFT (REAR)
KNIFE GUARD
SEPARATOR
INNER HEXAGON SCREW
M3*4 SUNK SCREW
ASSEMBLY & ACCESSORIES
l
..
I.
-
9
15
1

9
43
44
45
46
47
CHARGER
INTERNAL HEXAGON WRENCH
OILER
BUTTERFLY WRENCH
CHASSIS
Table of contents
Other Reliable Cutter manuals


Popular Cutter manuals by other brands

Milwaukee
Milwaukee HEAVY DUTY M12 FCOT Original instructions

Makita
Makita DCS552 instruction manual

SignWarehouse.com
SignWarehouse.com Bobcat BA-60 user manual

Makita
Makita 4112HS instruction manual

GEISMAR STUMEC
GEISMAR STUMEC MTZ 350S manual

Hitachi
Hitachi CM 4SB2 Safety instructions and instruction manual


