Reliable i600 User manual

The i600
Professional
Steam
Products
INSTRUCTION MANUAL
GUIDE D’UTILISATION
MANUAL DE INSTRUCCIONES
지침 설명서 사용 안내서


ENGLISH 01
FRANÇAIS 15
ESPAÑOL 29
한국어 43

01
THE i600
PROFESSIONAL STEAM PRODUCTS
INSTRUCTION MANUAL
ENGLISH

02
CONGRATULATIONS
We would like to thank you and congratulate you for purchas-
ing the Reliable i600 series professional steam station from
Reliable Corporation. With it’s stainless steel construction, and
professional grade components; the i600 will allow you to
obtain the benefits of professional pressing or cleaning in a
compact and convenient format.
For your safety and to fully enjoy the advantages of this product,
please take a few minutes to read all the important safeguards
and care instructions. Keep this manual handy and review the
product warranty card for your reference.

03
IMPORTANT SAFETY INSTRUCTIONS.
SAVE THESE INSTRUCTIONS IN A SAFE
PLACE FOR FUTURE REFERENCE
READ ALL INSTRUCTIONS BEFORE USE
When using your Reliable steam station, basic safety precautions should always be
followed. Please read the following instructions carefully as they provide important
information concerning how to install, use and care for this product.
1. To protect against the risk of electric shock, do not immerse the appliance
in water.
2. Do not allow the cord to touch hot surfaces.
3. Always allow the appliance to cool for at least thirty minutes before storing.
4. Always put the appliance in a secure place on a table or counter when using.
5. Do not move the appliance without unplugging it first.
6. Always disconnect the appliance from the outlet before filling with or removing
water. Be careful to avoid spilling water on the appliance when filling.
7. Use tap water or 50/50 tap/distilled water in the appliance. Do not use per-
fumed or products containing alcohol in the appliance.
8. Always disconnect the appliance when not in use.
9. Do not use the appliance if the cord is damaged. Return the appliance or have
the cord repaired by the manufacturer, or their service agent.
10. Do not operate the appliance if it has been dropped or damaged. Do not
disassemble the appliance. Incorrect reassembly can cause a risk of electric
shock. Send it to an authorized service center for repair.
11. Do not operate another high wattage appliance on the same circuit.
12. This appliance must be grounded. Do not alter the plug or attempt to remove
this feature.
13. Be careful. Burns can occur from touching hot metal parts or steam.
14. This appliance is not intended for use by young children.
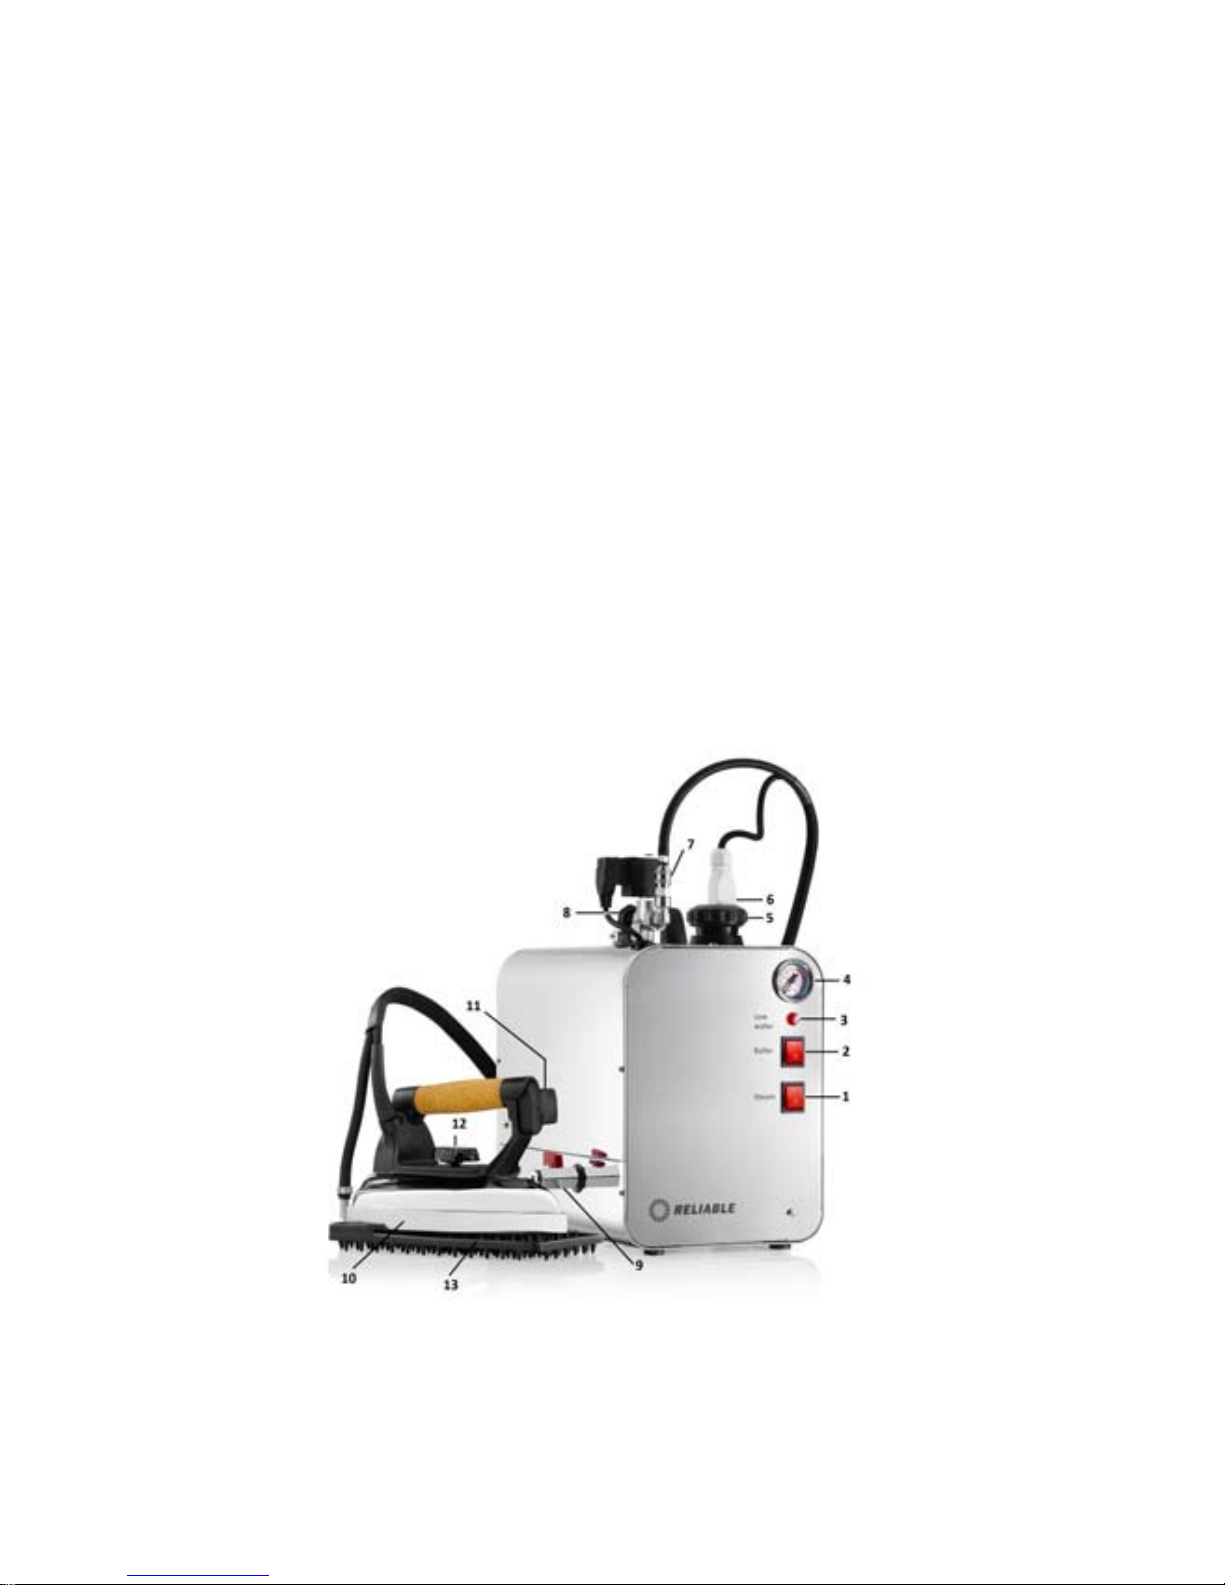
15. While using the appliance, never unscrew or remove the cap (5) while the
boiler is under pressure.
16. Before removing the cap, make sure there’s no more steam in the steam
chamber by shutting the boiler switch (2) to the off position, and pressing the
steam iron button (11) to release all of the remaining steam.
17. To ensure your safety, the safety cap (5) and all other components must be
replaced with original parts only.

04
FEATURES
• Lowwaterlightindicator
• Regulartapwateror50/50tap/distilledwater
• Upto65p.s.ioperatingpressure
• Ceramicterminalblock
• Dualswitchpressurecontrol
• 12-gaugeheavy-dutywiring
• Upto8hoursofsteam
IRONING
• Yournewironingstationprovidesclean,professionalresultseverytime
• Theprofessionalironsoleplateismadefromdurable,andfastheatingaluminum
• Stainlesssteeloutershellconstructionforlonglife
• Adjustablethermostatallowsforaccuratetemperaturesettings
• Corkhandleironiscomfortableandstayscool
STEAM CLEANING
• Adjustablesteamnozzlewithfootpedal(i600A)
• Steamgun(i600B)
IMPORTANT: When you want to dispose of the appliance, NEVER throw it in the
garbage. Instead, go to your closest recycling station or waste collection centre
for subsequent treatment. In this way, you will be contributing to looking after the
environment.

05
TECHNICAL DATA
Working voltage: 120V
Nominalcapacityofthetank:4.5Liters–1.25U.S.Gallon
Boiler power: 1 heating element 1200W
Power consumption: 16.7 amps (i600/i30), 10 amps (i600A, i600B)
Service pressure: 3,5 Bar/4 Bar
Maximum pressure: 4,5 Bar
HOW TO ASSEMBLE AND USE
1. Remove the steam station from its packing and make sure all packing has
been removed (including the protective bags). Put the station on a flat and
solid surface.
2. Yourboilerissuppliedwithasafetycapontheblow-downvalve(leftsideof
tank), as well as a plastic hose and fitting to secure the hose. Please remove
the safety cap and install the hose and fitting. This will allow you to follow the
proper cleaning procedure (ref. to flush the boiler tank). If there is a problem
with the blow-down valve (leaking) you can use the safety cap to prevent
water from leaking until you have the valve replaced.
3. A) i600/i30: It is recommended to put the iron on the iron pad, (supplied) as
the pad will withstand the temperature of the iron. B) i600A: Screw the nozzle
into the steam fitting and plug in the 4-pin receptacle for the electronic foot
pedal.C)i600B:Connectthesteamgunorsteambrushthesamewayusing
the quick disconnect for the steam hose.
4. Insert the two-piece wand (mod. i600) or one-piece wand (mod. i600B) into
the flange on top of the boiler, tighten with the side screw and attach the
spring on the hose (mod. 600) to the coil end of the wand. Note: mod. i600A
is not supplied with a wand.
5. Before beginning any operation, make sure that the exhaust valve (9) is
closed and the drain hose is installed (ref. step #2).
6. Unscrew the safety cap (5). Fill the boiler with water to the maximum as
marked on the water level stick. Use the funnel supplied, making sure you do
not overfill the tank.
7. Insert the plug into the electrical outlet; switch on the boiler (2) and steam
buttons (1). When the two button lights come on, the steam device and
boiler are working.
8. For the i600 iron system, turn the iron plate’s temperature regulating knob
(12) to the desired temperature.

9. Wait approximately 20 minutes for the boiler to reach maximum pressure.
Once it reaches 60 psi, the unit is now ready to operate.
10. NOTE: When you call for steam for the first time (after having turned the
boiler on) you might notice a fast decrease in pressure. This is normal for the
first time.
11. The steam station is ready for use.
12. Push the steam button or the foot pedal for steam.
13. This steam product is equipped with a low water warning light (3). During
operation, if the light comes on, it indicates that the unit requires more water
to operate. If this occurs, please follow these steps.
a) Turn off the boiler switch (2).
b) Press the steam iron button or foot pedal to ensure there is no more
steam in the boiler.
c) Slowly open the pressure cap (5) and refill to the required level with
warm water.
d) Replace the cap, tighten and wait for it to build up pressure again.
e) NOTE: Failure to shut off the boiler when the warning light is on may
result in damaging the heating element, which will void the warranty.
IMPORTANT
When you are finished using the boiler for the day, unscrew the fill cap one-turn on
the unit to release the steam/air from the tank. This will eliminate the vacuum that
may cause damage to the pressure gauge.
For a longer life and better machine performance we suggest that you flush out
the boiler tank once a week. Flushing the tank will help slow the sediment/mineral
buildup that may occur.
TO FLUSH THE BOILER TANK
(Be careful as the water will be very hot as it comes out of the tank):
1. Release the excess steam still inside the boiler at the end of use
(see item #13 above).
2. Turn off the steam switch power switch and unplug the boiler unit.
3. Carefullyopenthellerplugcap.
4. Make sure the clear drain tubing has been installed on to the blow-down
valve (drawing reference #9) situated on the lower right side of the
tank, and the tubing is draining into something that can hold hot water.
5. Open the blow down valve. Drain the remaining water from the boiler tank.
6. Closethevalve.
06

WATER INSTRUCTIONS
Use tap water or 50/50 tap/distilled water in the appliance. Do not use perfume
or products containing alcohol in the appliance.
DESCRIPTION OF THE i600/i30
1. Steam switch
2. Boiler switch
3. Lowwaterredpilotlight
4. Pressure gauge
5. Safety cap
6. Male 4-pin plug receptacle
7. Quick connect for steam hose
8. Steam regulation knob
9. Blow down valve
10. Steam iron (i30/120V)
11. Iron steam switch
12. Temperature regulation knob (i30)
13. Silicone iron pad
07

08

09
DESCRIPTION OF THE i600A
1. Steam switch
2. Boiler switch
3. Lowwaterredpilotlight
4. Pressure gauge
5. Safety cap
6. Female 4-pin receptacle plug (not shown)
7. Steam regulation knob
8. Adjustablesteamnozzle
9. Blow down valve
10. Foot pedal with cord and male plug

10

11
DESCRIPTION OF THE i600B
1. Steam switch
2. Boiler switch
3. Lowwaterredpilotlight
4. Pressure gauge
5. Safety cap
6. Male 4-pin receptacle plug
7. Quick connect for steam hose
8. Steam regulation knob
9. Cordsupport
10. Steam gun switch
11. i37 Steam gun with hose and steam fitting
12. Blow down valve

12

13
TROUBLESHOOTING
PROBLEM
The steam from the iron
is too wet.
Water is coming out from
the boiler.
There is no steam coming out
of the iron, nozzle or gun.
The steam is dirty.
REMEDY
1. The problem will go on
until the excess water is
emptied. Keep the steam
button pressed until the
water in the tank is at the
correct level.
2. Please check that the
temperature knob is
on the right position, if
not, increase the iron
temperature.
1. Contacttechnicalsupport
as in most cases, the
gasket will need to be
replaced.
1. Open the steam knob
anticlockwise.
2. After the iron switch
comes on, wait for 4 min-
utes so that the iron plate
gets hot.
3. Plug the 4-pin receptacle
into the boiler.
4. After the boiler switch
comes on, wait for 10
minutes so the boiler
produces steam.
5. Refill the boiler carefully
following the instructions.
1. Remove and rinse the
ironing shoe on a regular
(monthly) basis to avoid
scale build-up.
POSSIBLE CAUSES
1. While filling the tank you
may have poured too much
water into it.
2. The iron soleplate is not
getting hot enough.
1. There might be a leak in the
heating element gasket.
1. The steam knob might
be closed
2. The iron switch might be off
3. The foot pedal is not
plugged in (i600A)
4. The boiler switch might
be off
5. If the low water light is on,
the water in the tank is low
or empty.
1. When using the iron with a
ironing shoe, if not cleaned
regularly, calcium will form
between the shoe and the
iron base.

14
ReliableCorporation(“Reliable”)warrantstooriginalpurchaserofitsproductsthat
everyproductsoldbyReliable(a“ReliableProduct”)isfreefromdefectsinmaterial
and workmanship for a period of one year from the date of purchase, if properly used
andmaintained.Subjecttotheconditionsandlimitationssetforthbelow,Reliablewill
either repair or replace any part of a Reliable Product that proves defective by reason of
improper workmanship or materials. If the defective Reliable Product is no longer avail-
able and cannot be repaired effectively or replaced with an identical model, Reliable
shall replace the defective Reliable Product with a current Reliable Product of equal or
greater value. Repaired parts or replacement products will be provided by Reliable on
an exchange basis, and will be either new or refurbished to be functionally equivalent to
new. If Reliable is unable to repair or replace a Reliable Product, it will refund the current
value of that Reliable Product at the time the warranty claim is made.
This limited warranty does not cover any damage to a Reliable Product that results from
improper installation, accident, abuse, misuse, natural disaster, insufficient or exces-
sive electrical supply, abnormal mechanical or environmental conditions, wear and
tear resulting from normal use of the product, or any unauthorized disassembly, repair,
or modification. This limited warranty does not extend to any indirect, consequential
or incidental damages that may be suffered by a user or from the use of a Reliable
Product, including without limitation, any liability for third party claims for damage, and
is limited to the amount paid by the original purchaser Reliable Product with respect
to which this limited warranty protection applies. This limited warranty does not apply
with respect to products that have been altered or which are missing serial numbers
or for products not purchased directly from Reliable or a dealer authorized by us to sell
Reliable Products.
This limited warranty is the only warranty that applies to any Reliable Product, super-
sedes any and all terms that may be contained in any other document or purchase
order and may not be altered or amended except expressly in writing by Reliable.
To obtain a repair or replacement under the terms of this warranty, please contact our
customer service group at 1-800-268-1649 or at support@reliablecorporation.com.
Youwillberequiredtosubmitanoriginalreceiptviafaxore-mail.Thereceiptmust
reflect that you are the original purchaser, the product was bought directly from us or
from an authorized Reliable dealer and that the warranty claim is being made within the
warrantyperiod.Youwillbeissuedareturnauthorizationnumber(RA#)andaskedto
ship the defective product together with proof of purchase and RA#, prepaid insured to
the following address:
ReliableCorporation,5-100WingoldAvenue,Toronto,ONM6B4K7.Freightcollect
shipments will be refused. The risk of loss or damage in transit will be borne by the
customer. Once Reliable receives the defective product, it will initiate the repair or
replacement process.
RELIABLEPRODUCTSWARRANTY

15
LES PRODUITS i600
PROFESSIONNELS À VAPEUR
GUIDE D’UTILISATION
FRANÇAIS

16
FÉLICITATIONS
Nous aimerions vous remercier et vous féliciter pour l’achat de
votre centrale à vapeur professionnelle de la série Reliable i600
de Reliable Corporation. Avec sa fabrication en acier inoxydable
et ses composants de qualité professionnelle ; la i600 vous
permettra d’obtenir les avantages du repassage ou d’un
nettoyage professionnel dans un format compact et pratique.
Pour votre sécurité et afin de profiter pleinement des avantages
de ce produit, veuillez prendre quelques minutes pour lire toutes
les mises en garde et les instructions d’entretien importantes.
Veuillez conserver ce manuel à portée de main et consulter la
carte de garantie du produit pour vos références.

17
IMPORTANTES INSTRUCTIONS DE
SÉCURITÉ. CONSERVEZ CES
INSTRUCTIONS DANS UN ENDROIT
SÛR POUR TOUTE CONSULTATION
ULTÉRIEURE
LISEZ TOUTES LES INSTRUCTIONS AVANT L’UTILISATION
Lorsdel’utilisationdevotrecentraleàvapeurReliable,vousdeveztoujourssuivre
les consignes de sécurité basiques. Veuillez lire attentivement les instructions
suivantes car elles fournissent des informations importantes concernant
l’installation, l’utilisation et l’entretien de ce produit.
1. Afin de vous protéger contre le risque de choc électrique, n’immergez pas
l’appareil dans l’eau.
2. Ne laissez pas le cordon d’alimentation toucher des surfaces chaudes.
3. Laisseztoujoursl’appareilrefroidirpendantaumoinstrenteminutesavant
de le ranger.
4. Placeztoujoursl’appareildansunendroitsûrsurunetableouuncomptoir
lors de son utilisation.
5. Ne déplacez pas l’appareil sans l’avoir d’abord débranché.
6. Débrancheztoujoursl’appareildelaprisedecourantavantdelerempliroude
vider l’eau. Soyez prudent afin d’éviter des déversements d’eau sur l’appareil
lors du remplissage.
7. Utilisez de l’eau du robinet ou un mélange 50/50 d’eau distillée et d’eau du
robinet dans l’appareil. N’utilisez pas de produits parfumés ou qui contiennent
de l’alcool dans l’appareil.
8. Débrancheztoujoursl’appareillorsqu’iln’estpasutilisé.
9. N’utilisez pas l’appareil si le cordon est endommagé. Retournez l’appareil ou
faites réparer le cordon par le fabricant, ou son agent d’entretien.
10. Ne faites pas fonctionner l’appareil s’il est tombé ou est endommagé. Ne
démontez pas l’appareil. Un remontage incorrect peut entraîner un risque de
choqueélectrique.Envoyez-leàuncentredeserviceagréépourréparation.
11. Ne faites pas fonctionner simultanément un autre appareil de grande
puissance sur le même circuit.
12. Cetteappareildoitêtremisàlaterre.Nemodiezpaslacheetnetentez
pas de retirer cet accessoire.
13. Soyezprudent.Vouspouvezvousbrûlerentouchantlespartiesmétalliques
chaudes ou avec la vapeur.
Table of contents
Languages:
Popular Electric Steamer manuals by other brands

Vulcan-Hart
Vulcan-Hart C24GA Series Installation & operation manual

Solaris
Solaris SX-34EC Installation and operation manual

Middleby
Middleby Market Forge ECO-TECH PLUS ETP-10G Installation & operation manual

EUROPRO
EUROPRO THREE-TIER KS315 owner's manual

V-ZUG
V-ZUG CSTMSLQ operating instructions

V-ZUG
V-ZUG Combair-Steam SE operating instructions

Welbilt
Welbilt CLEVELAND SteamCraft 24CGA10 Operation installation maintenance manual

TriStar
TriStar VS-3914 instruction manual

Southbend
Southbend RAPIDSTREAM R2 Operator's manual

German pool
German pool JET-901 user manual

Sunbeam
Sunbeam ST6650 user manual

West Bend
West Bend Chris Freytag 86604CF instruction manual