Renau SKT T-2268 User manual

INSTRUCTION MANUAL
2022
6.8” SMART KITCHEN TIMER
T-2268
SKT
SMART KITCHEN TIMER
We Do More Than Design, We Invent

2
The Kitchen
Timer of the
Future Has
Arrived
SKT

3
Smart Kitchen Timer (SKT) Instruction Manual
About the SKT
Safety and General Information
Accessing the Conguration Tool
Creating a Food Group
Creating an Item
Pairing SKTs
Creating a Transferable Item
Creating Job Aids
Sending Conguration to the SKT
Glossary
Accessing and Navigating the SKT Menu
Uploading/Downloading Conguration Files
Adding a Gateway and Wireless Sensor Modules
Operating the SKT
4
5
6-7
8
9
10-11
12
13
14
15
16-17
18
19-20
21

4
The Smart KitchenTimerfeatures a durable 1280×480 displayalong with an incredibly
fast quad-core ARM Cortex A-7 microprocessor. As a result, the SKT oers superior
display capabilities when compared to our competitors. Congurable in either
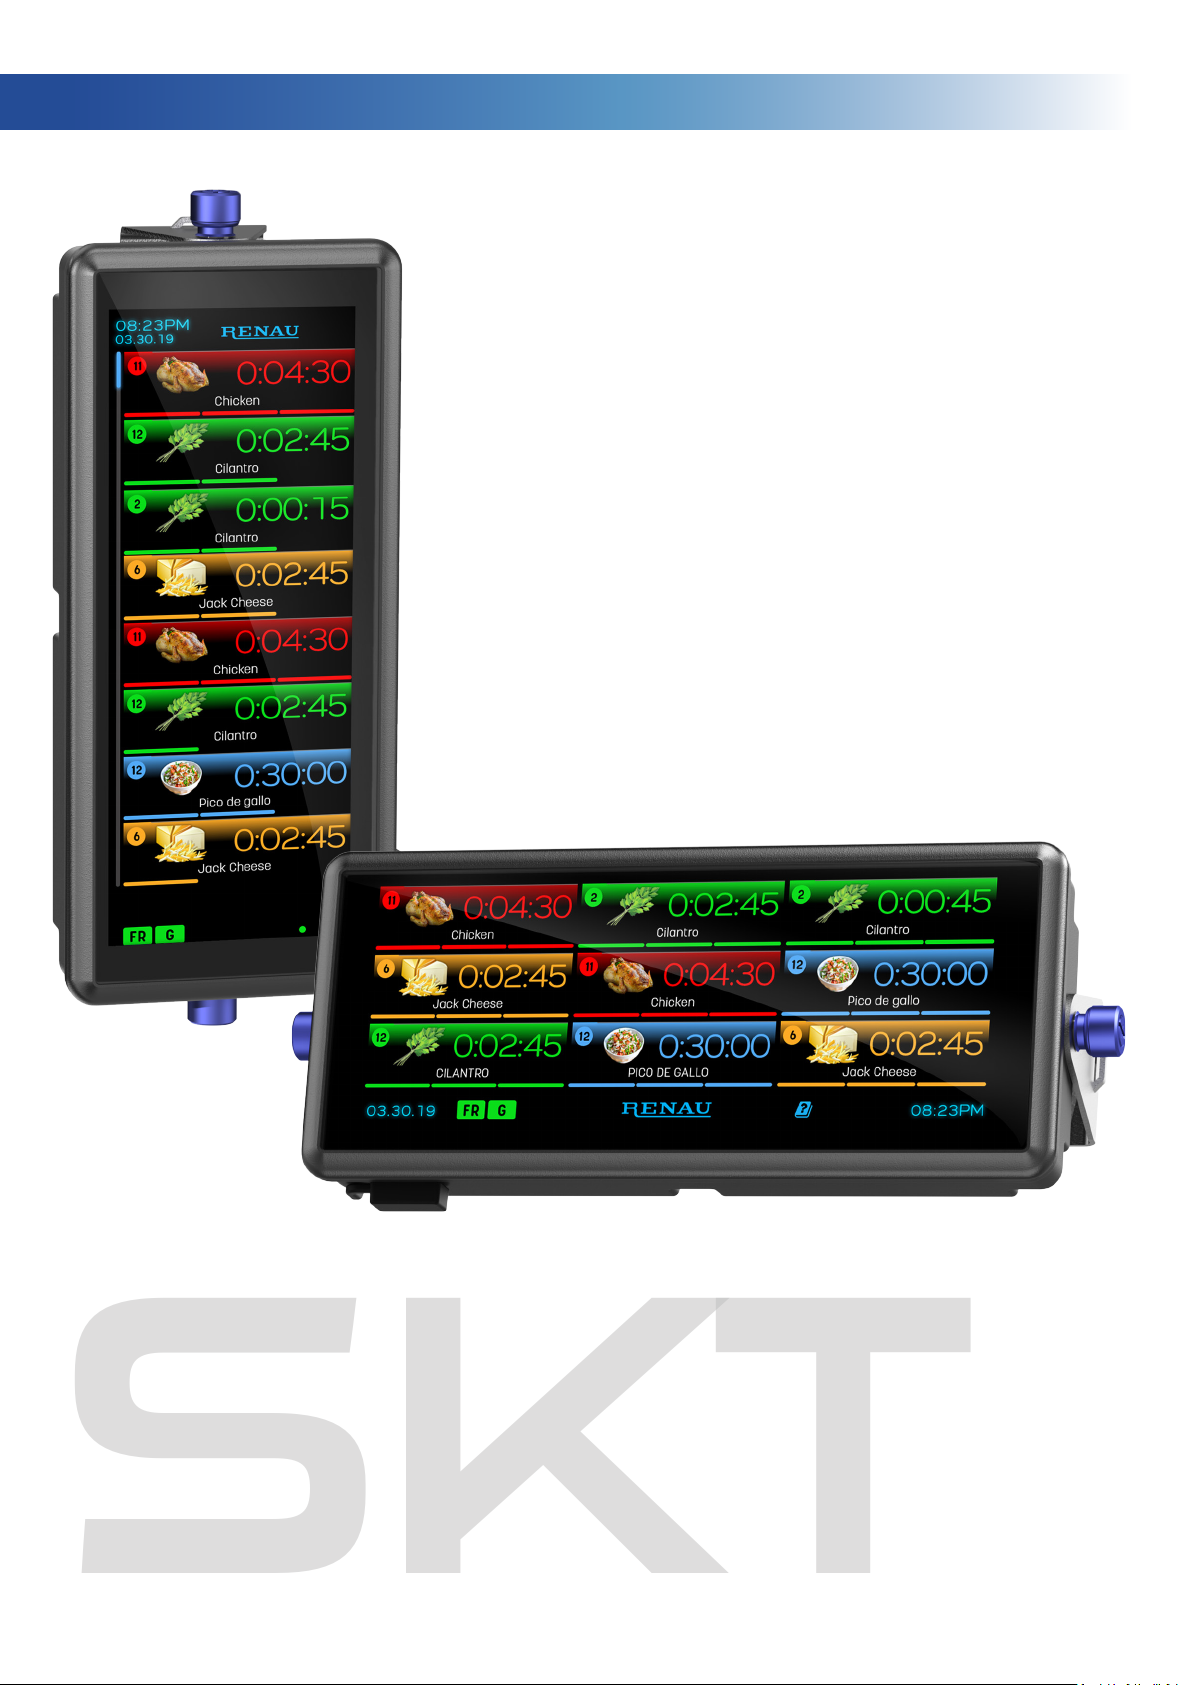
horizontal or vertical orientation, the SKT is an extremely versatile food service timer
which can be mounted and used in many dierent areas of the kitchen. These areas
include the grill, retherm station, fryer, hot/cold holding bins and prep table. What’s
more, the SKT can even be used for front of house tasks! Mounting the unit is simple
with the included bracket. The Smart Kitchen Timer can also be embedded in various
pieces of equipment and areas of the kitchen.
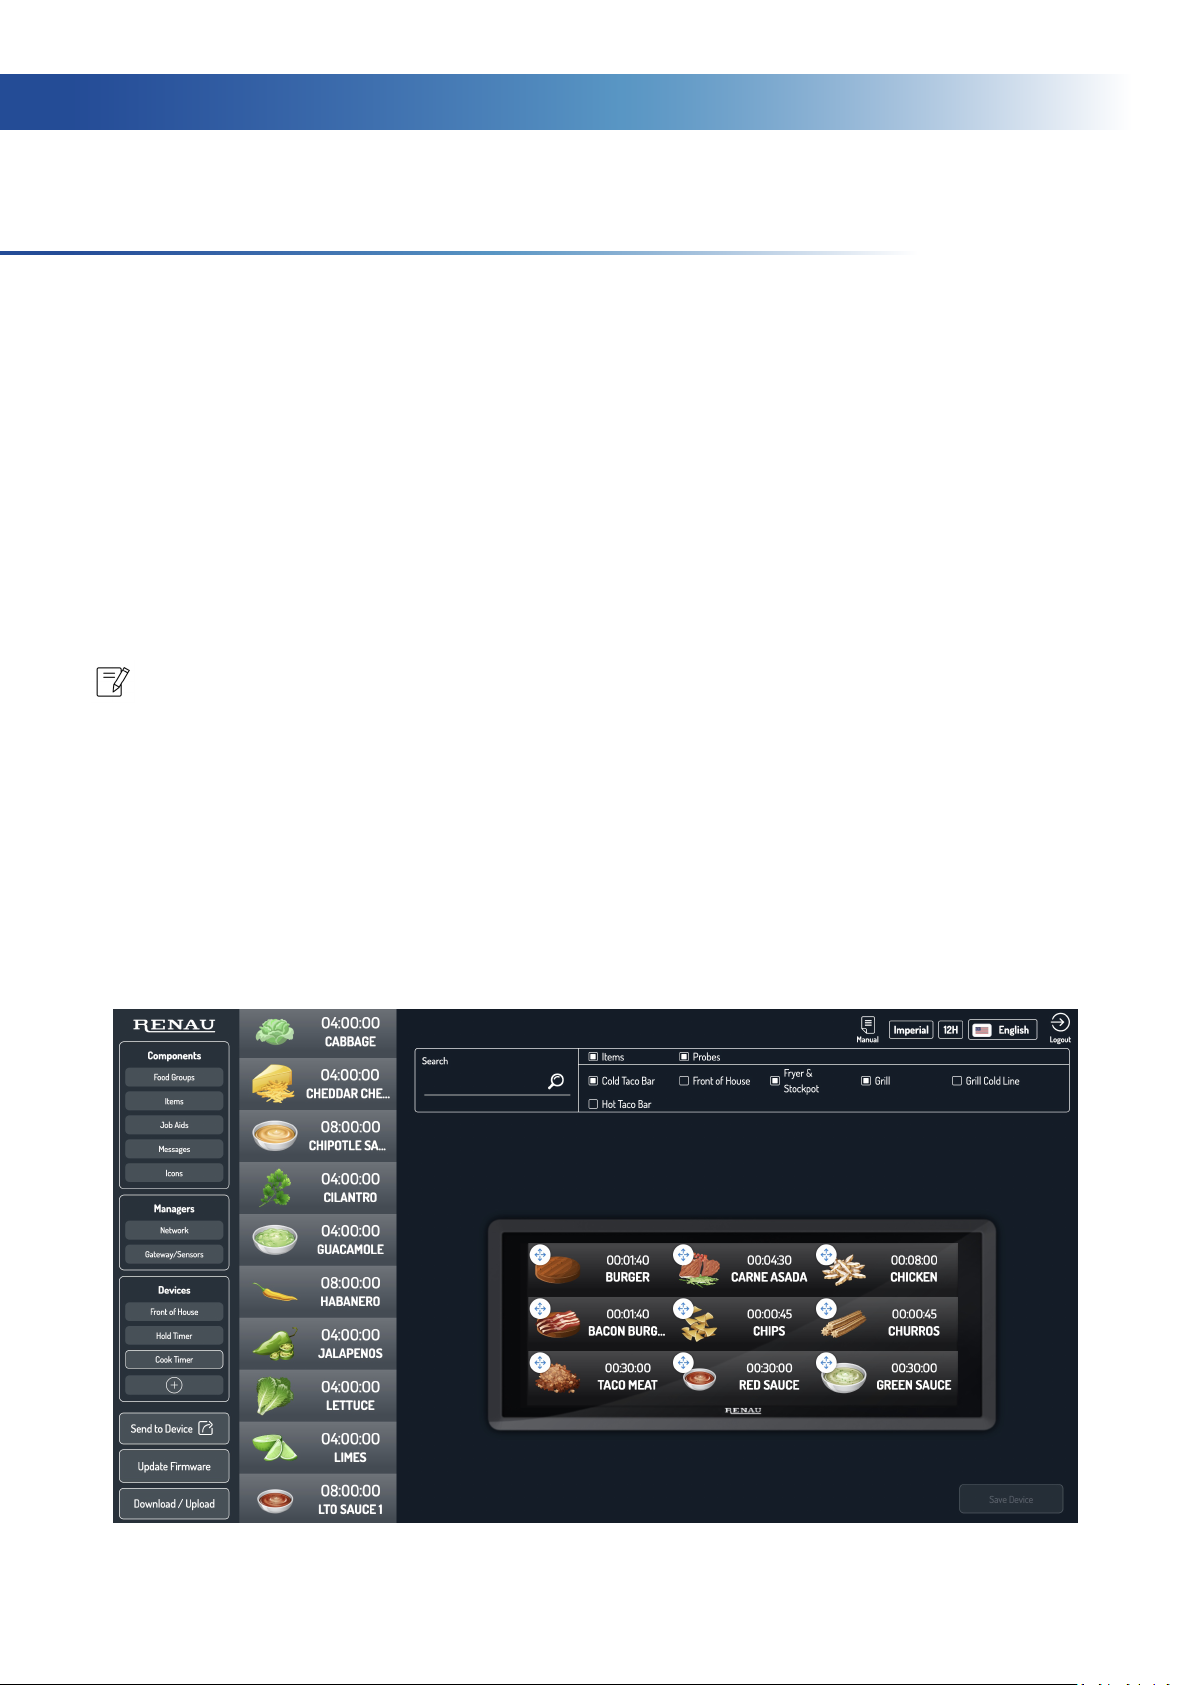
When in Holding Mode, each screen displays 9 items in horizontal orientation and
up to 8 in vertical orientation. When in Cook Mode, the left panel displays up to 4
items and up to 12 active timers on the right panel. In both modes you can scroll
through items, with up to 1000 programmable items total per unit. Use the timer as
a standalone or connect up to 7 additional units for added functionality such as the
ability to transfer items from a cook timer to a hold timer. Chiey, with the ability to
wirelessly program the SKT through PC or laptop the customization, adaptability, and
value provided are unrivaled.
Looking to monitor temperature or humidity as well? Pair a Gateway and up to 20
Wireless Sensor Modules for the ultimate freshness timer! Furthermore, when
connected to the Renau Cloud the SKT interfaces with our Smart Kitchen System
allowing it to be monitored and programmed remotely from anywhere in the world
with a Wi-Fi connection!
Are you ready to start building your very own connected kitchen? Our sleek 6.8″ Smart
Kitchen Timer provides a much needed alternative to the big, unruly, and expensive
eyesores that have become so common in the kitchen. Bring your kitchen into the
future with Renau’s T-2268 Smart Kitchen Timer!
• Durable and glove safe 6.8” touch screen
• Compatible with Renau’s Wireless Sensor Modules
• Multi-language support
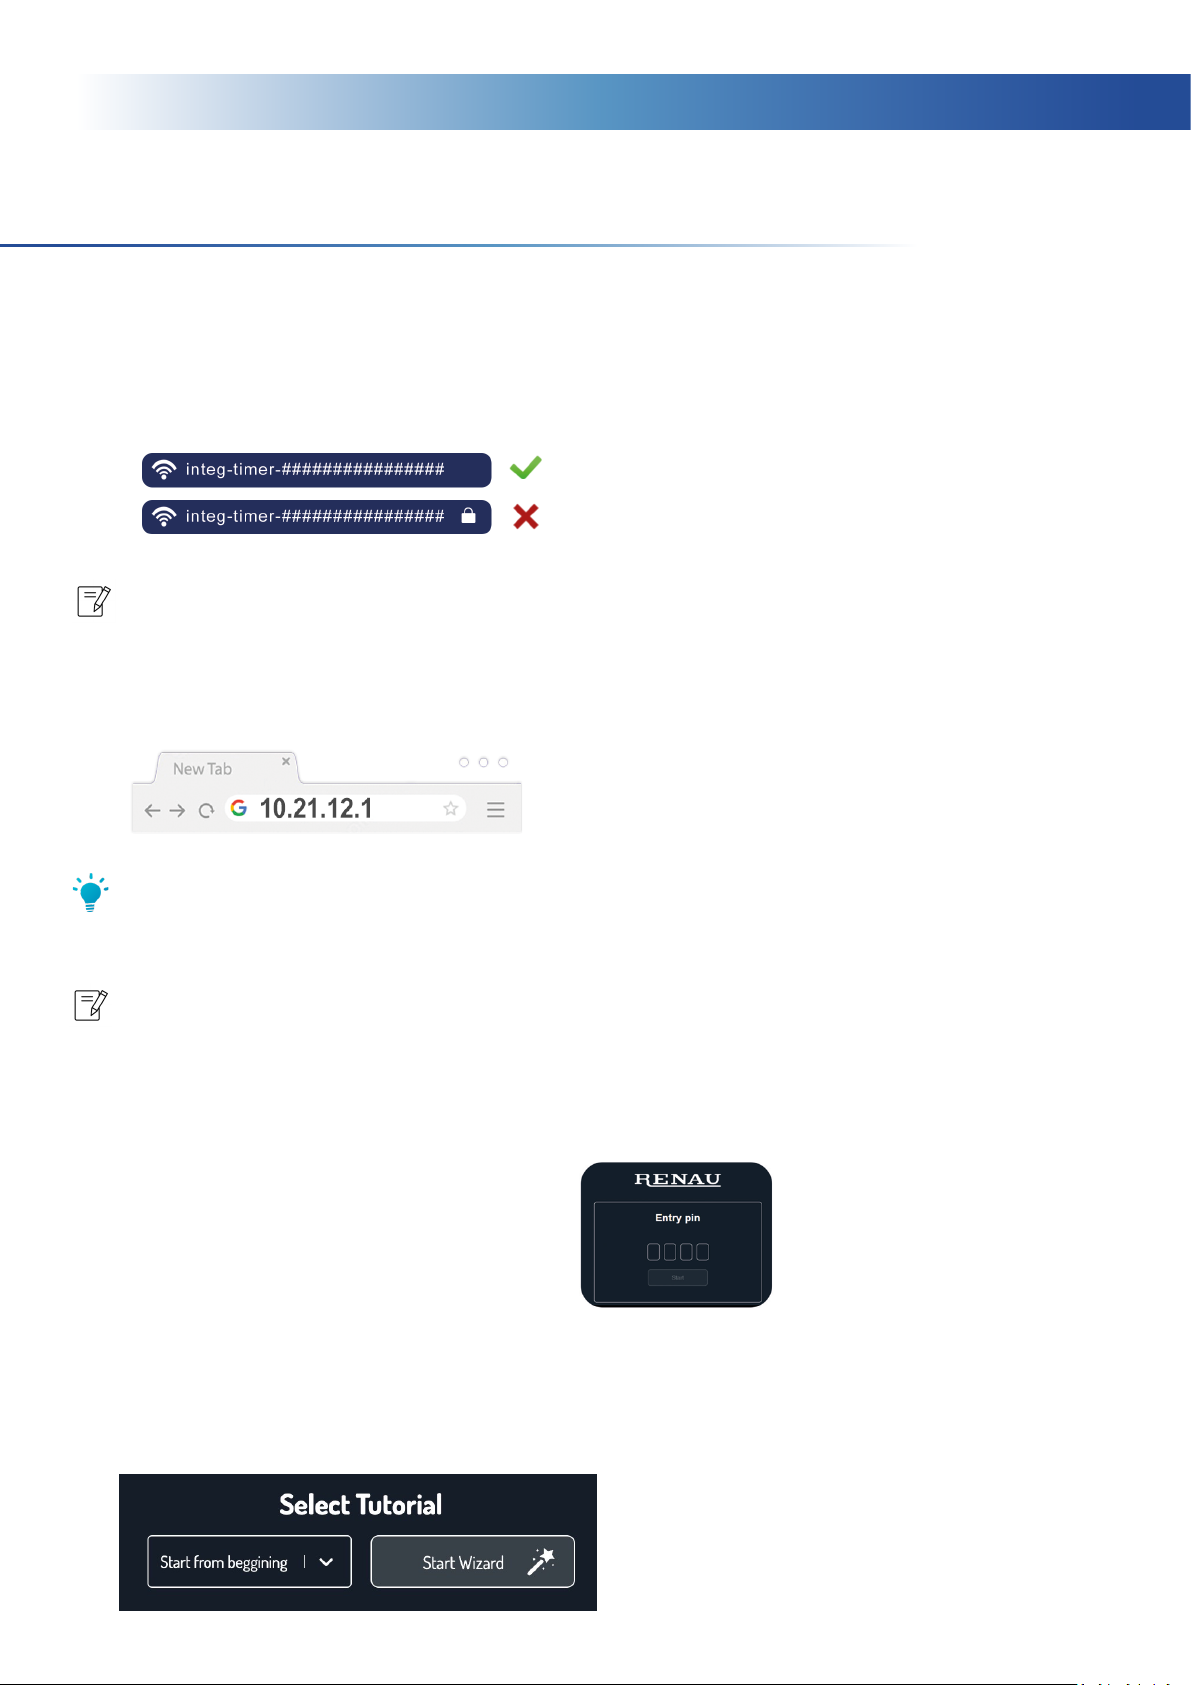
• Simple wireless conguration
• Customizable action messages
• Congurable task reminders
• Extensive library of icons with the ability to upload your own
• Transfer items between cook and hold timers
• Customizable day parts
• Congurable in vertical and horizontal orientation
• Job aids
• Use as a standalone unit or connect up to 7 additional SKTs
• And much more!
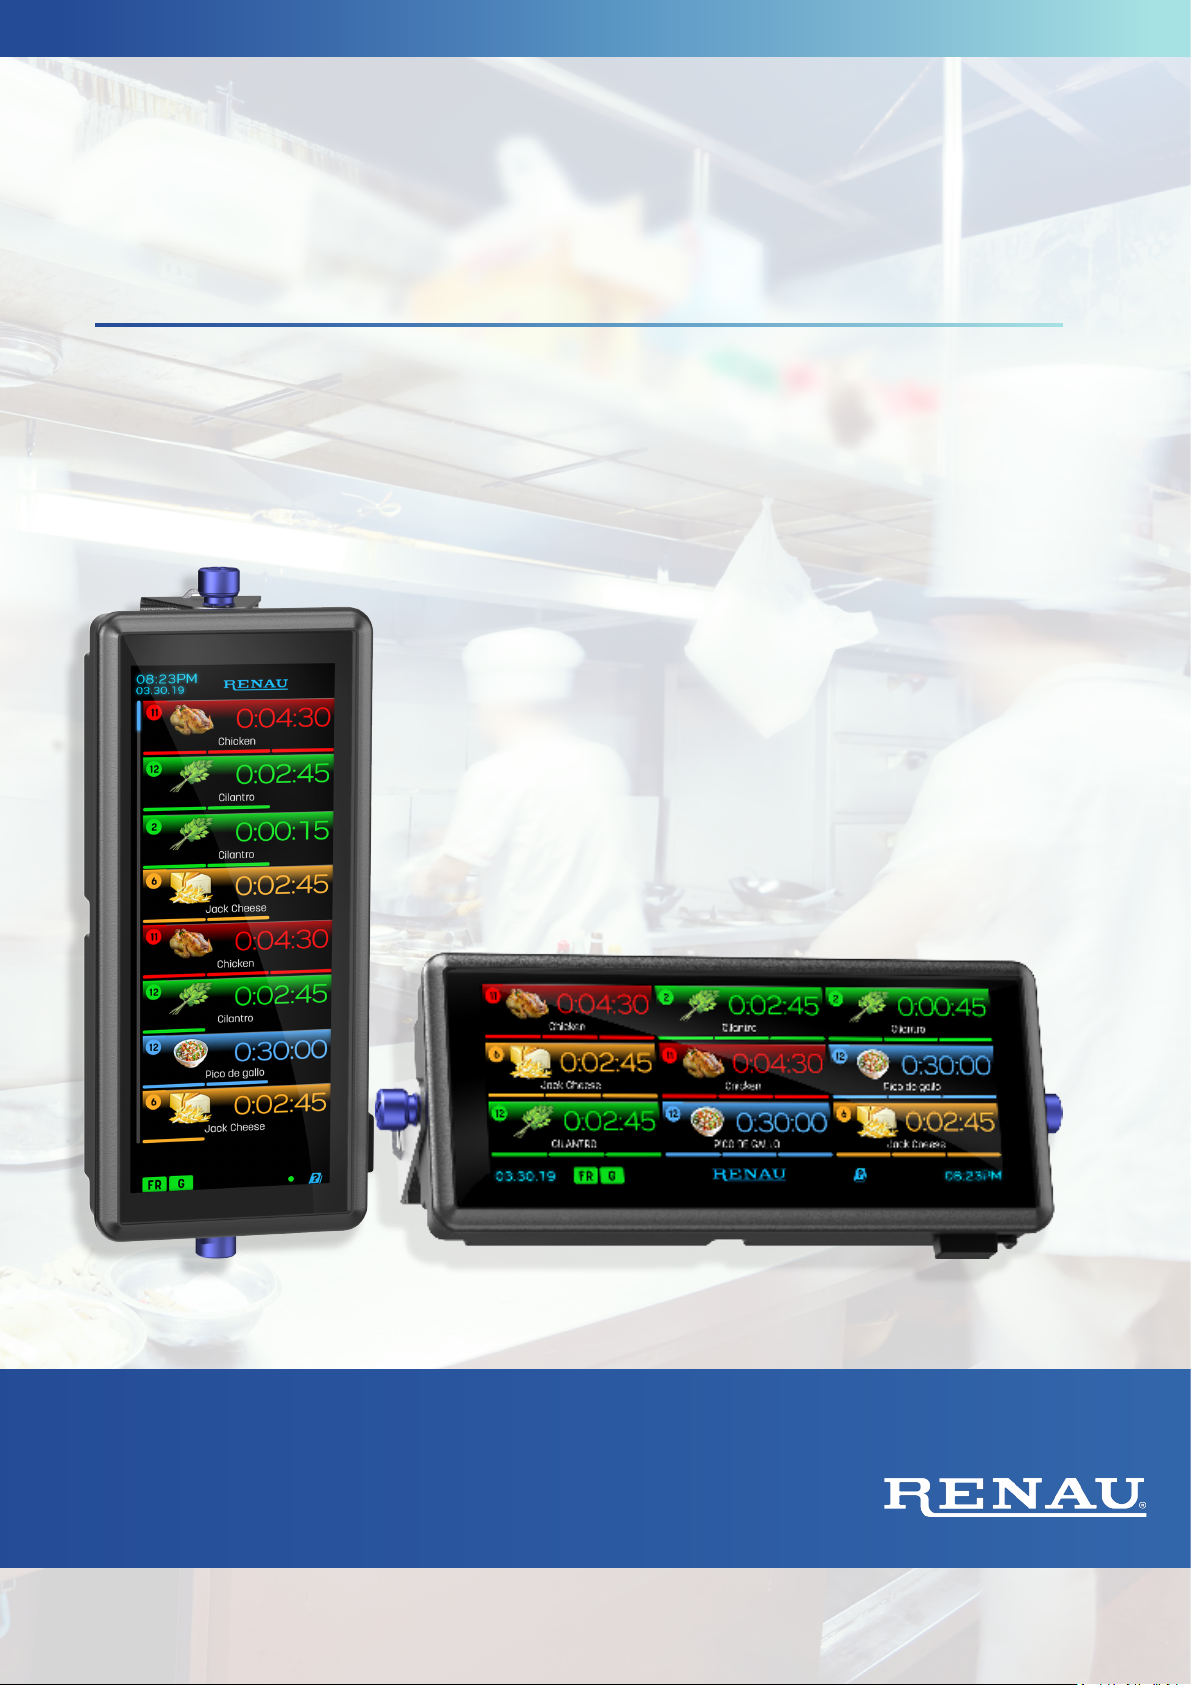
Renau’s T-2268 6.8” touchscreen cook/hold Smart Kitchen Timer (SKT)
gives food service operators total oversight of their operations while
guaranteeing freshness and consistency to their customers.
Features Include:
About the SKT

5
This equipment has been tested and found to comply with the limits for a Class B digital device,
pursuant to part 15 of the FCC Rules. These limits are designed to provide reasonable protection
against harmful interference when the equipment is operated in a commercial environment.
This equipment generates, uses, and can radiate radio frequency energy and, if not installed
and used in accordance with the instruction manual, may cause harmful interference to radio
communications. Operation of this equipment in a residential area is likely to cause harmful
interference in which case the user will be required to correct the interference at his own expense.
Clean only with a damp cloth. No detergents or substances containing alcohols or solvents may
be used to clean this device.
This device meets the emission and immunity requirements of PN-EN IEC 55014-1: 2021 on the
EU market.
Safety and General Information
Cleaning and Care:
General:
Caution:

6
Accessing the Conguration Tool
The Conguration Tool is accessed through your browser. It’s used to add and change
programming for the SKT. In the Conguration Tool you may create food groups, items, job aids,
devices, as well as add Wireless Sensor Modules and Gateways.
1. Connecting for the rst time: Connect the included power supply to the back of the
unit and insert the plug into a wall outlet. Initial power up may take up to 30 seconds.
Once the Smart Kitchen Timer has powered on, rotate the screen by tapping on the blue
button until the desired orientation is set. Once nished, tap “Next.” Continue with steps
2-6.
Reconnecting to the Conguration Tool: Hold the “RENAU” logo in the main screen,
enter the PIN number, Click on “Setup”, and nally select “Recongure Device.” Continue
with steps 2-6.
Warning: You must use the included power supply, or a Renau approved replacement.
Use of a third-party power supply or any other replacement not approved by Renau will
void the warranty.
2. Select the desired device operation mode:
Connected: Allows for communication between multiple SKT’s. If this is the main
connected SKT, select “Master.” Otherwise, select “Slave.” If selecting Slave, refer to pages
10-11 on how to establish a Master/Slave relationship. If you will be adding a Gateway or
Sensor Module, the SKT must be used in connected mode.
Standalone: Allows for the SKT to work as a single standalone device with reduced setup
requirements. Once congured, Standalone Devices do not require a WiFi dongle inserted
at all times.
3. The SKT should now display a screen with an SSID, an IP Address, and a Conguration
Tool PIN.
Note: Before getting started, ensure that the Wi-Fi Dongle provided in the packaging is inserted
into the USB port on the SKT.
Note: The preprogrammed PIN number for all new units is 4444. If you would like to change this
number, you may do so later in the SKT menu.

7
Accessing the Conguration Tool (cont.)
4. Open the Wi-Fi settings in your computer and connect to the Wi-Fi network matching the SSID.
If your computer is currently using Wi-Fi to access the internet, you will no longer have an
internet connection during conguration. If you are connected to the internet via Ethernet
cable, you will not lose your connection.
Note: When connecting your PC to the SSID displayed on the SKT you may see that initially
the network is locked. If this is the case, simply close the network selection window, wait a few
seconds, and then reopen it until the network is open.
5. After the WiFi connection has been established open a web browser and enter the IP address
listed on the SKT screen into the browser bar to access the Conguration Tool.
Tip: It is recommended that you enable either private browsing or incognito mode on your
browser in order to avoid any possible caching issues with cookies. The Conguration Tool has
been optimized for Google Chrome and Safari browsers.
Note: The SKT should remain on the SSID screen for the duration of programming. If at any
point during programming through the Conguration Tool the SKT is powered down or you exit
the SSID screen, the SKT will lose its connection. To return to the SSID screen, access the menu
on the SKT and locate “Recongure Device” inside the “Setup” tab. If you accidentally skipped
ahead to the “Device Assignment” or “Conguration Summary” page, simply tap the “Back”
button on the SKT until you return to the SSID screen. Reconnect the SKT to the Conguration
Tool to continue.
6. Login with the PIN provided on the SKT
to access the Conguration Tool.
(Pin # will be unique each new session.)
7. You will not land in the Conguration Tool dashboard.
To help familiarize yourself with the Conguration Tool, follow the “Tutorial Wizard” on the home
page. You can also nd instructional videos on the renau.com website.

8
Creating a Food Group
The SKT allows for the programming of 16 groups with up to 4 groups per SKT. Food Groups
are useful for navigating larger menus by grouping and categorizing items which are similar or
related.
1. Click “Food Groups” in the “Components” side menu
2. Click “+ Add Group,” then enter the desired group name and group label before saving by
clicking the oppy disk icon.
3. Repeat as necessary for any additional Food Groups
Note: Group Labels will display on the SKT with the given Group Label. When deselected
they will appear gray and when selected they will appear green.

9
Creating an Item
The SKT allows for the programming of up to 1000 items on a single device, and up to 8 duty
cycles and messages fora standard item. Items can be anythingfrom food items and ingredients
to tasks and events. To create a new item, rst access the Conguration Tool, click “Items” in
the “Components” side menu, then click “Add Item” to begin the item creation process. Before
continuing, decide whether you would like to create a standard timer, a Daily Based Timer, or a
Continuous Timer.
Standard Timer: This is the default timer when creating a new item. A standard timer will count
down from the set total time, display the desired alert message(s), and then complete once the
nal message is cleared by the user.
1. First, enter the desired item name.
2. Click the “+” button under the message label, enter the desired cook/hold time, enter the
message you would like displayed upon timer completion and select “Create.” Repeat as
necessary for any additional duty cycles.
Tip: You can also manage all of your programmed messages through the “Messages” tab in
the side menu. Adding messages in this menu also provides the option to add the same
message translated to the desired language.
3. Click the question mark under “Add or Select Icon” and either select an icon from the
database or upload your own by accessing the “Icons” tab.
4. Select the group you would like to associate the item with or select “Non-Group.”
Tip: If you would rather have an item visible on the SKT screen at all times, selecting Non-
Group would be the preferred option.
5. Lastly, save your changes by clicking the oppy disk icon.
Daily Based Timer: This creates a timer for which an alert will be displayed every day at the
specied time. You also have the ability to select multiple times of the day for which you would
like to receive the alert.
Continuous Timer: Selecting this option will create a timer that will repeat at a specied interval.
You must rst clear the triggered alert message before the timer will automatically reset.

10
Pairing SKTs
The SKT allows for the pairing of up to 7 Slave units with a Master. The Slave units do not need to
be individually programmed. You will create congurations for all paired SKT’s using the Master
by connecting it to the Conguration Tool and creating individual Devices to be assigned as
stations for the Slave units. To use SKT’s in a Master/Slave relationship, you must have a WiFi
dongle inserted into the USB port of all devices at all times.
1. To start, be sure that all SKT’s are congured in the “Connected” operating mode. To
do this, enter the “Setup” tab in the SKT menu, tap “Recongure Device”, and select
“Connected” as the operating mode. Do this on all units you wish to pair.
2. Select “Master” as the device type on the primary SKT (normally this would be the unit
you plan on using as a cook timer) and select “Slave” for the remaining units.
Note: There can only be one Master device in a setup.
3. At this point you will leave the Slave unit(s) alone and continue by connecting the Master
to the Conguration Tool.
4. Once the Master is connected to the Conguration Tool, proceed with programming all of
your items not just for the Master but for the Slave unit(s) as well. When nished, click the
“+” under “Devices” on the side menu, set the desired device conguration for the Master
device, click “Next Step”, and populate the mock screen as desired with the appropriate
items. Once nished, click “Save Device”. Repeat the last step but this time create Devices
for all Slave units. When nished, click “Send to Device” on the side menu.

11
Pairing SKTs (cont.)
5. Once the conguration has been successfully sent, close the Conguration Tool and tap
“Next” on the Master device to reach the device pairing screen. Depending on how many
SKT’s you are trying to pair, it could take anywhere from 5-60 seconds for all available
units to appear on the screen. Once visible, tap “Pair” on all SKT’s you wish to set as Slave
units. Once all Slaves have been successfully paired, tap “Next” on all devices, assign
them to the correct station, tap “Next” again and then nally “Save & Exit”. The devices
will now restart.
Note: For large congurations, it may take up to a few minutes for Slaves to receive the
conguration from the Master, and pair.
6. Once powered back up, the connection status indicator will initially be red on all paired
SKT’s but should turn green after 20-30 seconds.
Note: If there was a previous conguration on the Slave(s), you will need to tap the ashing
exclamation mark next to the indicator to update the unit with the new conguration.
Tip: You do not need to re-pair slave units when making conguration changes. Doing so
may result in communication issues.

12
Creating a Transferable Item
The transfer function allows you to transfer an item with a completed timer from one station to
another. Ex: transferring from a “Cook” unit to a “Hold” unit, after which the transferred item’s
timer will automatically begin on the “Hold” unit. To use this function, both SKT’s need to be
congured in the “Connected” operating mode with one device set as the “Master” and the
other set as “Slave.”
1. If you haven’t already done so, establish a Master/Slave relationship between the SKT’s
you wish to transfer items between.
2. Connect to the Conguration Tool with the Master unit and create separate groups for the
transferable items if you haven’t already done so. Next, create the item for the product
you would like to be transferable and assign it to the proper group. Once nished, create
a duplicate of the item, and simply replace the timer(s) and alert message(s), add any
additional duty cycles, and assign the item to the proper group.
Note: When creating a transferable item be sure to use the same name for both items. The
times, messages, and icon however, do not need to match.
3. If you haven’t already created and congured a Device for the Master and Slave units,
do so now and populate the mock screen with your items as desired. To help distinguish
between the transferable items, lter them by group. Save when nished and send the
conguration to device.
4. At this point you may close the Conguration Tool, tap “Next” on the Master, assign it to
the proper station, and nally tap “Save and Exit.” The SKT will now restart.
Note: Be sure to update the Slave unit by tapping the ashing exclamation mark.

13
Creating Job Aids
The SKT allows the programming of over 200 Job Aids which provide the operator directions on
how to perform certain tasks such as cleaning, prepping, and assembling food items.
1. To create a Job Aid, rst access the Conguration Tool and select the “Job Aids” tab from
the “Components” side menu and click “+ Add Job Aid.”
2. Enter the Job Aid name.
3. Select the Recipe Layout, whether to display recipe elements as a list or scrollable tiles.
4. Add any unique labels for your Job Aids such as KDS codes or item weight.
5. Next, we will add the steps required to assemble the food item or perform the task in
the Job Aid. First, add an icon that best represents the product or task and then enter
descriptive text for the item or action.
6. If necessary, enter any additional information such as item quantity or arrangement as
the Bottom Text and add an action icon to represent the text. Otherwise leave these
elds blank.
7. Add any additional steps as necessary. When nished, save the Job Aid by clicking the
oppy disk icon.

14
Sending Conguration to the Timer
Once you are nished programming the SKT, you will need to send the conguration to the
unit. It is also advised to create a backup of your conguration le and save it to a ash drive or
computer.
1. To begin, click the “+” under the “Devices” tab. Here you will name your device, set the
orientation, timer type, languages, and the time/unit format. Once complete, click “Next
Step” at the bottom right of the page.
2. On this next page, you will drag your items from the list onto the mock SKT screen and
arrange them as you see t. When nished, click “Save Device.”
3. Lastly, you will send your conguration to the device. To do so, simply click “Send to
Device” on the side menu. Once the conguration has been sent, tap “Next” on the SKT
screen, tap the device name you created and hit “Next”. Finally, tap “Save & Exit” to nish.
Note: If you are in Connected mode, you will also encounter the Pairing Screen in step
3. If you wish to pair additional SKT’s to this unit, refer to the Creating a Master/Slave
Relationship section of this guide. Be sure not to re-pair existing slave units.
Tip: When using a Master/Slave setup, you only need to upload the conguration le to the
master unit.

15
Uploading/Downloading Conguration Files
It is highly recommended that once you have nished programming your timer you create a
backup conguration le of your programming. Creating a copy of your conguration is also
useful for conguring multiple SKT’s with the same programming, and as a backup in case your
SKT is damaged or lost.
1. First, access the Conguration Tool using the SKT containing the conguration you would
like to make a copy of. Once on the dashboard, click “Download/Upload” in the side menu
and click “Download.” This will create a le containing the programming of your SKT. If
you plan on renaming the resulting conguration le you must use underscores in place
of any spaces in the le name. You now have a backup le you can reference later if
needed.
2. To upload this conguration le onto another unit, insert a ash drive containing the le
into the USB port on the SKT and enter the menu. Tap the “Conguration” tab, (swipe to
the bottom of the menu) and then tap “Upload Cong.” Alternatively, you can also upload
a le through the Conguration Tool by clicking “Upload” in the “Download/Upload” tab.
Note: Be sure to rst send the conguration to device before downloading the conguration
le.

16
Adding a Gateway and Wireless Sensor Modules
The SKT allows for the pairing of up to 64 Wireless Sensor Modules (WSM’s) per unit. Adding
Wireless Sensor Modules to the SKT allows the user to monitor and set alerts for temperature
and/or humidity. In order to use WSM’s with the SKT, a Gateway must rst be congured with
your system. Before you congure the Gateway to your system, you will rst need to pair your
WSM(s) to the SKT using the Conguration Tool. To access the Conguration Tool, refer to
the instructions at the beginning of this manual. Before continuing, make sure batteries are
inserted into the WSM(s) you wish to pair, and that the Gateway is powered on.
1. After accessing the Conguration Tool, make your way to the “Managers” tab and select
“Gateway/Sensors.”
2. You will now be brought to the Wireless Sensor Module pairing options. Once the WSM’s
are prepped, click the “+ Add Sensor” button. With WSM in hand, click the NFC button and
then hold the Wi-Fi logo on the top of the Module to the icon on the top right of the SKT.
It’s important to hold the Sensor Module still during this process. After a few seconds,
you should receive a popup on the Conguration Tool displaying the WSM’s information.
Click “Accept” to add the Module.
3. Next, click the “+” under “Probes” to setup the probe(s) connected to this WSM.
4. Select the icon you would like to represent the probe(s) and add probe name as you would
like it displayed in the SKT. Select the proper probe type.
5. Click “+ Add Alert,” input the desired message, select the desired “Condition” and “Value”
to trigger the alert. By default the alert will be set to “On,” to disable alerts for this probe
simply select o. Add any additional alerts to this probe as needed. Once complete, select
oppy icon to save. Repeat step 2-5 as needed.
6. Now click on the “+” under the Devices tab or click on an existing device if you have
already created one. Congure the settings for the SKT and proceed with populating the
mock SKT screen with the new Sensor(s) and Probe(s) before clicking “Save Device.”
7. Now, click “Send to Device”.
Note: If a WSM is using multi-probes or a Sensor measuring multiple perimeters, assign a
dierent number to each in the “Index” section under Probes.

17
Adding a Gateway and Wireless Sensor Modules (cont.)
8. At this point you should power up the Gateway if you haven’t already done so. Next,
navigate back to “Gateway/Sensors” under “Managers,” click “Gateway File Export” and
click “Yes” when prompted. The resulting le will be “cong.zip.”
Tip: To dierentiate between multiple Gateway cong les, create a folder with the desired
name and insert the cong le.
9. Next, insert a blank ash drive into your computers USB port and locate the Gateway
Conguration le in your downloads folder. Move the le onto the ash drive before
ejecting the drive and inserting it into the Gateway. Depending on how many WSM’s you
have in your system, the le may take up to 30 seconds to upload to the Gateway. The
LED on the Gateway will pulse on and o in 3 second intervals when the upload has
nished, after which you may remove the ash drive.
Note: It may take a few minutes for the sensors to connect to the gateway and start sending
data.

18
Operating the SKT
Once you have sent your programming to the SKT you will assign it to the desired station, and
tap “Save & Exit.” The device will now restart after which you may tap the group label(s) on the
SKT to bring up the desired items.
Starting and Stopping Timers: To start a timer, simply tap the desired item. To clear a timer,
hold your nger for a second on the item you wish to clear. You can adjust the amount of time
required to hold your nger on an item before it enables or clears in the SKT menu. You can
also start multiple timers for the same item. In a “Holding” conguration you may have up to 8
timers running simultaneously for the same item. This threshold is adjustable in the SKT menu.
Note: If you have many items programmed, you may need to swipe right or down on the
display depending on screen orientation to show additional items.
Switching Between Groups: You can switch between your programmed groups on the main
screen by selecting the group label corresponding to the desired group. You may also select
multiple group labels if you would like those items displayed as well.
Job Aids: If you have programmed Job Aids using the Conguration Tool, you may access them
on the SKT by tapping the question mark on the main screen.

19
Accessing and Navigating the SKT Menu
To access the main menu, hold the Renau logo on the SKT for a few seconds until prompted to
enter a 4-digit PIN number. The preprogrammed PIN number for all new units is 4444. If you
would like to change this number, you may do so later in the SKT menu. You can exit the menu
at any time by pressing the home icon.
GENERAL
Under the General tab you will nd the unique Timer ID, Timer Name, Model Number, and current
Firmware Revision.
SETUP
System Conguration: In this menu you will nd options to switch between cook/hold
functionality, change the screen orientation, switch between metric and imperial units, ip the
screen, and change the swipe function from horizontal to vertical. Most of these options can
also be adjusted in the Devices section of the Conguration Tool.
Device Assignment: This menu allows you to assign the SKT to an existing station created in
the Devices section of the Conguration Tool.
Recongure Device: This menu will allow you to change the SKT’s operating mode and make
changes to the programming by connecting to the Conguration Tool. To do so, follow the steps
provided at the beginning of this guide.
Timer Settings: This menu allows you to change the touch and hold time out to clear and
enable timers as well as adjust the limit for how many timers for the same item can be enabled
at once.
PIN Code: If you would like to change the PIN number to enter the menu or disable it you may
do so here.
Note: If you decide to change the preset PIN number be sure to record the new number
somewhere easily accessible. If this new PIN number is lost, you must perform a forced
factory reset on the unit and upload the conguration le again. To perform a forced
factory reset download the Factory Reset le (force_factory_reset) from the renau.com
website and load it onto a blank ash drive and insert into the SKT. Once the SKT has
rebooted you may remove the ash drive.

20
Accessing and Navigating the SKT Menu (cont.)
DATE & TIME
Here you can adjust the date and time, or switch between 12/24-hour formats.
LANGUAGE
This menu includes several language options to select as both primary and secondary options.
If you would prefer to use only a primary language, you may uncheck the box next to “Secondary
Language” to disable it.
DISPLAY
In this menu you will nd options to change the screen brightness, and the auto home time.
SOUND
Entering this menu will allow you to adjust the timer’s volume or turn it o completely.
(Not recommended)
CONFIGURATION
This menu is used to upload conguration les to the SKT and download Gateway conguration
les from the SKT to a ash drive.
SETUP cont.
Update Firmware: There are two ways to update the rmware, either through this menu directly
to the SKT via ash drive, or wirelessly through the Conguration Tool. To update directly to the
SKT, rst copy the update le to a blank ash drive. Then, insert the drive into the USB port
on the SKT, follow the on-screen prompts, then wait until the update is complete. To update
through the Conguration Tool, click “Update Firmware” in the side menu. Next, click “Select
File” and locate the update le on your PC. Lastly, click “Start Upload” to begin the rmware
update. This process could take up to 8-10 minutes depending on the size of the update, and
the distance between the PC and SKT.
Note: If updating via ash drive, the drive must be formated: FAT32 in order to work properly.
Right click on the drive folder and click the “Info” tab to check its format.
Factory Reset: If you would like to erase all your programming and return your SKT to its original
factory settings you may do so here.
Table of contents
Other Renau Timer manuals
Popular Timer manuals by other brands

Woods
Woods 59724 installation instructions

Oregon Scientific
Oregon Scientific TR113 instruction manual

Parkside
Parkside 393778 2104 Operation and safety notes

Mitsubishi Electric
Mitsubishi Electric PAC-SC32PTA Instruction book

Grasslin
Grasslin tasu 472 1 plus instruction manual

GESTRA
GESTRA PRS 50 Original Installation & Operating Manual