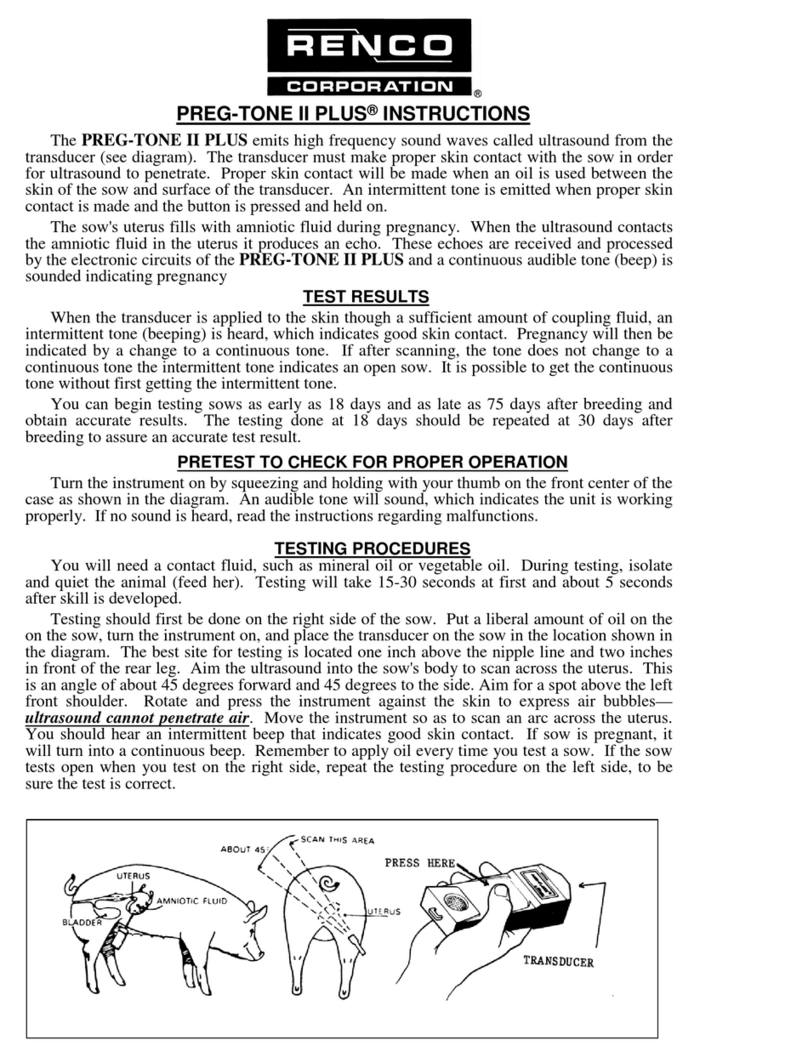
Renco LEAN-MEATER 12 Series Installation and operation manual

©2006 Renco Corporation. All rights reserved Page 1 of 3
LM-12 Inst Man Short Form-AB.doc 12/22/06
LEAN-MEATER ®
INSTRUCTIONS FOR USING THE SERIES 12
(S/N: 45000)
The Renco Lean-Meater uses pulsed ultrasound to measure total backfat depth of mammals
having 1, 2, or 3 backfat layers. Total measurement range and accuracy including skin is 4-
35mm, ±1 digit. Power is provided by a Nickel Metal Hydride (NMH) rechargeable battery.
The number of backfat layers is automatically determined and displayed. The instrument is not
waterproof, do not submerge. To assemble, connect the probe to the cable and the cable to the
instrument. Twist both connector barrels until they snap into locked position.
Turn On Sequence
Press and hold the push button to turn on the instrument. The display will show the number “88”
for a second, verifying that all segments are functional. The 3 READ lights on the left side of
the display will turn on briefly. After a moment, the right-most digit will show “0” and the rest
of the display will be dark.
Using the Lean-Meater
Apply a generous amount of coupling fluid, such as cooking oil or water to the test site.
Insufficient coupling fluid is the most common source of error as ultrasound cannot pass
through air or air bubbles. Press the Power button. Apply the probe to the site, use a gentle
pressing/rotating action to force out any air bubbles between the skin and probe. It is important
that the probe be kept perpendicular to the back. Errors may result if probe is at an angle. Many
have found that the probe is most easily managed if held between the index and middle fingers.
The illustration above shows 3 READ light indicators on the left. The TOP light indicates 1
layer, TOP and MIDDLE lights, 2 Layers, all 3 lights, 3 Layers. (The illustration shows 2
layers.) The skin thickness is included in all cases unless it is >3mm, in which case it will be
counted as 1 layer. The skin of most mammals does not exceed 3mm.
The READ indicators light when the appropriate number of layers have been found. If Read
light(s) do not come on, then skin contact is poor; use more oil, make a greater effort to remove
air bubbles, be sure probe is perpendicular to the back. Consistency of probe placement is of
great importance in obtaining comparative measurements.
1 2
Á
Á
22
1 LAYER
2 LAYERS
3 LAYERS
LIGHTSWHENBATTERY
CHARGERIS PROPERLY
CONNECTED
DISPLAY EXAMPLE SHOWS 2 LAYERS & 12mm OF BACKFAT
INCLUDING SKIN
READ LIGHTS

©2006 Renco Corporation. All rights reserved Page 2 of 3
LM-12 Inst Man Short Form-AB.doc 12/24/06
For swine, only site B (see the drawing below), will give an accurate reading of the 3 layers of
fat. Many hogs have a third layer of fat. As they increase in weight and age, the third layer
becomes thicker and more widespread over the body. Site B is the location normally used in the
old metal ruler probing technique, and shows the best correlation with overall carcass yield.
Because of the trapezius muscle at the shoulder (false lean), measurement at site C is more
difficult and inconsistent. (True for both ruler and ultrasound devices). Site A will give accurate
measurement for two layers of fat but may not give an accurate measurement for three layers of
fat due to the muscle tissue below the fat layers.
Values obtained using ultrasonic devices on live animals will generally be different than those
measured at slaughter because of differences in measurement sites and fat on a hanging carcass
is distorted or cut.
Example: Locating The Test Site For Swine
The most accurate spot in which to measure backfat can be found by walking your fingers
forward along the hog’s flank until you can feel the last rib, then place the probe on this site B,
65mm (2.5 inches) from either side of the backbone. Saturate the skin with a light oil (such as
cooking oil) or water.
Important: Small irregularities in the fat may block the beam of sound,. Moving the probe
slightly will allow the beam to bypass, and the correct reading to appear. Fat layers are not
uniformly thick. Averaging two or three readings at adjacent sites insures greatest accuracy.
Measurement occurs only when the Read lights are on. Older animals with tough dead skin will
require extra effort to obtain a good clean probe contact with the underlying live tissue. If
necessary, remove the hair at the site (true for all mammals). Then wet the skin with hot water.
Next, apply light oil and allow it to wet the skin a minute or two before measuring.
Charging the Battery and Low Power Indication
Plug the RENCO charger into a wall outlet that supplies the rated charger voltage and plug the
charger cable into the instrument. NOTE: Charger light stays lit until charger is
disconnected. Charge the battery for about 15 hours before the first use. (Charging the battery
after each period of use for three times longer than the time it was used insures long battery life.
Do not make a practice of charging the

©2006 Renco Corporation. All rights reserved Page 3 of 3
LM-12 Inst Man Short Form-AB.doc 12/24/06
battery for extended periods of time, say over 30 hours, as it may actually shorten the battery
life.) The instrument is deactivated and not usable when the charger is connected. When
the battery becomes discharged and no measurement is being made, a horizontal bar will show
in place of the “0”, which indicates only a brief time remains. The “0” reappears when a
measurement is made.
Nickel Metal Hydride Battery (NiMH or NMH): Battery is “green” and does not need to be
recycled. The Renco NMH battery uses special cells and should only be replaced with Renco
replacements to avoid damage and shortened battery life. Warranty is void if battery is
replaced with other than a Renco replacement. To replace battery, remove top cover by
removing the two end screws. Unplug battery, replace with new battery and replace cover.
The instrument will automatically turn off if it has been on for more that two minutes during
which there has been no measurement activity. This protects the battery from discharge if the
instrument is inadvertently placed upside down on a table, which might keep the Power button
actuated.
Plastic Test Cylinder: This is provided for verifying that the instrument is operational. Wet
the end of the probe or Cylinder and apply the probe to the Cylinder. Do not allow the opposite
end to be in full contact with any surface and be sure the hole is not plugged. The reading
should be approximately 25mm, depending on humidity, or approximately 30mm for
instruments purchased in Australia and New Zealand. Since the Lean-Meater is a crystal
controlled device, the actual reading is not as important as just getting a reading. If there is any
internal problem you will most likely not get any reading at all.
Service and Help
For help with any questions or problems in regard to the use of the Lean-Meater, RENCO
provides free telephone technical support during the warranty period, which may be obtained
by reading the FAQ’s on our Internet site, emailing or calling. (Our phones are open M-F, 8am
to 4pm Central Time.) We do not charge for online or telephone technical support. Use the
original carton to return the instrument to the factory for service and regardless of problem, be
sure to return instrument,probe,cable and charger.
CAUTION! DO NOT USE THE LEAN-MEATER ON HUMAN BEINGS.
“Ultrasound for Ultra Profits”®
116 Third Avenue North, Minneapolis, MN. 55401 USA
Tel: 800-359-8181 Fax: 612-333-9026
Internet: http://www.rencocorp.com Email: techsupport@rencocorp.com
This manual suits for next models
1
Table of contents
Other Renco Farm Equipment manuals