Ceci est une publication de Conrad Electronic SE, Klaus-Conrad-Str. 1, D-92240 Hirschau (www.conrad.com).
Tous droits réservés, y compris de traduction. Toute reproduction, quelle qu‘elle soit (p. ex. photocopie, microlm, saisie dans des installations
de traitement de données) nécessite une autorisation écrite de l‘éditeur. Il est interdit de le réimprimer, même par extraits. Cette publication
correspond au niveau technique du moment de la mise sous presse.
© Copyright 2015 par Conrad Electronic SE. V2_0615_02-HK
• La recherche automatique du signal de l‘heure a lieu tous les jours à 2 h 00 et à
3h00. Si la recherche a échoué, une nouvelle tentative sera eectuée à 4 h 00 et
5 h 00.
• Pour commencer ou interrompre la recherche automatique, appuyez sur la touche
▼ (9) pendant 3 secondes.
• Il faut quelques minutes jusqu‘à ce que le signal soit reçu et que l‘heure se règle
automatiquement. Ne déplacez pas le produit durant ce laps de temps et n’appuyez
sur aucune touche.
• Lors d’une bonne réception, le symbole de réception s’allume en permanence.
c) Réglage manuel de l’heure
• Maintenez appuyée la touche MODE/SET (10) pendant env. 3 secondes. L‘indicateur
RCC ON/OF pour la recherche du signal radio automatique clignote.
Si aucune touche n‘est activée pendant le réglage dans les 15 secondes, le
produit passe en mode d‘achage normal.
• Activez ou désactivez la recherche automatique du signal radio avec la touche
▲(8) ou ▼ (9).
- ON : activé
- OFF (L‘indicateur: OF): désactivé
• Validez avec la touche MODE/SET. Le prochain chire clignote.
• Procédez comme décrit ci-dessus avant d‘eectuer les réglages dans l‘ordre
suivant : recherche du signal radio automatique > fuseau horaire > heures >
minutes > année > format d‘achage de la date > mois > jour > langue > unité de
température.
Appuyez et maintenez la touche ▲ou ▼ pour un déroulement plus rapide.
• Validez en appuyant sur la touche MODE/SET pour enregistrer les paramètres des
réglages et quitter le mode de réglage.
Indication sur le réglage du fuseau horaire
Si vous ne recevez pas de signal radio, laissez le réglage sur 00. Si vous
avez reçu un signal radioélectrique mais que votre heure locale dière de
l‘heure reçue par radio, vous pouvez régler la diérence de l’heure (de - 12
jusqu’à + 12 heures). Cette diérence de temps est ensuite prise en compte
dans l‘achage de l‘heure.
Pour l‘achage du jour ouvrable, les langues suivantes sont disponibles :
GER Allemand ITA Italien
ENG Anglais DUT Néerlandais
FRE Français POL Polonais
SPA Espagnol CZE Tchèque
d) Réglage de la sonnerie de l‘alarme
• Dans le mode d‘achage normal, appuyez brièvement sur la touche MODE/SET (10).
L‘heure de la sonnerie est achée sur l‘écran.
• Tandis que la sonnerie du réveil est achée, maintenez appuyée la touche
MODE/SET pendant 3 secondes.
• Réglez l‘heure de la sonnerie avec la touche ▲ (8) ou ▼ (9).
• Validez avec la touche MODE/SET.
e) Activer la sonnerie d’alarme/fonction de répétition
• Réglez comme décrit ci-dessus l’heure de la sonnerie de l’alarme.
• Appuyez sur la touche AL ON/OFF (7), pour activer la sonnerie du réveil. L‘indicateur
apparaît sur l‘écran d‘achage.
• Sélectionnez avec le taquet coulissant ALARM MODE (4), qui indique quel jour la
sonnerie doit avoir lieu. Pour cela, il existe plusieurs possibilités décrites ci-après.
MON - FRI du lundi au vendredi
MON - SAT du lundi au samedi
MON - SUN du lundi au dimanche
• Une fois que la sonnerie du réveil retentit, il existe plus moyens décrit ci-dessous
pour l‘éteindre :
- Appuyez sur la touche SNOOZE (2) pour activer la fonction de répétition. La
sonnerie retentit de nouveau après environ 4 minutes.
- Pour arrêter la sonnerie, appuyez sur n’importe quelle touche.
- Après 2 minutes, la sonnerie s‘arrête automatiquement.
• Appuyez sur la touche AL ON/OFF, pour désactiver la sonnerie. L‘indicateur
s‘éteint.
La fonction de répétition peut être enclenchée jusqu‘à 8 fois. Pendant la
fonction de répétition, l‘indicateur clignote.
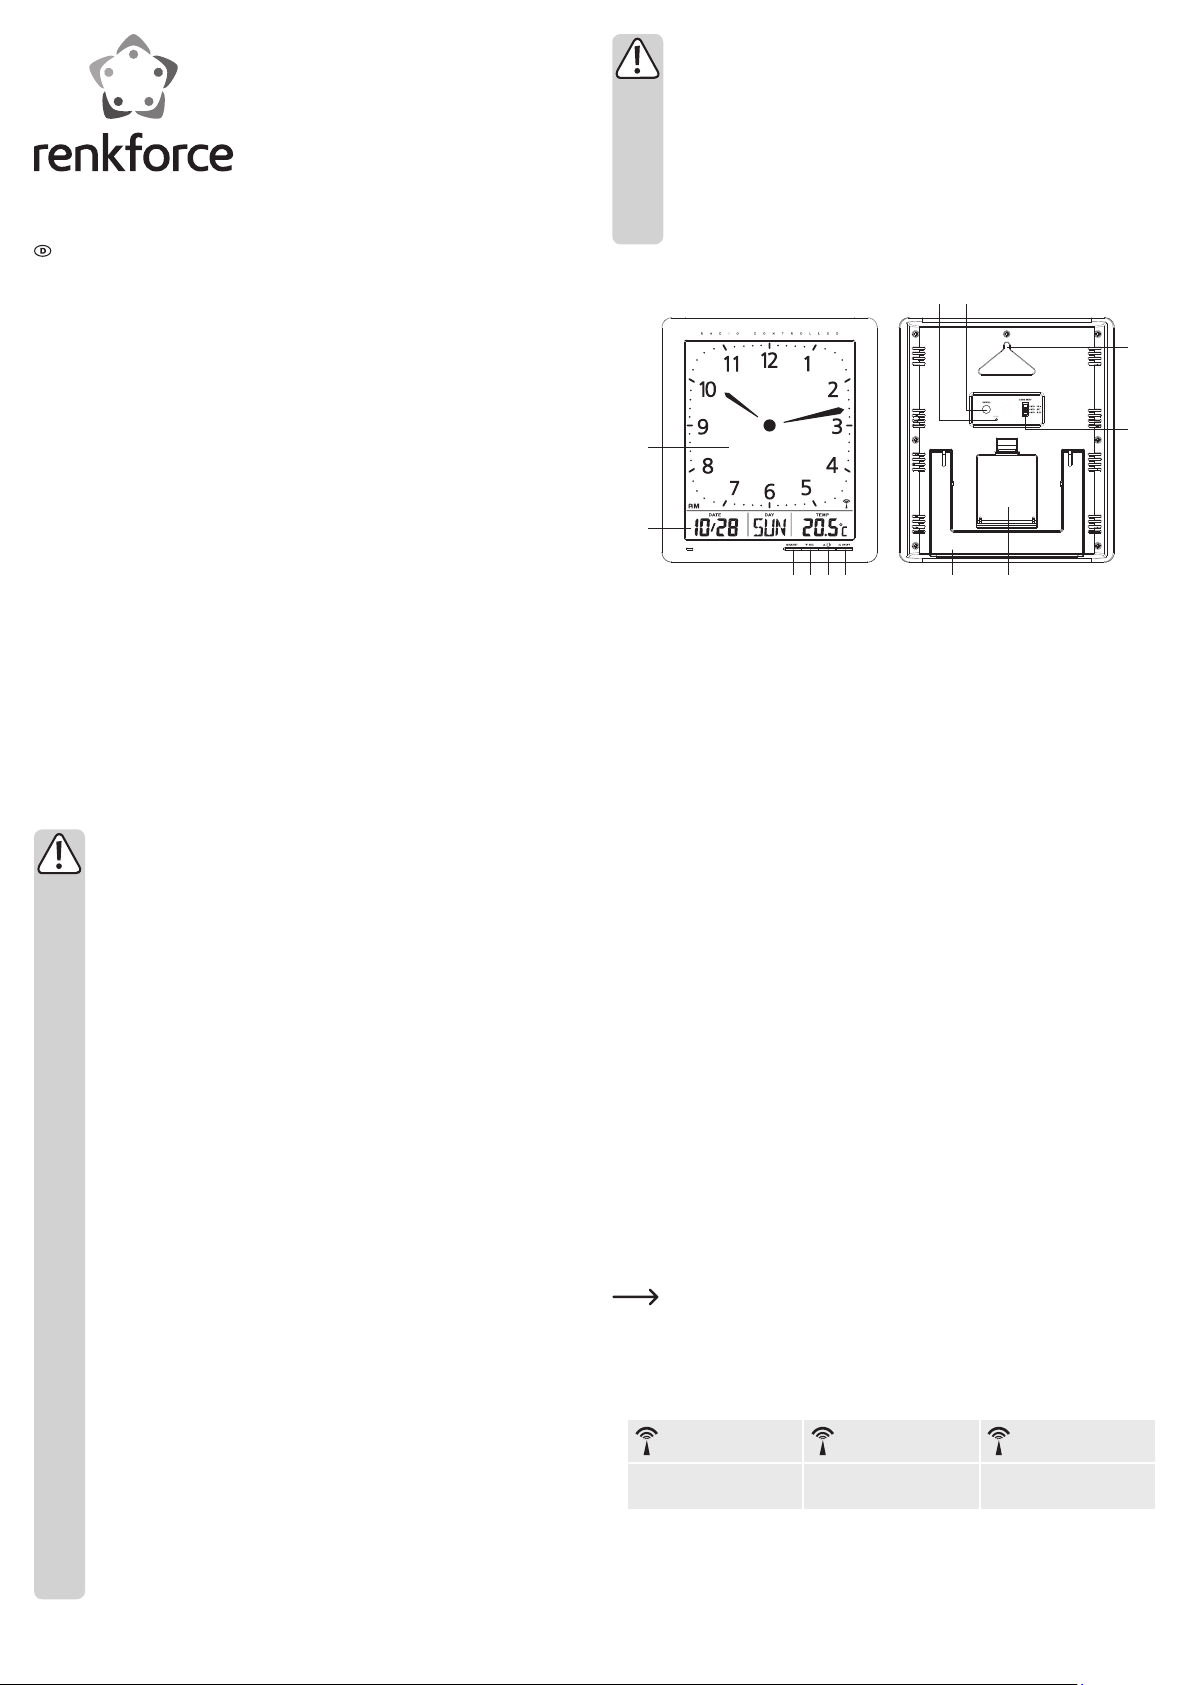
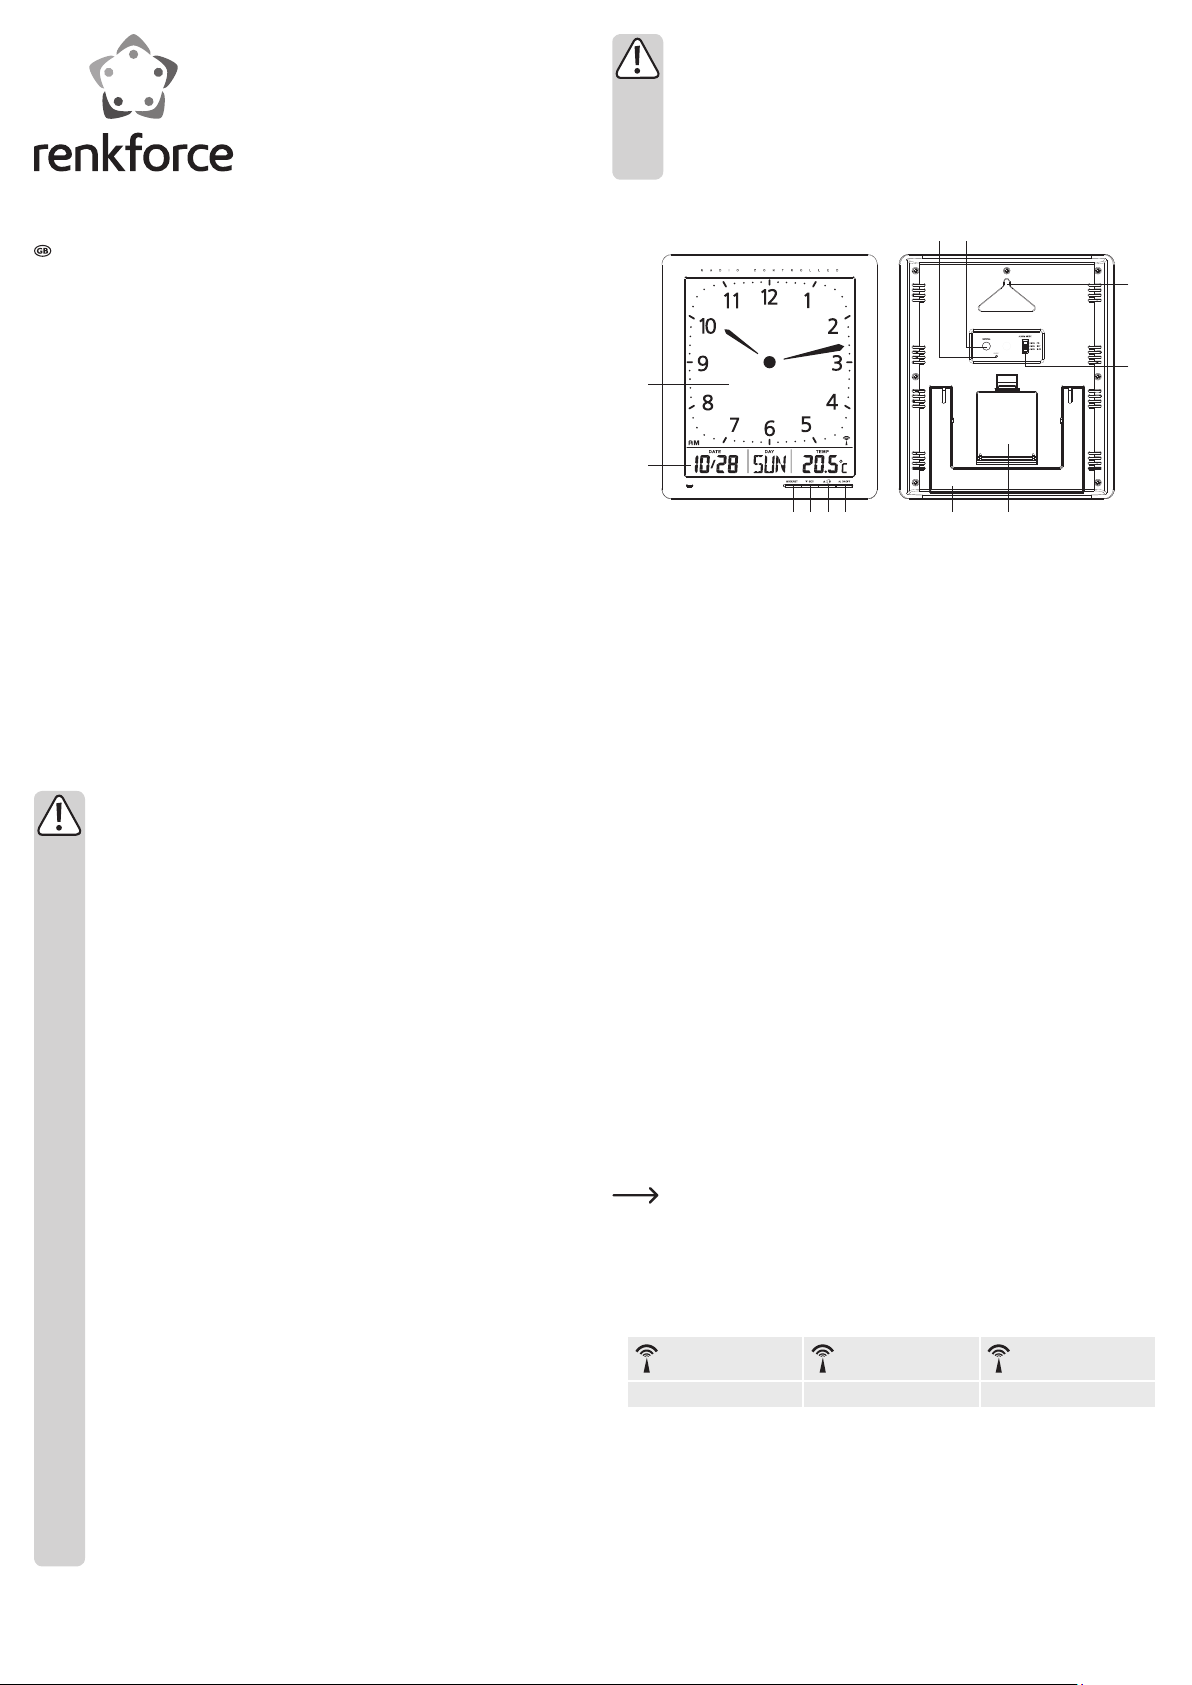
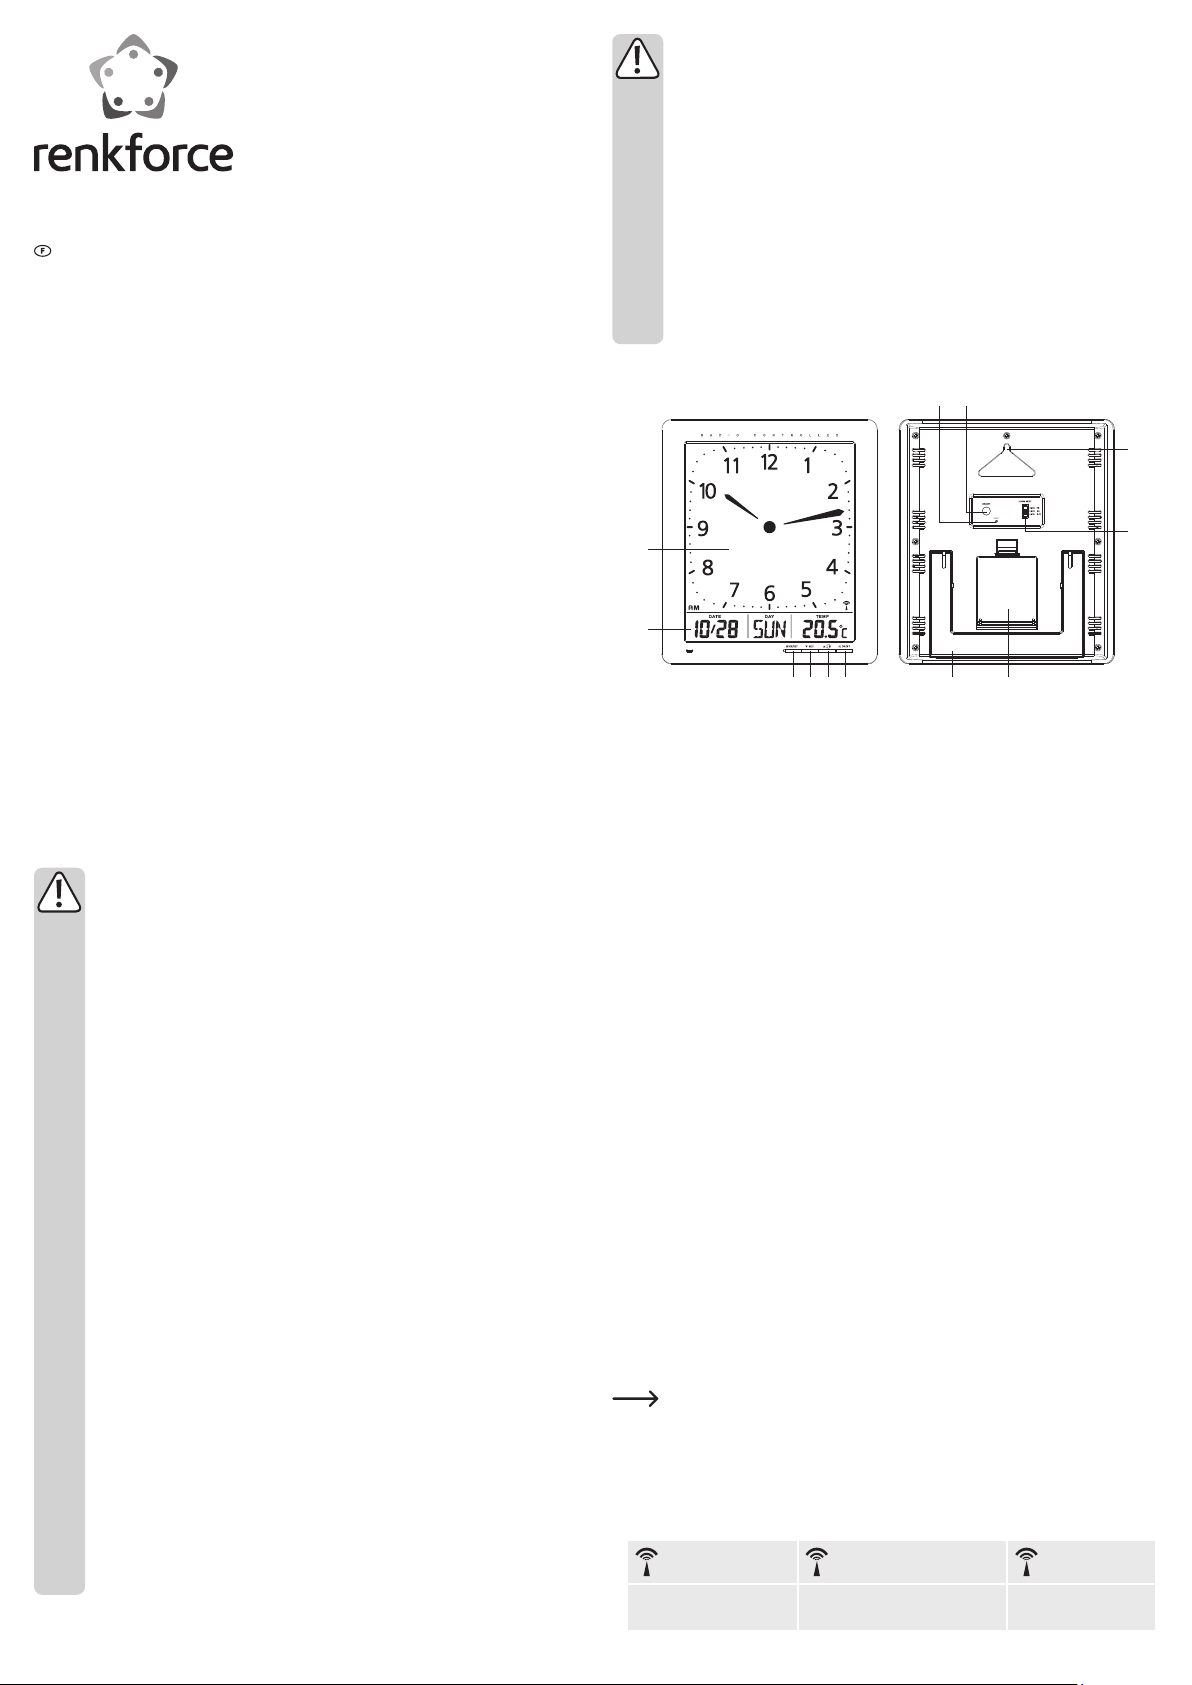
f) Aiguille des secondes
Dans le mode d‘achage normal, appuyez brièvement sur la touche ▼ (9), pour faire
apparaître ou masquer l‘aiguille des secondes.
g) Format de l‘achage de la date
Dans le mode d‘achage normal, appuyez brièvement sur la touche ▲ (8), pour
modier le format d‘achage de la date.
h) Thermomètre
Si la température se trouve en dessous de la plage de mesure, soit l‘indicateur LL.L
(c.-à-d. au-dessous de la température minimale), soit HH.H (c.-à-d. au-dessus de la
température maximale).
i) Réinitialisation
Appuyez sur la touche RESET (1) avec un objet pointu an de réinitialiser le produit
aux réglages par défaut.
Entretien et nettoyage
• Le produit ne nécessite aucune maintenance seulement un nettoyage de temps en
temps et le remplacement éventuel des piles.
• N’utilisez aucun produit de nettoyage abrasif ou chimique.
• Ne plongez pas le produit dans de l‘eau et ne le passez pas sous l’eau pour le
nettoyer.
• Lors du nettoyage, n’appuyez pas trop fort sur la surface an d’éviter de la rayer.
• Pour le nettoyage, utilisez un chion doux, sec, propre et non pelucheux. S’il existe
de la saleté tenace, vous pouvez légèrement humidier un chion avec de l‘eau
tiède. Utilisez en supplément un savon ou un produit de nettoyage doux.
Déclaration de conformité (DOC)
Conrad Electronic SE, Klaus-Conrad-Strasse 1, D-92240 Hirschau, Allemagne, déclare
que l’appareil est en conformité avec les exigences fondamentales et les autres
prescriptions pertinentes de la directive 1999/5/CE.
La déclaration de conformité (DOC) de cet appareil peut être consultée sur
le site www.conrad.com.
Elimination des déchets
a) Produit
Les appareils électroniques sont des matériaux recyclables et ne doivent
pas être éliminés avec les ordures ménagères.
En n de vie, éliminez l’appareil conformément aux dispositions légales en
vigueur.
Retirez les piles/accumulateurs insérées et éliminez-les séparément du
produit.
b) Piles / Accumulateurs
Le consommateur nal est légalement tenu (ordonnance relative à l´élimination des
piles usagées) de rapporter toutes les piles et batteries usagées, il est interdit de les
jeter dans les ordures ménagères.
Les piles/accumulateurs qui contiennent des substances toxiques sont
caractérisées par les symboles ci-contre qui indiquent l’interdiction de les
jeter dans les ordures ménagères. Les désignations pour le métal lourd
prépondérant sont : Cd = cadmium, Hg = mercure, Pb = plomb (la
désignation se trouve sur les piles/accumulateurs, par ex. sous le symbole
de la poubelle illustré à gauche).
Vous pouvez rapporter gratuitement vos piles/accumulateurs usagées aux
centres de récupération de votre commune, à nos succursales ou à tous
les points de vente de piles/accumulateurs.
Vous respectez ainsi les ordonnances légales et contribuez à la protection de
l’environnement.
Caractéristiques techniques
Alimentation en énergie.....................4 x pile de 1,5 V/CC, type AA (non incluses)
Protocole de l‘heure ..........................DCF
Consommation de courant ................26 mA maxi (en fonctionnement)
75 μA (en veille)
Plage de mesure du thermomètre....-9,9 à +50 ºC
Conditions de service.........................-9,9 à +50 ºC, 20 – 90 % hum. rel.
Conditions de stockage......................-9,9 à +50 ºC, 30 – 90 % hum. rel.
Dimensions (L x H x P)........................212 x 240 x 26 mm
Poids......................................................480 g