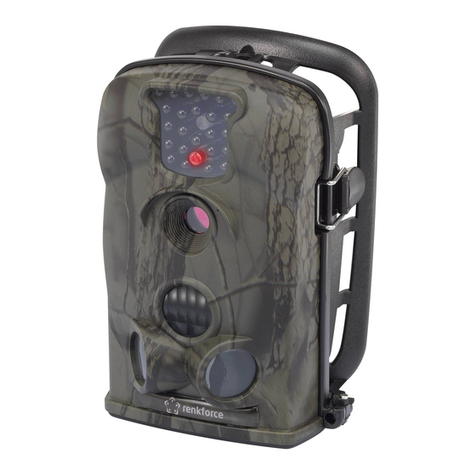
Renkforce 1298781 User manual

Bedienungsanleitung
Überwachungskamera mit DVR und TFT
Best.-Nr. 1298781 Seite 2 - 32
Operating Instructions
Surveillance Camera with DVR and TFT
Item No. 1298781 Page 33 - 63
Notice d’emploi
Caméradesurveillanceavecnumériscope
et écran TFT
N° de commande 1298781 Page 64 - 94
Gebruiksaanwijzing
Bewakingscamera met DVR en TFT
Bestelnr. 1298781 Pagina 95 - 125

33
Table of Contents
Page
1. Introduction ..........................................................................................................35
2. Explanation of Symbols ......................................................................................36
3. Intended Use ........................................................................................................36
4. Scope of Delivery ................................................................................................37
5. Safety Information...............................................................................................37
a) General Information.......................................................................................37
b) Mains Adapter................................................................................................38
c) Operation.........................................................................................................38
6. Rechargeable Battery Notes.............................................................................40
7. Operating Elements.............................................................................................41
8. Commissioning.....................................................................................................43
a) Inserting/Removing Memory Card ..............................................................43
b) Inserting the Rechargeable Battery ...........................................................44
c) Charging the Rechargeable Battery ...........................................................45
d) Switching On/O ............................................................................................45
e) Basic Functions of the Operating Buttons.................................................46
f) Pushing on/Turning/Taking o Clip..............................................................46
g) Resetting the Surveillance Camera ............................................................47
h) Sticker for Internal Memory Card Slot .......................................................47

34
Page
9. The Setup Menu ..................................................................................................48
a) Submenu for System Settings („System Setup“) .....................................48
b) Submenu for Time/Date Settings („Time Setup“) .....................................52
c) Submenu for Video Settings („Video Setup“)............................................53
d) Submenu for Photo Settings („Picture Setup“) ........................................55
e) Submenu for the Display of Photographs/Videos („Play Back“) ...........57
10. Recording a Video ...............................................................................................58
11. Recording a Photo...............................................................................................59
12. PC Connection......................................................................................................60
13. Maintenance and Cleaning................................................................................60
14. Disposal.................................................................................................................61
a) Product.............................................................................................................61
b) Batteries and Rechargeable Batteries.......................................................61
15. Technical Data .....................................................................................................62
a) Surveillance camera......................................................................................62
b) Rechargeable Battery ...................................................................................63
c) Mains Adapter................................................................................................63

35
1. Introduction
Dear Customer,
thank you for purchasing this product.
This product complies with the statutory national and European requirements.
Tomaintainthisstatusandto ensuresafe operation,youastheuser mustobserve
these operating instructions!
These operating instructions are part of this product. They contain
important notes on commissioning and handling. Also consider this if
you pass on the product to any third party.
Keep these operating instructions for future reference!
All company names and product names are trademarks of their respective
owners. All rights reserved.
If there are any technical questions, please contact:
International: www.conrad.com/contact
United Kingdom: www.conrad-electronic.co.uk/contact

36
2. Explanation of Symbols
The symbol with a lightning bolt in a triangle is used where there is a
health hazard, e.g. from electric shock.
An exclamation mark in a triangle indicates important notes in these
operating instructions that must be strictly observed.
The„arrow“symbolindicatesthatspecialadviceandnotesonoperation
are provided here.
3. Intended Use
The product contains a colour camera and a microphone, as well as a colour
TFT monitor. Videos/photographs can be recorded using microSD/microSDHC
memory cards (not enclosed) up to 32GByte.
The power supply takes place by a Li-Ion battery; the rechargeable battery is
charged by the enclosed plug-in mains unit.
Please note that you incur a penalty if you observe strangers with this product
without their knowing and consent. Observe the provisions and regulations of
the country in which you use this product.
The safety notes and all other information in these operating instructions always
have to be observed.
Anyotheruse thanthatdescribedabove isnotpermittedandwilldamagethe pro-
duct. Additionally, this is connected to dangers, such as short circuit, fire, etc.
This product complies with the statutory national and European requirements. All
company names and product names are trademarks of their respective owners.
All rights reserved.

37
4. Scope of Delivery
• Surveillancecamera
• Li-ionrechargeablebattery
• 2dierentbatterycompartmentlids(1xwithclip,1xwithoutclip)
• Mainsadapter
• USBcable
• Labelset
• Operatinginstructions
5. Safety Information
Theguarantee/warrantywillexpireifdamageisincurredresultingfrom
non-compliance with these operating instructions. We do not assume
any liability for consequential damage!
Nordoweassumeanyliabilityfordamagetopropertyorpersonalinjury
caused by improper use or failure to observe the safety information.
The warranty/guarantee will expire in such cases!
a) General Information
• Theunauthorisedconversionand/ormodicationoftheproductis
prohibited for safety and approval reasons (CE). Never dismantle the
product.
• Servicingorrepairmustonlybecarriedoutbyaspecialist.
• Donotleavepackagingmaterialunattended.Itmaybecomeadan-
gerous toy for children.

38
b) Mains Adapter
• ThemainsadapterisconstructedpursuanttoprotectionclassII.Only
a proper mains socket must be used as voltage source for the plug-in
mains adapter.
• Themainssockettowhichtheplug-inmainsunitisconnectedmust
be easily accessible.
• Useonlytheenclosedplug-inmainsunitforpowersupplyandto
charge the battery of the monitoring camera.
• Ifthemainsadapterisdamaged,donottouchit.Dangertolifefrom
electric shock!
First switch o the mains voltage for the mains socket to which the
plug-in mains unit is connected (switch o the circuit breaker or turn
out the fuse, then switch o the FI protection switch so that the mains
socket is separated from the mains voltage on all poles).
Then unplug the mains adapter from the mains socket. Dispose of
the damaged mains adapter in an environmentally compatible way.
Do not use it anymore. Replace it by a plug-in mains unit of the same
specifications.
c) Operation
• Theproductisnotatoy.Devicesthatareoperatedwithmainsvoltage
have no place in the hands of children. Therefore, be particularly
careful when children are present.
Operate the product in a way that it is out of reach of children.
• Theproductisonlysuitableforoperationindry,closedrooms.No
part of the product must get damp or wet; do not touch it with damp
or wet hands!
There is danger to life from electric shock due to the plug-in mains
unit!

39
• DonotuseanyforceforconnectionofUSBplugs.AUSBplugwill
only fit in the USB socket in one direction.
• Neverusetheproductimmediatelyafteritwastakenfromacoldinto
a warm environment. The condensation generated may destroy the
product. The mains adapter also involves the risk of a fatal electric
shock!
Let the product reach room temperature before connecting and using
it. This may take several hours.
• Thefollowingunfavourableconditionsaretobeavoidedattheplace
of installation and during transport:
- Dampness or too high humidity
- Cold or heat, direct solar radiation
- Dust or flammable gases, fumes or solvents
- Strong vibration, impact or blows
- Strong magnetic fields as present near machines or speakers

40
6. Rechargeable Battery Notes
• Keeptherechargeablebatteryoutofreachofchildren.
• Donotleavetherechargeablebatterylyingaroundopenly;thereisthedanger
of it being swallowed. If swallowed, consult a doctor immediately.
• Therechargeablebatterymustneverbeshort-circuited,disassembledorthrown
into fire. There is a danger of explosion!
• Neverdamagetherechargeablebattery,donotpuncturetherechargeable
battery with objects. There is a risk of fire and explosion!
• Therechargeablebatterymustnotgetdamporwet;thereisadangerofre!
• Protecttherechargeablebatteryfromstrongheatorcold.
• Leaking or damaged batteries/rechargeable batteries can cause chemical
burns to skin when touched without the use of adequate protective gloves.
• Liquidsleakingfromtherechargeablebatteryarechemicallyhighlyaggressive.
Objects or surfaces that come into contact with them may take severe damage.
Therefore, keep the rechargeable battery in a suitable location.
• Wheninsertingtherechargeablebatteryintothesurveillancecamera,ensure
itsproperpositioninthebatterycompartment.Thecontactsoftherechargeable
battery must correspond to the contacts in the battery compartment.
• Therechargeablebatterymustonlybechargedwhenitiscorrectlyinserted
into the surveillance camera.
• Chargetherechargeablebatteryevery2monthsatthelatest,evenifyoudonot
use the surveillance camera. Otherwise, there may be deep discharge, which
will damage the rechargeable battery; loss of guarantee/warranty!

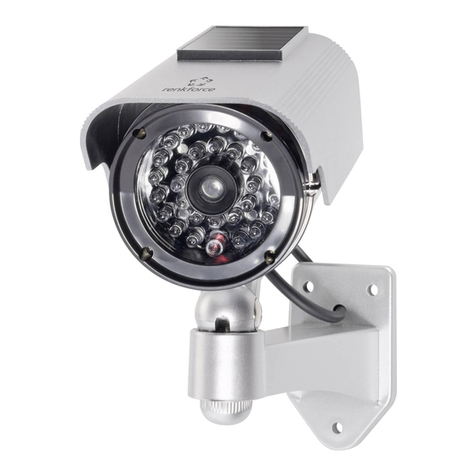
41
7. Operating Elements
1 Button „ “ for switching on/o
2 Turning attachment clip (removable)
3 Mini USB socket
4 External SD memory card slot
5 TFT colour monitor
6 Button „M“
7 Button „ “
8 Button „OK“
9 Button „ “
10 Button „ “
11 Indicator LED
12 Lens
13 Speakers
14 Internal memory card slot
15 Battery compartment
16 Reset button
1
2
3
4
5
6
789
10
11
12
13
14
15
16

42
Display:
A Symbol for video or photo mode
B Symbol appears during running video recording; the control LED (11) flas-
hes
C Symbol for battery condition
D Symbol for currently set video or photo resolution
E Symbol for inserted or missing memory card
F Current video recording duration
G Date and time
2 0 1 3 / 0 9 / 0 4 13 : 2 1 : 4 8
0 0 : 1 4
H D
A
B
C
D
E
F
G

43
8. Commissioning
a) Inserting/Removing Memory Card
The surveillance camera has two separate slots for one memory card each of
type microSD/microSDHC (max. 32 GByte).
In the setup menu, one can switch to which of the two memory cards a recording
is made on.
Internal memory card slot
• Toinsertamemorycardintheinternalslot(14),openthebatterycompartment
lid by pushing it down a little and then removing it.
• Carefullypushthemetalcoveroftheinternalslotalittletothelefttowards
„<OPEN“ (observe imprint in the metal cover).
• Thencarefullyfoldupthemetalcover.
• InsertamicroSDormicroSDHCmemorycardsothatthecontactsofthememory
card correspond to the contacts in the slot.
• Foldthemetalcoverbackdownandpushittotherighttowards„>LOCK“,so
that the metal cover is locked.
• Thenyoucaninserttherechargeablebatteryandclosethebatterycompartment
lid; see chapter 8. b).
To remove the memory card, proceed as described above.
External SD memory card slot
• Switchothesurveillancecamera(seechapter8.d).
• Opentherubbercoverabovetheexternalslot(4).
• PushamicroSDormicroSDHCmemorycardintotheslotinthecorrectorien-
tation until it latches audibly. The contacts of the memory card must point to
the back towards the TFT screen.

44
• Closetherubbercoveragain.
To remove a memory slot, first switch o the surveillance camera.
Open the rubber cover, push the memory card down into the slot a little
e.g. with a finger nail.
Then the latching mechanics release the memory card and will push it
a little out of the slot. The memory card can then be removed easily.
b) Inserting the Rechargeable Battery
• Pushthebatterycompartmentliddownalittleandtakeito.
• InserttheenclosedLiIonbatterysothattherechargeablebattery‘scontacts
correspond to the respective contacts in the battery compartment.
• Putonthebatterycompartmentlidagain.
The scope of delivery includes two dierent battery compartment lids.
• Batterycompartmentlidwithclip
• Batterycompartmentlidwithoutclip
Dependingonwherethesurveillancecameraistobeoperated/attached,
use one or the other battery compartment lid.

45
c) Charging the Rechargeable Battery
• OpentherubbercoverabovetheMini-USBsocket(3)andconnecttheenclosed
USB cable to the plug-in mains unit.
• Plugtheplug-inmainsunitintoapropermainssocket.
• Chargingthecompletelyatrechargeablebatterytakesupto6hours.
• ThendisconnecttheUSBcablefromthesurveillancecameraagainandclose
the rubber cover again.
• Unplugthemainsadapterfromthemainssocket.
Charge the rechargeable battery at the latest every 2 months, even
if you do not use the surveillance camera. Otherwise, there may be
deep discharge, which will damage the rechargeable battery; loss of
guarantee/warranty!

Thesurveillancecameracanalsobechargedviaacomputer‘sUSBport.
Observe that the USB port can provide a current of 500 mA. Therefore,
only connect the surveillance camera directly to a computer or a USB
hub with a dedicated mains unit.
Whenconnectingtoacomputer,theinsertedmemorycardisdisplayed
likea regularremovable mediumdrive.Thephotographsand videoscan
be played on the computer as well then; see chapter 12.
d) Switching On/O
• Toswitchon,keepthebutton„ “ (1) on the top pushed for 3 seconds. A sound
signal is issued and a welcome message appears on the TFT colour screen.
Thenthecamera‘sliveimageisdisplayed.
• Toswitcho,keepthebutton„ “ (1) on the top pushed for 3 seconds. A sound
signal is issued and the display on the screen goes out.

46
e) Basic Functions of the Operating Buttons
• Brieypushingthebutton„M“(6)switchesbetweenvideomode,photomode
and photo playback mode.
• Whenthesurveillancecameraison,youcanstartorendavideorecordingin
video mode by briefly pushing the button „OK“ (8) if a memory card has been
inserted.
In photo mode, the surveillance camera will record a picture by briefly pushing
the button „OK“ (8).
If the button „OK“ (8) is pushed for an extended period, the setup menu appears
in the display (only possible if no video recording is currently running).
• Thebuttons„ “ (7) and „ “ (9), for example permit changing functions or
settings in the setup menu or selection of a video or photograph in playback
mode.
• Thebutton„ “ (10) serves, e.g., to leave a function or setting in the setup
menu.
f) Pushing on/Turning/Taking o Clip
• Ifthesmallclipisenclosedseparately,pushitintotherespectiveslotatthe
rear of the surveillance camera.
• Theclipcanbeturnedby360°,sothatthesurveillancecameracanbeattached
very well in many locations.
• Iftheclipistoberemoved,turnitup.
Thenpushthesmallunlockingbutton(seehandsymbol
on the right) and pull out the clip.

47
g) Resetting the Surveillance Camera
If the surveillance camera does not react to the push of a button or if chaotic
characters appear in the display, briefly push the reset button (16) on the inside
of the battery compartment.
Alternatively, you can also take out the battery for a few seconds and then
insert it again.
h) Label for Internal Memory Card Slot
The enclosed labels can be used to cover the internal memory card slot and to
„hide“ it or to make it more dicult to remove the memory card.

48
9. The Setup Menu
To call the setup menu, the surveillance camera must be on and no video recor-
ding must be running.
Then push the button „OK“ (8) until the 5 icons of the setup
menu appear.
The buttons „ “ (7) and „ “ (9) call the respective
submenu.
Confirm your selection by briefly pushing the button „OK“ (8).
The button „ “ (10) leaves a submenu, function or the setup menu
again without changes (cancel).
a) Submenu for System Settings („System Setup“)
After you have called the submenu for the system setup and confirmed with the
button „OK“ (8), you can select the respective function with the buttons „ “
(7) and „ “ (9). Then push the „OK“ (8) button.
The following functions are available:
Selecting the language („Language“)
• Selectthedesiredmenulanguagewiththebuttons„ “ (7) and „ “ (9).
• Pressthe„OK“button(8)toconrm.

49
Switching the password function on/o, changing the password („Password“)
• Usethebuttons„ “ (7) and „ “ (9) to select if the password function is
to be switched o or on.
When the password function is on, a 4-digit code (can be chosen
freely between 0000 and 9999) must be entered when calling the setup
menu.
• If you want to use a password, you can choose it between „0000“ and
„9999“.
Use the buttons „ “ (7) and „ “ (9) to programme a number from „0“ to
„9“; the button „OK“ (8) moves the input position by one digit.
Whenall4digitshavebeenprogrammed(e.g.withthepassword„1234“),
push the button „OK“ 8) again for confirmation.
If the password is entered incorrectly 3x, the surveillance camera locks
access to the setup menu for one day.
Selecting internal/external memory card slot („Data Storage“)
• Usethebuttons„ “ (7) and „ “ (9) to choose between the internal and
the external memory card slot.
• Pressthe„OK“button(8)toconrm.

50
Activating motion sensor („G-Sensor“)
• Usethebuttons„ “ (7) and „ “ (9) to switch the motion sensor on or
o.
• Pressthe„OK“button(8)toconrm.
Withthemotionsensoron,thesurveillancecameraissuesasound
signal when the surveillance camera is moved (during video recording,
only 1x per video, depending on the set video length).
The video is also protected from being overwritten (a lock icon appears
at the upper left).
Automatic deactivation of the TFT-monitor („Auto LCD O“)
• SelectwhentheTFTmonitorswitchesitselfoifnobuttonispushedtosave
power with the buttons „ “ (7) and „ “ (9).
This function can either be switched o, or set to a time of 30 seconds, 1 minute
or 3 minutes.
• Pressthe„OK“button(8)toconrm.
Format memory card („Format“)
• Usethebuttons„ “ (7) and „ “ (9) to select if the currently active memory
card (in the internal or external memory card slot) is to be formatted or not.
Whenformatting,alldatasavedonthememorycardarelost.
If you have inserted a memory card in both memory card slots, we
recommend checking which memory card slot is currently active first.
Alternatively, remove the memory card from the surveillance camera
that you do not want to format. This prevents accidentally formatting
the wrong memory card.
• Pressthe„OK“button(8)toconrm.

51
Switching the sound signal at pushing of a button on/o („Beep“)
• Usethebuttons„ “ (7) and „ “ (9) to select if the surveillance camera is
to issue a brief sound signal at each push of a button or not.
• Pressthe„OK“button(8)toconrm.
Resetting to factory settings („Restore Default“)
• Usethebuttons„ “ (7) and „ “ (9) to select if the surveillance camera is
to be reset to factory settings or not.
• Pressthe„OK“button(8)toconrm.
Display firmware version number („Version“)
• Aftercallingthefunction,thermwareversionnumberofthesurveillance
camera is displayed.
• Pushthebutton„OK“(8),toreturntothefunctionselection.
Table of contents
Other Renkforce Security Camera manuals

Renkforce
Renkforce 80 85 82 User manual

Renkforce
Renkforce 1217435 User manual

Renkforce
Renkforce 754219 User manual

Renkforce
Renkforce 454422 User manual

Renkforce
Renkforce 81 83 59 User manual

Renkforce
Renkforce 1381002 User manual

Renkforce
Renkforce SB 505 User manual

Renkforce
Renkforce RF-1218354 User manual

Renkforce
Renkforce 1227480 User manual

Renkforce
Renkforce 1007598 User manual