Renogy RMS-LFPS-US User manual

Version 1.2
FOR SMART LITHIUM BATTERY SERIES
MONITORING
SCREEN

Disclaimer
The manufacturer accepts no liability for any damage caused by:
This manual contains important installation and operation
instructions for the Renogy monitoring screen. Please review
and observe these instructions and keep them located near the
monitoring screen for further reference. The following symbols
are used throughout the manual to indicate potentially dangerous
conditions or important safety information.
Force majeure including fire, typhoon, flood, earthquake, war,
and terrorism.
Intentional or accidental misuse, abuse, neglect or improper
maintenance, and use under abnormal conditions.
Improper installation, improper operation, and malfunction of
a peripheral device.
Contamination with hazardous substances, diseases, vermin,
or radiation.
Alterations to the product without express written consent
from the manufacturer.
Important Safety Instructions
Please save these instructions.
Indicates a potentially dangerous condition. Use
extreme caution when performing this task.
Indicates a critical procedure for the safe and proper
installation and operation of the monitoring screen.
Indicates a procedure or function that is important
to the safe and proper installation and operation
of the monitoring screen.

General Safety Information
DO NOT touch the exposed electrolyte or powder if the
battery casing is damaged.
Uncovered electrolyte or powder that has contacted skin or
eyes MUST be flushed out with plenty of clean water
immediately. Seek medical attention afterwards.
Please make sure any battery charger or charge controller
has been disconnected before working on the battery.
DO NOT connect or disconnect terminals from the battery
without first disconnecting loads.
DO NOT wear jewelry or other metal objects when working
on or around the battery.
DO NOT place tools on top of the battery.
Please keep the battery out of the reach of young children.
Please wear proper protective equipment when working on
the battery.
Please use insulated tools when working on battery.
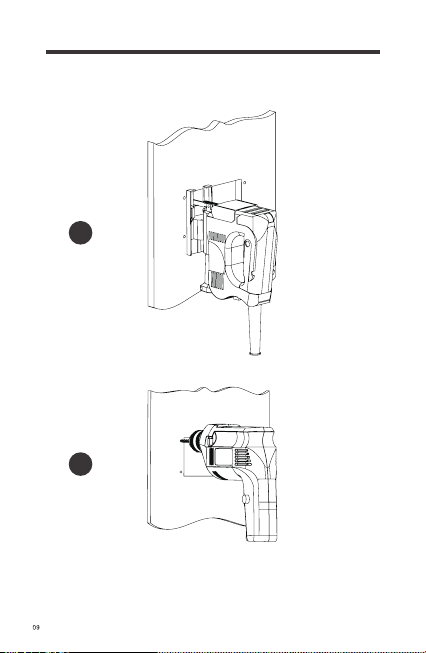
The monitoring screen is designed for indoor and compart-
ment installation. DO NOT expose it to direct sunlight, rain,
snow, moisture, or liquids of any type.
DO NOT puncture, drop, crush, burn, penetrate, shake, or
strike the monitoring screen.
DO NOT open, dismantle, or modify the monitoring screen.
The monitoring screen is only compatible with Renogy Smart
Lithium Iron Phosphate Batteries. DO NOT attempt to connect
the monitoring screen to other batteries or systems.

Table of Contents
General Information
Key Features
Product Overview
Identification of Parts
Dimensions
Additional Components
Installation
Preparation
Choosing an Installation Location
Mounting the Monitoring Screen
Connecting to the Battery
Operation
LCD Information
Button Operation
Troubleshooting
Technical Specifications
04
04
05
05
05
06
06
06
07
07
11
13
13
17
18
20

General Information
The Renogy Monitoring Screen for Smart Lithium Battery Series
is a high precision meter designed for Smart Lithium Iron
Phosphate Batteries in off-grid energy storage systems. Instead
of measuring the current flowing in/out of the battery bank, it
can communicate directly with the battery management system
(BMS) and obtain more accurate state of charge (SoC)
readings compared to traditional battery monitors. Other battery
bank information including voltage, current, capacity, remaining
time, error code, and number of paralleled batteries are also
available on the monitoring screen to help users avoid
abnormal conditions and extend the lifetime of battery bank.
Key Features
Plug and Play
Simply connect the monitoring screen to the battery bank using
an RJ45 communication cable for real-time monitoring.
Accurate Readings
Obtains battery bank status directly from the battery
management system for precise tracking and prediction.
Comprehensive Protection
Displays straightforward error codes for the quick recognition of
potential abnormal conditions and improper operation.
Easy Operation
Shows detailed battery bank information at the push of a button
without the need of system configuration and calibration.

Product Overview
Identification of Parts
② ③ ④ ⑤① ⑧ ⑦
⑥
LCD Screen
Page Down Button
Page Up Button
Power Button
①
②
③
④
Front Cover Plate
RJ45 Communication Port
Mounting Hole
Snap-Fit Joint
⑤
⑥
⑦
⑧
4.3in
110.0mm
2.8in
70.0mm
1.3in
31.8mm
2.3in
58.5mm
Dimensions

3.4in
87.5mm
Additional Components
RJ45 Communication Cable
The RJ45 Communication Cable
(5m / 16.4 ft) is used to connect
the monitoring screen to the
battery bank for power supply
and data transmission.
Self-Tapping Screws (4)
The Self-tapping Screws (M2.9
x 13) are used fix the monitoring
screen on the mounting surface.
Installation
Preparation
Before installing the monitoring screen, it is recommended to
have the following tools available:
Pencil
Drill
Jigsaw
Phillips Screwdriver

Choosing an Installation Location
Please choose a clean, dry, protected, and easily accessible
indoor location to install the monitoring screen. It is recommend-
ed to mount the monitoring screen at eye level for easy access
of operational controls and battery information. The RJ45
Communication Port is accessible from the back of the
monitoring screen. Clearance of at least 2 inch (50 mm) behind
the monitoring screen is recommended to allow for the bending
radius of the RJ45 Communication Cable that connects to the
monitoring screen.
Mounting the Monitoring Screen
1.
2.
3.
4.
5.
6.
7.
Remove the snap-fit Front Cover Plate from the monitoring
screen.
Use the monitoring screen as a template to mark the screw
holes and trace a cut-out area on the mounting surface with
a pencil.
Cut out a rectangular area for the monitoring screen on the
mounting surface with a jigsaw.
Pre-drill four screw holes on the mounting surface with a drill.
Place the monitoring screen into the cut-out area and align
the Mounting Holes on the monitoring screen with the
pre-drilled screw holes.
Affix the monitoring screen on the mounting surface with the
included four Self-Tapping Screws.
Re-attach the snap-fit Front Cover Plate to the monitoring
screen.

1
2

3
4

5
6

7
Connecting to the Battery
Please connect the monitoring screen to the RS485 UP
Communication Port of the battery using the included RJ45
Communication Cable to obtain detailed battery information
from the battery management system.
RJ45 Communication Port
RJ45 Communication
Cable
RS485 UP
Communication Port

If the monitoring screen is used with a parallel battery bank, the
communication between paralleled batteries must be enabled.
Please connect the RS485 LINK Communication Ports of the
former batteries to the RS485 UP Communication Ports of the
latter ones using CAT5 (or above) Ethernet straight through cables
(not included). The monitoring screen should be connected to the
RS485 UP Communication Port of the first battery.
RJ45
Communication
Cable
Ethernet Straight
Trough Cable
Copper Cable
DO NOT string batteries in series. Doing so can cause
catastrophic failure.
DO NOT string batteries with different chemistries, brands,
models, rated capacities, or nominal voltages in parallel.
RS485 LINK
Communication Port
RS485 UP
Communication Port

Please avoid too high a voltage difference between paralleled
batteries, despite the auto-balancing function, to avoid
triggering the over-current protection.
In parallel battery banks, the copper cables between each
battery should be of equal length to ensure that all batteries
in the system can work equally together.
It is not recommended to connect too many batteries in
parallel if taking advantages of the auto-balancing function.
Please leave the battery in shelf mode during installation. DO
NOT switch the battery to active mode until making sure that
all the connections are correct and secure. Connecting active
batteries to the system may trigger the short circuit protection
of the battery.
Operation
LCD Information
Overview
Present Voltage (V)

The present voltage indicates the real-time terminal voltage
of the battery. If the monitoring screen is used with a battery
bank, the present voltage will be the average terminal voltage
of the batteries in the battery bank.
Present Current (A)
The present current indicates the real-time current flowing
through the battery or the battery bank. If the charge current
is higher than the discharge current, the present current will
be a positive value. If the discharge current is higher than the
charge current, the present current will be a negative value.
The capacity indicates the maximum capacity that the battery
or the battery bank can deliver under the standard discharge
condition when fully charged. The capacity will diminish
gradually with the cycling of the battery or the battery bank.
Capacity (Ah)
The state of charge indicates the real-time charge level of the
battery relative to its capacity. If the monitoring screen is used
with a battery bank, the state of charge will be the average
charge level of the batteries in the battery bank.
State of Charge (%)

Number of Paralleled Batteries
The number of paralleled batteries indicates the number of
batteries connected in parallel in hexadecimal. If the battery
is used individually, the number of paralleled batteries will be
‘1’. If the communication of one or more batteries in the
battery bank is accidentally disconnected or the monitoring
screen fails to obtain the information of all batteries after the
battery bank is recovered from the over-discharge protection,
the battery icon next to the number of paralleled batteries will
flash. Please check the communication connections and l
ong
press the Page Up Button and Page Down Button at the
same time for 3 seconds to reset the monitoring screen.
Self-Heating Function Status
The self-heating function status indicates the operation status
of the self-heating function. If the self-heating function is not
available or not operating, the self-heating function status will
be ‘0’. If the self-heating function is available and operating,
the self-heating function status will be ‘H’.
Remaining Time (Hour)
The remaining time indicates the time remaining before the
battery or the battery bank will require a recharge based on
the current discharge rate. If the battery is being charged, the
remaining time will not display. If the battery under-voltage
warning is triggered during discharge, the remaining time will
be ‘0.0H’.

Battery Level
The battery level indicates the real-time charge level of the
battery relative to its capacity using four battery segments. If
the battery is being charged, the battery segments will
illuminate one by one repeatedly until the battery is fully
charged. If the monitoring screen is used with a battery bank,
the battery level will be the average charge level of the
batteries in the battery bank.
Error Code
The error code indicates the warnings and protections for the
abnormal conditions of the battery or the battery bank. If the
battery or the battery bank operates normally, the error code
will not display. If the battery or the battery bank triggers
multiple warnings and/or protections, the monitoring screen
will scroll display the corresponding error codes. See the
following table for error code interpretation. Please refer to
the online version user manual of the battery for the triggering
and recovery condition of each warning and protection.
Error Code Battery Operation Status
01 Battery High Temperature Warning
(Charge / Discharge)
02 Battery Low Temperature Warning
(Charge)
03 Battery Low Temperature Warning
(Discharge)

Error Code Battery Operation Status
04 Battery Over-Voltage Protection /
Battery Cell Over-Voltage Protection
05 Battery Under-Voltage Warning
06 Charge Over-Current Warning
07 Discharge Over-Current Warning
08 Battery High Temperature Protection
(Charge)
09 Battery Low Temperature Protection
(Charge)
The communication between paralleled batteries MUST be
enabled using CAT5 (or above) Ethernet straight through
cables before connecting the battery bank to the monitoring
screen to obtain the accurate battery bank information.
If the number of paralleled batteries increases after connecting
the battery bank to the monitoring screen, please long press
the Page Up Button and the Page Down Button on the
monitoring screen at the same time for 3 seconds to reset the
monitoring screen and refresh the battery bank information.
The monitoring screen is ONLY able to obtain the information
of battery bank with no more than 900Ah rated capacity.
Button Operation
After connecting the monitoring screen to the battery or the
battery bank, please long press the Power Button on the monitor-

ing for 1 second to switch the battery or the battery bank to
active mode. The backlight will be lit and the LCD Screen will
display the present voltage. If no operation is made within 25
seconds, the backlight will go out and the LCD Screen will scroll
through the present voltage, present current, capacity, and
state of charge.
To display a specific parameter, please press the Page Up
Button or the Page Down Button repeatedly until the desired
parameter shows up. The backlight will be lit once the Page Up
Button or the Page Down Button is pressed. If no operation is
made within 15 seconds, the backlight will go out again and the
LCD Screen will continue scrolling through the present voltage,
present current, capacity, and state of charge.
Prior to long periods of storage, please disconnect the battery
from the system and long press the Power Button for 3 seconds
to switch the battery or the battery bank to shelf mode. In shelf
mode, the battery has a low self-discharge rate and can hold
the charge for a longer period of time.
Troubleshooting
If any problems occur during the operation of the monitoring
screen, please refer to the following instructions or contact
Renogy for assistance:
If the monitoring screen does not operate after connecting to
the battery or the battery bank, please check monitoring
screen side and battery side connections. If all the connections
are solid, please check if the battery or the battery bank has
been switched to active mode. If the battery or the battery
bank cannot be switched to active mode using the monitoring
screen, it may have entered protection mode and will need
special attention. Please refer to the online version user
manual of the battery for troubleshooting instructions.

If the battery information displayed on the monitoring screen
is not accurate, please long press the Page Up Button and
Page Down Button at the same time for 3 seconds to reset
the monitoring screen and refresh the battery information.
If the monitoring screen resets frequently or does not display
battery information, please reactivate the battery or the
battery bank using the Power Button on the monitoring
screen.
If the battery or the battery bank is charged immediately after
high current discharge, especially when the state of charge is
greater than 90%, or discharged immediately after high
current charge, especially when the state of charge is less
than 10%, the monitoring screen may take a while to calibrate
the state of charge.
Table of contents
Popular Projection Screen manuals by other brands

Screen Excellence
Screen Excellence RM2-T installation instructions

Nierbo
Nierbo E46399F9FF instructions

ADEO SCREEN
ADEO SCREEN PROFESSIONAL PSCHP0001 user manual

Fraser
Fraser MagnaTrack Care and maintenance

Draper
Draper Premier PRE-28 installation instructions

Draper
Draper Luma 2 Installation & operation

Draper
Draper Targa Installation & operating instructions

Draper
Draper Paragon V Series Installation & operating instructions

Draper
Draper Access MultiView Installation & operating instructions

Elite Screens
Elite Screens Evanesce Tension B Series user guide

Siemens
Siemens SIMATIC HMI Product information

Elite Screens
Elite Screens Aeon CLR 3 Series user guide