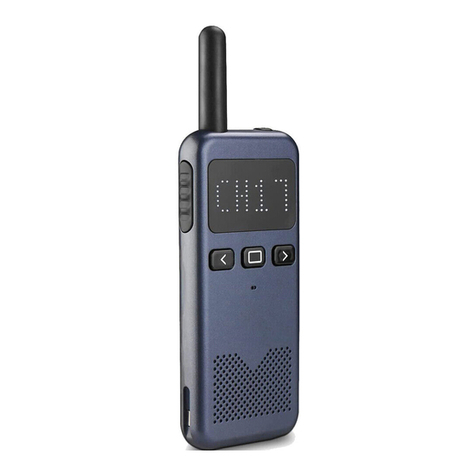
Retevis RB20 User manual

RB20
Network Two Way Radio
USER'S MANUAL

Open the box and check the device ...................................................................................................................
Preparation work ......................................................................................................................................................
Installing And Uninstalling Of the Accessories .....................................................................................................
Getting to know the radio ...............................................................................................................................................
Introduction .........................................................................................................................................................................
Basic use ..............................................................................................................................................................................
Menu Instruction ................................................................................................................................................................
Simple troubleshooting ...................................................................................................................................................
Software Instruction .........................................................................................................................................................
Platform Instruction ..........................................................................................................................................................
Smart PTT dispatch Management Platform .............................................................................................................
Specification .......................................................................................................................................................................
Warnings ...............................................................................................................................................................................
CONTENTS
1
1
1
3
4
4
5
5
6
7
11
16
17
FR(22-42)
DE(43-63)
IT(64-83)
ES(84-104)
EU Importer: Germany Retevis Technology GmbH
Address: Uetzenacker 29,38176 wendeburg
For downloading further resources:
Brochures, Software/Firmware, Manual etc, Pls contact your direct reseller first
OR go to website retevis.com and check “support” in the each product link to
download it.

Open the box and check the device
Please remove the radio carefully from the box. We suggest you check the accessories thoroughly
according to our list before discarding the packaging. If any part is missing or damaged when you
receive it, please contact us.
Supplied Accessories
Preparation work
Warning:
If the battery charge is not completed in normal time, please stop charging. The battery may flame, smoke or
crack due to an abnormal charging process.
The battery may flame, smoke or crack.
If the battery is broken or has an abnormal odour, please remove the battery from the radio and keep it away
from any flammable environments. The battery fluid is extremely flammable.
If the battery is abnormal in odour, colour, shape or in any other form, please remove it from the charger or
radio and do not use.
The charger and adaptor has been designed to be used exclusively with the Radio.
It ensures safety and reliability when charging the battery.
Installing And Uninstalling Of the Accessories
Installing the Lithium battery
Charge before use.
To reduce electrical emission in the battery, please remove the battery from the radio when not in
use and store the battery in a cool dry place. When storing the battery for long periods of time:
Remove battery from the radio. If possible, fully charge the battery before storage.
1
Radio body Antenna battery
USB Cable Belt clip and Screw
1
1
1
1
1
2
2
2
2
2
3
3
4
4
4
4
4
4
4
4
5
5
5
5
5
5
5
5
5
6
6
7
7
7
8
9
9
10
11
11
13
14
16
17

Attributes of Lithium battery
After repeated charging process, the battery capacity will
decrease.
The battery degenerates gradually even without being
used.
More time is required if charging the battery in cool
conditions.
Charging and storage of the battery in relatively warm
conditions will jeopardize its service life.
Please do not store the radio inside a vehicle or near
heating equipment.
If the duration of the battery shortens significantly, please
replace the battery immediately to prevent any fluid leaks.
Charging the Lithium battery
After the AC adaptor is connected and the battery is
placed in the charger, the indicator will show red which
means the battery is charging. The green light will
indicate the battery is fully charged.
The light will turn off if the temperature is too high or low,
the battery is damaged, the charger is damaged or the
connection is poor.
Installing antenna
Hold the radio and antenna, turn the antenna
clockwise until it is tightened.
Installing belt clip
If required, screw the belt clip onto the back of the radios
using the two screw holes shown on the image below.
Installing SIM card
Please insert effective SIMcard before use, make
sure the SIM card can be effective in 4G/3G radio.
Long press volume button to switch off the radio.
Remove the battery by pulling down the latch, then
pushing the battery backwards along the guides.
Lift SIM socket cover, place SIM card in the socket
in the correct position.
Replace the battery.
2

Installing headset
Open the cover on the side of the radio to show the headset sockets. Your headset will work immediately after
being plugged in.
Getting to know the radio
Antenna
Indicator light
Red for emission, Green for
reception, flashing Green for
no signal
Power ON/OFF switch,
Volume UP/DOWN
Menu keypad
Right Keypad
MIC
Speaker
1.77 inch diaplsy
Left Keypad
3

Side key one
long press for Group
Select
PTT Push to talk
press the button then
speak to the mic
Side key two
short press for Member
Select, long press to
active SOS function
Belt Clip
MIC/SP
MIC/SP Sock, plug in
speaker/ Microphone
Battery
Introduction
Volume selector/ON/OFF switch Long press volume button to switch ON/OFF the radio.
Clockwise for volume UP, counter clockwise for volume DOWN.
Push To Talk (PTT) button
When the device is standing by (Green light will flashing slowly), press PTT button to initiate a call (red light will go
on) During the call, the green light will go on toshow successful reception. If not in reception, hold PTT to apply for
turn totalk (red light will go on) Release the PTTto end call and go back to standing by.
Indicator light status
The green light goes on after the device is switched on. The green light flashes fast to indicate network
searching. Instandby mode, the green light flashes every five seconds. The green light remains on for reception,
and the red light remains on for transmission.
Basic use
Switch ON
Long press volume button to switch ON the radio, there will then be a voice prompt. After the radio is successfully
switched on, the green light goes on first then flashes to indicate network searching. After the network is
connected, there will be a voice prompt.
Switch OFF
Long press volume button to switch OFF the radio, the light will turn off.
Note: Do not frequently switch between ON and OFF, it may affect the switch function.
Volume adjustment
Revolve clockwise for volume UP and counter clockwise for volume DOWN.
4

Headset
Plug in headset, press the PTT button on headset (if there is one) to initiate a call, release the button to end the
call.
Group/Member selection
Enter Menu and choose Group select/Member select, click right keypad to choose group/member you want to
connect with, press Menu keypad toconfirm and radio will come with a voice prompt.
Menu Instruction
When insert SIM and set the correct setting on the Platform:
turn on the radio, it will login in the platform automatically, with the voice: welcome to use 4G IP radio, if the
account is added in the platform successfully, the radio will have the Voice with the Group and User’s name.
Select the Group call
There are 2 methods to start the group call:
1. Long press side key one to enter group select on homepage.
2. Press Menu key to enter the menu-group select, use or to choose the desired group.
Select the single call
There are 2 method to start the single call:
1. Short press side key two, to enter the member menu, if there are members online, you can choose the
desired one, please add members into your current group first if the group member list is empty.
2. Using the Menu key to enter the menu and press right keypad button to enter the member list, confirm to
choose the desired member, if there is member online.Press the PTT key to start the single call, press back
key to exit.
Select the friend
1. Add friend: login management paltform and edit account to add paltform friend.
2. Choose friend, enter Menu-Friend Select and then choose the friend you want toselect. Press PTTtostart single
call and back to exit.
GPS
Checking GPS information: enter the menu, use key to GPS menu, confirm to check the latitude,
longitude and satellite.
Note: GPS only working outside, if it is succeed open, the GPS icon will be white.
Setting
PTT Sound
OFF: When press PTT or release PTT, it will not have PTT sound
ON: when press PTT or release PTT, it will have PTT sound
OFF 2: Backlight: to choose 15s 20s 30s on
About: Version detail
Network: Auto: Suggested to choose this one.
4G mode
3G mode: if the 4G signal is not stable, please change to 3G.
2G mode: For the B5 test only.
Version: POC version: Updated
MCU version: updated
Factory: PASSWORD: checking with your local dealer
Simple troubleshooting
If your radio shows and of the following problems, please check the instructions below and if the problem still
persists then contact us.
Poor reception: Possible reasons are signal in your current location is weak or the line is busy. If this happens,
please move somewhere with improved signal or wait a while before attempting again.
Echo or noise: A possible reason is that the quality of the network provider is flawed. Please restart the radio, this
will let it automatically search for an available network with better quality.
5
Less battery duration: Possible reasons are using and charging the battery in high temperature conditions or
searching for a network constantly in a weak network area. If you are in an area with a weak signal, please
temporarily switch OFF the radio.
Unable toconnect to a network: Possible reasons are that the SIM card is not effective, poor signal or being
out of the network service area. Please try either replacing the SIM card or move to a position that is more open,
i.e. if you are in a building, move nearer the window.
Software Instruction
Platform Instruction
Smart PTT dispatch Management Platform
User’s Manual
Software Instruction
IP address
American: 47.254.88.91 / Singapore: 47.74.211.230
1. Create account in programming software
(1) Press the side key 1 then turn on the radio, you will find the screen:
(2) Choose the port:
COM write chip
NAME:4027EE8
HOST:114.141.132.4
STATE:
(3) After finished set up, press write. Then you can see the radio name in the radio’s screen.
6

Platform Instruction
4G LTE smart PTT management platform
Click: Platform website. Using the account and password to enter in, you will find the interface as below:
I: For second level admin, which can not add the device, can only creat the third admin or deal with the order
issue.
II: for third level admin
1. Add the admin, and set the Terminal Number
7

1.1 for third level admin, add the group first, as below
2. Add the device
Note: Only third level admin can add the device, please kindly contact your upper admin for the Account. There
are two method to add the device: add one by one and add in bulk. Add the device one by one:
2.1 Add the device in bulk
Lowest
8

3. Add the order
When the account number is not enough:
If the account quantity not enough support your radios quantity. You can add order then ask your upper level
administrator to assign the account.Click “Order management”, then click “Add order”
4. Main group and Sub - group
4.1 Nested groups definitions
Every group can be merged into a new group; it can also be merged into a new group separately; or be
combined with other subgroups. However, new groups that are combined by sub-groups cannot be merged.
The new group that merged by subgroups has all members of the subgroup.
Return the surplus account
When the quantity for account has exceed the radios, you can return the accounts to the upper level
administrator.
9

5. Renew the account
When your account want to expand the valid time, you need renew the validity period by this order.
After that, click “Save”, and you will find this order in the “Order list”When the order type is “Return the surplus
account, the previous administrator will approve this order automatic, so that the “order states” will shows
“Admin approved” , this order is deal with.
When the order type is “ Add account or renew the account” , you need wait the previous administrator to
10

1.6 File data
You can change the password in this interface.
Notice: when you want to delete the device in the device list, you need, you need to ask the
first-level administrator to delete.
Smart PTT dispatch Management Platform
Note: If the Dispatch management platform has registered, The radio will off-line, The same to the radio on and
dispatch management off. we suggested that the Dispatch management account is different with PTT platform.
1. In the software, turn on the GPS function
11

1.3 Set the IP address and GOOGLE/Baidu Map, and login in.
1.1 The dispatcher should selects the function for “Check Location” in the platform, so that the dispatcher can get
the other radios GPS information.
1.2 The radio should selects the function for “Location” in the platform, and the radio should be outdoors to get
the location. Also the programming software should be open the GPS
12

2. Menu in the Dispatch management platform
2.1Group list
Group list is in the left of the Dispatch platform, which can show the group available and the member, click the
group can show all the member and statue. Right click, can start the Private call/Get location/Get track.
Note: The “P” means that the radio is in this group. When the radio is in the group same as dispatcher, it can
receive a group call from dispatcher and transmit a group call to dispatcher.
Notice: the dispatcher will login the default group, if you want to login other group, you need modify the default
group.
2.2 Temporary Group call
This is in the right side of the Menu, which can show the all users which the dispatcher choose, can start the
temporary call.
13

2.3 Group call
To start the group call In the group call, choose the
desired group and click twice to enter the group.
Long press the to start the group call
After you choose the private call, Press “PttDown” and
you can transmit the radio, and release
the “PttDown” to wait for replying. The radio can press
“PTT”to reply.
Notice: the continuous transmission maximum time is
50S, when you over 50S, it will exits transmit
automatic.
To start the Temporary call
In the Group list, choose the desired member, right
click the member, choose the Private call.
Click to cancel temporary group call If it is no one
start talking within 10s, The temporary will exit
automatically.
2.4 To start the private call
Private call, when the dispatcher choose this function, it can transmit anyone in private call.
Operation:
click one radio you want to speak to, then right click, you can find three options: Private call/Get location/Get
track
14

2.5 Location in the MAP
Function Instruction
Terminal Box selected, use the Rectangular
Box or round box to choose the desired area
Track replay
Terminal Location
Map Zoom-in
Map Zoom-out
△
+
-
△
Note: The GPS function only wo rk outside, in the common case, it will open within 1 minutes,
he weather will affected.
If the GPS is succeed get the location, the GPS icon will be black, if not it will be red Icon.
2.6 Get track:
you can check the radio’s activity trajectory within a period of time.
Operation:
1) Click one radio you want to speak to, then right click, you can find three options: Private call/Get location/Get
track
2) After you choose the get location, you can see the radio’s trajectory on the map. You can also click the to
get track
3. Interval: 5/10/20/50S
It means the radio will uploads the GPS information in the chosen time.
4. The activity trajectory records will be saved one month, and every time you can track the activity trajectory
within 24 hours, for example, when the start time is 2018-7-18 14: 56: 45, the end time should be within
2018-07-18 14: 56: 46 to 2018-07-19 14: 56: 44
15

System Specification
Operating System
Language
Antenna
Display size
CPU
Battery capacity
Rx Sensibility:
Max Tx Power
Working Temperature
Storage Temperature
Audio output power
Linux
English
All networks external antenna, GPS antenna built-in
1.77Inch SPI color screen, resolution: 128*160
Quectel
4000mAh
-106dbm
23dBm-25dBm@all up bits
-20---+60°C
-20---+60°C
2W@10% distortion
LTE FDD B1
LTE FDD B3
LTE FDD B7
LTE FDD B8
LTE FDD B20
LTE FDD B28
LTE TDD B38
LTE TDD B40
LTE TDD B41
WCDMA B1
WCDMA 88
GSM
TX:1920-1980MHz
TX:1710-1785MHz
TX:2500-2570MHz
TX:880-915MHz
TX:832-862MHz
TX:703-748MHz
TX:2570-2620MHz
TX:2300-2400MHz
TX:2555-2655MHz
TX:1920-1980MHz
TX:880-915MHz
900MHz
RX:2110-2170MHz
RX:1805-1880MHz
RX:2620-2690MHz
RX:925-960MHz
RX:791-821MHz
RX:758-803MHz
RX:2570-2620MHz
RX:2300-2400MHz
RX:2555-26555MHz
RX:2110-2170MHz
RX:925-960MHz
1800MHz
European version
16

American version
LTE TDD B2
LTE TDD B4
LTE TDD B5
LTE TDD B12
LTE TDD B13
LTE TDD B14
LTE TDD B66
LTE TDD B71
WCDMA 82
WCDMA B4
WCDMA 85
TX:1850-1910MHz
TX:1710-1755MHz
TX:824-849MHz
TX:699-7160MHz
TX:777-787MHz
TX:788-798MHz
TX:1710-1780MHz
TX:663-698MHz
TX:1850-1910MHz
TX:1710-1755MHz
TX:824-849MHz
RX:1930-1990MHz
RX:2110-2155MHz
RX:869-894MHz
RX:729-746MHz
RX:746-756MHz
RX:758-768MHz
RX:2100-2200MHz
RX:617-652MHz
RX:1930-1990MHz
RX:2110-2155MHz
RX:869-894MHz
RF ENERGY EXPOSURE AND PRODUCT SAFETYGUIDE FORPORTABLE TWO-WAY
RADIOS
Before using this radio, read this guide which contains important operating instructions for
safe usage and RF energy awareness and control for compliance with applicable
standards and regulations
ATTENTION!
This two-way radio uses electromagnetic energy in the radio frequency (RF) spectrum to provide communications
between two or more users over a distance. RF energy, which when used improperly, can cause biological damage.
All Retevis two-way radios are designed, manufactured, and tested to ensure they meet government-established
RF exposure levels. In addition, manufacturers also recommend specific operating instructions to users of two-way
radios. These instructions are important because they inform users about RF energy exposure and provide simple
procedures on how to control it.
Please refer tothe following websites for more information on what RF energy exposure is and how tocontrol your
exposure to assure compliance with established RF exposure limits:http://www.who.int/en/
Local Government Regulations
When two-way radios are used as aconsequence of employment, the Local Government Regulations requires
users to be fully aware of and able to control their exposure to meet occupational requirements. Exposure
awareness can be facilitated by the use of a product label directing users tospecific user awareness information.
Your Retevis two-way radio has a RF Exposure Product Label. Also, your Retevis user manual, or separate safety
booklet includes information and operating instructions required tocontrol your RF exposure and tosatisfy
compliance requirements.
Radio License
Governments keep the radios in classification, business two-way radios operate on radio frequencies that are
regulated by the local radio management departments (FCC, ISED, OFCOM, ANFR, BFTK, Bundesnetzagentur...).-
To transmit on these frequencies, you are required to have a license issued by them. The detailed classification and
the use of your two radios, please contact the local government radio management departments.
Use of this radio outside the country where it was intended to be distributed is subject to government regulations
and may be prohibited.
Unauthorized modification and adjustment
Changes or modifications not expressly approved by the party responsible for compliance may void the user’s
authority granted by the local government radio management departments to operate this radio and should not be
made. To comply with the corresponding requirements, transmitter adjustments should be made only by or under
the supervision of a person certified as technically qualified to perform transmitter maintenance and repairs in the
private land mobile and fixed services as certified by an organization representative of the user of those services.
Replacement of any transmitter component (crystal, semiconductor, etc.) not authorized by the local government
radio management departments equipment authorization for this radio could violate the rules.
17

FCC Requirements:
This device complies with part 15 of the FCC Rules. Operation is subject tothe condition that this device does not
cause harmful interference. (Licensed radios are applicable);
This device complies with part 15 of the FCC Rules. Operation is subject tothe following two conditions: (Other
devices are applicable)
(1) This device may not cause harmful interference, and
(2) this device must accept any interference received, including interference that may cause undesired operation.
NOTE:
•(If applicable)This equipment has been tested and found tocomply with the limits for a Class A digital device,
pursuant to part 15 of the FCC Rules. These limits are designed to provide reasonable protection against harmful
interference when the equipment is operated in a commercial environment. This equipment generates, uses, and
can radiate radio frequency energy and, if not installed and used in accordance with the instruction manual, may
cause harmful interference to radio communications. Operation of this equipment in a residential area is likely to
cause harmful interference in which case the user will be required tocorrect the interference at his own expense.
•(If applicable)This equipment has been tested and found tocomply with the limits for a Class B digital device,
pursuant to part 15 of the FCC Rules. These limits are designed to provide reasonable protection against harmful
interference in a residential installation. This equipment generates, uses and can radiate radio frequency energy
and, if not installed and used in accordance with the instructions, may cause harmful interference to radio
communications. However, there is no guarantee that interference will not occur in a particular installation. If this
equipment does cause harmful interference to radio or television reception, which can be determined by turning the
equipment off and on, the user is encouraged totry tocorrect the interference by one or more of the following
measures:
—Reorient or relocate the receiving antenna.
—Increase the separation between the equipment and receiver.
—Connect the equipment into an outlet on a circuit different from that to which the receiver is connected.
—Consult the dealer or an experienced radio/TV technician for help.
CE Requirements:
•(Simple EU declaration of conformity)Shenzhen Retevis Technology Co., Ltd. declares that the radio equipment
type is in compliance with the essential requirements and other relevant provisions of RED Directive 2014/53/EU
and the ROHS Directive 2011/65/EU and the WEEE Directive 2012/19/EU; the full text of the EU declaration of
conformity is available at the following internet address: www.retevis.com.
•Restriction Information
This product can be used in EUcountries and regions, including: Belgium (BE), Bulgaria (BG), Czech Republic
(CZ), Denmark (DK), Germany (DE), Estonia (EE), Ireland (IE), Greece (EL), Spain (ES), France (FR), Croatia
(HR), Italy (IT), Cyprus (CY), Latvia (LV), Lithuania (LT), Luxembourg (LU), Hungary (HU), Malta (MT), Netherlands
(NL), Austria (AT), Poland (PL), Portugal (PT), Romania (RO), Slovenia (SI), Slovakia (SK), Finland (FI), Sweden
(SE) and United Kingdom (UK).
For the warning information of the frequency restriction, please refer tothe package or manual section.
•Disposal
The crossed-out wheeled-bin symbol on your product, literature, or packaging reminds you that in the European
Union, all electrical and electronic products, batteries, and accumulators
(rechargeable batteries) must be taken to designated collection locations at the end of their
working life. Do not dispose of these products as unsorted municipal waste. Dispose of
them according tothe laws in your area.
IC Requirements:
Licence-exempt radio apparatus
This device contains licence-exempt transmitter(s)/receiver(s) that comply with Innovation, Science and Economic
Development Canada’s licence-exempt RSS(s). Operation is subject tothe
following two conditions:
(1) This device may not cause interference.
(2) This device must accept any interference, including interference that may cause undesired operation of the
device.
Le présent appareil est conforme aux CNR d’Industrie Canada applicables aux appareils radio exempts de licence.
L’exploitation est autorisée aux deux conditions suivantes :
(1) l’appareil ne doit pas produire de brouillage;
(2) l’utilisateur de l’appareil doit accepter tout brouillage radioélectrique subi, même si le brouillage est susceptible
d’en compromettre le fonctionnement.
18
Table of contents
Languages:
Other Retevis Two-way Radio manuals

Retevis
Retevis RB25 User manual

Retevis
Retevis RM40 User manual

Retevis
Retevis RT67 User manual

Retevis
Retevis A7105A User manual

Retevis
Retevis RT33 User manual

Retevis
Retevis RT6 User manual

Retevis
Retevis RB17 User manual

Retevis
Retevis RT49P User manual

Retevis
Retevis RB616 User manual

Retevis
Retevis RT-628 User manual

Retevis
Retevis RT628S User manual

Retevis
Retevis RT638 User manual

Retevis
Retevis RT30 User manual

Retevis
Retevis RT602 User manual

Retevis
Retevis RT48 User manual

Retevis
Retevis T-628 Manual

Retevis
Retevis RT666 User manual

Retevis
Retevis RT30M User manual

Retevis
Retevis RT45 User manual

Retevis
Retevis RB19P User manual