Retevis RT-628 User manual

EU
DE
FR
IT
ES
RT628
Kids Walkie Talkie
User’s Guide
RT-628 RT-628

English
Read this operating instruction carefully
before using your Retevis RT628 two way
radio, including the part on Product Safety
and RF Energy Exposure Compliance
CAUTION
1
Specification
Product number
Frequency range
Channel number
Channel spacing
Working voltage
Frequency stability
Operating temperature range
The antenna impedance
Overall dimensions
Weight
TECHNICAL PARAMETERS
Rf power
Modulation method
Noise and harmonic
Residual Radiation
Modulation distortion
Maximum deviation
RT628
PMR
8
12.5KHz
3.6V
±2.5ppm
-20℃~50℃
50Ω
160*55*28mm
90g
0.5W
11kΦF3E
<-40dB
≤-35dB
≤7%
≤±5KHz
TRANSMITER
The sensitivity
Modulation receiver bandwidth
Adjacent selective
Intermodulation interference resistance
Spurious response inhibition
Audio output power
Audio distortion
≤0.2uV
±5KHz
≥40dB
≥35dB
≥70dB
≥300mW
≤8%
RECEIVER
RT-628
High/Low Power
Headphone Plug/
Microphone jack
Antenna
Key Lock
Scanning
Roger Beep Icon
CTCSS
TX/RX Icon
VOX
Up/Monitor Button
Menu/Lock Button
Up Button
Battery Level
PTT Button
Channel/Menu
Item
Power/Scan
Button
Down Button
MIC
Speaker
Radio Parts and Controls

2
chirps and the display briefly shows all feature icons
available on your radio. The display then scrolls through
the available channels and Interference Eliminator
Codes. Press and hold button turn the radio off.
Setting the Volume
- Press the up button to increase the speaker volume.
- Press the down button to decrease the speaker
volume.
- The speaker volume level is indicated by the number
1-8 displayed.
Setting a Channel
1. With the radio on, press , the current channel
flashes.
2. Press up or down button to set the channel.
3. Press PTT to confirm and save the channel setting.
Control Buttons
Use / to:
• Turn radio on/off
• Scan
Use UP/DOWN to:
• Adjust volume
• Scroll through menus
Use ♪/MON to:
• Transmit call tone
Use to:
• Select menu options
• Exit the menu (when pressed while in a menu)
Installing the AA Batteries
Your radio uses 3 AA Alkaline batteries.
1. With the back of the radio facing you, there are a
secret button to release the battery cover and remove.
2. Install 3 AA Alkaline batteries as shown on the inside
of the battery compartment.
3. Re-cover the battery cover and press down to secure.
The walkie talkie can use a NiMH rechargeable battery
instead of 3 AA Alkaline batteries.
Battery Meter
The battery icon shows the battery charge level,
from full to empty . When the battery is empty, the
radio chirps periodically after releasing . The radio
powers off when the voltage drops below a predeterm-
ined level to protect the rechargeable battery life.
Note: Remove the batteries before storing your radio
for extended periods of time. Batteries corrode
over time and may cause permanent damage to
your radio.
Turning Your Radio On and Off
After you installed batteries turn the radio on, the radio
Getting Started
MENU
MENU
Frequency Allocation
Channel
1
2
3
4
Frequency
446.00625
446.01875
446.03125
446.04375
Channel
5
6
7
8
Frequency
446.05625
446.06875
446.08125
446.09375

3
this procedure.
Note: You must set the Interference Eliminator Code to
0 if you want to communicate with another radio
which didn’t set up the Interference Eliminator
Code.
Push to Talk Timeout Timer
To prevent accidental transmissions and save battery
life, the radio emits a continuous warning tone and
stops transmitting if you press PTT for 180 continuous
seconds.
Locking the Keypad
To avoid accidentally changing your radio settings,
press and hold for 3 seconds or until displays.
You can turn the radio on and off, adjust the volume,
receive, transmit, send a call tone, and monitor
channels. All other functions are locked.
To unlock the radio, press and hold for 3 seconds
or until is no longer displayed.
Scanning Channels
Use scanning to monitor channels for transmissions or
to find someone in your group who has accidentally
changed channels. To start scanning, briefly press and
release . The scan indicator displays. When
the radio detects channel activity, it stops scanning
and you can hear the transmission. To respond to the
transmission, press PTT within 5 seconds,the channel
will be confirmed.
Scan Advance
If the radio stops scanning on a channel you do not
Special Features
MENU
• Lock and unlock the keypad (when held down and
not in a menu)
Use to:
• Talk
• Save a setting
Talking and Listening
To communicate, all radios in your group must be set
to the same channel and Interference Eliminator Code.
To talk, press and hold PTT. Hold the radio 2 to 3
inches away from your mouth when speaking.
When you finished speaking, release PTT (press to
talk, release to listen)
Checking the Channel Before Transmitting
Your radio has 22 channels shared on a “take turn”
basis. For uninterrupted communication, do not talk on
a channel if someone else is currently talking on it.
To check for activity on a channel before you talk,
press and hold ♪/MON. If you hear static, the channel
is clear to use.
Interference Eliminator Code
Interference Eliminator Codes help minimize interference
by providing you a choice of code combinations. To set
the code for a channel:
1. Press twice, then the code starts to flash.
2. Press UP or DOWN to select the code 0-121 or 121-0.
3. Press PTT to save the code setting.
You can set a different code for each channel using
MENU
MENU

4
want to listen to, briefly press and release or to resume
scanning for the next active channel.
Removing Channels from the Scan List (Nuisance
Delete Feature)
To remove a channel so the radio does not stop on it
while scanning, press and hold UP or DOWN for at
least 3 seconds, then release. This channel temporarily
removes the channel from the scan list.
To restore the channel, turn the radio off and then back
on.
Note: You cannot remove the channel of your radio
setting when you started the scan (called your
home channel)
Setting and Transmitting Call Tones
Your radio can transmit different call tones to other
radios in your group so you can alert them that you
want to talk.
To set a call tone:
1. With the radio on, press 3 times. The current call
tone setting flashes displays.
2. Press UP or DOWN to change and hear the call tone.
3. Press or to set the new call tone.
To transmit your call tone to other radio , you need to
set to the same channel and Interference Eliminator
Code as your radio, then press ♪ .
Note: Setting the call tone to 0 disables the call tone
feature.
Voice Activation (VOX)
Voice activation (VOX) allows you to talk hands-free.
1.Press PTT and , then turn on the radio
2. When Turn the radio on. displays.
3. To transmit, speak into microphone. There is a short
delay between the time you start talking and when
the radio transmits.
4. To receive, stop talking.
To turn VOX off, press PTT.
Setting the Sensitivity Level
Adjusting your radio’s sensitivity level helps minimize
the possibility of unintended noises triggering a
transmission and helps the radio pick up soft voice.
1. Press until displays.
2. Press UP or DOWN to select the sensitivity level:
3 = High Sensitivity
for quiet environments
2 = Medium Sensitivity
for most environments
3 = Low Sensitivity
for noisy environments
Setting the double channel monitor
1. Press five times until CH displays, the current
channel flashes.
2. Press UP or DOWN to set the monitor channel.
3. Press PTT to save the double channel monitor
setting.
4. Then the double channel will flash.
Setting the SQUELCH Level 1-6
1. Press six times or until SL displays.
2. Press UP or DOWN to select the receive sensitivity
level.
01 = High receive Sensitivity
MENU
MENU
MENU
MENU
MENU

02~05 = Medium receive Sensitivity
06 = Low receive Sensitivity
Setting the TX POWER LO/HI
1. Press seven times until pr displays.
2. Press UP or DOWN to select the LO or HI level.
3. Press PTT to save the TX POWER LO/HI setting.
Important Information on Safe and Efficient
Operation Read. This Information Before Using
Your Radio
The information provided in this document supersedes
the general safety information contained in user guides
published prior to July 2000.
Transmit and Receive Procedure
Your two-way radio contains a transmitter and a
receiver. To control your exposure and ensure
compliance with the general population/uncontrolled
environment exposure limits, always adhere to the
following procedure:
• Transmit no more than 50% of the time.
• To transmit (talk), press the Push to Talk (PTT) button.
• To receive calls, release the PTT button.
Transmit no more than 50% of the time, or less, is
important because the radio generates measurable RF
energy exposure only when transmitting (in terms of
measuring standards compliance).
Exposure to Radio Frequency Energy
Your radio is designed to comply with the following
national and international standards and guidelines
regarding exposure of human being to radio frequency
electromagnetic energy:
Two-Way Radio Operation
When using your radio as a traditional two-way radio,
hold the radio in a vertical position with the microphone
one to two inches (2.5 to 5cm) away from the lips.
Facilities
To avoid electromagnetic interference and/or
compatibility conflicts, turn off your radio in any facility
where posted notices instruct you to do so.
Hospitals or health care facilities may be using
equipment that is sensitive to external RF energy.
Aircraft
When instructed to do so, turn off your radio when on
board an aircraft. Any use of a radio must be in
accordance with applicable regulations per airline crew
instructions.
Potentially Explosive Atmospheres
Turn off your radio prior to entering any area with a
potentially explosive atmosphere. Do not remove,
install, or charge batteries in such areas. Sparks in a
potentially explosive atmosphere can cause an
explosion or fire resulting in bodily injury or even death.
Note: The areas with potentially explosive atmosphere
referred to above include fueling areas such as
below decks on boats, fuel or chemical transfer
or storage facilities, areas where the air contains
chemicals or praticles, such as grain, dust or
metal powders, and any other area where you
5
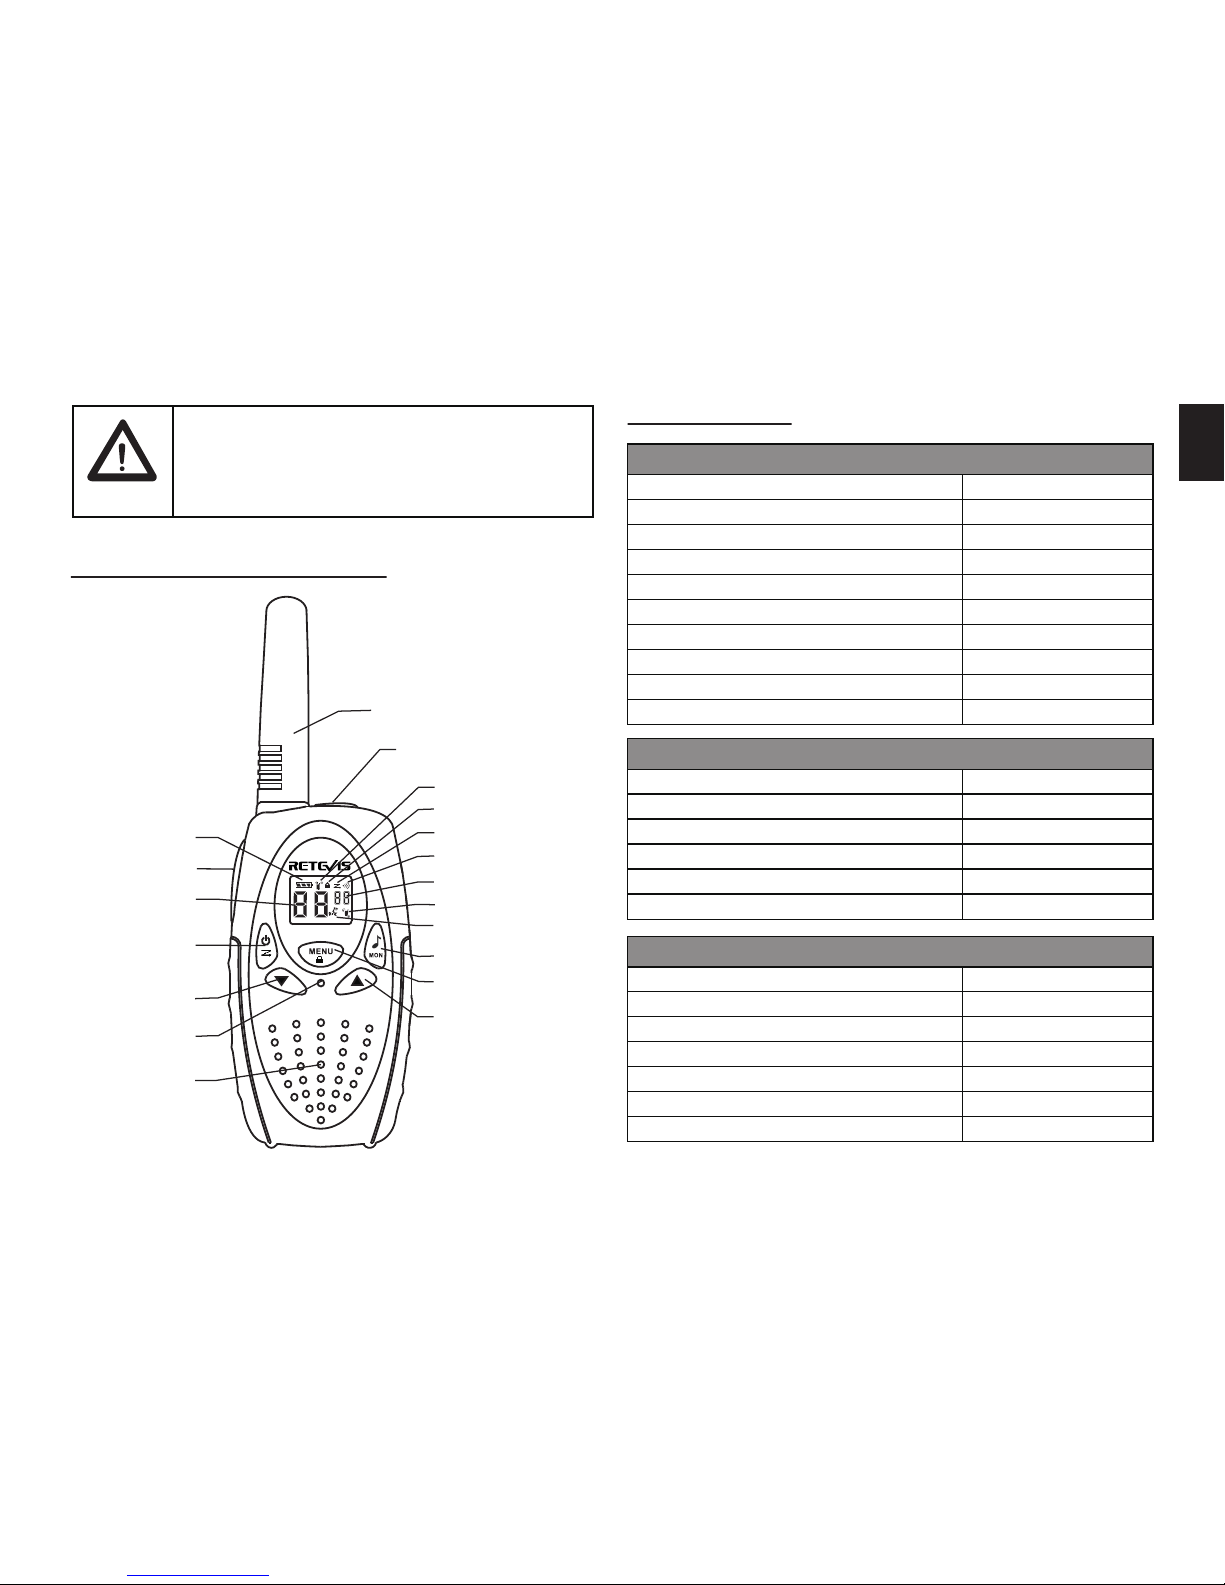
Safety and General Information
MENU

would normally be advised to turn off your
vehicle engine. Areas with potentially explosive
atmospheres are often but not always posted.
Antennas
Do not use any portable radio that has a damaged
antenna.
If a damaged antenna comes into contact with your
skin, a minor burn can result.
Batteries
All batteries can cause property damage and/or bodily
injury such as burns if a conductive material such as
jewelry, keys, or beaded chain touch exposed terminals.
The conductive material may complete an electrical
circuit (short circuit) and become quite hot. Exercise
care in handling any charged battery, particularly when
placing it inside a pocket, purse, or other container with
metal objects.
- Battery Charger Safety Instructions
1. Do not expose the charger to rain or snow.
2. Do not operate or disassemble the charger if it has
received a sharp blow, or has been dropped or
damaged in any way.
3. Never alter the AC cord or plug provided with the
unit. If the plug will not fit the connector, have the
proper connector installed by a qualified electrician.
An improper condition can result in a risk of electric
shock.
4. To reduce the risk of damage to the cord or plug,
pull the plug rather than the cord when disconnecting
the charger from the AC receptacle.
5. To reduce the risk of electric shock, unplug the
charger from the connector before attempting any
maintenance or cleaning.
6. Use of an attachment which not recommended, may
result in a risk of fire, electric shock, or personal injury.
7. Make sure the cord is located where it will not be
stepped on, tripped over, or subjected to damage or
stress.
8. An extension cord should not be used unless
absolutely necessary. Use of an improper extension
cord could result in a risk of fire and/or electric shock.
If an extension cord must be used, make sure that:
• The pins on the plug of the extension cord are the
same number, size, and shape as those on the
plug of the charger.
• The extension cord is properly wired and in good
electrical condition.
• The cord size is 18 AWG for lengths up to 100 feet,
and 16 AWG for lengths up to 150 feet.
Remarks:
1. This guarantee card should be kept by the user, no
replacement if lost.
2. Most new products carry a two-year manufacturer’s
warranty from the date of purchase. Further details,
pls read http://www.retevis.com/after-sale/
3. The user can get warranty and after-sales service
as below:
6
Operational Cautions
Annex I

standards and guidelines (listed below) for human
exposure to radio frequency electro-magnetic energy.
The CE marking means: Hereby, Shenzhen Retevis
Technology Co., Ltd. declares that the radio equipment
type RT628 is in compliance with the RED Directive
2014/53/EU and the ROHS Directive 2011/65/EU and
the WEEE Directive 2012/19/EU. The full text of the
EU declaration of conformity is available at the following
internet address: www.retevis.com
NOTE: The approved batteries, supplied with this radio,
are rated for a 5-5-90 duty factor (5% talk-5% listen-90%
standby) even though this radio complies with FCC
occupational exposure limits and may operate at duty
factors of up to 50% talk.
RF energy exposure standards and guidelines
(if appropriate)
Your Retevis walkie talkie complies with the following
RF energy exposure standards and guidelines:
• American National Standards Institute (ANSI) /
Institute of Electrical & Electronic Engineers (IEEE)
C95. 1-2005
• Institute of Electrical and Electronic Engineers
(IEEE) C95.3-2002
• International Commission on Non-Ionizing Radiation
Protection (ICNIRP)
• International Electrotechnical Com-mission
IEC62209-2:2010]
7
• Contact the seller where you buy.
• Products Repaired by Our Local Repair Center
4. For warranty service, you will need to provide a
receipt proof of purchase from the actual seller for
verification
Exclusions from Warranty Coverage:
1. To any product damaged by accident.
2. In the event of misuse or abuse of the product or as
a result of unauthorized alterations or repairs.
3. If the serial number has been altered, defaced, or
removed.
Compliance with RF Exposure Standards (If
appropriate, Reference to the actual product’s
Safety Marking)
Your Retevis walkie talkie is designed and tested to
comply with a number of national and International
Model Number:
Serial Number:
Purchasing Date:
Dealer:
Telephone:
User’s Name:
Telephone:
Country:
Address:
Post Code:
Email:
Guarantee

Deutsch
1
Technische Daten
Produktnummer
Frequenzbereich
Kanalmenge
Kanalabstand
Betriebsspannung
Frequenzstabilität
Betriebstemperaturbereich
Antennenimpedanz
Gesamtabmessungen
Gewicht
TECHNISCHE PARAMETER
RT628
PMR
8
12.5KHz
3.6V
±2.5ppm
-20℃~50℃
50Ω
160*55*28mm
90g
Rf Leistung
Modulationsmethode
Lärm und Harmonische
Reststrahlung
Modulation Verzerrung
Maximale Abweichung
0.5W
11kΦF3E
<-40dB
≤-35dB
≤7%
≤±5KHz
SENDER
Empfindlichkeit
Modulation Empfänger Bandbreite
Angrenzend selektiv
Intermodulation Interferenz Widerstand
Nebenreaktions-Inhibierung
Audio-Ausgangsleistung
Audioverzerrung
≤0.2uV
±5KHz
≥40dB
≥35dB
≥70dB
≥300mW
≤8%
EMPFÄNGER
RT-628
Hohe / Niedrige
Leistung
Kopfhörer/
Microfon-Buchse
Antenne
Tastensperre-Symbol
Scan-Symbol
Roger-Beep
CTCSS/DCS Code
Senden/
Empfangen Signal
VOX
Anruftaste/
Monitortatse
Menü/Tastensperre
Nach Oben-Taste
Batterieanzeige
PTT-Taste
Kanalnummer
Power/
Scan-Taste
Nach
Unten-Taste
Mikrofon
Lautsprecher
Strukturdiagramm
Bitte lesen Sie vor der Verwendung dieses
Produkts die mit Funkgerät begleitende
Bedienungsanleitung für die sichere
Verwendung, die "Produktsicherheit und
HF-Exposition" enthält.
VORSICHT

2
einen Rufton zu senden. Es gibt 10 verschiedene
Ruftöne zur Auswahl.
Halten Sie die Taste MON gedrückt, um die Monitor
Funktion zu aktivieren. Wenn Sie diese Taste loslassen,
wird die Monitor Funktion beendet.
Funktionsoptionen wechseln
Nach dem Einschalten drücken Sie die Taste MENU,
um in die Menüeinstellungen zu gelangen:
• Drücken Sie die Taste MENU einmal, um den Kanal
zu blinken, und drücken Sie die Taste ▲ oder ▼, um
den Kanal auszuwählen.
• Drücken Sie die Taste MENU zweimal, um den
CTCSS-Code einzustellen.
• Drücken Sie die Taste MENU viermal, um die VOX
Funktion zu aktivieren. Das VOX-Level ist AUS/1/2/3.
• Drücken Sie die Taste MENU dreimal, um den Rufton
auszuwählen. Es gibt 10 verschiedene Roftöne.
• Drücken Sie die Taste MENU fünfmal, um die
Dual-Monitor-Funkton zu aktivieren. Mit der Taste
wählen Sie den zweiten Kanal aus. Zwei Kanäle
blinken abwechselnd im Standby-Modus.
• Drücken Sie die Taste MENU sechsmal, um die
Funktion Squelch zu aktivieren. Das Squelch-Level
ist 1-6.
• Drücken Sie die Taste MENU siebenmal, um die hohe
und niedrige Leistung auszuwählen. Es zeigt HI/LO.
• Drücken Sie die Taste MENU achtmal, um in den
Standby-Modus zurückzukehren.
Kanaleinstellungen
Drücken Sie die Menütaste einmal und die Kanalnummer
(z.B. 01) blinkt, und drücken Sie dann die Taste ▲ und
Ein-und Ausschalten und die Scan Funktion
- Ein-und Ausschalten
Halten Sie die Taste gedrückt, bis die LCD-Anzeige
aktiviert und gleichzeitig einen Ton “Piepton” zu hören.
Halten Sie die Taste nochmal gedrückt, um das Walkie
Talkie auszuschalten
- Scan Funktion
Drücken Sie kurz die Scan-Taste , um die Funktion
zu aktivieren. Wenn ein Signal vorhanden ist, wird es
auf dem Kanal zu bleiben. (In diesem Fall drücken Sie
PTT, um mit dem anderen Gesprächspartner zu
sprechen.) Nach 5 Sekunden gibt es kein Signal, wird
das Scannen fortfahren. Drücken Sie die Scan-Taste
nochmal, um diesen Scan-Vorgang zu beenden.
Lautstärkeeinstellung
Wenn das Walkie Talkie sich im Standby-Modus
befindet, bitte drücken Sie die Taste ▲ oder ▼, um die
Lautstärke einzustellen.
Rufton und die Monitor Funktion
Im Standby-Modus kurz drücken Sie die Taste ♪, um
Funktionseinführung
Frequenzzuteilung
Kanal
1
2
3
4
Frequenz
446.00625
446.01875
446.03125
446.04375
Kanal
5
6
7
8
Frequenz
446.05625
446.06875
446.08125
446.09375

▼, um den gewünschten Kanal einzustellen
(z.B. 01-08 in EU).
CTCSS/DCS-Code Einstellung
Drücken Sie die Menütaste zweimal, die Nummer der
oberen rechten Ecke blinkt (z.B. 01) und drücken Sie
dann die Taste ▲ und ▼, um den gewünschte Code
auszuwählen (00 ist CTCSS / DCS aus; CTCSS: 01-38,
DCS: 39-121)
Hinweis: Die Verwendung von CTCSS/DCS kann nur
verhindern, dass das Funkgerät durch irrelevante
Signale gestört wird und kann das Abhören durch
andere nicht verhindern. Wenn CTCSS/DCS
ausgeschaltet ist, können Sie immer noch Signale
von anderen Funkgeräten mit oder ohne CTCSS /
DCS hören. Wenn CTCSS / DCS aktiviert ist,
können Sie nur Signale mit demselben CTCSS /
DCS hören, um unnötige Signale herauszufiltern.
Rufton
Drücken Sie die Menütaste dreimal, blinkt die aktuelle
Nummer. Mit den Tasten ▲ und ▼, den Rufton
auszuwählen. 10 verschiedene Ruftöne. Drücken Sie
die PTT-Taste, um die Änderung zu bestätigen.
VOX Funktion
Drücken Sie die Menütaste viermal, blinkt die aktuelle
Nummer. VOX-Level 1,2,3. Drücken Sie die Tasten ▲
und ▼, um die VOX-Empfindlichkeit einzustellen und
an- / auszuschalten.
3=Hohe Empfindlichkeit Geringes Hintergrundrauschen
2=Mittlere Empfindlichkeit für die meisten Anwendungen
1= Geringe Empfindlichkeit Hohes Hintergrundrauschen
OF=Geschlossen
Das LCD wird ein VOX-Symbol haben, um zu zeigen,
ob diese Funktion aktiviert wird.
Hinweis:
1. Es wird eine leichte Verzögerung zwischen dem
Beginn der Sprach- und der Funkübertragung
auftreten
2. Wenn die VOX aktiviert ist, wird die PTT automatisch
ausgeschaltet. Sie brauchen die PTT nicht zu
drücken, um die Nachricht zu senden
3. Die Ausgabe endet automatisch nach zwei Sekunden
des Sprechen.
DCM-Zweikanalüberwachung
Das Walkie Talkie ist in der Lage, zwei Kanäle, den
derzeitigen Kanal sowie einen weiteren Kanal, zu
überwachen.
Drücken Sie die Menütaste fünfmal, und auf der
LCD-Anzeige werden das Symbol „CH”, ein blinkendes
„OF”und die Kanalnummer angezeigt. Drücken Sie
dann die Taste ▲ und ▼, um den zweiten Kanal (1-8,
außer dem derzeitigen Kanal) auszuwählen, der auch
überwacht werden soll. Drücken Sie die PTT-Taste,
um Ihre Einstellung zu bestätigen.
Squelch Funktion
Drücken Sie die Menütaste sechsmal, das Symbol SL
wird auf dem Display angezeigt und die Nummer blinkt.
Drücken Sie die Taste ▲ und ▼, um den Rauschlevel
einzustellen.
06 ist das höchste Level, 01 ist das niedrigste Level
und der Squelch-Level wird entsprechend der
Reichweite ausgewählt.
3

Hohe/Niedrige Leistung einzustellen
Drücken Sie die Menütaste siebenmal, das Symbol LO
oder HI wird auf dem Display angezeigt.(LO bedeutet
0.3W, HI 0.5W). Nach der Bestätigung wird LO oder HI
auf dem Display angezeigt.
Tastensperre
Um die Tastensperrfunktion zu aktivieren, halten Sie
die Menütaste so lange gedrückt, bis das Symbol
für die Tastensperre auf der LCD-Anzeige angezeigt
wird. Halten Sie die Menütaste so lange gedrückt, um
die Tastensperrfunktion zu deaktivieren. Die Sperrfu-
nktion sperrt verwandte Tasten, um versehentliche
Änderungen an den Einstellungen des Funkgeräts zu
verhindern.
Hinweis: Die PTT-Taste, Ruftaste bleiben funktionsfähig,
selbst wenn die Tastensperrfunktion aktiviert ist.
Niedrige Batterie
Wenn die Batterieleistung nicht ausreicht, wird das
Symbol für die Niederspannungsbatterie in der oberen
linken Ecke des Display angezeigt, und der
Anzeigepegel hängt von der niedrigen Spannung ab.
Wie man miteinander spricht
Wenn Sie miteinander sprechen möchten, müssen Sie
die Funkgeräte auf den gleichen Kanal und das gleiche
CTCSS/DCS einstellen.
Wenn Sie sprechen, drücken Sie die PTT-Taste und
legen Sie das Walkie Talkie in einem Abstand von
5-10cm von Ihrem Mund entfernt, um die Klarheit des
Anrufs zu maximieren. Nach dem Senden lassen Sie
die PTT-Taste los, damit die Gegenstelle jederzeit
sprechen kann.
Beachten Sie, beim Senden kann das Walkie Talkie
nicht empfangen, beim Empfang kann es nicht senden.
Auf dem Display wird das Sendsymbol und
Empfangsymbol angezeigt.
Kombinationtasten
Halten Sie die Taste ▲ gedrückt und nicht loslassen,
gleichfalls die Taste Power auch lang drücken, bis
das Gerät eingeschaltet wird, so ermöglicht es eine
Ein-Ausschaltung des Roger-Beeps.
Halten Sie die Taste ▼ gedrückt und nicht loslassen,
gleichfalls die Taste Power auch lang drücken, bis
das Gerät eingeschaltet wird, so ermöglicht es eine
Ein-Ausschaltung des Tastentons.
Das LCD-Display wird zeigt, ob der Roger-Beep
aktiviert ist.
Speicherfunktion und Wiederherstellen der
Werkseinstellungen
Es gibt eine Speicherfunktion, wenn das Gerät
ausgeschaltet wird, und die vorherige Einstellung wird
beibehalten.
Halten Sie die Menü Taste gedrückt und nicht loslassen,
gleichfalls die Taste Power auch lang drücken,bis das
Gerät eingeschaltet wird, so können Sie das Gerät
wiederherstellen.
4

5
Bemerkungen
1. Diese Garantiekarte sollte vom Benutzer aufbewahrt
werden, kein Ersatz bei Verlust.
2. Die meisten neuen Produkte haben ab dem
Kaufdatum eine zweijährige Herstellergarantie.
Weitere Details, lesen Sie bitte
http://www.retevis.com/after-sale/
3. Der Benutzer kann Garantie und Kundendienst wie
unten erhalten:
• Kontaktieren Sie den Verkäufer, wo Sie kaufen.
• Von unserem lokalen Reparaturzentrum reparierte
Produkte
4. Für den Garantieservice müssen Sie dem Verkäufer
eine Quittung des Kaufbelegs zur Überprüfung
vorlegen.
Modell-Nr:
Seriennummer:
Kaufdatum:
Händler:
Telefon:
Benutzername:
Telefon:
Land:
Adresse:
Postleitzahl:
E-Mail:
Garantie
Anhang I Nicht von der Garantie abgedeckt
1. Zu irgendeinem Produkt, das durch Unfall beschädigt
wird.
2. Im Falle eines Missbrauchs oder aufgrund von nicht
autorisierten Änderungen oder Reparaturen.
3. Wenn die Seriennummer geändert, unkenntlich
gemacht oder entfernt wurde.
Einhaltung der RF-Expositionsstandards (ggf.
Verweis auf die Sicherheitskennzeichnung des
Produkts)
Ihr Retevis Walkie Talkie ist so konzipiert und getestet,
dass es eine Reihe nationaler und internationaler
Normen und Richtlinien (siehe unten) für die Exposition
von Menschen mit hochfrequenter elektromagnetischer
Energie erfüllt.
Die CE-Kennzeichnung bedeutet: Hiermit erklärt
Shenzhen Retevis Technology Co., Ltd., dass der Typ
des Funkgeräts RT628 der RED-Richtlinie 2014/53/EU
und der ROHS-Richtlinie 2011/65/EU und die
WEEE-Richtlinie 2012/19/EU entspricht.
Der vollständige Text der EU-Konformitätserklärung
ist unter folgender Internetadresse verfügbar:
www.retevis.com
HINWEIS: Die mit diesem Funkgerät gelieferten
zugelassenen Batterien sind für ein Tastverhältnis
von 5-5-90 ausgelegt (5% Senden - 5% Empfangen
- 90% Standby), obwohl dieses Funkgerät den
FCC-Grenzwerten entspricht und im Betrieb
eingesetzt werden kann Faktoren von bis zu 50%
sprechen.

RF-Expositionsstandards und -richtlinien (falls
zutreffend)
Ihr Retevis Walkie Talkie entspricht den folgenden
Normen und Richtlinien zur RF-Exposition:
• American National Standards Institute (ANSI)
/Institute of Electrical & Electronic Engineers
(IEEE) C95. 1-2005
• Institute of Electrical and Electronic Engineers
(IEEE) C95.3-2002
• International Commission on Non-Ionizing Radiation
Protection (ICNIRP)
• International Electrotechnical Com-mission
IEC62209-2:2010

Sensibilité
Bande passante du récepteur de modulation
Adjacent sélectif
Interférence d'intermodulation
Inhibition de réponse parasite
Puissance de sortie audio
Distorsion audio
≤0.2uV
±5KHz
≥40dB
≥35dB
≥70dB
≥300mW
≤8%
Réception
Numéro de l’article
Gamme de fréquences
Numéro de canaux
Space de canaux
Tension de travail
Stabilité de fréquence
Plage de température de fonctionnement
Impédance d’antenne
Dimension
Poids
RT628
PMR
8
12.5KHz
3.6V
±2.5ppm
-20℃~50℃
50Ω
160*55*28mm
90g
Paramètres techniques
Puissance RF
Modulation
Bruit et harmonique
Rayonnement résiduel
Distorsion de modulation
Déviation maximale
0.5W
11kΦF3E
<-40dB
≤-35dB
≤7%
≤±5KHz
Transmission
1
Français
Spécifications
RT-628
Puissance
Haute/Basse
Jack d’écouteur
/haut-parleur
Antenne
Verrouillage
des boutons
Icône de scan
Roger Beep
Sous-canal
(CTCSS/DCS)
En Réception
/Transmission
VOX
Bouton de tonalité
d’appel/Monitor
(surveillance)
Bouton de Menu
/Verrouillage
Haut
Indicateur
d’énergie
de batterie
PTT
Indicateur de
Canal/Menu
Bouton
d’Alimentation
/Scan
Bas
Microphone
Haut-parleur
Schéma de structure
Avant d'utiliser ce produit, lisez le mode
d'emploi pour une utilisation en toute
sécurité contenu dans le livret Sécurité
du produit et Exposition aux RF joint avec
votre radio.
Attention

Attribution de fréquences
Canal
1
2
3
4
Fréquence
446.00625
446.01875
446.03125
446.04375
Canal
5
6
7
8
Fréquence
446.05625
446.06875
446.08125
446.09375
2
relâchez ce bouton pour quitter ce mode.
Options de fonction
Allumer le talkie walkie pour entre au réglage de menu:
• Appuyez sur le bouton MENU 1 fois, l’icône du canal
clignote, appuyez sur les bouton ▲ et ▼ pour choisir
le canal.
• Appuyez sur le bouton MENU 2 fois, l’icône du
sous-canal clignote, appuyez sur les bouton ▲ et ▼
pour choisir le sous-canal, soit CTCSS/DCS.
• Appuyez sur le bouton MENU 3 fois pour entrer le
réglage de tonalitéd’appel. Appuyez sur les bouton ▲
et▼ pour choisir une tonalité.
• Appuyez sur le bouton MENU 4 fois pour régler le
VOX, OFF et le niveau de sensibilité 1, 2, 3 en option.
• Appuyez sur le bouton MENU 5 fois pour entrer au
mode double surveillance/réception . Appuyez sur les
bouton ▲ et▼ pour choisir le deuxième canal de
réception.
• Appuyez sur le bouton MENU 6 fois pour choisir le
niveau de squelch, 1-6.
• Appuyez sur le bouton MENU 7 fois pour choisir la
puissance en émission, HI(haute)/LO(basse).
• Appuyez sur le bouton MENU 8 fois pour revenir au
mode veille.
• Si vous voulez modifier le réglage, appuyez sur le les
bouton ▲ et▼ pour sélectionner.
• Si vous voulez confirmer le réglage, appuyez sur le
bouton PTT ou entendez 15 secondes pour quitter
automatiquement.
Réglage de canal
Appuyez sur le bouton MENU 1 fois, l’icône du canal
Bouton d’alimentation et fonction scan
• Appuyez sur le bouton environ trois secondes
pour allumer le talkie walkie, l’écran LCD s’éclaire et
un bip sera entendu.
• Appuyez à nouveau ce bouton trois secondes pour
éteindre le talkie walkie.
• Appuyez sur le bouton pour scanner. Le talkie
walkie s’arrête sur un canal lorsque un signal est
détecté sur ce canal.
• En ce moment-là, appuyez sur le bouton PTT pour
répondre à ce signal. 5 minutes après que le signal
disparaisse, le scan continue. Appuyez sur le bouton
pour quitter le scan.
Réglage de volume
En veille, appuyez sur les bouton ▲ et▼ pour régler
le volume.(01 est le volume minimum, 08 le volume
maximum)
Tonalité d’appel et Surveillance
En veille, appuyez sur le bouton ♪ pour envoyer une
tonalité. 10 tonalités d’appel en option. Appuyez sur le
bouton MON enfoncé pour entrer au mode surveillance,
Opérations de fonction

3
clignote, puis appuyez sur les bouton ▲ et▼ pour
choisir le canal désiré.
Réglage de sous canal(CTCSS/DCS)
Appuyez sur le bouton MENU 2 fois,l’icône du
sous-canal clignote, appuyez sur les bouton ▲ et▼
pour choisir le sous-canal, soit CTCSS/DCS.
(00: CTCSS désactivé, CTC: 01-38, DCS: 39-121)
NOTE: L’utilisation de sous-canal n’empêche que des
interférences des signaux et ne peut pas
empêcher l’écoute des autres radios. Si CTCSS
/DCS désactivé, vous pourriez entendre encore
les signaux des autres radios avec CTCSS/
DCS ou sans. Si CTCSS/DCS activé, vous ne
pourriez entendre que les signaux avec le même
CTCSS/DCS pour filtrer des signaux inutiles.
Sélection de tonalité d’appel
Appuyez sur le bouton MENU 3 fois, l’icône du chiffe
clignote sur l’écran indiquant la tonalité actuelle.
appuyez sur les bouton ▲ et ▼ pour choisir les 10
mélodies et appuyez sur le bouton PTT pour confirmer
votre choix.
Fonction VOX
Appuyez sur le bouton MENU 4 fois, l’icône du chiffe
clignote sur l’écran indiquant le niveau de VOX,
appuyez sur les bouton ▲ et▼ pour choisir le niveau
de sensibilité VOX ou le désactiver.
3 = niveau le plus sensible, utilisé dans les
environnements avec des bruits faibles
2 = niveau moyen
1 = niveau le moins sensible, utilisé dans les
environnements avec des bruits forts
OF = désactiver
Icône VOX sur l’écran indique que si la fonction VOX
est activée.
Remarque :
1. Il y aura un léger retard entre le début de la parole
et la transmission radio.
2. Lorsque VOX activé, le PTT est automatiquement
éteint.Vous n'avez pas besoin d'appuyer sur le PTT
pour envoyer le signal.
3. L'émission se termine automatiquement après deux
secondes de parole.
DCM(dual channel monitor)-double surveillance
/réception
DCM permet le talkie walkie de surveiller simultanément
les signaux de deux canaux.
Appuyez sur le bouton MENU 5 fois, l’icône CH s’affche
sur l’écran. A gauche, affiche « OF » ou le numéro du
canal secondaire de réception. Appuyez sur le bouton
PTT pour confirmer votre choix.
Squelch(silence)
Appuyez sur le bouton MENU 6 fois, l’icône SL s’affiche
sur l’écran, et un chiffe clignote. Appuyez sur les bouton
▲ et▼ pour régler le niveau de squelch. 06 le niveau
le plus haut, 01, le niveau le plus bas, choisir le niveau
approprié selon la distance de communication.
Sélection de puissance haute/basse
Appuyez sur le bouton MENU 7 fois, l’icône LO/HI
clignote sur l’écran(LO:puissance basse 0.3w, HI :
puissance haute 0.5w), après le réglage, LO ou HI

Annex I
s’affiche sur l’écran.
Verrouillage du clavier
Appuyez sur le bouton MENU enfoncé trois secondes
pour verrouiller le clavier, l’icône s’affiche sur l’écran.
Appuyez à nouveau trois seconde pour déverrouiller.
La fonction verrouillage peut verrouiller les bouton pour
éviter toute opération inactive et causer la modification
des réglages.
Remarque : lorsque la fonction verrouillage activée, le
bouton PTT et le bouton ♪ fonctionnent encore.
Détection automatique de l’énergie de batterie
Lorsque la batterie est faible, l’icône de batterie faible
s’affiche sur l’écran. La barre varie selon le niveau de
l’énergie de batterie.
Comment communiquer?
Il faut régler la même fréquence et le même CTCSS/
DCS pour la communication, Veuillez vous référer au
paramètre de CTCSS/DCS.
Note : il faut appuyer sur le bouton pour parler. Gardez
5-10 cm entre votre bouche et le microphone de
talkie walkie pour une communication claire.
Après la parole, relâchez le bouton PTT si bien
que les autres peuvent parler. Le talkie walkie
est simplex, donc, quand il est en réception, il ne
peut pas transmettre et en transmission, il ne
peut pas recevoir. En transmission ou réception,
l’icône correspondant s’affiche sur l’écran.
Fonction de combinaison des boutons
Lorsque vous appuyez sur le bouton d'alimentation et
le bouton bas▼en même temps, le son du bouton sera
activé ou désactivé. Lorsque vous appuyez en même
temps sur le bouton d'alimentation et sur le bouton
haut ▲, la tonalité de fin d'émission(Roger beep) sera
activée ou désactivée et l'écran LCD affichera l'icône
de tonalité de fin d'émission.
Fonction de mémoire:
Il y a une fonction de mémoire lorsque l'alimentation
est coupée ou éteinte, et le réglage précédent est
conservé à nouveau.
Restaurer les paramètres d'usine: appuyez sur le
bouton d’alimentation et le bouton MENU en même
temps pour allumer le talkie walkie.
Remarque
1. Cette carte de garantie doit être conservée par
l'utilisateur, pas de remplacement en cas de perte.
2. La plupart des nouveaux produits bénéficient d'une
garantie de deux ans de fabricant à compter de la
date d'achat. Plus de détails, s’il vous plaît consulter
http://www.retevis.com/after-sale/
3. L'utilisateur peut obtenir la garantie et le service
après-vente comme ci-dessous:
Contactez le vendeur où vous achetez.
Produits réparés par notre centre de réparation local.
4. Pour le service de garantie, vous devrez fournir une
preuve d'achat de reçu du vendeur pour la
vérification.
4

Numéro de modèle
Numéro de série
Date d’achat
Distributeur
Téléphone
Nom d’utilisateur
Téléphone
Pays
Adresse
Code postal
Émail
Garantie
5
Le marquage CE signifie: Par la présente, Shenzhen
Retevis Technology Co., Ltd. déclare que le type
d'équipement radio RT628 est conforme à la Directive
RED 2014/53/EU et à la Directive ROHS 2011/65/EU
et la directive DEEE 2012/19/EU. Le texte intégral de la
déclaration de conformité EU est disponible à l'adresse
internet suivante: www.retevis.com
Remarque: Les batteries agréées, fournies avec cette
radio, sont conçues pour un facteur d’utilisation de
5-5-90 (5% émission-5% réception-90% veille) alors
que cette radio est conforme aux limites d’exposition
de la FCC et peut fonctionner dans des facteurs de
fonctionnement allant jusqu’à 50% d’émission.
Normes d'exposition à l'énergie RF et lignes
directrices (le cas échéant)
Votre talkie-walkie Retevis est conforme aux normes
et directives d'exposition à l'énergie RF suivantes:
• American National Standards Institute (ANSI)/
Institute of Electrical & Electronic Engineers (IEEE)
C95. 1-2005
• Institute of Electrical and Electronic Engineers
(IEEE)C95.3-2002
• International Commission on Non-Ionizing Radiation
Protection (ICNIRP)
• International Electrotechnical Com-mission
IEC62209-2:2010
Exclusions de la couverture de la garantie
1. Pour tout produit endommagé par accident.
2. En cas de mauvaise utilisation ou d'abus du produit
ou à la suite de modifications ou de réparations non
autorisées.
3. Si le numéro de série a été modifié, effacé ou
supprimé.
Conformité aux normes d'exposition RF (le cas
échéant, référence au marquage de sécurité du
produit)
Votre talkie walkie Retevis a été conçue et testés pour
satisfaire à un certain nombre de normes et de
directives nationales et internationales (répertoriées
ci-dessous) relative à l'exposition humaine à l'énergie
électromagnétique à radiofréquence.

Prima di utilizzare questo prodotto, leggere
attentamente le istruzioni per l'utilizzo e
sulla sicurezza dell'esposizione RF del
prodotto in dotazione con la radio.
Attenzione
Sensibilità
Modulazione di ricevitore
Selettivo adiacente
Resistenza alle interferenze
Emissione spuria condotta
Potenza di uscita audio
Distorsione audio
≤0.2uV
±5KHz
≥40dB
≥35dB
≥70dB
≥300mW
≤8%
RICEVITORE
Modello
Frequenze
Capacità del canale
Spaziatura dei canali
Tensione di lavoro
Stabilità di frequenza
Temperatura di lavoro
Impedenza dell'antenna
Dimensioni
Peso
SPECIFICHE GENERALI
RT628
PMR
8
12.5KHz
3.6V
±2.5ppm
-20℃~50℃
50Ω
160*55*28mm
90g
Potenza RF
Modulazione
Rumore e Armoniche
Radiazione Residua
Distorsione di modulazione
Deviazione massima
0.5W
11kΦF3E
<-40dB
≤-35dB
≤7%
≤±5KHz
TRASMETTITORE
1
Italiano
Specificazione
RT-628
Icona Potenza
Auricolare/Microfono/
Jack Ricarica
Antenna
Icona Blocco
Tastiera
Icona Scansione
Icona Avviso
Icona Sotto-canale
Icona TX/RX
Icona VOX
Tasto Call/Monitor
Tasto Menù
Tasto Su
Icona Batteria
Tasto PTT
Icona Canale
Tasto
Power/Scan
Tasto Giù
Microfono
Altoparlante
Istruzioni sulla radio
Other manuals for RT-628
3
Table of contents
Languages:
Other Retevis Two-way Radio manuals

Retevis
Retevis RT65 User manual

Retevis
Retevis RT28 User manual

Retevis
Retevis RT45P User manual

Retevis
Retevis RT37 User manual

Retevis
Retevis RB637 User manual

Retevis
Retevis RT22 User manual

Retevis
Retevis RT30 User manual

Retevis
Retevis RT602 User manual

Retevis
Retevis RB17A User manual

Retevis
Retevis H-777 User manual

Retevis
Retevis RB85 User manual

Retevis
Retevis RA19 User manual

Retevis
Retevis RB89 User manual

Retevis
Retevis RT53 User manual

Retevis
Retevis RT66 User manual

Retevis
Retevis RT669 User manual

Retevis
Retevis RT639 User manual

Retevis
Retevis RT38 User manual

Retevis
Retevis RB616 User manual

Retevis
Retevis RT24 User manual