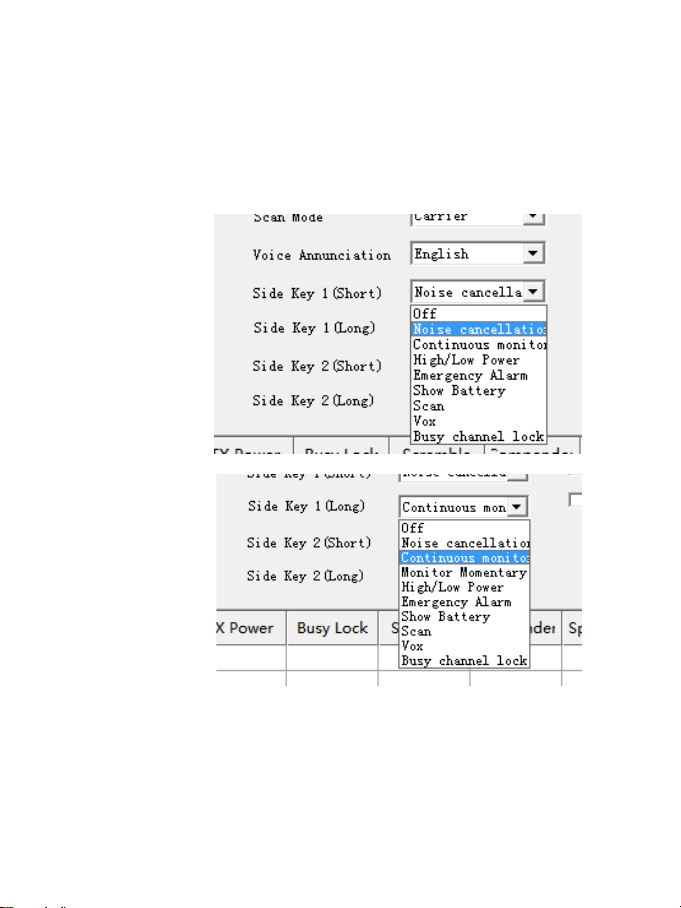
Retevis RB85 User manual

User’s manual
RB85


CONTENTS
Main functions ................................................................
Unpacking and checking equipment ............................
Charging the Battery ......................................................
Using the battery ............................................................
Installing and uninstalling of the accessories ............
Getting acquainted .........................................................
Basic opeartions ............................................................
Specification ...................................................................
Warnings ..........................................................................
DE(12-22)
FR(23-33)
IT(34-44)
ES(45-55)
EU Importer: Germany Retevis Technology GmbH
Address: Uetzenacker 29,38176 wendeburg
For downloading further resources:
Brochures, Software/Firmware, Manual etc, Pls contact your direct reseller first OR go
to website retevis.com and check “support” in the each product link to download it.
01
01
01
01
02
03
04
07
08

Main functions
TOT
Scan
CTCSS/DCS
Chinese and English voice prompt
Battery Saving function
Low battery alert
Hi/ Low power selectable
Wide/Narrow band selectable
VOX
Programming protect
Busy lock function
Squelch level selectable
Scrambler
ANI function(Active Noise Cancellng)
10W/5W selectable via side-key/CPS
Side-key assignment
Unpacking and checking equipment
Welcome to use our two-way radio. Carefully unpack the radio. We recommend you check the items listed in the
following table before discarding the package. If any item is missing, please contact local dealer immediately.
Supplied Accessories
Charging the Battery
Please use the designated battery charger to charge battery, and follow the steps
• Insert DC jack of power adapter into DC jack behind the charging kit.
• Insert power adapter into AC power supply socket, now the charging red and green
indicator lights, successfuly connect the power supply.
• Insert the battery to radio equipped with battery into the charging kit.
Red indicator keeps lighting means radio is under charging.
Red indicator flashes means battery not be used for long time andover-discharged.
And will Turn to normal charge when red indicator keeps lighting.
• Confirm the battery is fully charged, when red indicator goes out.
• Please take off the adaptor and battery.
Using the battery
The battery is not completely charged at the factory, please charge it before using.
After purchase or extended storage(more than two months), the first time to charge batterycannot make battery
reach its normal operating capacity. After repeating charge /discharge it two or three times, the operating
capacity wllincrease to its normal capacity.
Antenna
Charge
Li-ion Battery Belt Clip
User’s Manua
User’s manual
RB85
1

Notice: After fully charge the battery, please do not charge it again and should take it off from the charger. If not,
it will short or damage the battery life for over charge.
Note:
• The temperature for charging should be from 5°C to 40°C.Battery can not be over fully charged out of this
temperature range.Please prepare a spare battery for the cooler weather and do not discard the defect
battery.Because it may be used under the normal temperature.
• Please clean the battery terminal when it covers with some dust or dirty.
• To make sure the battery can be normal use and charge.
• Please turn off the radio power before charging.
• Do not charge the battery before radio or the battery being wet.
• Please change another new battery if battery can not be recover normal capacity after fully charged.
Battery Type
Please use the assigned battery to charge.It maybe explode and harm to human body if use other batteries.
Safety Tips
• Do not discard the battery into fire.
• Do not unfold the battery case by yourself.
Battery Storage
1) Please fully charged battery first to store before long time no use it. To avoid the battery self over discharge
and being damage.
2) To avoid short the battery capacity, please fully charged the battery after long time no use. Recommend
charge the battery again after six months.
3) Please take care the temperature and humidity for storing battery. Make sure the battery store under the
normal temperature, cool and dry to reduce battery discharge.
Installing and uninstalling of the accessories
Installing /Removing the Battery
To install the battery into the battery positioning hole of radio bottom, then press the battery, make the button
completely to lock battery. To remove the battery, please turn off the radio, and then push up the battery button of
radio top, finally take off the battery.
Installing/Removing the Antenna
Screw the antenna into the connector on the top of the radio by
holding the antenna at its base and turning it dockwise until secure.
To turn the antenna counter-clockwise until youcan remove it.
(Install the battery) (Remove the battery)
2

Installing Earphone /Programming Jack
• Uncover earphone lid, directly insert earphones into earphone holes (earphones need
to be additionally purchased)
• You can use computer programming software to operate(consult with local dealers
about computer programming software)
Note: If your radio developed with VOX function, you should re-turn on
radio power once to active VOX function.
Installing the belt clip
If necessary, attach the belt clip to the back of battery with the screws supplied carry
conveniently.
Power/volume knob
Power on by rotating clockwise,
Power off by rotating counter
clockwise till hear the "kata" sound.
VOL control by rotating.
Antenna
Channel-selecting knob
Choose channel 1-16 by rotating
Speaker
Microphone
Getting Acquainted
3

Basic opeartions
Led indicator
It lights red when transmiting, and lights green when receiving.
Channel-selecting knob
Rotate it to select channel 1-16, clockwise rotation to increase, counter-clockwise rotation to decrease. An alert
tone will sound when an empty channel is selected.
Power/Volume knob
Rotate it by clockwise to power on the radio. To turn off the radio, rotate it by counter-clockwise until a click
sound is heard, VOL control by rotating.
PTT switch
Press PTT switch and then talk to the microphone, the indicator light turns red, if the channel does not have
transmitting frequency,a "Du Du"tone sounds, and indicator light turns red.
Release PTT switch to receive. It lights green when there is signal.
Moni key
Monitoring: monitor your selected channel if anyone in the call, if no signal is loud "Rustle" sound.Both side-key
can be set to be Moni.
Squelch level
The squelch level will determine the signal strength to open the speaker of the radio. If the squelch level is lower,
the background noise of opening the radio's speaker will be higher,and the corresponding communication range
will be further, but the anti-interference capacity will be weaker. The default setting of squelch level is 5, you can
adjust it through the menu "Squelch level"of the"Optional features"in the software, level 0 to 9 can be selected.0
is the lowest level.
Time out timer(TOT)
The purpose of TOT is to prevent any radio from talking in one channel for too long, and to prevent the radio
from being damaged due to continuous transmission. If the transmitting time exceeds the TOT pre-set time, the
radio wil stop transmission and an alert tone sounds.
Release PTT switch to stop the alert tone, the radio resume to receiving mode.
PTT switch
Side key 1
Side key 2
Speaker/Microphone Jack
Battery Pack
Battery release latch
4

Scan On/Off
When the radio is set as scan via software, rotate the channel-selecting knob to channel
16, it will start scanning. It will scan all scannable channels from channel 1 to 16.
you can define as channel added or deleted in software.
When there is signal in the scanning channel, it stops in the channel for talk.
Note:
a. The radio wil stay in the channel which has signal, and 15 seconds after the signal disappears, it will continue
scanning.
b. It can not scan when there is less than 2 scannable channels.
Non-standard CTCSS code programmable
You can program non-standard CTCSS code by program software.
a. Set non-standard CTCSS code on channels, you can choose 67.0-254.1Hz for CTCSS frequency.
b. The non-standard CTCSS code should set on the same channel.
English/Chinese voice prompt
Voice prompt Off, radio will not issue a prompt. Select Chinese, then open the Chinese"prompt"function, select
English, then open the English "prompt"function.
VOX
Speak to the microphone in normal voice to transmit directly, no need to press PTT switch.
Turn VOX on/off through programming software.
1) When VOX is on in your working channel.
• Speak to the microphone directly, it will transmit automatically.
• The radio stops transmitting when there is no voice, and waits for receiving.
2) When a headset with a microphone is used.When VOX is on, you should VOX gain for the radio to identify
voice volume.
• If microphone is too sensitive, the noise around radio will start transmitting.
• If microphone is not sensitive, the radio can not collect your voice. Please adjust VoX level well to guarantee
smooth communications.
Note: When turn on VOX and VOX gain is in high and sensitive level, if connect mic/speaker with radio, the
signal of mic/speaker will probably cause radio transmit.
Battery save function
The batter capacity will be saved when this function is turned on via program software. It means radio does not
save battery when there is not a tick. It means radio save battery when there is a tick.
Low battery prompt
Note: Low voltage: when the voltage falls below a certain level, if select prompt off, every 15s issued a “DeDe”
voice prompt;if select prompt on, “Please replace the battery.” If you choose Chinese or English speech, press
and hold the PTT button or VOX are allinvalid and issued a "please change" battery voice prompt and loud "Di"
sound until PTT release or end VOX.
Busy channel lockout(BCLO)
If you set busy channel lockout, press PTT after receiving a signal, prohibiting transmit, and issue "Di" sound
until PTT release
High/low power selective
The default setting s high power, you can select “High/Low” power through the menu “power” in the software.
Wide/narrow bandwidth selective(25KHz/12. 5KHz)
The default setting is wide band, you can select “Wide/ narrow” in the “Channel" in the software.
PC program protection
You can set in the software
QT/DQT
You can select the QT/DQT via program software. When a channel has QT/DQT, the speaker will be turned on
when it receives the same QT/DQT. If there is transmitted signal with different QT/DQT in the same channel, the
speaker will not open and indicator light turns green
Scrambler
When the radio is allowed the scrambler function, and press the key, TX voice will be sent out with scrambler ,
other radio only received the signal when its scrambler also turns on.
5

5/10W power select
The radio is 5W/10W power selectable,You can set in CPS or side-key.
ANC (Activate Noise Cancelling) function
Audio sound active control is a signal-processing methodology that reduces the effective sound amplitude to
improve signal-to-noise ratio (SNR) so that unwanted noise is less perceptible. The ANC methodology is also
called audio noise reduction (ANR). ANC or ANR is based on coherent acoustics that accurately replicate the
original sound field in all its forms. This radio equipped with the ANC ( Active Noise canceling )function , can help
you hear clear in the noisy environment.
6
Side- Key assignment
This function is make the radio more convince in using.
The side-key function support the following :
Short press:
1.Off
2.Noise cancellation
3.Continuous monitor
4.Hi/Low power
5.Emergency alarm
6.Battery capacity
7.Scan
8.VOX
9.Busy channel lock
Long press:
1.Off
2.Noise cancellation
3.Continuous monitor
4.Monitor momentary
5.Hi/low power
6.Emergency alarm
7.Show battery
8.Scan
9.Vox
10.Busy channel lock

Specification
General
Channel Capacity
Operating Voltage
Operating Temperature
Antenna
Antenna Impedance
Power
16 channels
7.4VDC
-10℃~+50℃
High gain antenna
50Ω
10W/5W
Transmitter
Modulation Type
Spurious Radiation
Modulated noise
Modulation distortion
Frequency stability
Max Fr. Deviation
Audio response(300-3000Hz)
Adjacent CH. Power
Intermediation sensitivity
16KFΦ3E
≤7.5μV
<-40dB
<5%
5ppm
≤ ±5KHz
+6.5~ -14dB
≥65dB
8-12mv
Receiver
Sensitivity
Occupied bandwidth
Selectivity
Intermediation
Audio Output
Audio Distortion
Frequency Stability
current
Audio response(300-3000Hz)
≤0.2μV
≤16KHz
≥65dB
≥55dB
> 1W
≤5%
5ppm
55mA(when standby);150mA(when working)
+7~ -12.5dB
Note: Specification will be revised without notice due to technical improvement. Thank you.
7

RF ENERGY EXPOSURE AND PRODUCT SAFETY GUIDE FOR PORTABLE
TWO-WAY RADIOS
Before using this radio, read this guide which contains important operating instructions for
safe usage and rf energy awareness and control for compliance with applicable standards
and regulations.
ATTENTION!
This two-way radio uses electromagnetic energy in the radio frequency (RF) spectrum to provide communica-
tions between two or more users over a distance. RF energy, which when used improperly, can cause biological
damage.
All Retevis two-way radios are designed, manufactured, and tested to ensure they meet government-established
RF exposure levels. In addition, manufacturers also recommend specific operating instructions to users of
two-way radios. These instructions are important because they inform users about RF energy exposure and
provide simple procedures on how to control it.
Please refer to the following websites for more information on what RF energy exposure is and how to control
your exposure to assure compliance with established RF exposure limits:http://www.who.int/en/
Local Government Regulations
When two-way radios are used as a consequence of employment, the Local Government Regulations requires
users to be fully aware of and able to control their exposure to meet occupational requirements. Exposure
awareness can be facilitated by the use of a product label directing users to specific user awareness
information. Your Retevis two-way radio has a RF Exposure Product Label. Also, your Retevis user manual, or
separate safety booklet includes information and operating instructions required to control your RF exposure and
to satisfy compliance requirements.
Radio License
Governments keep the radios in classification, business two-way radios operate on radio frequencies that are
regulated by the local radio management departments (FCC, ISED, OFCOM, ANFR, BFTK, Bundesnetzagen-
tur...).To transmit on these frequencies, you are required to have a license issued by them. The detailed
classification and the use of your two radios, please contact the local government radio management
departments.
Use of this radio outside the country where it was intended to be distributed is subject to government regulations
and may be prohibited.
Unauthorized modification and adjustment
Changes or modifications not expressly approved by the party responsible for compliance may void the user’s
authority granted by the local government radio management departments to operate this radio and should not
be made. To comply with the corresponding requirements, transmitter adjustments should be made only by or
under the supervision of a person certified as technically qualified to perform transmitter maintenance and
repairs in the private land mobile and fixed services as certified by an organization representative of the user of
those services.
Replacement of any transmitter component (crystal, semiconductor, etc.) not authorized by the local government
radio management departments equipment authorization for this radio could violate the rules.
FCC Requirements:
This device complies with part 15 of the FCC Rules. Operation is subject to the condition that this device does
not cause harmful interference. (Licensed radios are applicable);
This device complies with part 15 of the FCC Rules. Operation is subject to the following two conditions: (Other
devices are applicable)
(1) This device may not cause harmful interference, and
(2) this device must accept any interference received, including interference that may cause undesired
operation.
NOTE:
•This equipment has been tested and found to comply with the limits for a Class A digital device, pursuant to part
15 of the FCC Rules. These limits are designed to provide reasonable protection against harmful interference
when the equipment is operated in a commercial environment. This equipment generates, uses, and can radiate
radio frequency energy and, if not installed and used in accordance with the instruction manual, may cause
harmful interference to radio communications. Operation of this equipment in a residential area is likely to cause
harmful interference in which case the user will be required to correct the interference at his own expense.
8

•This equipment has been tested and found to comply with the limits for a Class B digital device, pursuant to part
15 of the FCC Rules. These limits are designed to provide reasonable protection against harmful interference in
a residential installation. This equipment generates, uses and can radiate radio frequency energy and, if not
installed and used in accordance with the instructions, may cause harmful interference to radio communications.
However, there is no guarantee that interference will not occur in a particular installation. If this equipment does
cause harmful interference to radio or television reception, which can be determined by turning the equipment off
and on, the user is encouraged to try to correct the interference by one or more of the following measures:
—Reorient or relocate the receiving antenna.
—Increase the separation between the equipment and receiver.
—Connect the equipment into an outlet on a circuit different from that to which the receiver is connected.
—Consult the dealer or an experienced radio/TV technician for help.
CE Requirements:
•(Simple EU declaration of conformity) Shenzhen Retevis Technology Co., Ltd. declares that the radio equipment
type is in compliance with the essential requirements and other relevant provisions of RED Directive 2014/53/EU
and the ROHS Directive 2011/65/EU and the WEEE Directive 2012/19/EU; the full text of the EU declaration of
conformity is available at the following internet address: www.retevis.com.
•Restriction Information
This product can be used in EU countries and regions, including: Belgium (BE), Bulgaria (BG), Czech Republic
(CZ), Denmark (DK), Germany (DE), Estonia (EE), Ireland (IE), Greece (EL), Spain (ES), France (FR), Croatia
(HR), Italy (IT), Cyprus (CY), Latvia (LV), Lithuania (LT), Luxembourg (LU), Hungary (HU), Malta (MT),
Netherlands (NL), Austria (AT), Poland (PL), Portugal (PT), Romania (RO), Slovenia (SI), Slovakia (SK), Finland
(FI), Sweden (SE) and United Kingdom (UK).
For the warning information of the frequency restriction, please refer to the package or manual section.
•Disposal
The crossed-out wheeled-bin symbol on your product, literature, or packaging reminds you that in the
European Union, all electrical and electronic products, batteries, and accumulators (rechargeable
batteries) must be taken to designated collection locations at the end of their working life. Do not dispo-
se of these products as unsorted municipal waste. Dispose of them according to the laws in your area.
IC Requirements:
Licence-exempt radio apparatus
This device contains licence-exempt transmitter(s)/receiver(s) that comply with Innovation, Science and
Economic Development Canada’s licence-exempt RSS(s). Operation is subject to the following two conditions:
(1) This device may not cause interference.
(2) This device must accept any interference, including interference that may cause undesired operation of the
device.
Le présent appareil est conforme aux CNR d’Industrie Canada applicables aux appareils radio exempts de
licence. L’exploitation est autorisée aux deux conditions suivantes :
(1) l’appareil ne doit pas produire de brouillage;
(2) l’utilisateur de l’appareil doit accepter tout brouillage radioélectrique subi, même si le brouillage est
susceptible d’en compromettre le fonctionnement.
RF Exposure Information
•DO NOT operate the radio without a proper antenna attached, as this may damage the radio and may also
cause you to exceed RF exposure limits. A proper antenna is the antenna supplied with this radio by the
manufacturer or an antenna specifically authorized by the manufacturer for use with this radio, and the antenna
gain shall not exceed the specified gain by the manufacturer declared.
•DO NOT transmit for more than 50% of total radio use time, more than 50% of the time can cause RF exposure
compliance requirements to be exceeded.
•During transmissions, your radio generates RF energy that can possibly cause interference with other devices
or systems. To avoid such interference, turn off the radio in areas where signs are posted to do so.
•DO NOT operate the transmitter in areas that are sensitive to electromagnetic radiation such as hospitals,
aircraft, and blasting sites.
•Portable Device, this transmitter may operate with the antenna(s) documented in this filing in Push-to-Talk and
body-worn configurations. RF exposure compliance is limited to the specific belt-clip and accessory configura-
tions as documented in this filing and the separation distance between user and the device or its antenna shall
be at least 2.5 cm.
•Mobile Device, during operation, the separation distance between user and the antenna subjects to actual
regulations, this separation distance will ensure that there is sufficient distance from a properly installed
externally-mounted antenna to satisfy the RF exposure requirements.
9

10
•Occupational/Controlled Radio, this radio is designed for and classified as “Occupational/Controlled Use Only”,
meaning it must be used only during the course of employment by individuals aware of the hazards, and the
ways to minimize such hazards; NOT intended for use in a General population/uncontrolled environment.
•General population/uncontrolled Radio, this radio is designed for and classified as “General population/uncon-
trolled Use”.
RF Exposure Compliance and Control Guidelines and Operating Instructions
To control your exposure and ensure compliance with the occupational/controlled environment exposure limits,
always adhere to the following procedures.
Guidelines:
•User awareness instructions should accompany the device when transferred to other users.
•Do not use this device if the operational requirements described herein are not met.
Operating Instructions:
•Transmit no more than the rated duty factor of 50% of the time. To Transmit (Talk), push the Push to Talk (PTT)
button. To receive calls (listen), release the PTT button. Transmitting 50% of the time, or less, is important
because the radio generates measurable RF energy exposure only when transmitting in terms of measuring for
standards compliance.
•Transmit only when people outside the vehicle are at least the recommended minimum lateral distance away
from a properly installed according to installation instructions, externally mounted antenna.
•When operating in front of the face, worn on the body, always place the radio in a Retevis approved clip, holder,
holster, case, or body harness for this product. Using approved body-worn accessories is important because the
use of Non-Retevis approved accessories may result in exposure levels, which exceed the IEEE/ICNIRP RF
exposure limits.
Hand-held Mode
• Hold the radio in a vertical position with the microphone (and other parts of the radio including the
antenna) at least 2.5 cm (one inch) away from the nose or lips. The antenna should be kept away
from the eyes. Keeping the radio at a proper distance is important as RF exposure decreases with
increasing distance from the antenna.
Phone Mode
•When placing or receiving a phone call, hold your radio product as you would a wireless telephone. Speak
directly into the microphone.
Electromagnetic Interference/Compatibility
NOTE: Nearly every electronic device is susceptible to electromagnetic interference (EMI) if inadequately
shielded, designed, or otherwise configured for electromagnetic compatibility
Avoid Choking Hazard
Small Parts. Not for children under 3 years.
Turn off your radio power in the following conditions:
WARNING
•Turn off your radio before removing (installing) a battery or accessory or when charging battery.
•Turn off your radio when you are in a potentially hazardous environments: Near electrical blasting
caps, in a blasting area, in explosive atmospheres (inflammable gas, dust particles, metallic powders,
grain powders, etc.).
•Turn off your radio while taking on fuel or while parked at gasoline service stations.
To avoid electromagnetic interference and/or compatibility conflicts
•Turn off your radio in any facility where posted notices instruct you to do so, hospitals or health care
facilities (Pacemakers, Hearing Aids and Other Medical Devices) may be using equipment that is
sensitive to external RF energy.
•Turn off your radio when on board an aircraft. Any use of a radio must be in accordance with
applicable regulations per airline crew instructions.
• Use the lowest volume necessary to do your job.
• Turn up the volume only if you are in noisy surroundings.
• Turn down the volume before adding headset or earpiece.
• Limit the amount of time you use headsets or earpieces at high volume.
• When using the radio without a headset or earpiece, do not place the radio's speaker directly
against your ear
Protect your hearing:
WARNING

11
Antennas
•Do not use any portable radio that has a damaged antenna. If a damaged antenna comes into
contact with the skin when the radio is in use, a minor burn can result.
Batteries (If appropriate)
•When the conductive material such as jewelry, keys or chains touch exposed terminals of the
batteries, may complete an electrical circuit (short circuit the battery) and become hot to cause bodily
injury such as burns. Exercise care in handling any battery, particularly when placing it inside a
pocket, purse or other container with metal objects.
Long transmission
•When the transceiver is used for long transmissions, the radiator and chassis will become hot.
• Use careful with the earphone maybe possible excessive sound pressure from earphones and
headphones can cause hearing loss.
Note: Exposure to loud noises from any source for extended periods of time may temporarily or
permanently affect your hearing. The louder the radio's volume, the less time is required before
your hearing could be affected. Hearing damage from loud noise is sometimes undetectable
at first and can have a cumulative effect.
Forbid
•Do not use charger outdoors or in moist environments, use only in dry locations/conditions.
•Do not disassemble the charger, that may result in risk of electrical shock or fire.
•Do not operate the charger if it has been broken or damaged in any way.
•Do not place a portable radio in the area over an air bag or in the air bag deployment area. The radio
may be propelled with great force and cause serious injury to occupants of the vehicle when the air
bag inflates.
To reduce risk
•Pull by the plug rather than the cord when disconnecting the charger.
•Unplug the charger from the AC outlet before attempting any maintenance or cleaning.
•Contact Retevis for assistance regarding repairs and service.
•The adapter shall be installed near the equipment and shall be easily accessible
•Contact Retevis for assistance regarding repairs and service.
•The adapter shall be installed near the equipment and shall be easily accessible
•This radio meets the RF exposure guidelines when used with the Retevis accessories supplied or
designated for the product. Use of other accessories may not ensure compliance with the RF
exposure guidelines and may violate regulations.
•For a list of Retevis-approved accessories for your radio model, visit the following website:
http://www.Retevis.com
Approved Accessories
WARNING
Safety Operation
WARNING
WARNING
Avoid Burns

Hauptfunktionen
TOT , Scan , VOX
CTCSS/DCS
Eingabeaufforderung für chinesische und englische Sprache
Batteriesparfunktion
Alarm bei schwacher Batterie
High / Low Power wählbar
Breites / schmales Band wählbar
Programmierschutz
Besetzt-Sperrfunktion
Squelch-Level wählbar
Scrambler
ANI-Funktion (Active Noise Cancelling)
10W/5W wählbar über Seitentaste/CPS
Seitentastenbelegung
Ausrüstung auspacken und prüfen
Willkommen bei unserem Funkgerät. Packen Sie das Radio vorsichtig aus. Wir empfehlen Ihnen, die in der
folgenden Tabelle aufgeführten Elemente zu überprüfen, bevor Sie das Paket entsorgen. Wenn ein Artikel fehlt,
wenden Sie sich bitte sofort an den Händler vor Ort.
Beiliegendes Zubehör
Die Batterie aufladen
Verwenden Sie zum Laden des Akkus das dafür vorgesehene Ladegerät und befolgen
Sie die Schritte
• Stecken Sie die DC-Buchse des Netzteils in die DC-Buchse hinter dem Ladeset.
• Stecken Sie das Netzteil in die Netzsteckdose. Jetzt leuchten die roten und grünen
Ladeanzeigen auf, und schließen Sie das Netzteil erfolgreich an.
• Legen Sie den Akku in ein mit Akku ausgestattetes Radio in das Ladeset ein.
Die rote Anzeige leuchtet weiter, was bedeutet, dass das Radio aufgeladen wird.
Die rote Anzeige blinkt, wenn der Akku längere Zeit nicht verwendet und überladen wird.
Und wird auf normale Ladung umgeschaltet, wenn die rote Anzeige weiter leuchtet.
• Vergewissern Sie sich, dass der Akku vollständig aufgeladen ist, wenn die rote Anzeige
erlischt.
• Bitte nehmen Sie den Adapter und den Akku ab.
Batterie verwenden
Der Akku ist werkseitig nicht vollständig aufgeladen. Bitte laden Sie ihn vor dem Gebrauch auf.
Nach dem Kauf oder einer längeren Lagerung (mehr als zwei Monate) kann das erste Laden des Akkus nicht
Antenne
Aufladen
Litium-Ionen Batterie Gürtelschnalle
Handbuch
12
User’s manual
RB85

dazu führen, dass der Akku seine normale Betriebskapazität erreicht. Nach zwei- oder dreimaligem Wiederholen
des Ladens / Entladens steigt die Betriebskapazität auf ihre normale Kapazität.
Hinweis: Laden Sie den Akku nach dem vollständigen Aufladen nicht erneut auf und nehmen Sie ihn vom
Ladegerät ab. Wenn nicht, wird die Akkulaufzeit durch Überladung kurzgeschlossen oder beschädigt.
Hinweis:• Die Temperatur zum Laden sollte zwischen 5°C und 40°C liegen. Die Batterie kann außerhalb dieses
Temperaturbereichs nicht vollständig aufgeladen werden. Bereiten Sie bitte eine Ersatzbatterie für das kühlere
Wetter vor und entsorgen Sie die defekte Batterie nicht normale Temperatur.
• Bitte reinigen Sie den Batteriepol, wenn er mit Staub oder Schmutz bedeckt ist.
• Um sicherzustellen, dass der Akku normal verwendet und aufgeladen werden kann.
• Bitte schalten Sie das Radio vor dem Aufladen aus.
• Laden Sie den Akku nicht auf, bevor das Radio oder der Akku nass ist.
• Bitte tauschen Sie eine andere neue Batterie aus, wenn die normale Kapazität der Batterie nach dem
vollständigen Aufladen nicht wiederhergestellt werden kann.
Batterietyp
Bitte verwenden Sie zum Laden den zugewiesenen Akku. Es kann explodieren und den menschlichen Körper
schädigen, wenn andere Batterien verwendet werden.
Sicherheitstipps
Entsorgen Sie den Akku nicht ins Feuer.
Klappen Sie das Batteriefach nicht selbst auf.
Batteriespeicher
1) Bitte laden Sie den Akku zuerst vollständig auf, um ihn vor langer Zeit zu lagern. Verwenden Sie ihn nicht. Um
zu vermeiden, dass sich der Akku selbst überlädt und beschädigt wird.
2) Um zu vermeiden, dass die Akkukapazität kurz wird, laden Sie den Akku nach längerer Nichtbenutzung
vollständig auf. Es wird empfohlen, den Akku nach sechs Monaten erneut aufzuladen.
3) Bitte achten Sie auf die Temperatur und Luftfeuchtigkeit, um die Batterie zu lagern. Stellen Sie sicher, dass
der Akku unter der normalen Temperatur lagert, kühl und trocken ist, um die Batterieentladung zu verringern.
Installation und Deinstallation des Zubehörs
Batterie ein- / ausbauen
Um die Batterie in das Batteriepositionierungsloch des Funkbodens einzubauen, drücken Sie die Batterie und
drücken Sie die Taste vollständig, um die Batterie zu verriegeln. Um die Batterie zu entfernen, schalten Sie bitte
das Radio aus und drücken Sie dann den Batterieknopf des Radiooberteils. Nehmen Sie schließlich die Batterie ab.
Installieren / Entfernen der Antenne
Schrauben Sie die Antenne in den Anschluss oben am Radio, indem
Sie die Antenne an der Basis halten und im Uhrzeigersinn drehen, bis
sie fest sitzt.
Drehen Sie die Antenne gegen den Uhrzeigersinn, bis Sie sie
entfernen können.
(Setzen Sie den Akku ein) (Entfernen Sie die Batterie)
13

Kopfhörer / Programmierbuchse installieren
• Decken Sie den Kopfhörerdeckel ab und stecken Sie die Kopfhörer direkt in die
Kopfhörerlöcher (Kopfhörer müssen zusätzlich gekauft werden).
• Sie können Computerprogrammiersoftware verwenden (wenden Sie sich an lokale
Händler, um Informationen zu Computerprogrammiersoftware zu erhalten).
Hinweis: Wenn Ihr Radio mit der VOX-Funktion entwickelt wurde, sollten Sie die aktive
VOX-Funktion einmal wieder einschalten.
Anbringen des Gürtelclips
Befestigen Sie gegebenenfalls den Gürtelclip mit den mitgelieferten Schrauben an der
Rückseite der Batterie.
Power / Volume-Regler Einschalten
durch Drehen im Uhrzeigersinn ,
Schalten Sie das Gerät aus, indem
Sie es gegen den Uhrzeigersinn
drehen, bis Sie den "Kata" -Sound
hören.VOL-Steuerung durch Drehen.
Antenne
Kanalauswahlknopf Wählen Sie
Kanal 1-16 durch Drehen
Lautsprecher
Mikrofon
Bekannt werden
14

Grundoperationen
LED-Anzeige Sie leuchtet beim Senden rot und beim Empfang grün.
Kanalauswahlknopf
Drehen Sie ihn, um Kanal 1-16 auszuwählen, drehen Sie ihn im Uhrzeigersinn, um ihn zu erhöhen, und drehen
Sie ihn gegen den Uhrzeigersinn, um ihn zu verringern. Ein Alarmton ertönt, wenn ein leerer Kanal ausgewählt
wird.
Power / Volume-Regler
Drehen Sie es im Uhrzeigersinn, um das Radio einzuschalten. Um das Radio auszuschalten, drehen Sie es um
im Uhrzeigersinn, bis ein Klickgeräusch zu hören ist, VOL-Steuerung durch Drehen.
PTT-Schalter
Drücken Sie die PTT-Taste und sprechen Sie dann mit dem Mikrofon. Die Anzeigelampe leuchtet rot. Wenn der
Kanal keine Sendefrequenz hat, ertönt ein "Du Du" -Ton und die Anzeigelampe leuchtet rot.
Lassen Sie den PTT-Schalter los, um zu empfangen. Es leuchtet grün, wenn ein Signal vorliegt.
M-Taste ist Moni-Taste
Überwachung: Überwachen Sie den von Ihnen ausgewählten Kanal, wenn sich jemand im Anruf befindet und
kein lautes "Rustle" -Signal zu hören ist.
Squelch-Level
Der Squelch-Pegel bestimmt die Signalstärke zum Öffnen des Lautsprechers des Radios. Wenn der
Squelch-Pegel niedriger ist, ist das Hintergrundgeräusch beim Öffnen des Lautsprechers des Radios höher und
der entsprechende Kommunikationsbereich ist weiter, aber die Entstörungskapazität ist schwächer. Die
Standardeinstellung für die Squelch-Stufe ist 5, Sie können sie über das Menü "Squelch-Stufe" der "Optionalen
Funktionen" in der Software einstellen. Die Stufen 0 bis 9 können ausgewählt werden. 0 ist die niedrigste Stufe.
Timeout-Timer (TOT)
Der Zweck von TOT besteht darin, zu verhindern, dass ein Radio zu lange in einem Kanal spricht, und zu
verhindern, dass das Radio durch kontinuierliche Übertragung beschädigt wird. Wenn die Sendezeit die
voreingestellte TOT-Zeit überschreitet, stoppt das Radio die Übertragung und es ertönt ein Alarmton.
Lassen Sie den PTT-Schalter los, um den Alarmton zu stoppen. Das Radio kehrt in den Empfangsmodus zurück.
PTT-Schalter
Seitenschlüssel 1
Seitentaste2
Lautsprecher-
/ Mikrofonbuchse
Batteriepack
Batterieentriegelung
15

Scan ein / aus
Wenn das Radio als Scan per Software eingestellt ist, drehen Sie den Kanalauswahlknopf auf Kanal
In 16 wird der Scanvorgang gestartet. Es werden alle scannbaren Kanäle von Kanal 1 bis 16 gescannt.
Sie können als Kanal definieren, der in der Software hinzugefügt oder gelöscht wird.
Wenn sich im Scan-Kanal ein Signal befindet, stoppt es im Kanal, um zu sprechen.
Kein Tee. Das Radio bleibt in dem Kanal, der das Signal hat, und 15 Sekunden nach dem Verschwinden des
Signals wird das Scannen fortgesetzt.
b. Es kann nicht gescannt werden, wenn weniger als 2 scannbare Kanäle vorhanden sind.
Nicht standardmäßiger CTCSS-Code programmierbar Sie können nicht standardmäßigen CTCSS-Code mit der
Programmsoftware programmieren.
a. Wenn Sie den nicht standardmäßigen CTCSS-Code für Kanäle festlegen, können Sie für die CTCSS-Fre-
quenz 67,0 bis 254,1 Hz auswählen.
b. Der nicht standardmäßige CTCSS-Code sollte auf demselben Kanal eingestellt sein.
Eingabeaufforderung für Englisch / Chinesisch
Sprachaufforderung Aus, das Radio gibt keine Aufforderung aus. Wählen Sie Chinesisch aus und öffnen Sie das
Chinesisch Funktion "Eingabeaufforderung", wählen Sie Englisch aus und öffnen Sie die englische Funktion
"Eingabeaufforderung".
VOX
Sprechen Sie mit normaler Stimme mit dem Mikrofon, um direkt zu senden, ohne den PTT-Schalter drücken zu
müssen.
Schalten Sie VOX über die Programmiersoftware ein / aus.
1) Wenn VOX in Ihrem Arbeitskanal eingeschaltet ist.
Sprechen Sie direkt mit dem Mikrofon, es sendet automatisch.
Das Radio hört auf zu senden, wenn keine Stimme zu hören ist, und wartet auf den Empfang.
2) Wenn ein Headset mit Mikrofon verwendet wird.
Wenn VOX eingeschaltet ist, sollten Sie die VOX-Verstärkung für das Radio verwenden, um die Sprachlaut-
stärke zu ermitteln.
• Wenn das Mikrofon zu empfindlich ist, beginnt das Funkgeräusch zu übertragen.
• Wenn das Mikrofon nicht empfindlich ist, kann das Radio Ihre Stimme nicht erfassen. Bitte passen Sie den
VoX-Pegel gut an, um eine reibungslose Kommunikation zu gewährleisten.
Hinweis: Wenn VOX eingeschaltet ist und die VOX-Verstärkung hoch und empfindlich ist und Mikrofon /
Lautsprecher mit Radio verbunden wird, verursacht das Signal von Mikrofon / Lautsprecher wahrscheinlich eine
Funkübertragung.
Batteriesparfunktion
Die Batteriekapazität wird gespeichert, wenn diese Funktion über die Programmsoftware aktiviert wird. Dies
bedeutet, dass das Radio keine Batterie spart, wenn kein Häkchen vorhanden ist. Es bedeutet, dass das Radio
die Batterie spart, wenn ein Häkchen vorhanden ist.
Eingabeaufforderung für niedrigen Batteriestand
Hinweis: Niederspannung: Wenn die Spannung unter einen bestimmten Wert fällt und die Auswahlaufforderung
ausgeschaltet ist, wird alle 15 Sekunden eine Sprachaufforderung „DeDe“ ausgegeben. Wenn Sie sich für
chinesische oder englische Sprache entscheiden, halten Sie die PTT-Taste gedrückt, oder VOX ist ungültig und
gibt eine Batteriesprachaufforderung "Bitte ändern" und einen lauten "Di" -Ton aus, bis PTT VOX loslässt oder
beendet.
Busy Channel Lockout (BCLO)
Wenn Sie die Sperrung des besetzten Kanals eingestellt haben, drücken Sie nach dem Empfang eines Signals
die PTT-Taste, um das Senden zu verhindern, und geben Sie bis zur Freigabe von ptt "Di" aus
High / Low Power selektiv
Die Standardeinstellung ist hohe Leistung. Sie können Highyow-Leistung über das Menü Leistung in der
Software auswählen.
Selektive Breitband- / Schmalbandbreite (25kHz / 12.5KHz)
Die Standardeinstellung ist Breitband. Sie können in der Software unter „Kanal“ die Option „Breit / Schmal“ auswählen.
16

PC-Programmschutz
Sie können in der Software einstellen.
QT / DQT
Sie können das QT / DQT über die Programmsoftware auswählen. Wenn ein Kanal QT / DQT hat, wird der
Lautsprecher eingeschaltet, wenn er denselben QT / DQT empfängt. Wenn im selben Kanal ein Signal mit
unterschiedlichem QT / DQT gesendet wird, öffnet sich der Lautsprecher nicht und die Anzeigelampe leuchtet
grün.
Scrambler
Wenn dem Radio die Scrambler-Funktion erlaubt ist und Sie die Taste drücken, wird die TX-Stimme mit dem
Scrambler gesendet. Andere Funkgeräte haben das Signal nur empfangen, wenn sich der Scrambler ebenfalls
einschaltet.
5 / 10W Leistungsauswahl
Das Radio hat eine wählbare Leistung von 5 W / 10 W. Sie können CPS oder Seitentaste einstellen.
ANC-Funktion (Activate Noise Cancelling)
Audio Sound Active Control ist eine Signalverarbeitungsmethode, die die effektive Schallamplitude reduziert, um
das Signal-Rausch-Verhältnis (SNR) zu verbessern, sodass unerwünschtes Rauschen weniger wahrnehmbar
ist. Die ANC-Methode wird auch als Audio Noise Reduction (ANR) bezeichnet. ANC oder ANR basieren auf einer
kohärenten Akustik, die das ursprüngliche Schallfeld in all seinen Formen genau nachbildet. Dieses mit der
ANC-Funktion (Active Noise Cancelling) ausgestattete Radio kann Ihnen helfen, in lauten Umgebungen klar zu
hören.
17
Seiten-Tastenbelegung
Diese Funktion soll das Radio bei der Verwendung überzeugen.
Die Seitentastenfunktion unterstützt Folgendes:
Kurz drücken:
1.Aus
2. Geräuschunterdrückung
3. Kontinuierlicher Monitor
4.Hohe/Niedrige Leistung
5. Notfallalarm
6. Batteriekapazität
7.Scannen
8.VOX
9. Besetzt-Kanalsperre
Lange drücken:
1.Aus
2. Geräuschunterdrückung
3. Kontinuierlicher Monitor
4.Überwachen momentan
5. Hohe/niedrige Leistung
6. Notfallalarm
7. Batterie anzeigen
8.Scannen
9.Vox
10.Besetzt-Kanalsperre
Table of contents
Languages:
Other Retevis Two-way Radio manuals

Retevis
Retevis RT-35 User manual

Retevis
Retevis RT25 User manual

Retevis
Retevis RA685 User manual

Retevis
Retevis RB25 User manual

Retevis
Retevis RT49B User manual

Retevis
Retevis RT45 User manual

Retevis
Retevis RT628S User manual

Retevis
Retevis RB27 User manual

Retevis
Retevis RT-388 User manual

Retevis
Retevis RT18 User manual

Retevis
Retevis RB18 User manual

Retevis
Retevis RT42 User manual

Retevis
Retevis RT67 User manual

Retevis
Retevis RT75 User manual

Retevis
Retevis RT40 User manual

Retevis
Retevis RT-628 User manual

Retevis
Retevis RT37 User manual

Retevis
Retevis RB35 User manual

Retevis
Retevis RT33 User manual

Retevis
Retevis T-628 Manual