Retigo Orange Vision Plus 2E0623IA User manual

Retigo
Orange Vision Plus
PERFECTION IN COOKING AND MORE...
USER’SMANUAL
READ THIS MANUAL BEFORE USE

DEND OF COOKINGCPROGRAM DETAILS
QUICKVIEW
B1 Option
Preheat/Cool
B2 Cooking mode
selection
B3 Humidity selection
B4 Setting the time
B5 Setting the
temperature
B6 Settings for other
functions
B7 Step back
B8 Overview of program
steps
B9 Temperature probe
settings
B10 Start cooking
D1 Information about
the selected mode/
program for the
cooking process
D2 Disable the sound
signal
D3 Option to immediately
extend the last
cooking step
D4 Save the completed
cooking process as
aprogram
D5 Display power
consumption during
the cooking process
D6 Return to the last
screen before pressing
the START button
A1 Current time
A2 Manual cooking setup
A3 Selecting previously
used programs /
baking or cooking
methods
A4 User and service
settings
A5 Selection from saved
programs
A6 Shows the history of
all programs started
on the equipment with
aHACCP data record
A7 Active Cleaning
automatic cleaning
C1 Option
Preheat/Cool
C2 Step parameters
C3 Enter another program
step
C4 Step back
C5 Enter/delete
aprogram step
C6 Start cooking
DESCRIPTION OF THE MOST COMMON SCREENS
AMAIN SCREEN BMANUAL MODE
12:00
Manual cooking
LastTen
Cleaning
Settings
Programs
HACCP data
10
A1
A2
A3
A4 A7
A6
A5
190°C
Manual cooking
0:30h:m
180°C
100%
F
Start
Back
B4
B5
B6
B7
B1
B2
B3
B9
B10
B8
1
2
190°C
Steaks
165°C
180°C
0:06
0:02
100%
100%
100%
30%
+Add step
Start
Back C6
C5
C1
C2
C3
C4
Manual cooking
Stop sound
Cooking processfinished
Save as program
Eco Logic
Extra time
Back
D2
D3
D4
D5
D6
D1

3
TABLE OF CONTENTS
FOREWORD 4
ABOUT THIS MANUAL 5
01 I BASIC INFORMATION ABOUT THE APPLIANCE 7
1.1 USE: WHAT IT’SFOR 7
1.2 DESCRIPTION OF THE APPLIANCE 7
1.3 OPTIONAL EQUIPMENT AND ACCESSORIES 7
1.4 CONTROLS: BASICS 8
02 ISAFETY DURING USE 9
2.1 SAFE OPERATION 9
2.2 PROTECTIVE AIDS 10
2.3 PROTECTIVE ELEMENTS OF THE APPLIANCE 10
2.4 DANGEROUS LOCATIONS AND RESIDUAL HAZARDS 11
2.5 USING ACCESSORIES 13
03 ICONTROLS 14
3.1 TOUCHSCREEN PANEL 14
3.2 OTHER BUTTONS 14
3.3 KEYBOARD 14
04 I COOKING 15
4.1 MANUAL MODE 15
4.2 PROGRAMS 18
4.3 MULTITASKING 25
05 I OTHER 26
5.1 LOW-TEMPERATURE BAKING 26
5.2 REGENERATION AND KEEP WARM 26
06 I SETTINGS 27
6.1 BASIC SETTINGS 27
6.2 DATA HACCP 33
07 IMAINTENANCE 35
7.1 DAILY MAINTENANCE 35
7.2 WEEKLY MAINTENANCE 37
7.3 HALF-YEARLY MAINTENANCE 39
7.4 YEARLY MAINTENANCE 39
08IAUTOMATIC CLEANING 40
8.1 AUTOMATIC CLEANING: WHAT YOU SHOULD KNOW 40
8.2 STARTING THE CLEANING PROCESS 41
09IERROR MESSAGE TABLE 42
10ISERVICE LIFE, TAKING OUT OF OPERATION AND WARRANTY 43

4
FOREWORD
Dear customer,
Thank you for purchasing aproduct from Retigo s.r.o. We are amanufacturer
and supplier of specialised professional culinary appliances with along track
record of success. We believe this appliance will help you implement your
ideas with outstanding results in your daily work. With this appliance, you
can produce meals of such quality that your customers will come back again
and again.
We wish you lots of enjoyment and success in using the Orange Vision Plus.
User'smanualIRetigo Orange Vision PlusIFOREWORD

5
ABOUT THIS MANUAL
This manual should help you to easily understand how to operate the Orange
Vision Plus and inform you about its options and capabilities.
SYMBOLS USED IN THIS USER'SMANUAL
In this manual, you will find symbols with the following meanings:
SYMBOL MEANING
These symbols mean "ATTENTION"
and "WARNING", they inform you
about things that may cause serious
injury to the user and/or damage
to the machine. Furthermore, they
indicate an important instruction,
feature, method or issue that
must be followed or considered
when operating or maintaining the
appliance.
This symbol indicates useful
information related to the appliance
or its accessories.
This symbol is a reference to
another chapter in the manual.
It indicates other procedure
options that you may, but do not
necessarily have to, apply.
Dummy symbol for an icon of
certain menus or programs and for
pictograms.
VALIDITY OF DOCUMENTATION
ThismanualrelatestoRPtypeappliancesandthefollowingmodels:
ELECTRICAL MODELS
2E0623IA, 2E0611IA, 2E0611BA, 2E1011IA, 2E1011BA, 2E2011IA,
2E2011BA, 2E1221IA, 2E1221BA, 2E2021IA, 2E2021BA.
GAS MODELS
2G0611IA, 2G1011IA, 2G2011IA, 2G1221IA, 2G2021IA.
WHO IS THE MANUAL FOR?
This manual is intended for anyone who comes into contact with the
appliance only during its maintenance or operation. These people must study
the manual carefully before beginning any kind of work with the appliance.
ESSENTIAL INFORMATION
Study the manual carefully. The manual must be considered an inseparable
part of the appliance. Therefore, keep it for future use.
Follow its instructions exactly, not only to make using the appliance easier,
but also to ensure its optimal use and long lifetime.
Do not start the appliance unless you are thoroughly acquainted with all
instructions, prohibitions and recommendations indicated in this manual,
especially those in chapter "Safety during use".
The illustrations and pictures contained in this user'smanual may not always
correspond to reality, their purpose is the description of the main principles
of the device.
User'smanualIRetigo Orange Vision PlusIABOUT THIS MANUAL
The complete technology documentation for the appliance
can be found at the manufacturer’swebsite.
WHEN IN DOUBT
In practice, unforeseeable situations frequently arise that cannot be included
and described in this user'smanual. Therefore, when you're not sure what to
do, always contact the manufacturer:
RETIGO s.r.o.
Láň 2310
756 61 Rožnov pod Radhoštěm
+420 571 665 511
INFORETIGO.CZ
WWW.RETIGO.CZ
If you have any questions or doubts, feel free to contact the trained
professionals at the following telephone numbers:
PROFESSIONAL SALESPEOPLE:
+420 603 571 360
+420 604 568 562
PROFESSIONAL CHEFS:
+420 734 751 061
+420 727 867 220
PROFESSIONAL SERVICE TECHNICIANS:
+420 571 665 560
When contacting the manufacturer or trained professionals, please have your
appliance'sbasic information ready. This information can be found on the
model plate — see the chapter "Appliance identification".
Adetailed description of the data indicated on the model plate can
be found in the paragraph "Appliance identification".
ORGANIZATION OF CUSTOMER DOCUMENTATION
The customer documentation is made up of two parts:
- Transport and installation instructions
- Operating instructions

6
THE MAIN TOPIC OF THE TRANSPORT AND INSTALLATION
INSTRUCTIONS
-Basic information: describes the functions and main parts of the
appliance relevant to its installation
- Safety: describes safety and appropriate measures during installation
- Transport: contains the necessary information about moving the
appliance and handling it at the installation site
- Placement: describes and specifies rules for selecting the installation site
- Installation: describes set-up of the appliance, making the electrical
connections, connecting the gas (for gas models only), connecting the
water and drain, and finally the start-up.
- Decommissioning: describes the necessary tasks at the end of the
appliance’slifetime, including its disposal.
- Technical data: contains all dimensional sketches and connecting
dimensions
MAIN TOPICS IN THE USER'SMANUAL
- Basic information: describes the functions and main parts of the
appliance relevant to its installation
- Safety: describes safety and appropriate measures during installation
- Controls: describes the appliance’smain control elements
- Software operation: contains instructions for working with the control
software when cooking, describes settings, data import and export
- Cleaning: describes cleaning methods, work procedures and steps for
cleaning and the operator’shandling of the appliance
Maintenance: contains the instructions, maintenance plan, and handling of
the appliance during maintenance
APPLIANCE IDENTIFICATION
The model plate is on the right side of the appliance at the bottom. Themodel
plate lists the appliance'smanufacturer, technical data on the appliance and
the CE mark, indicating that the product complies with all requirements of
the standards ČSN, EN, IEC and government decrees.
Electrical models
A– Brand name
B – Model
2E – heat generation
method:
E– electric
1221 – machine size: 0623,
0611, 1011, 2011, 1221, 2021
I– steam generation
method:
I–injection
B –boiler
A – motor fan control
method:
A– frequency converter
Z– without frequency
converter
C– Electrical parameters
Gas models
A– Brand name
B – Model
2G – heat generation
method:
G – gas
0611 – Machine size: 0623,
0611, 1011, 2011, 1221, 2021
I– steam generation
method:
I– injection
A– motor fan control
method:
A– frequency converter
Z– without frequency
converter
C– Electrical parameters
D – Gas parameters
User'smanualIRetigo Orange Vision PlusIABOUT THIS MANUAL

7
01 I BASIC INFORMATION
ABOUT THE APPLIANCE
User'smanualIRetigo Orange Vision PlusI01 BASIC INFORMATION ABOUT THE APPLIANCE
1.1 USE: WHAT IT’SFOR
The Orange Vision Plus combi oven is a universal appliance for preparing
meals, including complete menus. It can be used for all types of food
preparation methods based on heat, for example baking, frying, grilling,
stewing, steam cooking, low-temperature overnight cooking, etc. The
process is performed either in manual mode or in automatic mode utilising
programs.
CORRECT USE OF THE APPLIANCE
• The appliance can be used only for heat preparation of various types of
food. This involves steam, hot air or acombination of the two. The food
must always be placed in standardized gastronorm containers, baking
trays dimensioned for baking or standard accessories exclusively from the
manufacturer.
• The cooking containers that are used must be made of stainless steel,
ceramics, heat-resistant plastic or enamelled steel.
• The appliance is exclusively for professional use in the culinary field.
LIMITATIONS ON THE USE OF THE APPLIANCE
The following must not be placed in the appliance:
- no food in enclosed jars or packaging
- no easily flammable items with an ignition point lower than 260°C, such
as for example low flash point oils, fats, wipes (wiping cloths)
- no dry powder or granulate
1.2 DESCRIPTION OF THE APPLIANCE
2
4
5
7
12
6
8
1
1718
9
13
314 15
10 1116
1. Hand shower (optional equipment)
2. Control panel
3. Detachable interior wall in front of fan
4. Side cover
5. Air and dust filter
6. USB connector
7. Drain cover
8. Height-adjustable legs
9. Condensation drip pan for the inner glass with automatic draining
10. Door with rounded exterior glass
11. Inner glass fastening clips
12. Temperature probe (optional equipment)
13. Door handle
14. Interior lighting
15. Openable inner glass of the door
16. Gastronorm container racks
17. Excess steam venting flap (optional equipment)
18. Venting chimney
Any use of the appliance beyond this application areas, including
modifications to safety or operational components without the
manufacturer's permission, is considered to constitute use not
conforming to its purpose. The company accepts no liability for damages
resulting from such use; the user bears all risk.
The user is also responsible for abiding by the conditions prescribed
by the manufacturer for installation, operation and maintenance of
the appliance, which must be maintained and repaired only by persons
familiar with it and instructed on its hazards.
1.3 OPTIONAL EQUIPMENT AND
ACCESSORIES
OPTIONAL EQUIPMENT
The standard configuration of Retigo Orange Vision Plus combi ovens
includes automatic cleaning. and 99 programs with 9 steps.
Optional equipment that can be purchased:
- Temperature probe
- Excess steam venting flap
- Standard hand shower
- Self-winding hand shower (excluding size 623).
OPTIONAL ACCESSORIES
GASTRONORM PANS AND BAKING TRAYS
Gastronorm pans and baking trays serve not only as containers for cooking
and baking, but are also suitable for transporting, serving and storing the
meals. They significantly contribute to higher work eciency - when one
plans their work properly, it is often unnecessary to transfer cooked or baked
meals from one pan or tray to another.
Adhere to workplace safety codes when handling gastronorm
containers, see 2. SAFETY DURING USE.
STANDS, RIDEIN TROLLEYS AND BRACKETS
Essential accessories for the combi oven include various stainless steel
stands, wall brackets (on model 623) and ride-in trolleys (on sizes 1011, 2011,
1221, 2021). Special equipment is considered to be banquet baskets, trolleys
and thermoboxes used for serving meals.

8
User'smanualIRetigo Orange Vision PlusI01 BASIC INFORMATION ABOUT THE APPLIANCE
VISION VENT HOOD
The Vision Vent condensation hood will enable you to comfortably maintain
apleasant climate in your kitchen thanks to strong exhaust performance and
intelligent switching. The Vision Vent is designed for the combi ovens Retigo
Vision 623, 611, 1011 and 2011.
OIL GUN
An oil gun is aspecial tool that allows one save up to 2/3 of the costs related
to oil consumption for cooking, or when frying in the appliance. Thanks to
the narrow nozzle, one can perfectly coat the food with avery fine layer
of oil, and maintain the beautiful colour of fried foods while keeping oil
consumption to aminimum. Thanks to the exchangeable nozzle, the oil gun
can be used for other viscous materials used in the food industry, such as
chocolate.
VISION SMOKER
The Vision Smoker smoke generator is asimple accessory compatible with
Orange Vision Plus and all Retigo combi ovens. Thanks to simple controls,
with the option to smoke up to three hours non-stop and its simple
maintenance, the Vision Smoker will enable you to liven up the oered meals
or to expand the menu with smoked specialities.
When working with the oil gun and the Vision Smoker, adhere to
workplace safety as described in the user manuals for this appliance.
1.4 CONTROLS: BASICS
TURNING ON AND OFF
The appliance is permanently connected to the power grid and it is turned on
and o by pressing an external main power switch. Its location is determined
by the operator of the appliance upon installation and you as the user must
be informed of its placement. During ordinary use, it is enough just to put the
appliance into Standby mode by pressing the white circle under the display
and then the Standby button.
OPENING AND CLOSING THE DOOR
The combi oven’sdoor is equipped with a closing mechanism that allows
right- or left-handed opening. Moving the lever to the side will release the
door latch. Pull on the handle to open the door.
To close the door, push on the handle (by slamming). If you have an appliance
with the ride-in trolley (2011, 1221, 2021) close the door and turn the door
handle clockwise by 90°.
PREHEATING THE BOILER (combi ovens with aboiler)
When the combi oven is turned on, the boiler is automatically filled with
water which is then heated. For this time, the start of the program will be
temporarily disabled in the "Steam" and "Hot air with steam" modes, until
the boiler is fully heated. After this time, the combi oven will automatically
continue running.

9
The appliance cannot be operated without a certain amount of caution,
alertness and common sense. Even though the appliance has been designed
and manufactured to meet all international safety standards, the user bears
primary responsibility for his or her personal safety while operating the
appliance. The manufacturer of the appliance bears no responsibility for
personal injury, equipment damage or environmental damage caused by
failure to operate the appliance according to the manual or by failure to
follow applicable safety regulations.
This chapter provides the most important information on working safely and
protecting the health of the user and all others who come into contact with
the appliance or its accessories.
2.1 SAFE OPERATION
GENERALLY
• The appliance may only be used by personnel authorised, qualified and
trained for operating it. Persons who are not authorised to use and have not
been trained in its operation must never be allowed to handle or maintain
it, or to perform any activity contrary to its use. Such unprofessional activity
may cause injury or damage the appliance.
• Arrange for regular training on how to operate the appliance. This prevents
occupational injuries and damage to the appliance.
• This appliance is to be used only for food preparation and in compliance
with the manual. Any other use is in conflict with its purpose and is
considered dangerous.
• For safety reasons, do not remove the hard covers or try to get inside
the appliance - risk of injury by electrical shock. The device contains no
components that the user can handle. Repair of any defects or maintenance
beyond that described in this manual must be done by aqualified service
technician.
• Do not install any heat sources in the immediate area of the appliance
(such as fryers, grills, cookers, hot plates, etc.).
Detailed requirements related to the location of the appliance are
provided in the transport and installation instructions.
• Do not work with the appliance if you suer from dizziness, fainting or
other weakness or lack of concentration or if under the influence of drugs
or alcohol!
• It is strictly forbidden to remove or damage the labels fastened to the
appliance.
• Only operate the appliance in perfect working order. Do not make any
changes to it.
• Follow the prescribed inspection plan, follow the instructions in the
user'smanual, adhere to generally applicable regulations for gas appliances.
• Do not place anything near the appliance that you could trip over. Keep the
workplace (including access ways) clean and tidy.
OPERATING ENVIRONMENT FOR THE APPLIANCE
• The permitted ambient temperature range is +4°Cto +35°C.
• The environment must not be explosive or toxic.
• Afire extinguisher or an automatic fire extinguishing system must not be
located directly above the appliance.
• There must be no flammable materials, gasses or liquids located
underneath or next to the appliance.
User'smanualIRetigo Orange Vision PlusI02 SAFETY DURING USE
BEFORE USING THE APPLIANCE
• Before starting the appliance, it is absolutely necessary to study the chapter
"Safety during use", along with this chapter.
• If you have any doubts about the appliance's installation, operation or
safety, contact your supplier.
• In the event that any damage occurs to the electrical equipment, it is
necessary to organise repairs without delay; adamaged appliance must
not be used.
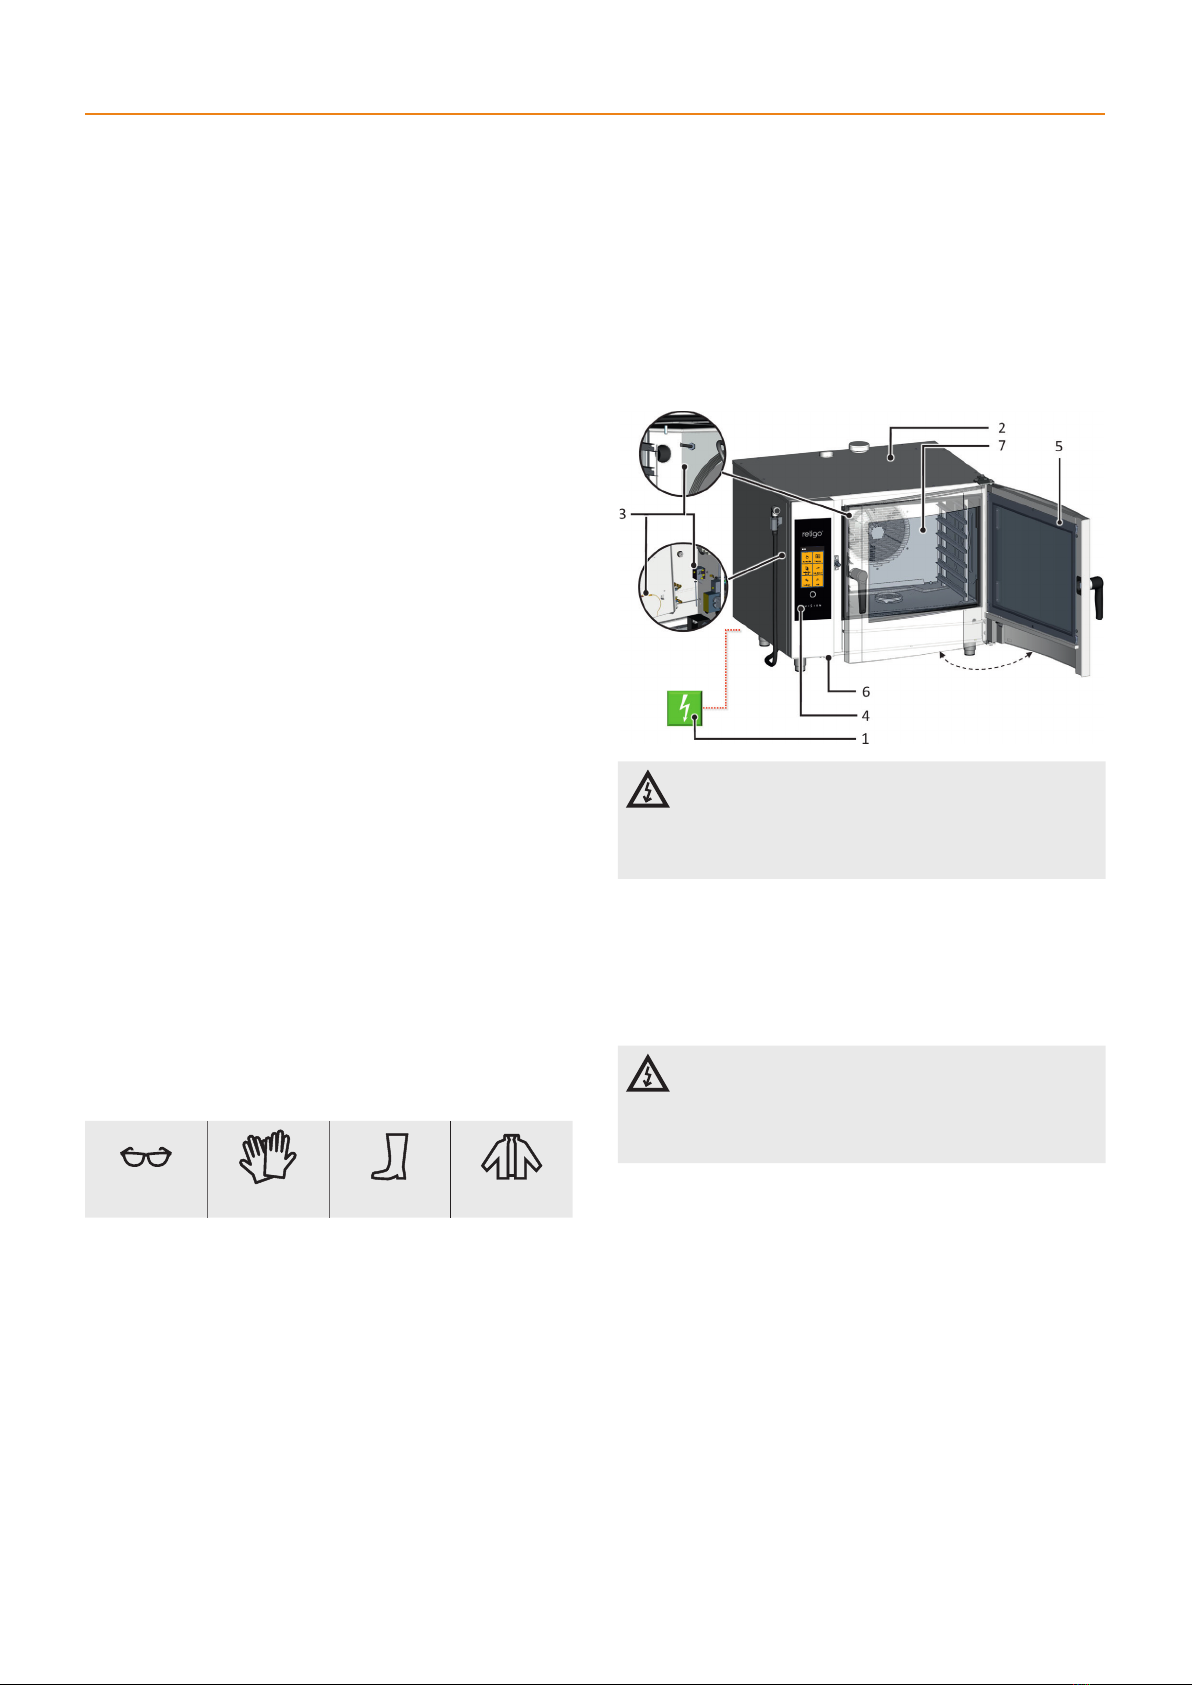
• Do not block the appliance’s vents with objects, and especially do not
place cooking utensils, fabrics or other items on the appliance. Make sure
that steam freely escapes from the vents at the top of the appliance.
• Before using, check the appliance’s cooking chamber. Remove all
remaining food, cleaning agent residues or other objects, and thoroughly
rinse the cooking chamber with the hand shower.
• Be sure not to sprinkle or spray water on the appliance, and do not place
objects filled with water on it.
• Do not place sources of open flame on or near the appliance.
DURING USE OF THE APPLIANCE
• Do not continue using the appliance if you have the slightest doubt as to
its safe operation or whether it is damaged. Turn it o immediately, unplug
the power cable, shut o the water supply, and contact your supplier.
• If noise increases beyond the permitted limit while the while you are using
the appliance, stop the appliance and fix the cause.
• Immediately report all faults to your superior, who must arrange for their
repair.
• Do not leave the appliance unattended while it is turned on, unless
explicitly instructed to by the manual.
• Use only your fingers to operate the control panel buttons. Using sharp,
pointed or other objects to operate the appliance voids the warranty.
• When working with the appliance, be aware that gastronorm containers,
cooking inserts and grates can be hot. The temperature of the external
glass on the door may reach temperatures higher than 60°C. In all cases
there exists arisk of burns.
• Hot steam is generated while the appliance is running – when the door is
opened, there is arisk of scalding, etc. When opening the door, especially
during steam operations, always stand in such away that you cannot be
scalded by the steam escaping from the open door. Open the door only
partially and do not open fully until the steam has escaped.
• If gastronorm containers are more than three-quarters filled with liquid,
greater care must be taken when handling and removing them. When
placing containers this full into the appliance, put them only in racks into
which you can see. Otherwise, the user may be scalded. Take great care
when removing hot gastronorm containers — whatever their content!
• Be especially careful when working with an appliance (set of appliances)
whose highest rack is 160cm or higher above the ground. Here there is
arisk that the gastronorm container may flip over and cause burns.
• Hot areas may form during the cooking process, especially on the
cookware, grills and the inner side of the door. Use protective gloves
whenever handling hot objects.
• It is forbidden to start the fan without the cover. If the appliance is equipped
with aride-in trolley, then you must always brake the trolley once inside
the appliance. When handling a full trolley, the gastronorm container
locking mechanism must always be used (GNs are closed).
• When transporting gastronorm containers filled with aliquid, they must be
covered with sealing lids. Otherwise, the user may be scalded.
02 ISAFETY
DURING USE

10
• In the event that the floor is very uneven, ride-in trolleys must not be used
for riding into or out of the appliance. Never leave the trolley handle inside
aclosed appliance. This may break the appliance’sdoor. Do not pull the
ride-in trolley without the handle designed for this purpose. Otherwise,
this may result in burns.
• When using banquet trolleys, always make sure that the plates are correctly
seated on the stands.
• For cleaning the trolleys, always use the automatic cleaning program (if
available). Otherwise, use cleaning products designed for semi-automatic
cleaning. It is not permitted to use the appliance without the ride-in trolley
for standard work and automatic cleaning!
AFTER YOU HAVE FINISHED WORKING WITH THE APPLIANCE
• Perform cleaning and service only when the appliance is cold!
• Remove solid pieces of food by taking them out of the cooking chamber—
never flushing them down the appliance’sdrain.
• Cleaning and descaling agents are to be used only according to the
instructions in this manual and in compliance with the instructions for the
individual agent.
• After work (e.g. overnight), leave the appliance’sdoor ajar.
• When the appliance is not used for an extended period of time, shut o the
water and power supply.
WHEN CLEANING
• Use extra caution when handling cleaning agents. Contact with cleaning
agents and their fumes poses ahazard of burns or irritation to skin, eyes
and respiratory organs.
• When handling cleaning agents, wear safety equipment.
• When dosing powdered cleaning agents, be extra cautious that they are not
inhaled and do not come into contact with eyes and mucous membranes.
2.2 PROTECTIVE AIDS
When operating the appliance, it is also necessary to wear the right clothes
and use personal protection gear. Clothing, shoes and protective gear must
comply with national safety requirements for your type of work. Especially do
not forget to use these important items:
safety glasses safety gloves work shoes work clothing
When working with the appliance, we do not recommend wearing:
• Scarves, neck ties, chains, watches, bracelets, keys, rings or other metal
objects, or work with an inappropriate bandage on.
• Electrical components such as heart pacemakers, watches, credit cards,
etc., or other items with magnetic recording media.
• Long, loose hair. Secure long hair with an appropriate head covering.
2.3 PROTECTIVE ELEMENTS OF THE
APPLIANCE
The appliance is equipped with safety elements that make it safer to operate.
Here is alist of the most important ones:
1. External main switch
2. External covers
3. Safety temperature limiter
4. Control panel
5. Door with magnetic switch
6. Ventilation position of the appliance'sdoor
7. Internal wall
None of the elements below are intended to be removed by the operator.
They can be removed for inspection, maintenance or repair only by
aperson qualified for the task.
EXTERNAL MAIN SWITCH
The appliance is designed for permanent connection to the power grid.
Connect and disconnect the power supply using an external main switch. The
switch is used for turning the appliance on and o (when starting operation,
making repairs, installing, and also in emergencies). The external main switch
must be easily accessible at all times!
It is forbidden to tamper with safety circuits, to remove the side covers,
or to perform any unauthorised changes, which change the reliability
and safety of these circuits.
EXTERNAL COVERS
All removable covers are firmly connected to the appliance, so they can
be removed only with tools. Covers prevent unintentionally touching parts
carrying electricity. Always check whether the covers are in place.
SAFETY TEMPERATURE LIMITER
Safety temperature limiters are located in the cooking chamber, boiler
and electrical panel. When there is excessive temperature, these elements
activate and turn o the appliance. When there is excessive temperature,
these elements activate and turn o the appliance.
If asafety limiter fails, an error code is displayed accompanied by an audible
signal.
User'smanualIRetigo Orange Vision PlusI02 SAFETY DURING USE

11
User'smanualIRetigo Orange Vision PlusI02 SAFETY DURING USE
CONTROL PANEL
The control panel is located outside the area prone to high temperatures and
makes it possible to quickly turn o the appliance using the STOP button. The
display also shows malfunctions.
The control panel is securely fixed to the front control panel and prevents
unintentionally touching conductive parts. It can be removed only with atool.
DOOR WITH MAGNETIC SWITCH
The moment the door opens, the heat automatically shuts o and the fan
quickly stops to limit the escape of steam from the cooking chamber. To
protect against steam scalding, first open the door slightly and wait awhile
before opening it fully. To close the door, push on the handle (by slamming).
If the door is not closed properly and the appliance is in the Start mode,
a"close door" prompt will appear.
VENTILATION POSITION OF THE APPLIANCE'SDOOR
To protect against steam scalding, the door can first be opened slightly. Inthis
position, the door remains partly locked. Once steam stops coming out of the
cooking chamber, the door can be opened completely.
INTERNAL WALL
It is always located inside the cooking chamber in front of the fan so as to
prevent striking against the fan’srotating wheel. The internal wall can only be
removed with tools.
Under no circumstances should you remove any safety or protective
element of the appliance! Do not make any changes to it without the
permission of the manufacturer.
2.4 DANGEROUS LOCATIONS AND RESIDUAL
HAZARDS
The appliance is designed so that when properly used in perfect technical
condition, it poses no danger to the operator or surroundings. Nonetheless,
during its operation, situations may arise that could be dangerous if the user
is not aware of them. These are called residual hazards — those that remain
even after all preventive and protective measures have been considered and
implemented. Spot these hazards early and avoid them.
Dangerous locations, types of hazards and
their eects.
COOKING CHAMBER
While it is running, the appliance generates high-temperature steam in the
cooking chamber.
• Burning hazard from hot places throughout the chamber.
• Burning hazard from side handles (ladders/racks) of gastronorm
containers and other accessories used when heating food.
• Scalding hazard from hot steam escaping the cooking chamber when
the appliance'sdoor is opened.
FAN
In the appliance’scooking chamber, behind the internal wall, there are one or
more circulating fan wheels.
• Hand injury hazard from careless handling in the cooking chamber
behind the inside wall when it is not properly installed in place.
• Hand injury hazard from careless handling in the cooking chamber
behind the inside wall during cleaning or maintenance.
DOOR
The inside of the door and especially the internal glass heat up to a high
temperature when the appliance is running. The appliance also generates
hot steam that escapes when the door of the cooking chamber is opened.
• Risk of burns from the inside of the door when opening the door during
or after the cooking process.
• Risk of scalding by hot steam and fumes when opening the appliance,
and especially when the top of the door is at face level, as it is with sets
of appliances.
UPPER COVER OF APPLIANCE
Never cover the appliance or place on it any objects that may catch fire. Your
appliance is not astorage shelf!
Be careful and use safety gloves.
• Risk of burns during the cooking process.
• Fire hazard if the cover is covered or if flammable materials are on the
cover during the cooking process.
GASTRONORM CONTAINERS
Never handle containers above eye level that contain hot liquids or hot liquid
food, and always use safety gloves.
• Risk of burns during improper handling of hot accessories when
removing them from the appliance after cooking.
FLAP AND CHIMNEY
Do not place any part of the body above these parts and always use safety
equipment (gloves, safety glasses, etc.).
• Burning hazard from steam escaping during the cooking process.

12
When handling the appliance, adhere to the the relevant regulations for tying
loads and the handling of lifting equipment.
• Make sure that the internal wall is always in its place and properly
secured against loosening!
• Risk of hand injury may occur when sliding or pulling out the loading
trolley or loading basket.
• When handling loading accessories, always use the handle provided
for the purpose.
HIGH TEMPERATURE
During the cooking process, the appliance’s interior heats to a high
temperature, including containers and food that have been inserted, and
after the door of the cooking chamber is opened, this heat escapes to its
surrounding. For this reason, there is risk of burning or scalding when working
with or near the appliance.
• Risk of burns from hot surfaces mainly occurs in the entire cooking
chamber, including the inside of the door, and on all parts that are or
have been inside during cooking, such as cooking containers, handles
of cooking containers and grates.
• Wear the prescribed safety clothing, especially safety gloves!
• Ascalding hazard from hot steam can occur when water is sprayed
into the warmed-up cooking chamber or the door is open during “Cool
down” function.
• Step far enough away from the appliance, and do not spray water into
the warmed-up cooking chamber for fast cooling or when rinsing with
the hand shower!
• A scalding hazard occurs when water is sprayed into the appliance
when there iscontainer containing hot fat inside it.
• Do not spray water into hot fat!
• There is also a water scalding hazard during improper handling of
the gastronorm containers, when using gastronorm containers of
inappropriate dimensions, and when using a plate of inappropriate
dimensions in relation to the handle of the banquet trolley plate
handles.
• When handling containers that contain hot liquids or hot liquid food,
use extra caution and always use safety gloves.
WASHING DETERGENTS
When washing detergents are used, there is arisk of burning or irritation to
the skin, eyes and respiratory organs from direct contact with the cleaning
agent or its fumes.
• Avoid direct contact with washing detergents. If there is risk of contact,
use safety gloves.
• When dosing, be especially careful not to inhale the detergent.
• During fully automatic cleaning, do not open the appliance's door
unless prompted by the software — there is danger of inhaling washing
detergent fumes or splashing skin and eyes.
HAND SHOWER
• Scalding hazard from hot steam or hot fat when spraying ahot cooking
chamber.
• Do not use the hand shower for cooling down the cooking chamber or
for cleaning when its temperature is greater than 90 °C.
• Scalding hazard from hot fat and steam when water splashes into hot fat.
• Do not spray water directly into hot fat — this may cause spattering and
intense steam generation.
Residual risks
To further reduce risks and to ensure the eectiveness of safety protection,
we provide information about residual risks. To eliminate them, we have
established the following technical and organizational measures for
implementation by the user. These are intended to overcome the respective
hazards.
ELECTRICAL CURRENT
All of the appliance'selectrical components are powered by potentially fatal
current. The power supply terminals and other electrical components remain
under live voltage even when the appliance is turned o.
• The power supply terminals and other electrical components remain
under voltage even when the appliance is turned o.
However, access to the area with electrical components is only possible after
removing a rigid cover. As the user, you are not authorised to service the
appliance'selectrical components. There is only ahazard in the event that
power supply cables of the appliance are damaged, e.g. by means of being
inappropriately placed, twisted, pinched, weighed down, etc. Moreover, if the
appliance moves by itself on the wheeled frame, this may break the power
supply cable.
• When operating the appliance, always lock the wheels with the parking
brake!
If there is any damage to the electrical equipment, it is necessary to stop using
the appliance immediately and arrange immediate repair by an authorised
service centre.
If it is not necessary to have the appliance under live current, disconnect the
main power supply connection by turning o the main power switch.
MECHANICAL PARTS
Hazards arise only when the appliance has been installed on awheeled frame
or has been installed incorrectly (such as with astrong tilt, not anchored on
aslippery or unstable surface, etc.), and its unexpected movement may cause
crushing or pinching when it looses stability.
• If you think that the appliance is incorrectly installed in regard to
stability, do not continue working, and immediately contact the owner
to check the installation.
• Injury hazards from moving parts occur in situations where the cooking
chamber is cooled with the door open — “Cool down” function , the
internal wall in front of the fan is missing, so that the fan wheel is freely
accessible.
User'smanualIRetigo Orange Vision PlusI02 SAFETY DURING USE

13
FOOD CONTAMINATION
When cleaning or descaling agents are used incorrectly, the area around the
appliance, where food is usually prepared, may become contaminated. This
may result in food contamination.
• Make sure the work surface has not been splashed with washing
detergent or descaler!
• Do not place empty containers on the work surface — the food may
get contaminated!
WATER
If the appliance and its wheeled cart begin making undesired movements,
this may break or damage the water supply line, and the escaping water may
cause slips and falls.
• Before operation, always check that the wheels are locked with the
parking brake! Keep the appliance’swork area and surroundings clean
and dry!
2.5 USING ACCESSORIES
TEMPERATURE PROBE
When using the temperature probe, adhere to the following:
• Use the probe only for inserting into food.
• Do not insert the probe into frozen food. This can break it!
• Never forcefully bend the temperature probe’spower cable.
• Never pull the probe out of the food by the cable.
• Place the temperature probe into the food in such away that it does not
lean against the door glass.
• The temperature probe may be hot — use safety gloves.
• Pull the temperature probe out of the food before removing the food from
the appliance and place it into the probe holder.
• When the probe is not in use, keep it in the probe holder.
• Never leave the temperature probe hanging outside the cooking chamber
— the door may close on it and damage it.
HAND SHOWER
When using the hand shower, adhere to the following:
• The hand shower may only be used for cleaning the cooking chamber.
• The hand shower works for only two minutes after the door is open. After
this, it turns o automatically.
• Never use the hand shower when the appliance is hot. Allow it to cool
down to under 65 °C.
• Never use the hand shower for cooling down the cooking chamber when
the temperature inside the cooking chamber is higher than 90°C— this
may destroy the inner glass of the door and cause deformation of the
cooking chamber!
User'smanualIRetigo Orange Vision PlusI02 SAFETY DURING USE
• Never spray water from the hand shower on to hot door glass — this can
destroy it!
• After use, always place the hand shower in its holder.

14
3.2 OTHER BUTTONS
The Vision button serves to:
a) switch to Multitasking mode 4/4.3
b) turn on the control system
c) put the appliance into standby mode.
d) screen calibration mode after holding down the
button for more than 2 seconds
Pressing the symbol will display the main screen (A).
Standby
When pressed, the control system will go into sleep
mode and the screen will turn o. The sleep mode
is indicated to the user by the regular flashing of the
Vision button. The system is woken up by pressing
the Vision button.
E/2 Pressing this button will reduce power input to the
appliance by half, thanks to which power is saved
while the appliance is idle.
Light Light
Press it to permanently illuminate the cooking
chamber and press it again to turn the light o.
Lighting it is only lit when the cooking chamber door
is opened.
Press to show or hide further lines that oer
extended functions of the appliance.
3.3 KEYBOARD
The system also has keyboards. They are controlled in the same way in all
modes and functions of the appliance.
BASIC NUMERICAL KEYPAD
Serves to enter values.
Back Ok
-1 +1
123
456
7 8 9
0
Delete values.
-1 +1 Quick correction of
values.
Non-stop time, non-
stop performance of
afunction.
EXTENDED ALPHANUMERICAL KEYBOARD
For entering letters, symbols and numbers.
User'smanualIRetigo Orange Vision PlusI03 CONTROLS
03 ICONTROLS
Keyboard options. Select
language and style
(QUERTY-QUERTZ).
abc
Toggle between akeyboard
with numbers/symbols and
akeyboard with letters.
Delete characters.
Space bar.
3.1 TOUCHSCREEN PANEL
The meanings of buttons (icons) found on the most common screens is
provided on figures A, B, C, D. The basic button functions are selected by
gently tapping on the icon on the panel. The extended functions are then
activated by pressing and holding down the button for longer than 2 seconds.
FREQUENTLY RECURRING BUTTONS
The system has buttons that are common for the individual modes and
functions of the appliance. Their meanings are as follows:
Back Press the button to go to the previous step.
Ok Press the symbol to confirm your selection.
StartPress to start the desired cooking process, cleaning,
etc.
Stop Press to stop the current cooking process and
display it on screen D.
Change case.
123
Toggle between akeyboard
with letters and akeyboard
with numbers/symbols.
Delete characters.
Space bar.
abc
Back Ok
90
123 4 56 7 8
.,?!"
‘
#()
/ \
@:;_+
123
Back Ok
qerzuow tip
asdfghj
kl
yxcvbnm

15
User'smanualIRetigo Orange Vision PlusI04 COOKING
4.1 MANUAL MODE
This option is utilised by users, who want to have the cooking process
parameters set exactly according to their requirements. Set the cooking
parameters manually according to your own discretion and experience.
Pressing option A2 will display the Manual mode (B).
B1 COOKING CHAMBER PREHEATING
O.
On.
The value below the symbol is set
at the factory to 15°Chigher than
the cooking process temperature
you have set (B5). This means that
whenever you manually set the
cooking process temperature with
active preheating, the preheating
temperature automatically increases
by 15°C. The only exception is
the Steaming mode, in which the
preheating temperature corresponds
to the set process temperature.
190°C
The increase value can be changed in
the user settings ( 06
SETTINGS/6.1/Cooking/Preheat/
Temperature increase).
The preheating temperature can also
be manually set in the range 30°C-
300°Cby pressing and holding down
the preheating symbol. This allows
the creation of aprogram containing
asingle step with automatic preheating
with aprecise temperature. If, after
it is started, the temperature in the
cooking chamber is significantly lower,
it is possible to open the door without
stopping the rotation of the fan. Thefan
will continue at the standard RPM and
will blow hot air out of the chamber. As
soon as the temperature in the chamber
reaches the set preheat temperature,
the fan will stop automatically.
B2 COOKING MODE SELECTION
HOT AIR
Substitutes for baking in apan, in an
oven, frying in adeep fryer, etc.
Temperature range: 30-300° C
HOT AIR WITH STEAM
(COMBINATION)
Substitutes for baking requiring
basting or procedures, where the
meal requires acertain humidity
percentage, while simultaneously
cooking it with hot air, etc.
The amount of steam in the cooking
chamber can be set by moving the
slider or tapping on the percentage
value and entering it using the
numerical keypad.
Temperature range: 30-300 °C
50 %
STEAMING
Substitutes for cooking in water.
Temperature range: 30-130 °C
04 I COOKING
B3 SETTING THE HUMIDITY
HOT AIR mode is shown by aflap
symbol, and moving or tapping the
scroll bar allows the following settings:
Fully open flap valve; continuous
venting of humidity from the cooking
chamber.
The system controls the opening/
closing of the flap valve itself
according to the set percentage of
humidity.
Auto
50 %
Fully closed flap valve; all the humidity
stays in the cooking chamber.
In Combination mode, humidity is
displayed as apercentage, which can
be changed by moving the scroll bar
in arange from 0% to 100%.
NOTE:
In STEAMING mode, the humidity
is afixed setting and cannot be
changed.
15 %
100%
B4 SETTING THE TIME
Set the cooking process time.
Time range: 00:01-23:59 (h:m)
B5 COOKING PROCESS TEMPERATURE
Set the cooking process temperature.
The temperature range depends on
the used cooking mode.
B6 SETTINGS FOR OTHER FUNCTIONS
F
FAN SPEED
Set seven fan speeds. 80 90
100%
40 50 60 70
FAN TIME CONTROL
The fan will rotate only:
- when the heating elements are on.
- for 10 seconds when idle for longer
than 2 minutes.
NOTE ON THE STEP
Allows text comments to be written,
which will display upon transition
to the relevant program step. The
comments are accompanied by an
audible signal.

16
User'smanualIRetigo Orange Vision PlusI04 COOKING
4.1.1 Cooking with manual settings
1 GO TO MANUAL MODE
Manual cooking
2 SELECT AND ADJUST THE AVAILABLE PARAMETERS AS
REQUIRED
F
2.1 OPTION: ADD ASTEP
Press
Press
+
Add step
Select and edit the parameters B1 to B9 as required
F
To add another step, repeat the procedure from point 2.1
2.2 OPTION: SAVE AS AUTOMATIC START
If you want the program to automatically start repeatedly at
aspecific day and time, proceed according to chapter 4.2.10.
3 START THE COOKING PROCESS BY PRESSING
Start
4 WAIT FOR THE COOKING CHAMBER TO PREHEAT OR COOL
DOWN
4.1 OPTION: SKIP PREHEATING/COOLING
Press Skip
4.2 OPTION: END THE COOKING PROCESS
Press Stop
5 INSERT THE FOOD
After preheating or cooling down the cooking chamber, you will be
requested to insert the food.
Inserting the food and closing the door will start the cooking
process.
5.1 OPTION: TURN OFF THE SOUND SIGNAL
Press
Stop sound
B8 OVERVIEW OF PROGRAM STEPS
Shows an overview of all the set
cooking parameters. Enables the
changing of settings, adding another
step or reading of chef'stips. For
adetailed description, see screen C.
B9 TEMPERATURE PROBE
Setting the temperature probe
temperature
Allows the cooking process to
be controlled by setting the final
temperature at the centre of the food.
Temperature range: 30-110 °C
DELTA T
Allows aconstant dierence to be set
between the temperature at the centre
and that in the cooking chamber.
Temperature range: 20-70 °C

17
User'smanualIRetigo Orange Vision PlusI04 COOKING
6 AT THE END OF THE COOKING PROCESS, SELECT AN ACTION
WITH WHICH TO CONTINUE screen D
6.1 OPTION: EXTEND THE TIME OF THE LAST COOKING STEP
Press
Extra time
6.2 OPTION: SAVE THE PROCEDURE TO THE PROGRAMS
Press Save as program
Select afolder or sub-folder, where you wish to store
the new program
Back Save
Meat
Vegetables
Side dishes
Desserts, Puddings
Breads and Pastries
Other
Oven-baked dishes
Press
Save
Enter the name of the program
123
Back Ok
qerzuow tip
asdfghj
kl
yxcvbnm
Press
Ok
In the QuickView preview, you can check all the steps of the
cooking program.
1
2
190°C
Czech wedding
mini cakes
165°C
180°C
0:06
0:02
100%
100%
100%
30%
+Add step
++
CH&
Start
Back
Press
Save
6.3 OPTION: OVERVIEW OF THE COOKING PROCESS STATISTICS
Press Eco Logic
6.4 OPTION: TURN OFF THE SOUND SIGNAL
Press
Stop sound
6.5 OPTION: RETURN TO THE MAIN SCREEN
Press
Back

18
User'smanualIRetigo Orange Vision PlusI04 COOKING
4.2 PROGRAMS
The Program mode enables the combi oven to be utilised to the maximum
extent possible, with ultimate control comfort ensuring that the final products
are repeatedly of the highest quality.
4.2.1 Cooking according to aprogram
1 ENTER THE PROGRAMS
Press
Programs
2 SELECT APROGRAM CATEGORY
If necessary, select an appropriate sub-category
Programs
Meat
Vegetables
Oven-baked dishes
3 SELECT EDIT MEAL PROGRAM
Stewed cubes, slices, rolls
Steaks
Roast beef
Beef
4 PROGRAM PREVIEW APPEARS QUICKVIEW
All the program steps are shown on asingle screen
with the option of quickly editing or adding another step. 1
2
190°C
Steaks
165°C
180°C
0:06
0:02
100%
100%
100%
30%
+Add step
Start
Back
4.1 OPTION: EDIT PARAMETERS
Select and edit the parameters as required
F
4.2 OPTION: ADD ASTEP
Press
+
Add step
To add another step, repeat the procedure from point 4.1
4.3 OPTION: START APROGRAM FROM THE SELECTED STEP
Press
Select
Start from this step
4.4 OPTION: DELETE STEP
At steps that you wish to delete, press
Select
Delete step
4.5 OPTION: SAVE AS AUTOMATIC START
If you want the program to automatically start repeatedly at aspecific day and time, proceed according to chapter 4.2.8.
If after the cooking process you do not select the option Save as program, then the changes to the program performed in steps 4.1 to 4.5 will not be
permanent, i.e. they apply only once when the program is started. When opened the next time, the program will have the original structure.
PROGRAM SYMBOLS
ProgramsMain category according to meal type (category).
Meat Subcategory with more programs
SteaksProgram
Newly created program with no pictogram assigned.

19
4.2.2 Create anew program
1 ENTER THE PROGRAMS
Press
Programs
2 SELECT APROGRAM CATEGORY IN WHICH
YOU WISH TO CREATE ANEW PROGRAM
Programs
Meat
Vegetables
Oven-baked dishes
3 PRESS
4 PRESS
New program
5 ENTER THE NAME OF THE PROGRAM
123
Zpět Ok
qerzuow tip
asdfghj
kl
yxcvbnm
6 PRESS
Ok
7 PROGRAM DETAILS WILL BE SHOWN screen C
7.1 OPTION: ADD PROGRAM STEPS
+
Add step
Edit the parameters as required
F
Press
Ok
7.2 OPTION: STEP PARAMETER SETTINGS
Press the step that you wish to edit
165°C
0:06
100%
1
100%
Edit the parameters as required
F
Press
Ok
7.3 OPTION: INSERT ASTEP
At the step, above which you wish to insert anew step, press
To insert it, select button
Insert step
7.4 OPTION: DELETE STEP
At steps that you wish to delete, press
To delete it, select button
Delete step
User'smanualIRetigo Orange Vision PlusI04 COOKING
5 START THE COOKING PROCESS BY PRESSING
Start
6 AT THE END OF THE COOKING PROCESS, SELECT AN ACTION
WITH WHICH TO CONTINUE (screen D)

20
4.2.3 Editing asaved program
1 ENTER THE PROGRAMS
Press
Programs
2 SELECT APROGRAM CATEGORY IN WHICH YOU WISH TO EDIT
APROGRAM
Programs
Meat
Vegetables
Oven-baked dishes
3 SELECT THE PROGRAM YOU WISH TO EDIT AND HOLD IT
DOWN FOR LONGER THAN 2 SECONDS
4 FROM THE MENU, SELECT THE MODIFICATION THAT YOU
WISH TO MAKE
Rename program
Edit program
Delete program
Select
4.1 OPTION: EDIT APROGRAM
It is possible to change the name of the program, parameter settings,
add or delete astep. The procedure is similar to creating anew
program.
4.2 OPTION: RENAME APROGRAM
Rename aprogram using the alphanumerical keyboard.
4.3 OPTION: DELETE APROGRAM
Permanently delete aprogram after confirming.
4.4 OPTION: SELECT
Select the current program or multiple programs by ticking fields
and subsequently copy or move them to adierent category of
programs or delete them.
After selecting aprogram(s), press and select one of the oered
options.
4.5 OPTION: MOVE UP/DOWN
Move any program to adierent location in the program list.
Return to the program list and press
Select
Move up/down
Press and hold down any program and drag your finger to move it
to anew location.
Press
Save
User'smanualIRetigo Orange Vision PlusI04 COOKING
8 PRESS
Programs
Meat
Vegetables
Oven-baked dishes
9 THE NEW PROGRAM IS SAVED
10 RETURN TO THE PROGRAMS
Back
This manual suits for next models
17
Table of contents
Other Retigo Oven manuals
Popular Oven manuals by other brands

Caple
Caple C2105 instruction manual

Electrolux
Electrolux OKD5C51V user manual

Electrolux
Electrolux E30EW85ESS - Icon Designer Series Electric Double... Specifications

Whirlpool
Whirlpool AKZ 360 01 IX Instructions for use

Electrolux
Electrolux LW 20 GN 2/1-GAAS Specification sheet

Frigor
Frigor OPY65B1 User instructions