Retriev-R-Trainer SIDE-KICK REMOTE LAUNCHER User manual

SIDE-KICK
FULLY READ THE WARNINGS BEFORE OPERATING!
AMERICAN MADE AND BACKED BY A 1-YEAR WARRANTY.
FULLY READ THE WARNINGS BEFORE OPERATING!
AMERICAN MADE AND BACKED BY A 1-YEAR WARRANTY.
REMOTE LAUNCHER
OPERATING INSTRUCTIONS

1SIDE-KICK REMOTE LAUNCHER
OPERATING INSTRUCTIONS
PLEASE READ CAREFULLY BEFORE ATTEMPTING TO OPERATE
SIDE-KICK REMOTE LAUNCHER INSTRUCTIONS
IMPORTANT!
TAKE SPECIAL HANDLING CARE AND SAFETY PRECAUTIONS!
Your Side-Kick Remote Launcher is not a rearm, but the same handling, care and
safety precautions must be exercised. Your Side-Kick Remote Launcher is provided
with certain built-in safety features, but are not substitutes for safe handling practices,
which include the use of ear and eye protection as well as the use of heavy leather gloves.
DISCLAIMER
Any use or modication of the Side-Kick Remote Launcher not in conformity with the
manufacturer’s instructions as described in this user’s manual is AT THE SOLE RISK
AND RESPONSIBILITY of the individual performing such unauthorized use and/or
modication. Direct any inquires regarding use to Specialty Products Company prior to
use or continued use of this product.
• This product can be hazardous!
• With the dummy, you are ring what is equivalent to a six to eight ounce bullet. A heavy recoil and
loud report should be expected.
• Expect a loud report when the launcher is red. Exposure to loud report may eect hearing to dogs
and surrounding persons.
• NEVER insert a live load into the chamber
• NEVER use a load other than those specically designed and recommended for use in the RRT
Launcher
• NEVER aim or re the Side-Kick Remote Launcher Unit at anyone or anything
• NEVER use a dummy other than a RRT dummy for the Side-Kick Remote Launcher Unit.
• NEVER cock the bolt until you are ready to re
• NEVER use a dummy that has debris of any kind inside the tube, including but not limited to, mud,
grass, water or rust
• NEVER cock and re the Side-Kick Remote Launcher Unit without a cartridge in the chamber
• NEVER re the RRT Hand Held Launchers in the Side-Kick Remote Unit if the exhaust hole in any of
the shaft/barrels is/are obstructed in any way, also ensure the barrel is free of debris before every launch
• NEVER allow person or animal to be in line of launch/re of launchers or dummies, including rst and
every re-load of loads, blanks and dummies
>> WARNING

2
SIDE-KICK REMOTE LAUNCHER
OPERATING INSTRUCTIONS
FAILURE TO FOLLOW THESE WARNINGS MAY RESULT
IN SERIOUS INJURY OR DEATH
• NEVER operate the Side-Kick Remote Launcher Unit without proper ear, eye and hand protection
• NEVER place a load in the chamber before placing a dummy on the shaft/barrel
• NEVER store a dummy on barrel of launcher when not in use
• NEVER allow the Side-Kick Remote Launcher Unit to be accessible to children
• NEVER LAUNCH THE SIDE-KICK UNLESS COMPLETELY LEVEL
• NEVER USE ON UNEVEN GROUND
• DO NOT USE IN DRY CONDITIONS! Hot air or sparks could cause grass/tinder re!
• NEVER DRY FIRE THE LAUNCHER(S). DOING SO MAY DAMAGE THE PRODUCT AND CAUSE
CATASTROPHIC FAILURE WHEN FIRED IN THE FUTURE.
• NEVER FIRE/LAUNCH WITHOUT FULL CLEARANCE OF YOU THE OPERATOR, SURROUNDING
PERSONS AND ANIMALS!
• NEVER POINT OR FIRE THE SIDE-KICK REMOTE LAUNCHER SYSTEM AT ANY PERSON, ANIMAL
OR OBJECT!
• NEVER USE THE SIDE-KICK WITH OUT BOTH STAKES PROVIDED PROPERLY AND SECURELY AS
STATED IN THE INSTRUCTIONS.

3SIDE-KICK REMOTE LAUNCHER
OPERATING INSTRUCTIONS
FOR OUTDOOR USE ONLY!
ANGLE ADJUSTMENT KNOB
2 STAKES
LEG SPREADER BAR
SERVO

4
SIDE-KICK REMOTE LAUNCHER
OPERATING INSTRUCTIONS
>> ADAPTING RRT HAND HELD LAUNCHER FOR THE
SIDE-KICK REMOTE LAUNCHER SYSTEM
The Side-Kick Remote Launcher was designed to work with any RRT
Hand Held Launcher built from 1990 to present. The RRT Launchers
manufactured during this time period have a rubber ribbed hand grip and a
plastic or aluminum pull knob. If you have recently purchased a new RRT
Launcher (will have RRT LAUNCHER on the grip in raised lettering) you
can skip step one below.
If you are unsure if your RRT Launcher is compatible contact Specialty
Products Company before attempting to use with your Side-Kick Remote
Launcher System. If your RRT Launcher is dierent from the ones in the
images to the right, please contact us for possible retrot options.
1) The rubber grip will require trimming in order to t into the Side-Kick Launcher Tube. On the base of the grip (end
closest to the pull knob) the lip of the grip must be trimmed. Please refer to image below. This can be achieved by using
a sharp utility knife and turning the grip or turning the grip on a sander. Launchers manufactured after July of 2015 will
not require trimming.
2) Install the black cap plug into the bottom of the pull knob on the RRT Launcher. Lightly tapping with a hammer will help
to set the cap plug. The black plug must be installed completely into the pull knob with no gap present.
3) Install the aluminum pull ring onto the pull knob. Position the pull ring so it is ush with the end of the pull knob and
tighten the set screw securely with the allen wrench.
4) Slide your RRT Hand Held Launcher (with pull rind and cap plug properly installed) into the Side-Kick Launcher Tube.
Position the launcher so the pull ring shaft exits the long slot in the launcher tube. Conrm that the launcher in fully seated
into the tube. A light coating of lubricant will help the launcher slide into the launcher tube. The lubricant must be cleaned
o if the launcher is removed and red by hand.
INCORRECT -
GAP PRESENT
CORRECT -
FLUSH WITH
PULL KNOB
INCORRECT -
NOT FLUSH
CORRECT - FLUSH WITH
END OF PULL KNOB
Trimmed Grip
DO NOT ATTEMPT TO USE OTHER MANUFACTURES HAND HELD LAUNCHERS

5SIDE-KICK REMOTE LAUNCHER
OPERATING INSTRUCTIONS
>> BLANK POWER CHARGES
Choose your power charge based on the distance you wish to throw the dummy. Use only those charges
intended for the Side-Kick Remote Launcher.
• Light Green Load - Distance of approximately 75’-100’
• Medium Yellow Load - Distance of approximately 100’-150’
• Heavy Red Load - Distance of approximately 150’ - 200’
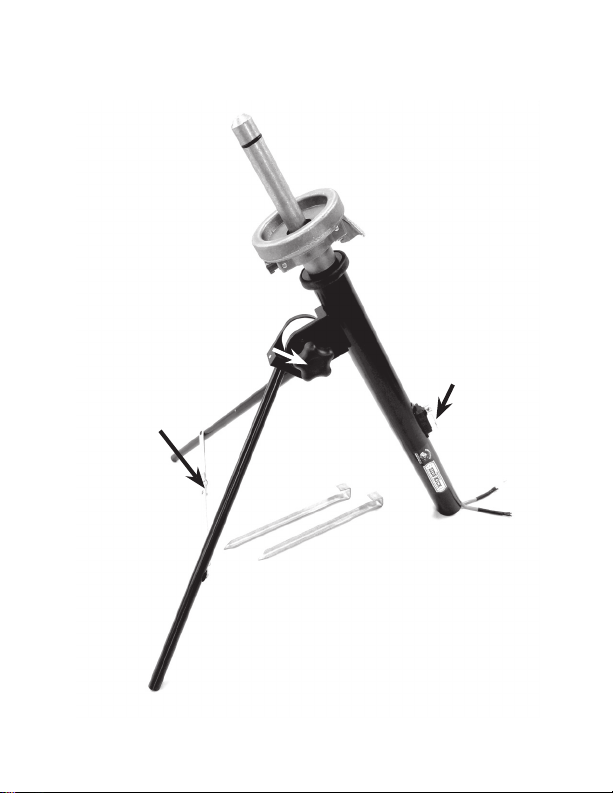
1) Place your Side-Kick Remote Launcher where you will be training with it. Spread the legs open and press down on the
leg spreader bar until the legs are in the LOCKED open position. Loosen the angle adjustment knob and position legs so
that the desired launch angle is achieved. ENSURE THAT IT IS FULLY LEVEL AND NEVER USED ON UNEVEN GROUND!
>> PREPARATION FOR FIRING
2) Press the 2 metal stakes into the ground so that the hooks on top
of the stake captures and secures the leg spreader bar and securely holds the
Side-Kick on the ground. Place the stakes on either side of the leg spreader bar
approximately 1 inch from either outside leg.
3) Install any RRT Dummy onto each launcher.
4) Open the breech of the Launcher by depressing the thumb latch. Install a green,
yellow or red power level Blank Cartridge.
!!! WARNING !!!
BEFORE PERFORMING THE NEXT STEPS USE EXTREME CAUTION!!
BE SURE YOUR FULL BODY, SURROUNDING PERSONS AND ANIMALS ARE IN A POSITION THAT IS
OPPOSITE FROM THE DIRECTION OF ANY OR ALL OF THE LAUNCHERS WHERE THE DUMMIES ARE
POINTING AND THE REMOTE RECEIVER IS TURNED OFF AS WELL AS UNPLUGGED FROM THE TUBE
CONNECTING HARNESS!
5) Close the breech of the RRT Hand Held Launcher
6) Turn the servo arm so it is pointing in the 1 o’clock position. Some models of release systems will not send a signal that
is long enough to move the servo arm from 1 o’clock around and re the launcher. If this happens, try setting the servo
arms to 2 o’clock or 3 o’clock. This will shorten the distance the servo arm needs to travel, allowing it to re the launcher
with a single press of the button.
7) Locate the remote to the receiver that you are using and ensure that it is clear of any pressure on it. Do not keep in your
pocket or leave it placed on the ground where it could be walked on. ACCIDENTAL DEPRESSION OF THE BUTTON WILL
CAUSE THE SIDE-KICK REMOTE UNIT TO FIRE AND COULD CAUSE INJURY OR DEATH.
8) Slide the pin/pull ring back and seat the pin into the notch ensuring that it is as far left as it can be positioned.
ACCIDENTAL RELEASE OF THE PIN WILL CAUSE THE FIRING PIN TO MAKE CONTACT WITH THE POWER CHARGE
AND THE LAUNCH OF THE DUMMY WILL OCCUR! ALWAYS KEEP YOURSELF, SURROUNDING PERSONS AND
ANIMALS FULLY CLEAR OF THE UNIT, LAUNCHERS, LAUNCHER DIRECTION AND DUMMYS!
If using multiple Side-Kicks in the same location check to ensure that you do not have any launch interference with the
launchers and/or bumpers of other Side-Kicks. Every path of launch must be clear of obstruction!
When you have completed above steps with extreme caution and you and surrounding persons and animals have full
clearance you may plug the remote receiver into the Tube Connecting Harness and turn the power switch on.
You are now ready to re your Side-Kick Remote Launcher!
LEG SPREADER BAR
PROPER PLACEMENT OF
2 PROVIDED STAKES

6
SIDE-KICK REMOTE LAUNCHER
OPERATING INSTRUCTIONS
WARRANTY
The Side-Kick Remote Launcher is guaranteed for 1 year from the date of purchase to be free of
manufacturer defects. This guarantee is void if other than the recommended power charges are used
or if the product is not used in conformance with these instructions. RRT dummies are guaranteed for
a period of 1 year from the date of purchase to be free of manufacturer defects.
If you do not understand the instructions or have further questions regarding the use and
operation of the Side-Kick Remote Launcher please discontinue use and contact Specialty
Products Company USA at (570) 729-7192 with your questions.
User must throughly clean the barrel, chamber and hinge areas with a good gun cleaning solvent
after each use of each RRT Launcher used in the Side-Kick Remote Launcher Unit. Before each
use examine your Side-Kick Remote Launcher Unit and RRT Launchers to ensure there is no
debris and no damage to the equipment. Improper maintenance and failure to properly clean
>> MAINTENANCE
the RRT Launchers and Side-Kick Remote Launch Unit may
result in serious injury or death.
User is responsible to evaluate the entire unit before
every launch to ensure all ttings are secure and full
functioning.
You may purchase the Retriev-R-Trainer Cleaning Kit at any
of our retailers listed on our website at www.rrtlauncher.com.
A small amount of gun oil applied to the hinge area after
cleaning will help to ensure smooth operation. Cleaning of the
chamber can be enhanced by using a .22 caliber wire brush.
Also thoroughly clean and dry the inside of the aluminum
dummy tube after each launch. Be certain that prior to each time you launch the dummy from
your Side-Kick Remote Launcher that it is free of debris both internally and externally. Failure
to properly maintain the aluminum insert tube in your dummy may result in serious injury
or death.
A rubber “O” Ring in a groove near the outer end of the barrel provides a seal for the release
gases from the power charge. This “O” Ring will wear, causing some of the gases to escape,
thereby reducing the ight distance of the dummy.
Apply a thin coat of Vaseline, or any other lubricant safe for use on rubber components, to
prevent drying and cracking of the “O” Ring. Replacement “O” Rings are available from our
retailers on our website.

7SIDE-KICK REMOTE LAUNCHER
OPERATING INSTRUCTIONS
1
LIMITATION OF LIABILITY
DISCLAIMER
In no event shall TLB Industries, Inc. be liable for any direct, indirect, punitive, incidental, special
or consequential damage arising out of the use or misuse of this product. By using this product,
you assume all risks and liability in connection with it. TLB Industries, Inc. shall not be liable for any
damages arising out of or connected with the use or misuse of this product. The buyer assumes all
risks and liability from the use or misuse of this product. TLB Industries, Inc. reserves the right to
change the terms, conditions under which this product is oered without further notice.
Any use or modication of the RRT Remote Launcher System not in conformity with the manufacturer’s
instructions as described in this user’s manual is AT THE SOLE RISK AND RESPONSIBILITY of the
individual performing such unauthorized use and/or modication. Direct any inquiries regarding use
to Specialty Products Company prior to use or continued use of this product.
Table of contents
Other Retriev-R-Trainer Pet Care Product manuals
Popular Pet Care Product manuals by other brands

Garmin
Garmin ALPHA 100F owner's manual

PawHut
PawHut D02-062 Assembly & instruction manual

Petsafe
Petsafe Bark Control Collar operating guide

Therian
Therian All-Aluminium Kuranda Bed Assembly instructions

Maximum Reptile
Maximum Reptile Essential Series Assembly instructions

Garmin
Garmin DELTA SE owner's manual