Revbox Erg User manual

REVBOX Erg Owners Manual
Intro uction
Congratulations on the purchase of your new evbox Erg – a low inertia stationary air resistance
trainer with no flywheel assistance; designed, developed and assembled in New Zealand.
The evbox will make you stronger and more efficient as it recruits and engages all the muscle
groups throughout your pedal stroke, increasing strength and neuromuscular efficiency, and fo-
cuses your pedaling technique.
Welcome to the Revbox Community!
In the Box
Your evbox Erg should come with the following:
1 x evbox trainer unit
1 x Stabiliser leg
1 x Short quick release skewer for the stabilizer leg
1 x Long quick release skewer to mount the bike
1 x Velcro fastened carry handle which can/should be removed if not required
1 x 0.7mm cassette spacer
The following optional parts are also available:
Miche 10 speed cassettes different ratios (Shimano Compatible) (Different atios Available)
evbox soft carry bags
evbox foam carry bag for international travel
To purchase any of these see: http://www.revbox.co.nz/shop
Set-Up
To prepare your evbox Erg for use, please set it up as follows:
1. Take your new trainer unit and stabiliser leg out of the box.
2. Fit the short quick release skewer to lower front of evbox unit.
3. Attach the stabilizer leg to the evbox unit using this short quick release skewer – make
sure the leg is pushed in as far as possible, so there is almost no gap (See Image 1) between the
leg and the unit, and the guide plates are resting on the stops (See Image 2), then tighten the
skewer as tight as possible to fix the stabiliser leg securely in place.

4. Mount a suitable cassette to the freehub body.
Note: The evbox Erg has been designed with a Shimano 10 speed freehub body, for a 10 speed
cassette, which will work perfectly with both 10 and 11 speed Shimano, Sram and Campagnolo
drivetrains. For best results with any 11 speed drivetrain please use a 10 speed Miche Primato
Cassette, and fit a 0.7mm cassette spacer between the largest and second largest sprocket.
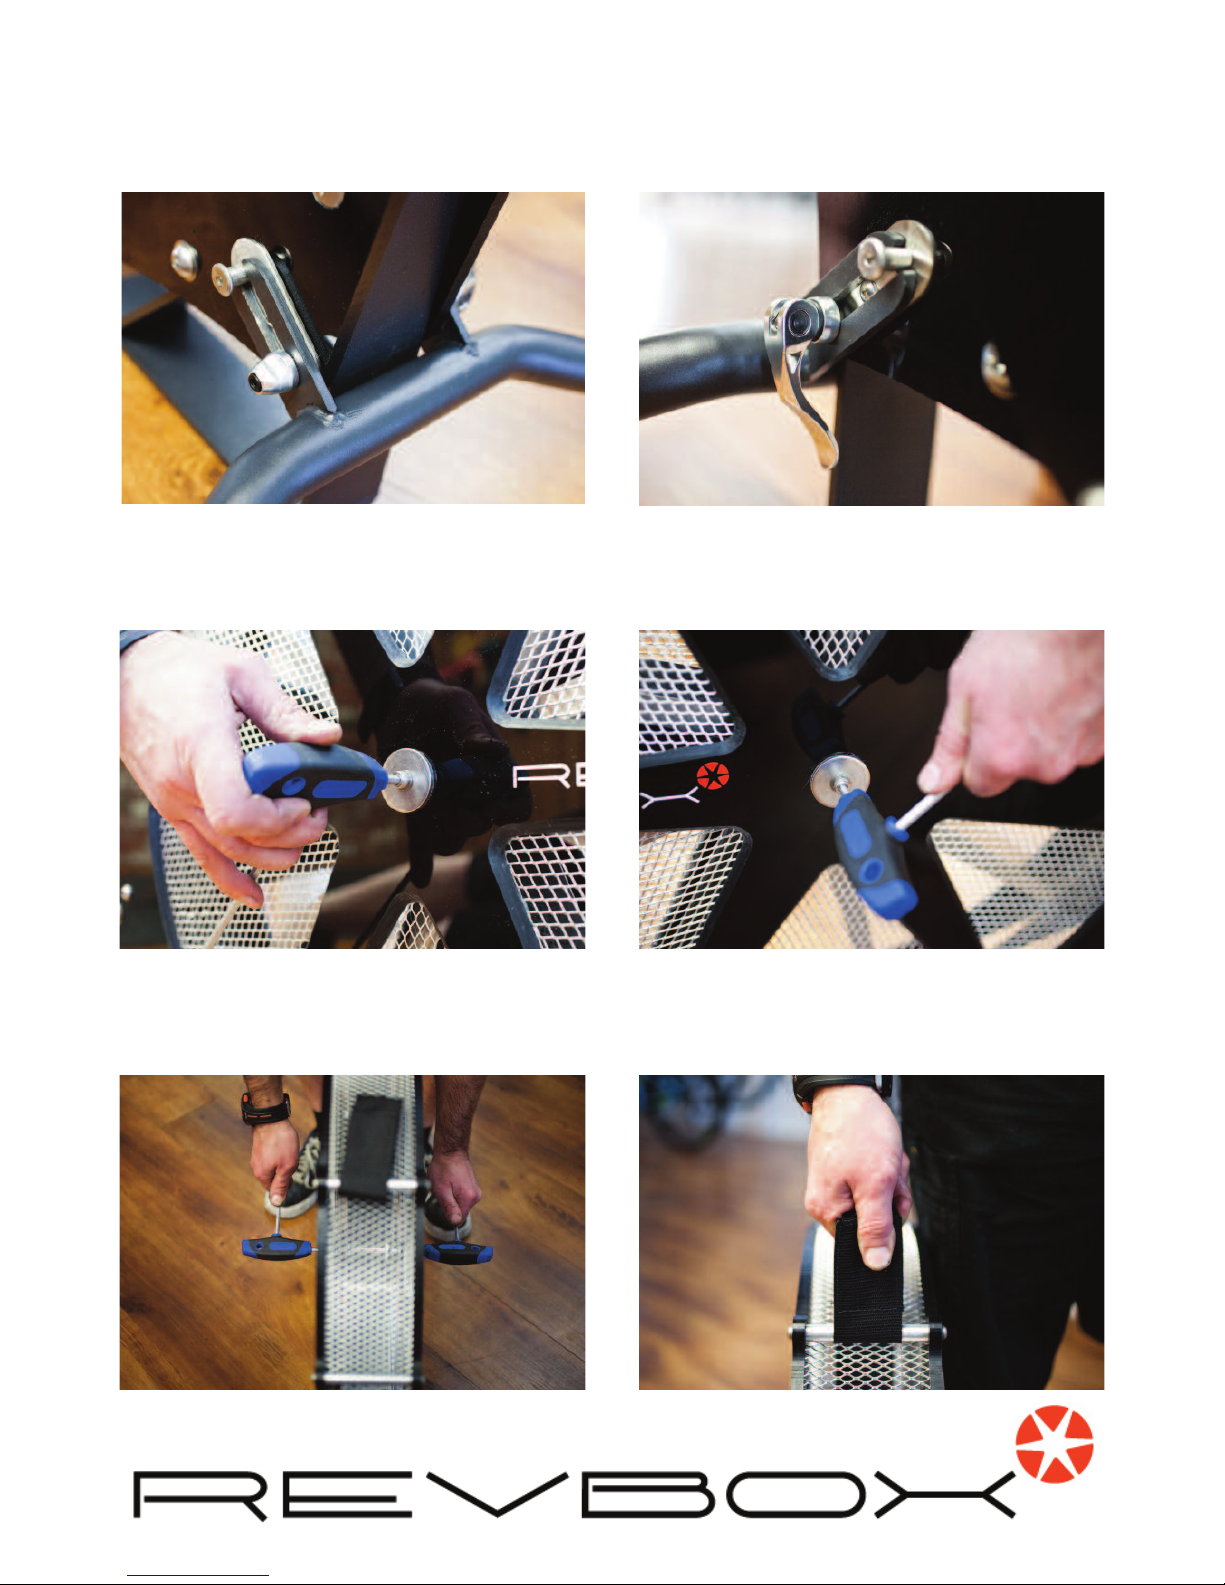
5. Fit the long quick release skewer to the trainer through the cassette/freehub axle. (remove this
whenever returning trainer into the soft carry bag).
6. Mount your bike to the evbox Erg unit: emove the rear wheel from your bikeand place
dropouts and chain over the cassette/freehub of the trainer. Securely tighten the quick release
skewer. (This is usually easiest achieved with the gears set in the smallest sprockets).
7. Adjust the rear foot of the evbox so it sits flush against the floor – this is most accurately
achieved with a rider on the bike.
8. Get started!
For further information please see our website: www.revbox.co.nz
Training
This part is up to you but to get most of your training, for some ideas on training sessions see:
www.revbox.co.nz/training.
Note: The evbox Erg is NOT designed as just a winter trainer. To experience the maximum bene-
fits from the evbox Erg it’s highly recommend using it for regular training sessions all year round.
Maintenance
While the evbox is largely maintenance free, there are a couple of small things you can do that
will greatly enhance the longevity of your unit.
1. After approximately two weeks use, please check and tighten all the bolts on the unit – they
should be tightened to 8Nm.
2. Periodically check that the chain on the evbox unit is tight, we recommend checking every 6
hours use, especially in the first month. The chain should have no more or less than 7-10mm
slack where it first comes into contact with the top of the chainring. If there is more movement
than this, please adjust the chain tension as follows:
a). Loosen the 2 bolts (See Image 3 an 4) at the centre of the main fan panels
b). Pull the fan with a 5mm allen key on both sides (See Image 5 ) back until the chain is suitably
tight
c). e-tighten the bolts to 14Nm, starting with the driveside bolt, making sure that the fan remains
straight – the fan blades should not be within 5mm of hitting the chain in any part of the fan’s revo-
lution.
3. The lube on the chain from new will last for a long time, but when it eventually becomes time to
re-lube please only use a silicone lubricant. (This can also be applied to the cassette if required).

Transport an Care
When transporting the evbox please make sure to:
1. Keep it properly secured – we recommend the use of the optional evbox soft carry bag to keep
all the parts protected from harm.
2. Use the supplied Velcro fastened carry handle to lift the evbox, making sure that the Velcro is
fully secured with your thumb (See Pic 6) on the front side.
While using the Revbox please…
1. Avoid placing pressure or weight on the mesh that covers the top of the fan.
2. Do not put force on the mesh of the side panels.
3. Avoid rocking your bike excessively – while the evbox is very stable, this can cause damage to
both your bike and the trainer itself.
4. Although the evbox Erg is almost fully covered and very safe to use, we strongly recommend
you train in a safe and controlled environment, without children or pets, so no small body parts can
get into the machine while in use.
Warranty
The evbox comes with a 12 month warranty. If you need to claim on this warranty this for any
reason, please contact us via our website: www.revbox.co.nz/contact
Liability
The details in the manual are for information purposes only. European Sport Imports Limited con-
stantly pursues innovation and reserves the right to make changes or improvements in the prod-
ucts described in this manual, without prior notice. European Sport Imports Limited cannot accept
any liability for direct, incidental, exceptional damage or any injuries arising from or connected to
the use of this material or the products described here.
Enjoy your training, and please send us an email if you need any help
Yours Sincerely
Your Revbox Team from New Zealand

Image 1 Image 2
Image 3 Image 4
Image 5 Image 6
Table of contents
Other Revbox Fitness Equipment manuals