REVIVER RPlate Operating and safety instructions

Modern Licensing
for Modern Living
Battery Powered RPlate
Setup + Install Guide

Hi, We’re Reviver
Our team has pioneered
development of the world’s
rst digital license plate +
connected vehicle platform.
Thanks for joining us on our
mission to modernize the
driving experience.
Visit reviver.com to see
where our journey is
headed next.

Download Reviver App
Activate your new RPlate
Install RPlate Device
1
2
3
Wait until receiving conrmation
that your RPlate is activated before
installing device.
!
Overview: Setup + Installation

a. Create Reviver Account
Create your Reviver account in the mobile app.
b. Add Your RPlate to Your Account
Scan the serial number on the front top right corner of your plate
and enter the email used when purchasing your RPlate.
c. Setup Your RPlate
Follow the in-app instructions to setup your RPlate and add your
vehicle registration to the device. You will need to submit photos
of your latest vehicle registration document and your license
plate.
d. Post-Setup Plate Refresh
Once our team has conrmed your vehicle and plate info, you
will receive a notication by email and through your Reviver app
to refresh your RPlate and display your license plate image.
Download Reviver App
Setup Your New RPlate
Is Your RPlate showing a “Detached” Message?
Make sure that it is in contact with the included metal bracket that you will attach
to the rear of your car shortly. The RPlate has an anti-theft sensor – attaching it to
the bracket will allow you to complete step 2d.
Download the App
Download the Reviver app at the Apple Store for
your iPhone or the Google Play Store for your Android.
!
1
2
3

Bag A
• Alcohol wipe
• Screws with colored dot:
• Brown - 2
• Blue - 2
• Yellow - 2
• Green - 2
• White - 2
• Black - 2
RPlate
Mounting Bracket
Bag B
• Front Screws - 2
• Rubber plugs - 2
• L-wrench (Torque 20)
Tools that are not included:
• Phillips + at screwdriver
• Microber towel
• Glass cleaner
Install RPlate Device
What’s In the Box
Follow these detailed instructions to install
the RPlate on your vehicle.
3
4
Wait For Activation + License Plate Image to Display Before Installing Device
Only move to step 3 and install your RPlate hardware after you have received app
and email conrmation that your plate has been setup and your license plate
image is displaying. This normally takes one business day, but can sometimes take
a few days for DMV approval, depending on weekends or holidays.
!

Make sure to also remove:
• Plate, frame + screws
• Adapters / Brackets
• Foam or tape
Some international models
may require Torque 20 tool
to remove adapter. Found
in Bag B.
Clean surface with
provided alcohol wipe
On vehicles with special
coating (ceramic, wrap and
matte nish), use microber
towel and glass cleaner.
Mount the RPlate bracket
with correct screws
Make sure holes are aligned
to prevent blocking camera.
Find the right screw by
comparing the diameter
or threading of the old
plate screw vs. the screw
options provided.
Old plate
screw
Do not adhere
the tape yet
New plate
screw
Remove Metal License Plate
Prepare For Installation
Mount Bracket
i
A
B
C
i
Note:
Phillips screwdriver not included
5
Bracket Adjustments
Remove RPlate. Pull red
liners and press tape
rmly to clean vehicle
surface for 15 seconds.
Ensure screws are fully
fastened.
Use supplied screws
only (Bag A).
Slots on back of RPlate
engage tabs to top edge
of bracket
Make sure RPlate bracket
tape is ush to vehicle
Test Fit RPlate
Install RPlate Bracket
D
E
i
15 sec
6

Install two screws using the
L-wrench (Torque 20) from
Bag B
Insert the rubber plugs,
groove facing down
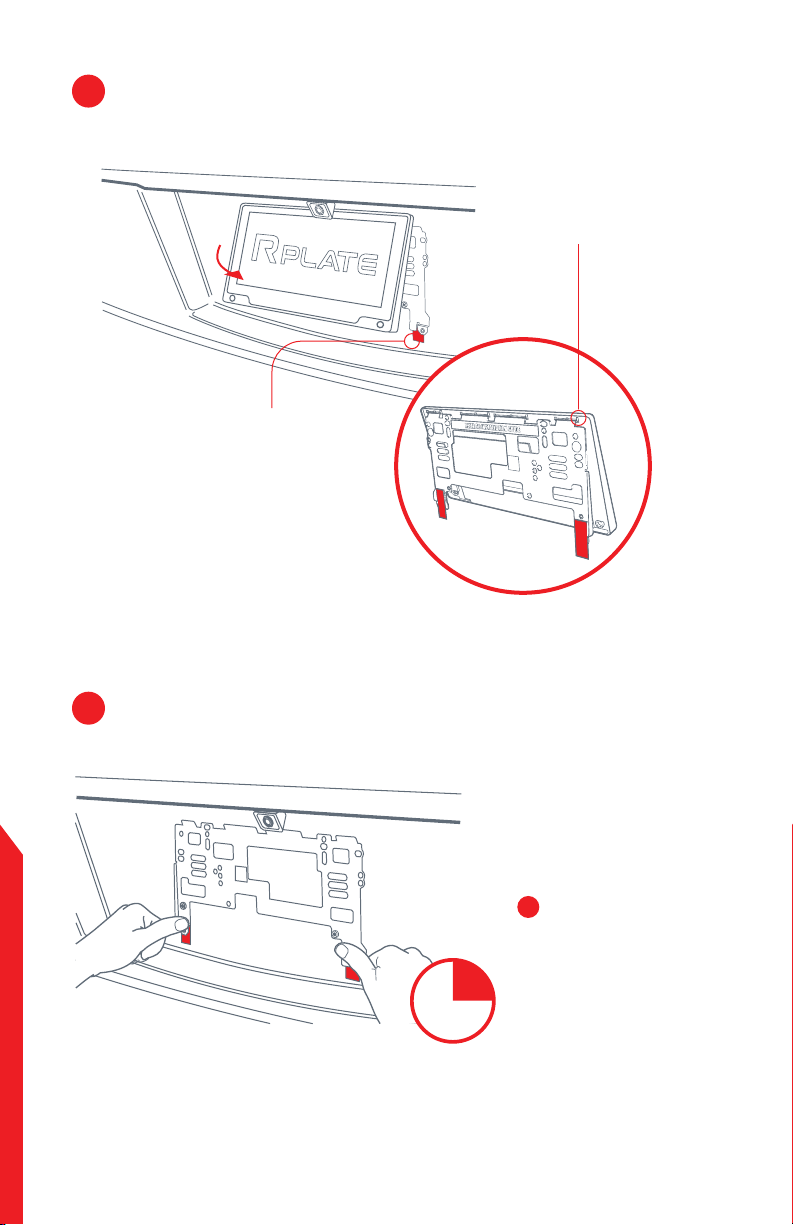
Secure RPlate To Bracket
Final Steps
F
G
Replace RPlate by
repeating step 4
Remove plastic lm
Follow instructions in the
app to complete pairing
and setup
7
You’re Ready to Hit the Road!
Feedback
100% of our packaging is compostable or recyclable. Please join
us in our commitment to a healthy planet by disposing of your
materials responsibly.
Box, Cradle
Foam, Plastic Bags, Paperwork
Compostable
Recyclable
Visit
support.reviver.com
Email
Not happy yet?
We’d like to help.
Tell your friends and
family and give them a
10% discount on their rst
year with promo code
FRIEND10
Leave us a review
Connect with us and
share your #RPLATE
photos
Happy?
So are we!
8

This guide contains important information. Please
keep it for future reference.
Designed by Reviver in California. Assembled in Taiwan.
RPlate is a registered trademark of Reviver © 2019 All
rights reserved.
CAUTIONS + WARNINGS
CAUTION: For vehicles with paint protective lm,
ceramic coating or matte nish use soap, water and dry
cloth to clean surface before installing license plate.
CAUTION: Routinely check this product for proper and
safe condition. If there is any damage or broken parts,
remove product from use.
CAUTION: If for any reason the screen (display) is frac-
tured or cracked, immediately remove this product from
use and contact Reviver Consumer Services for replace-
ment if under warranty.
CAUTION: The display module should not be exposed to
harmful gases, such as acid and alkali gases, which
corrode electronic components.
CAUTION: Disassembling the display module can cause
permanent damage and invalidate the warranty
agreement.
CAUTION: Observe general precautions that are
common to handling delicate electronic components.
The glass can break, and front surfaces can easily be
damaged. Moreover, the display is sensitive to static
electricity and other rough environmental conditions.
WARNING: The display glass may break when it is
dropped or bumped on a hard surface. Handle with care.
Should the display break, do not touch the electrophoret-
ic material. In case of contact with electrophoretic
material, wash with water and soap.
WARNING: This product contains chemicals known to
the
State of California to cause cancer and birth defects or
other reproductive harm.
NOTICE: Use mounting hardware sent with RPlate to
attach mounting bracket. Wipe car surface prior to install.
Ensure product installed correctly.
NOTICE: Do not use product if it was damaged in an
accident.
NOTICE: RPlate is sold as rear license plate. Consult with
applicable laws and regulations imposed by state agen-
cies with respect of display of the front license plate.
NOTICE: Tools may be required to remove the
license plate, adapter, and foam.
Battery replacement Instructions:
RPlate includes a non-rechargeable lithium battery pack
designed by Reviver. For replacement, only use Reviver
products. For further instruction, please go to
www.reviver.com/legal.
Battery safety:
Dispose of used battery pack properly. Only battery pack
provided by Reviver is acceptable for replacement.
DO NOT incinerate used batteries.
DO NOT dispose of batteries in re, as batteries may
explode or leak.
DO NOT recharge non-rechargeable batteries.
DO NOT short-circuit the supply terminals.
DO NOT expose to temperatures beyond the specied
temperature range.
DO NOT crush or puncture.
DO NOT open cells, do not disassemble battery packs.
DO NOT expose contents to water.
DO NOT connect with false polarity.
DO NOT weld or solder to the battery’s body.
FCC NOTICE:
This device complies with Part 15 of the FCC rules. Op-
eration is subject to the following two conditions: 1) This
device may not cause harmful interference, and 2) This
device must accept any interference received, including
interference that may cause undesired operation.
NOTE: This equipment has been tested and found to
comply with the limits for a Class B digital device, pursu-
ant to part 15 of the FCC Rules. These limits are designed
to provide reasonable protection against harmful
interference in a residential installation. This equipment
generates uses and can radiate radio frequency energy
and, if not installed and used in accordance with the
instructions, may cause harmful interference to radio
communications. However, there is no guarantee that
interference will not occur in a particular installation.
If this equipment does cause harmful interference to
radio or television reception, which can be determined by
turning the equipment off and on, the user is encouraged
to try to correct the interference by one or more of the
following measures:
• Reorient or relocate the receiving antenna.
• Increase the separation between equipment
and receiver.
• Consult the dealer or an experienced radio/TV
technician for help.
NOTE: Changes or modications to this unit not expressly
approved by Reviver could void the user’s authority to
operate the equipment.
FCC Declaration of Conformity
Trade Name: RPLATE
Model Number: ATT
Contains: FCC ID: XPY2AGQN4NNN
Contains: FCC ID: XPYNINAB1
Electronic waste: To recycle product, visit your local
e-waste collection facility or local recycler. Reviver offers
a mail-back program for its products. Reviver will ensure
recycling and disposal are performed in an environmen-
tally sound manner that complies with all governmental
laws and regulations. To access the mail-back program,
reach out to the Reviver customer service.
Customer service contact: Contact our consumer
Warranty: Subject to a limited two (2) year warranty.
Visit Terms of Sale and Use for full details. Reviver shall not
be liable for any incidental or consequential damages
for the breach or any warranty on this product. Some
jurisdictions do not allow the exclusion or limitation
of incidental or consequential damages, or limitation on
how long an implied warranty lasts, so the above limita-
9
!
Table of contents
Popular Automobile Accessories manuals by other brands


ULTIMATE SPEED
ULTIMATE SPEED 279746 Assembly and Safety Advice

SSV Works
SSV Works DF-F65 manual

ULTIMATE SPEED
ULTIMATE SPEED CARBON Assembly and Safety Advice

Witter
Witter F174 Fitting instructions

WeatherTech
WeatherTech No-Drill installation instructions

TAUBENREUTHER
TAUBENREUTHER 1-336050 Installation instruction