RGBlink Mini User manual

●4 HDMI inputs, 1 HDMI output
●6 images multi-view, switch between preview and program
●2.1 inch TFT full color screen
●Support MIC and LINE audio input, multi-channel mix audio
●Image scaling & croping
●Support PIP,PBP
●Support T-Bar switch
●LOGO overlay
●Support PC and APP control
●Optimized heat dissipation performance
●Integrated design, compact and portable
Quick Start

© Xiamen RGBlink Science & Technology Co., Ltd.
1/22
CONTENTS
Product Introduction...................................................................................................................................................2
Packing Configuration................................................................................................................................................. 3
Hardware Orientation................................................................................................................................................. 4
Front Panel.......................................................................................................................................................... 4
Interface Panel.....................................................................................................................................................5
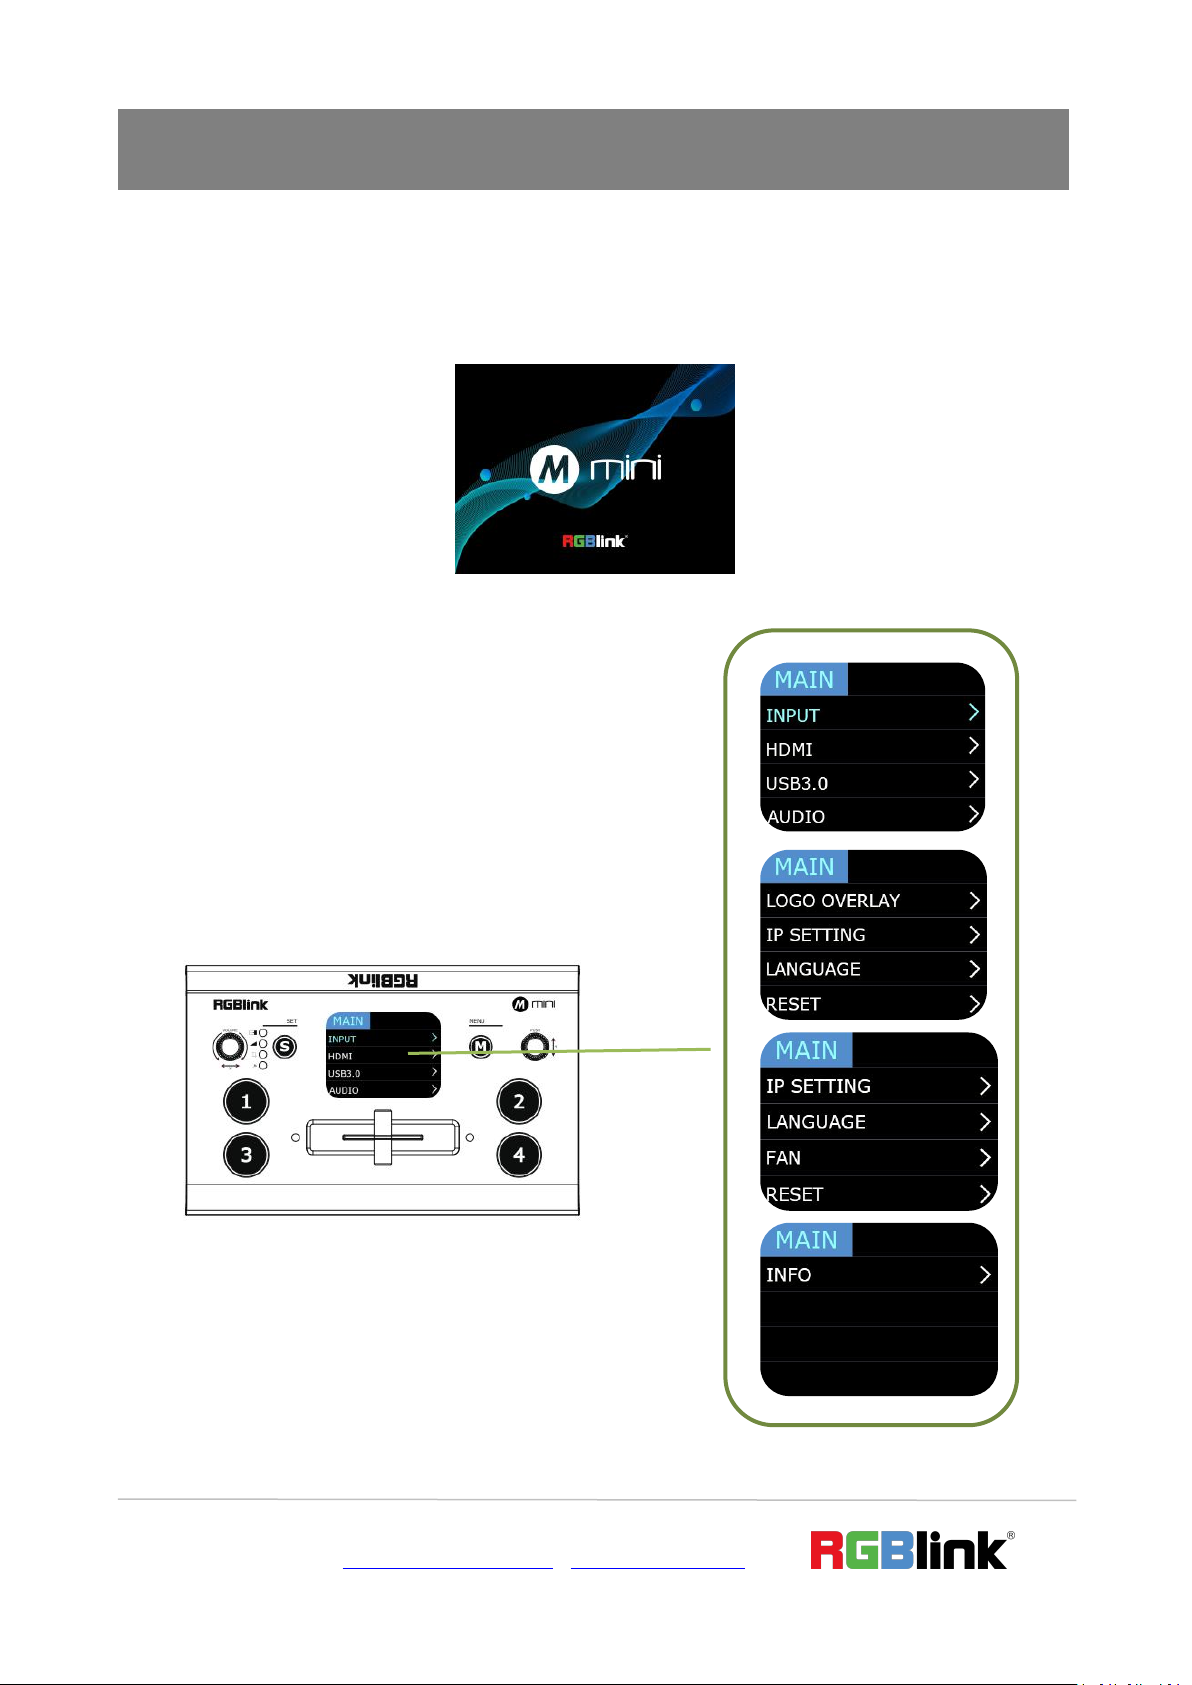
Use Your Product......................................................................................................................................................... 6
MENU.................................................................................................................................................................. 6
Input............................................................................................................................................................ 7
HDMI........................................................................................................................................................... 7
USB3.0 ........................................................................................................................................................ 8
Audio........................................................................................................................................................... 8
Logo Overlay................................................................................................................................................9
IP Setting......................................................................................................................................................9
Language................................................................................................................................................... 10
Fan Control................................................................................................................................................ 10
Factory Reset............................................................................................................................................. 11
Info.............................................................................................................................................................11
S Button............................................................................................................................................................. 12
MIX............................................................................................................................................................ 12
MODE........................................................................................................................................................ 12
PIP..............................................................................................................................................................13
Switch Source.................................................................................................................................................... 13
XPOSE mini Operation.......................................................................................................................................15
YouTube Streaming............................................................................................................................................19
Contact Information.................................................................................................................................................. 21

© Xiamen RGBlink Science & Technology Co., Ltd.
2/22
Product Introduction
Introducing new mini.
With all the features of the preceding model including the unique built in LCD preview display, the mini
streaming switcher features four HDMI high-definition inputs, a configurable HDMI output and USB3.0
streaming output to connect with virtually any laptop or streaming platform.
PIP picture in picture receives a boost in this new release, with dual fully scalable video windows in any position
possible.
Make use of audio from multiple sources with mix including Line and TRRS connectors as well as supporting
headphone/mic combinations.
mini is powered via standard USB-C port for even greater compatibility and mobile live flexibility.
With industry leading hardware performance and reliability, along with superior heat management and
dissapation, mini is the must have mini streaming switcher.
mini is light and robust at only 480gm thanks to an all new impact resistant, precision pressure cast ABS
housing.
System Connection Diagram
mini System Connection Diagram

© Xiamen RGBlink Science & Technology Co., Ltd.
3/22
Packing Configuration
Power Adapter
USB3.0 Cable
Type-C cable

© Xiamen RGBlink Science & Technology Co., Ltd.
4/22
Hardware Orientation
Front Panel
1
VOLUME/X
Turn the knob to adjust volume or select items and attributes
Control camera left-right spinning when it is in PTZ setting
2
Shortcuts
For shortcut & selection of features
1. Transition Effect ( ),
2. PIP( ),
3. Volume Control
3
M(menu)
Menu and back button
4
PUSH/Y
Y:turn knob to select menu item, push to confirm
PUSH:Push knob to quickly switch HDMI Out between 6-Picture PVW
and PGM when 2.1 inch TFT is under the state of previewing
5
TFT Display
To display 4 inputs and menu
6
1,2,3,4
For signal switching and visual status
1. red: is on air (PGM),
2. static green: signal is standing by,
3. flashing green: ready to be switched,
4. no light: input source is not supported
7
T-Bar
Manual switch, push to left end or right end to switch signal to PGM

© Xiamen RGBlink Science & Technology Co., Ltd.
5/22
Interface Panel
1
HDMI OUT
1 HDMI output port, connect to display to show multi-view
2
HDMI IN
4 HDMI inputs, connect to input source from HD camera or PC
3
Type-C
1 type-C power interface
4
AUDIO IN/OUT
AUDIO In, analog audio input port, connect to microphone with power
AUDIO OUT, analog audio output port, connect to loudspeaker
5
LAN
Communication port to link dedicated software for control
6
USB
USB 3.0 output, capture signal via third party streaming software and push
to live broadcasting websites

© Xiamen RGBlink Science & Technology Co., Ltd.
6/22
Use Your Product
MENU
Main Menu
When mini is power on, the native TFT display show starting up page.
After mini is powered on, push button M to enter the
main menu. Main Menu include:INPUT, HDMI,
USB 3.0. AUDIO, LOGO OVERLAY, IP SETTING,
LANGUAGE, FAN, RESET, INFO

© Xiamen RGBlink Science & Technology Co., Ltd.
7/22
Input
HDMI
1.Push
「M」
button(MENU) to enter main menu
and select first menu item<INPUT>,push「Y」
knob to enter <INPUT>menu.
2.The input menu displays the information of the
input signal source.
If there is no input source, it displays: NO
INPUT.
1.Push MENU and select the second menu item
<HDMI>
Push「Y」knob to enter <HDMI> menu.
2.Rotate 「Y」knob to select PVW output and
PGM output for HDMI.
Output:PVW or PGM
Format:1920×1080@60

© Xiamen RGBlink Science & Technology Co., Ltd.
8/22
USB3.0
Audio
1.Push MENU, rotate and push「Y」knob to enter
the third menu item<USB3.0>
2.Rotate 「Y」knob to select PVW output and
PGM output for HDMI.
Output:Choose PGM or PVW
Format:1920×1080@60
1.Push MENU,rotate and push 「Y」knob to
enter the fourth menu item<AUDIO>
2.Rotate 「Y」knob to select
Input
Input: MIC, LINE or OFF
Volumn: 1-100
HDMI 1/2/3/4
HDMI 1/2/3/4: MIC, LINE or OFF
AFV: ON/OFF
Volumn: 1-100
Column:ON/OFF

© Xiamen RGBlink Science & Technology Co., Ltd.
9/22
Logo Overlay
IP Setting
1.Push MENU,rotate and push 「Y」knob to enter
the fourth menu item<LOGO OVERLAY>
2.Rotate 「Y」knob to select
Enable: ON/OFF
POS: set the position of overlay
Push MENU, rotate and push「Y」knob to enter the
sixth menu item<IP SETTING>
SET IP Address Manually
Select each segment with the「Y」knob, then
press to enter and set the value of each segment
by pressing the knob again.
Set IP Address Automatically
Use this setting if yournetwork/router has a D
HCP server
Select DHCP and set to ON,manual setting is di
sabled, and the IP Address for mini is set from
the network.
Note: After setting IP address manually, please restart the device.

© Xiamen RGBlink Science & Technology Co., Ltd.
10 /22
Language
Fan Control
1.Push MENU and rotate and push「Y」knob to
enter the seventh menu item<LANGUAGE>
2.Rotate and push「Y」knob to select
Chinese and English.
1.Push MENU and rotate and push「Y」knob to
enter the seventh menu item<FAN>
2.Rotate and push「Y」knob to select
Speed: 1-4

© Xiamen RGBlink Science & Technology Co., Ltd.
11 /22
Factory Reset
Info
1.Push MENU and rotate and push「Y」knob to
enter the eighth menu item<RESET>
2.Rotate and push「Y」knob to select YES or
NO
Push MENU and rotate and push「Y」knob to enter
the ninth menu item<INFO>
INFO shows Device SN,IP address,MAC
address,MAC address,MCU version,Video version.

© Xiamen RGBlink Science & Technology Co., Ltd.
12 /22
S Button
When you want to personalize your live show, you can use the mini's 14 built-in switching effects and control
the timing of the switch via T-BAR.
Push S button to enter transition effect menu<MIX> and the LED indicator beside will light up;
Push S button twice to enter mode switch menu<MODE> and the LED indicator beside will light up;
Push S button three times to enter menu<PIP> and the LED indicator beside will light up;
Push S button four times to preview four inputs;
Each time the menu is opened, the corresponding indicator light will be on, and then rotate the PUSH knob (" Y
") to select and confirm.
MIX
MODE
Press "S" button to enter transition effect menu<MIX>,there are 14 kinds
of effects
To change the switching effect, proceed as follows.
1. Press the "S" button to stay in the effects screen.
2. turn the「Y」knob to select the effect
In actual use, the hard cut is only available in Quick Cut mode, if you use
T-Bar mode, it will automatically change to FADE.
Push S button twice to enter <MODE>menu,and rotate 「Y」knob to
select FAST or T-BAR
After selecting Quick Cut, you need to select the switching time: from
0.5s to 5.0s.
The steps are as follows.
1. Press the "S" button until you enter the mode interface.
2. Press the「Y」knob and wait for the option to turn yellow.
3. Turn the「Y」knob to change the parameters.
4. Press the「Y」knob to confirm.
In T-Bar mode, you can directly control the progress of the T-Bar
manually and customize the switching.

© Xiamen RGBlink Science & Technology Co., Ltd.
13 /22
PIP
How to Enter PIP Menu Quickly
"S" button has memory function.When the TFT screen returns to preview mode, press S button to directly enter
PIP menu if you use it last time. If you want to enter other menus, continue to press the "S" button.
Switch Source
When you access the four source buttons, the lights on the source buttons will appear in four states:
green constant: the signal is recognized, no action is being taken;
green flashing: the currently selected,signal is being edited;
red constant: the signal is currently on the main output;
unlit: the source is not accessed or the resolution of the accessed source is not supported by the mini
Push S button three times to enter <PIP> menu and select PIP mode(9
PIP modes)
The steps are as follows:
1.Push "S" button, enter PIP setting page.
2.Rotate「Y」button to select layout you want and confirm by Pressing.
3.Select the signal you want for background. (When the letter is A, it
means background signal)
4.Press「X」button to select signal for PIP layer. (The A will change to B)
5.Finally, push the T-Bar and the content you’ve set will be taken to
PGM. (T-bar has to be totally left or right side to make sure the content
has been taken.)

© Xiamen RGBlink Science & Technology Co., Ltd.
14 /22
In FAST + TIME Mode:
Press a source button (1, 2, 3, or 4) that is green.
Selected source will be switched to the output with the set fade TIME and using the MIX
transition selected, with the pressed source button becoming red.
In T-BAR Mode:
Press a green button to set the source as the PVW, the source button will blink green.
Slide the T-BAR to switch/mix from the current PGM source to the PVW source.Any MIX
transition effect will be applied as the T-BAR is moved. Once the T-BAR has been fully transitioned, the indicator
lights on sources buttons that are PGM and PVW will be swapped.
Note: Source selection is locked when T-BAR is in transition (not entirely docked at a left or right position)
1.Press a source button (1, 2, 3, or 4)
that is green.
2.Slide T-Bar from left end to right end
or reversely.

© Xiamen RGBlink Science & Technology Co., Ltd.
15 /22
XPOSE mini Operation
After software is installed, click the icon
XPOSE and login the software.
After searching, all available mini devices in the
sub-net can be found, up to 128 devices can found
if there are.
Click Search to search mini device.
Install dedicated software named XPOSE to
control mini or mini+.
Right click the setup exe file .
Choose Run as administrator to open the
exe and install the software.

© Xiamen RGBlink Science & Technology Co., Ltd.
16 /22
Select the desired device by SN and IP and enter the
management interface. The software interface is a
simulation of operation panel on real mini device.
For example, clicking Button M can open up
menu as on the device. If it is the first time for you
to use mini, we suggest you watch our User Guide
video.
Click the drop down arrow and click to play the user
guide video.
If you have use XPOSE mini before,then you can
directly click and check sub menu.
Following sections are dedicated to the additional
features of XPOSE mini.

© Xiamen RGBlink Science & Technology Co., Ltd.
17 /22
Live Streaming
Device Capture:choose RGBlink USB3.0 Capture
H.265: When it is ON, users can watch 4 inputs
streaming back on XPOSE software.
Import the related OBS application if users need
to do live streaming, click Relate to confirm.
OBS: slide ON to start streaming.
Note: H.265 and OBS cannot work at the same
time. User choose either H.265 or OBS, not both.
Test Pattern
To facilitate troubleshooting, XPOSE mini provides a
test signal output, which can be used to troubleshoot
the USB or HDMI output interface when there is no
output signal from USB or HDMI.
1.Select the USB/HDMI interface to be tested.
2. Select the mode of the test signal
3.Adjust color

© Xiamen RGBlink Science & Technology Co., Ltd.
18 /22
Password Protection
In order to solve the problem of control conflicts
caused by different devices controlling the same
mini in the same LAN, XPOSE mini provides a
password protection function, as an administrator,
you can set a password for the device controlling
XPOSE mini, and when you control the interface
again, you need to
enter the password to control it.
Note: If you have forgotten your password, please
restore the factory settings on the mini.
T-Bar Calibration
If the T-Bar is not in the correct position, no other
operation is possible.T-Bar correction is available in
XPOSE mini.
The steps are as follow:
1. Turn on the T-Bar Calibration switch.
2. Push the T-Bar to the far right on the mini.
3. Turn on the "On" switch
4. Push the T-Bar to the far left on the mini.
5. Turn on the "On" switch

© Xiamen RGBlink Science & Technology Co., Ltd.
19 /22
YouTube Streaming
1. Create a video or post.
2. Then click “Go live”.
3.Enter Live streaming interface. And then create a title.
Other manuals for Mini
6
Table of contents
Other RGBlink Lighting Equipment manuals
Popular Lighting Equipment manuals by other brands

Wild tech
Wild tech ME2602-1 user guide

PT
PT W2250 owner's manual

MIIDEX LIGHTING
MIIDEX LIGHTING Vision-EL 75494 Notice Instructions

Meanwell
Meanwell LCM-40DA installation manual

Eaton
Eaton CEAG CGLine Series Mounting and operating instructions

Clevertronics
Clevertronics LP Cleverfit Pro CCFPRO Series Installation & maintenance instructions