RHINO JAG User manual

1
A U S T R A L I A N S T A N D A R D S A P P R O V E D
REMOTE CONTROL ENGINE IMMOBILISER
• This product complies with AS/NZS 3749.1 2003 Class A. Volumetric Sensing must be enabled to
comply with a Class A installation (refer ‘feature programming’).
• Class A VSAS (Vehicle security alarm system) includes control equipment including setting and
unsetting facilities, all sensors, warning devices and provisions for immobilization of the vehicle and the
volumetric sensing device (glass break/shock).
• This product complies with AS/NZS 3749.1 2003 Class B. Volumetric Sensing must remain disabled to
comply with a Class B installation (refer ‘feature programming’).
• Class B VSAS (Vehicle security alarm system) includes control equipment including setting and
unsetting facilities, all sensors, warning devices and provisions for immobilization of the vehicle.
• This product complies with AS/NZS 4601:1999/Amdt 1: 2003
• This product is to be installed in accordance with the methods & principles detailed in AS 3749.2:1997
Thank you for purchasing a Rhino Engine Immobiliser. Please read this manual carefully
before commencing installation and keep it in a safe place for future reference.
Contents
Contents ................................................................................................................................................................................................ 1
Has your insurer
specified fitting a
“RES2001”?
For details, please
refer to page 12

2
Features ................................................................................................................................................................................................. 3
Detailed Feature Descriptions ............................................................................................................................................................... 4
!" #
$ %& # " #
' # $ (
" ) # *# " #
$ *# + ( " #
, -! . # / --0
$ * ! # " # 1
" 2# 0 - & # / + 3 4 / 1
- 1
Operation .............................................................................................................................................................................................. 6
Remote Control Functions .................................................................................................................................................................... 6
Operation .............................................................................................................................................................................................. 6
5 6 0 7
# $# 5 8
4" 0 8
6 - 6 8
" # # 6 0 9 + # * 6 0 8
Overriding the Immobiliser................................................................................................................................................................... 8
Programming......................................................................................................................................................................................... 8
' / " # :
' / 0 # 6+ , + 6;< =
' / 0 # 6+ , + 62< ;;
Installation .......................................................................................................................................................................................... 12
>6+ 2? ? ;@ 6A ;2
# B 0 . ;2
0 $# ;2
# --0 ;1
0 # + (# + - 6B ;1
# ;1
# ' # $ ;1
0 # 5 0 * !# ;7
& 66) 5 + 6B 0 ) $) 2?

3
Features
Standard System Features
• Microprocessor Controlled
• Three Point Engine Immobilisation (Onboard Relays)
• Auto Immobilise (Passive Arming)
• Code Hopping Remote Technology (Anti-Scanning, Anti-Code Grabbing)
• Two SSR™ Solid State Remote Controls with 4 Function Operation (Arm / Disarm, Boot Release, Panic & LED
Torch)
• Long Life Lithium Cell Remote Control Batteries (Each Remote Uses 2 x CR2025)
• Automatic Re-arm in case of Accidental Disarm
• Ultra-Bright Red Flashing LED Light
• Visual Arming and Disarming via Indicators (1 Flash For On, 2 Flashes For Off)
• Safety Circuit Prevents Arming While Ignition On
• Learning Mode for Adding Additional Remote Controls (maximum of 5)
• Negative On Alarm Output for Optional Internal Cabin Siren
• Onboard Central Locking Relay Outputs
Selectable System Features (These features can be turned on and off).
• Arm / disarm beeps (if optional siren fitted)
• Door ajar warning (indicators flash & siren (if fitted) beeps for 3 seconds if a door is left ajar i.e. Vehicle’s interior
light circuit sees door in open position)
• Electric boot release output via remote control – no delay (standard feature is to hold button for 3 seconds)
• Timed headlight delay (optional feature at additional installation cost)
• Multiple vehicle remote control (control 2 cars separately from the 1 remote)
• Central closure (allows electric window / sunroof closure on arming of some vehicles)
• Door lock on ignition (anti hi-jack)
• Perimeter night light (indicators hold on for 20 seconds on disarm)
• Dome Light Extension (interior light turns on for 20 seconds on disarm)
• User programmable override code in case of loss or damage of remotes (over 63,000 possible codes)
• Compatible with Transformer interface for vehicles with factory keyless entry systems. Allows for factory remote
controls to arm/disarm the system.
• Compatible with Wireless Keypad to allow arm/disarm of the system without remote controls.
Alarm System Features (Optional)
These features can be utilised once the optional BBSC Model Back-up Battery Siren is fitted.
• All points of entry alarm protection (doors, boot, bonnet)
• Personal panic button via remote control (siren sounds & indicators flash)
• In-built 2 stage pre-alert car body impact sensor with ETS™
• Audio discriminating glass break sensor
• Alarm memory (allows recall of the 10 most recent alarm activations in order)
• Auto Bypass (prevents false alarms caused by faulty sensors / or switches)
Optional Accessories
• Backup Battery Siren (Part No: BBSC)
• Internal Cabin Siren (Part No: DPS)
• Ultrasonic Sensors (Part No: UD6)
• Microwave Sensor (Part No: UD5)
• Electronic Tilt Sensor (Part No: TILTSENSE2)
• Paging System (Part No: APAGER)
• Transformer Interface (Part No: TRANS TX)
• Wireless Keypad (Part No: WKPB)

4
Detailed Feature Descriptions
Auto Immobilise
/ / 4: # /
*+ $/ 4 /
& # C / # / : C /
# B ! / /
5 / / # ( 4C / 4 !
/ C ! # : ( ! # !# C
/ % # 4# ! 5
! 4
Automatic re-arm & relock (Programmable)
4 # / / #
4 4 # / 7? /
C / ! " # $ # %
/ : *+ $/ 4
7? !C / / ! D !/
/ *+ $/ #
Door Ajar Warning (Programmable)
4 / 4 C /
4 --0 C/
Timed Headlight Delay (Optional connection by installer at extra cost)
5 4 # ;1 /
/ / C ! ! 5 # ;1
#
Perimeter Night Light (Programmable)
& C / 2? C #
/ 4 #
Dome Light Extension (Programmable)
# / 4 C # / 4 4
# 2? C # #
/ # C # / A ! # # # (# #
2? C 4 C # # ) + < 4
6 6 !C /
Glass Break Sensor (For Optional Use Along with BBSC Siren)
6+ 7? ;/ # # !#
4 / # # C 4# A !# #
# # 4 4 # ! #

5
Door Lock On Ignition (Programmable)
4 !# C/ / !/ # C !/
# 4 4 #
Pre-Alert (2 Stage) Car Body Impact Warning with ETS™ 4 /
4 / # # # 4 /
4 / # 4 / # 4
/ 4 ! ! C /
/ / / / 4 ! C
/ 4 A + 3 + 4 #
/ 4 ! C ! C (/ C
# ! 4
A 6 E %@ C / # 1 # C
!# / 4 ! C/ 4
4 / 4
4 4 4 %
" # #
Auto Bypass
# / (
# # / /
4 / # (
/ / 4#

6
Operation
Remote Control Functions
TOP
BUTTON
Operation
Your Remote Control
CENTRE
BUTTON
Press and hold for 3
seconds to activate the
boot release feature.
Press to activate panic
feature, press again to
cancel.
LEFT
BUTTON
RIGHT
BUTTON
Press to
Arm and
Disarm.
Press for
high
intensity
LED
torch.

7
Arming and Disarming Your Immobiliser
Activate Panic or Car Finder Function
Remote Boot Release
Programming Additional Remote Controls / Erasing Lost Remote Controls
& ' ( ) ' * ( ' + , - . ( /$
" % ! 0
4 # +
!/
/ 9
!# C / ! *+ $# / 2? C& 1 .
' + , - . ( - ' 2 '
+ !
, . 3 ' . - ' 4 4 4 ! 5 !
& ' 3 - ( ) ' * ( ' + , - . ( /$ " % ! 0
4 C +
! / / /
/ *+ $/ # !# C / !
& 1 . ' + , - . ( - ' 2
' 66 4 C /
7 +
+ ! &
, . 3 -
' 66
Your RES4601a is supplied standard with 2 remote controls. You can use up to a maximum of 5.
To add a new remote
to your immobiliser, simply follow the procedure below:
1.
4 F#
2.
+ #
(
3.
+ /
4.
4 F#
5.
/ / #
Erasing Lost Remote Controls:
If you lose a remote control or perhaps have your car keys stolen, you can
simply erase the lost/stolen remotes by repeating the procedure above 6 times. This will fill the system memory with
remotes that only you have in your possession.
Learning In a Remote If all Remotes are Lost:
You may learn in a remote without having an already learnt
-
in remote. Simply perform the Overriding the Immobiliser procedure followed by the remote learning procedure abo
ve
(from step 2).
. . ( . ) 7 8 ( 6 3 . ( 6* & '
9 4 # ( +
G#
C/
> @C ( +
# ) + <" / !/ #
A */ + " + 4 " #
-6+ *+ + (
/ 4 / (#
! # , !+
/ !C
/ ) + < / / ! / #
5 # , !+
Press Centre Button
Press Centre Button

8
Overriding the Immobiliser
Programming
How to Program the Selectable Features
5 6 # 4
A $ / #
& 4C C # # 6+ , + 6
# / 4 C C
4 / 4
& !! " ! ! 9 4 ! #
1. 6+ , + 6; 2/ + # ! # 6+ , + 6;
2. 4 6+ , + 6;C C# #
3. # # C , ! + A
F # ! # + /
! *+ $ C/ # 4
4. #
1 / / 444
*+ $ / # / >7 ( &
" & @ ( / # C / C
! # / #
" 60 + $. 6+ <
/ 4 4
4# 5 4 47C? ? ? 6 6# 2
" # # : / /
& : 9
& " %
; 4F 4 C/
2 ) / # A #
4 / 211
& ! / 4
) / # A #
4 / 211
/ / 5 / : H / /
) + <. C # C / 4 4
/

9
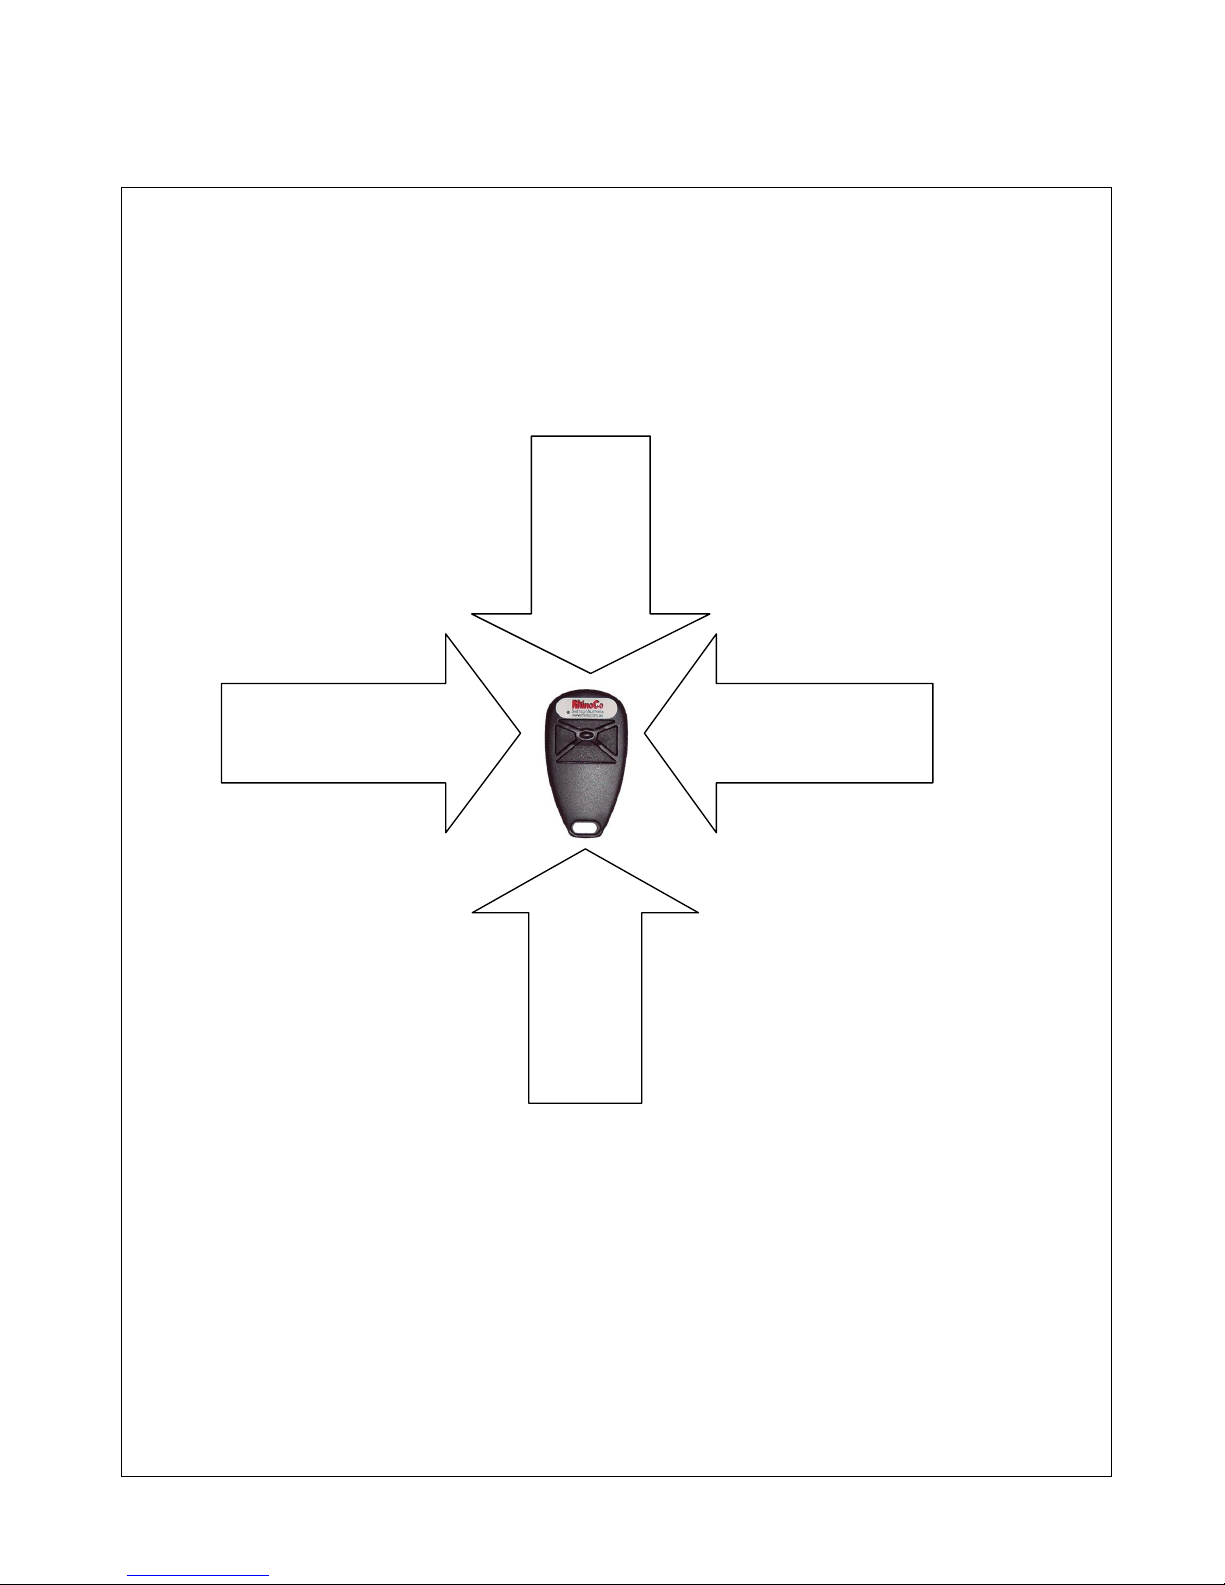
How to Change REGISTER 1:
; - * 9
**
$
6
0 *+ $) $
' +
, ) )
. 6) + $
)
*
( < "
. 6)
)
9
+ . 6+
I
' +
*
+
-
. )
)
' +
6
+ B +
6. & * ( .
7
(
& "
&
6 & ' ( )
- . & &
3 . - ( 7 & '
# $# - ; ) ; 2 $ D
6 $
$ * ! #
' % !
& C / !/ #
C !/ #
) $ %& # & C %/ #
4 D /
" ) # *# 1 & C /
2? C #
/ 4 #
- 6 7 & C *-
/ A # # /
$ *# + (
# / #
C # /
4
6
6 ! 4
# 2
: # /
4 C # / 4
4 # 2? C
# #
/ # C # /
A !# # # (# #
2? C 4
C # #
! % ;; 7
+ *+ 0
4
A
# ;; C
# :4 %
# 47" # /
4 4 48 *+ $/
4 / 4" # #
/ 4 4:(" #
# / % 4;4
4% 44 # C
# (
B
;2 + *+ 0
B
6A
# ;2 C
# / 9 / 4
# # / !# C/ 4#
/ !/ # # #
/ C C 4
/ / #
C # # 4
# (
" 3 " # #
B
; + *+ 0
# ; C
# 5 6 A
/ / # #
;- C; I # $
2- C2 , -!
- C !
- C " /
1- C1 #
7- C7 (
8- C8 $
:- C: - 9 -
/ 4 / 4 #
! *+ $/ /
4 # C ;
! & "
# (

10
0 4
;1 ) & C / # # /
#
) + < / ) *5
4 # /
) C ) /
& J B
;: & & J
4 / #
! ! 4 &
J
# /
/
;= &
/
4 4
) + < / / C
/ 4 )
# /
/

11
How to Change REGISTER 2:
; - * 9 $
6I+ 6
F
$
6
" + )
C
) $
' +
, ) )
. 6) + $
)
*
( < "
. 6)
)
9
+ . 6+
I
' +
*
+
-
. )
)
' +
6
+ B +
6. & * ( . 7
( &
" &
6 & ' ( )
- . & &
3 . - ( 7 & '
0 ; # # C
*+ - .
9 $ I
2 4 4/ / 6 C
4 4 /
4
) 42# # !
6 6 ! 4 # / !
/ 7? # 2
4 C #
( / 9
!
) # 4
' # D;1
1 & C # = ( / #
% %
/ / / 4
# # ;1 # C /
C # / ;1
C / 5
*+ #
;1 5 / /
/ C # ! # ;1 /
/ /
7 ) & C 4 # /
# #
+ (* !" 0
0
8 & C ! ;1 # 4
? 1 4 /
4 !# / /
-B & CB ! C / / / C
+ (. !" : & C ! ;1 # 4
? 1 4 /
4 ! #
40
;
/ / 4
4 4
4 / !# 5 4
47C? ? ? / <
; # ; C
# !/
4 4
2 ) / # /
211;;
& !
) / # /
2117
1 & !
7 5 4 # 4
# ;;7
8 B ! / 4 K$
/ / /
' & . 4F #

12
Installation
“RES2001” Insurance Requirements
0 / / A 6 B >6+ 2? ? ;@
F4 / 4
The code RES2001 has been especially given to insurance companies to make sure that their specified
installation of a RES4601a is carried out to their client’s vehicles. If a customer says they need to have an
RES2001 fitted this means that you must:
; -A 4 CA
) &
2 6 L , / CC #
" 4 / 4 # >6 6+ 2? ? ;@
Installing the Main Control Unit
Mount under the dash, in a well hidden location. Securely fix the main unit with cable ties or similar to prevent
the unit from moving around. Failure to do this will result in poor shock sensor sensitivity, and may cause harm
to the electronics.
Internal Connector Diagram
! / C( #
. # / /
!
" #$ %&
'$ ()
'$% '*
'$% +,
+#$ ' #$
+#$% +#$%
!"#$%&'()*+,(-,./(01
.
.0
.%
IM2B

13
2
:
CONNECTION
5 * ' 6 # !#
>
2&
3 0
? $
@ , . 3
&
5; 0 M ;24 4 ( # !
# 4 / # *+ $ / # C / 4 /
!M *+ $ M ;2I
A - 0 / / ) <5
6 --0 /
B # ( C % ' 9 D & C / # 4 4
;1? B 0 # # / 6 , *. ? ? / / 0
# % / / /
4# # # C / C
# / ;1 C / 5
*+ # ;1 5
/ / / C # ! # ;1 /
/ / C % D ! --0 # 4
L ,
E + ' ' & ## ' * & # 4 ;1? ( /
? 0 # 4 6A #
5 1 ' ' 3 0 - /
5 #, . 3 / / # 4 *+ $
55 *F > % & 9 DC /
/ 4
5 + 0 # ! 4 +
(
5> * ' 6 # ! #
5 #3 ' ' ( 0 (# / 7 # 4/ # C 4
/ # 4 # 4#
$ >
2&
+
$ A
2&
5
2&
5+
2&
2&
+
2&
: / # 4 &
: @ 5; " % : 0 / 4
/ ! B ;- /
!B ;
6 4 # / / B 2 B 2-
6 4 # / / B B -
' & . 6 ! "9 9 ? " % G "
& ! " % G " ? "
/ 0 " ' 9
B , 6 # !#
E , ' 6 # !#
, ' 6 # !#
* 6 # !#
0 @ 5 % C/
! %

14
-!!.#/0&
1
2)
-!!.#/0&12)
-!!.#/0&1&!3)
-!!.#/0&1&!3)
"-402!540!!0.#4!/6
+,-&7#084029443&
%%9-402"#0/%&3&
"*-))%&3&:;!</0!3/
'%=%-
+'%=%-
2
13
,%!
,"!
,"!
,"!
$
,"!
4,"$
,$
,$
0> -
56
'7
4
1
#
898
'
$
&
-!!.#/0&
1
2)
-!!.#/0&
1
2)
-!!.#/0&14)
-!!.#/0&
1
4)
(%%-:;
"%:;-
<"%:3-
'%=%-
'%=-
+'%=%-
+'%=-
0#'$4040!/
-/0
-*0;
'='-'?#$
'="-"4;#$
-
4/:;
%%"-402&
-*0;
-/0
-!!.#/0&
1
2)
-!!.#/0&12)
-!!.#
/0&
1
0)
-!!.#/0&
1
0)
.=
5/
=
>
$
"
=
"

15
Installing the BBSC siren
Connecting To An Existing Electric Boot Release Motor
) <? 0 # 46A
Installing Additional Sirens
Installing Timed Headlight Delay
+;!-9?
>
>
>@0,,(A8
.
<"%:3-
#5"&
>B
0.
-/03:
-
*0;
"*-/:@
'"-4020#0!&3&

16
Connecting the Vehicle’s Door Switch to the Immobiliser
Connecting Your System To Central Locking
Connecting to Negative Pulse Central Locking Systems:
( . .
( . 3
( . .
. !) 0 ) .
. !0 B . !" ) # 4
. ! ) +
* ! ) 0 ) .
* !0 B * !" ) # 4
* !) +
0 # / # 4 # / <
+,(;C7+,417+,6
7

17
Connecting to a New Door Motor
# / # ! # A 4 4 !# 4
4F C / / ! >!@ % 4F
Connecting to Negative or Positive Activated Central Locking Systems
• 6' ( 7 ' - & ; . & ( . - & & 1 . ' . & ; . 0 . ) *0 J ) *0 J ) +
• 6' ( . & ; . & ( . - & & 1 . ' 7 ' - & ; . 0 . ) *0 J ) *0 J ) ;2I$0
. ) *0 J ) 0
+
. ) *0 J 0 B
. ) *0 J ) M ;2I$0
*0 J ) 0 +
*0 J 0 B
*0 J ) M ;2I$0
31"!%
%=
3
.
* , ' <
* , ' < '
* , ' < ' . M ;2I$0
*0 J ) 0
*0 J 0 B
*0 J ) + M ;2I$0
+9
0A/
*7/4
0#
'$4
:;
0
0#
'$4
?0
!"#$
0 2 / / 69 - - !, M ;2I$0
'$40
#%&3&
+#$40#%&3&

18

19
Connection For Two Stage Unlocking Using Rhino Central Locking Kit
" # ! 4F " # !
" # # ! *!I0
:)-15((3=()++(,1)(31*
IMPORTANT NOTE:Vehicles fitted with an interior light delay.
Vehicles fitted with an interior light delay require a diode to be added
to prevent the system giving a door ajar warning.
Please follow the wiring diagram below:
Interior light
DOOR DELAY
CIRCUIT
+12V
White wire
Place a diode here
RHINO
Door Switches
0 * !
0 / " :
0 *J 0
B
0 - 6
& " ;? 0 *J
0 B
* !)
. ! )
;2I
) <
& # 0
* !# J C $*;? 242
/ 4
!/
/ / /
Door wire

20
WARRANTY TERMS & CONDITIONS
RhinoCo Technology (The Company) warrants its products to be in conformance with its own plans and specifications
and to be free from defects in materials and workmanship under normal use and service for 12 months from the date
stamp control on the product, or for products not having a date stamp, for twelve months from the date of original
purchase unless the installation instructions or catalogue sets forth a shorter period, in which case the shorter period
shall apply. The Company’s obligation shall be limited to repairing or replacing, at its option, free of charge for
materials or labor, any part which is proved not in compliance with The Company’s specifications or proves defective
in materials or workmanship under normal use and service. The Company shall have no obligation under this Limited
Warranty or otherwise if the product is altered or improperly repaired or serviced by anyone other than The Company.
For warranty service, return transportation prepaid, to RhinoCo Technology, 9 Hannabus Place McGraths Hill NSW
2756 Australia.
There are no warranties, expressed or implied, of merchant ability, or fitness for a particular purpose or otherwise,
which extend beyond the description on the face hereof. In no case shall The Company be liable to anyone for any
consequential or incidental damages for breach of this or any other warranty, express or implied, or upon any other
basis of liability whatsoever, even the loss or damage is caused by its own negligence or fault.
The Company does not represent that the products it sells may not be compromised or circumvented; that the
products will prevent any personal injury or property loss by burglary, robbery, fire or otherwise; or that the products
will in all cases provide adequate warning or protection. Customer understands that a properly installed and
maintained alarm system may only reduce the risk of a burglary, robbery, or fire without warning, but it is not insurance
or a guarantee that such will not occur or that there will be no personal injury or property loss as a result.
Consequently, The Company shall have no liability for any personal injury; property damage or other loss based on a
claim the product failed to give any warning. However, if The Company is held liable, whether directly or indirectly, for
any loss or damage arising under this limited warranty or otherwise, regard less of cause or origin, The Company's
maximum liability shall not in any case exceed the purchase price of the product, which shall be the complete and
exclusive remedy against The Company.
This warranty replaces any previous warranties and is the only warranty made by The Company on this product. No
increase or alteration, written or verbal, of the obligations of this Limited Warranty is authorised.
Table of contents
Other RHINO Car Alarm manuals
Popular Car Alarm manuals by other brands

Code Alarm
Code Alarm CA-640 owner's manual

Audiovox
Audiovox Pursuit PRO-9600 supplementary guide

Clifford
Clifford 330X1 owner's guide

Bulldog Security
Bulldog Security MA1000 Installation instructions operations manual

Omega
Omega Excalibur Gold Series-1200atv owner's manual

Audiovox
Audiovox UTX-ETX Programming guide