RHINO GT User manual

INSTRUCTION MANUAL FOR
Code Hopping Remote Control Car Alarm, with
Engine Immobilsation, Backup Battery, Two Stage
Impact Sensor & Fully Programmable Features.
Build Date:
N517
Designed & Engineered in
Australia
V2.0
HIGH SECURITY SWITCH
Located in the rear of the siren is a master switch. This can be
used to turn the system on/off. Bear in mind that if you unplug
the alarm while it is armed, the built in backup battery will
continue to power the system.
KEYSWITCH POSITIONS
SYSTEM OFF SYSTEM ON
TURN CLOCKWISE
TO ARM/DISARM ALARM
The alarm is activated by pressing the LEFT button (Marked with a 1) on the
remote control transmitter. The blinkers will flash once, and the siren will beep once.
The dash LED-light will stay on for 20 seconds then flash, THE ALARM IS NOW ON.
To deactivate the alarm, press the LEFT button again. The blinkers will flash twice
and the siren will beep twice. THE ALARM IS NOW OFF.
12
For audible arm / disarm
use the LEFT button.
For silent arm / disarm
press BOTH buttons (1 & 2) together.
BOOT RELEASE FUNCTION
(Available only on cars fitted with an electric boot release motor).
The alarm is fitted with remote boot release opening capability. This feature enables the user to unlock the
boot by pressing the RIGHT button (Marked with a 2) for 3 seconds. The boot will unlock and the alarm will
disarm with audible beeps. NOTE: For safety reasons the remote boot release will not work when the ignition
is turned on.
EMERGENCY PANIC BUTTON
The panic feature is activated by pressing the LEFT button on the remote control transmitter for 3 seconds
This sets off the siren. To cancel “panic”, press the LEFT button on the transmitter for 1 second NOTE:
Panic does not work when the ignition is on by requirement of Australian Law (EPA-Environmental
Protection Authority).
BACKUP BATTERY TEST
The alarm is fitted with an intelligent battery backup test feature. When you turn the ignition to on, the alarm
does a diagnostic check on the backup battery. If the charge is below an acceptable level, then the dash LED
will flash for the first 5 seconds when the ignition is turned on.
PAT™ PAST ALARM TRIGGER MEMORY
If the alarm was triggered by an intruder while your alarm was set, it will beep the siren and flash the
blinkers four times on disarm. The system will also store the ten last times the alarm has been activated in
its memory, and can tell you what has triggered the system. Please refer to “Features used by Users and
Installers” contained later in these instructions.
1

2
PRE-ALERT IMPACT WARNING WITH ETS™
This special feature provides a two stage impact sensing system. It gives the security conscious owner a
sensitive car body impact sensor that will give a potential thief prior warning that the vehicle is protected by
this most formidable alarm system. On detection of a low level impact i.e. from a tyre kick, the siren will
simply beep for a few seconds to warn away the would-be thief. If the vehicle is attacked any further, the
system will move into full siren mode. The unique ETS™ Environment Tuned Sensor is able to distinguish
between environmental shocks caused by aircraft, trucks, or extreme weather conditions, and the impact
caused by any thief attempting to break in or other heavy impacts. Furthermore the system features the
unique Rhino "Auto Adjust" process, where during the 20 sec. arming delay, the alarm samples the
background noise where the vehicle is parked, and will if necessary automatically reduce the sensitivity of the
impact sensor to an appropriate level. This process allows a trouble free sensitivity that ordinary alarms
simply can not provide. The sensitivity level reference point can be adjusted to suit your particular needs.
Please refer to the programming section contained later in this manual.
DOOR AJAR WARNING FEATURE
If the vehicles doors are not properly closed when you try to activate your alarm system, the blinkers will
flash and the siren will continuously beep for 3 seconds to alert you that the vehicle is not secure.
PROGRAMMABLE FEATURES
The features outlined below are the most popular that can be turned on or off to suit your requirements.
Please refer to the section is this manual marked “Rhino Programmable Features” for full details.
PASSIVE ARMING: The alarm can automatically arm itself one minute after you leave your vehicle provided
that the ignition is turned off, and that at least one door has been opened and closed ie. the owner has
parked and has exited the vehicle. This feature will not lock the vehicle where central locking is connected.
AUTOMATIC RE-ARM FEATURE: This feature prevents accidental disarming by the owner ie. the owner
turns the alarm off but is then distracted and forgets that they have deactivated the system. If a door is not
opened within one minute from when the system is turned off by the remote, the system will re-arm and if
central locking is connected it will re-lock the vehicle.
AUTO IMMOBILISE: Enables the alarm system to act as an engine immobiliser only. The immobiliser
activates 38 seconds after the ignition is turned off. The dash mounted LED will stay on constantly to
confirm the system’s special status. The vehicle can not be started unless the remote is pressed. If the
remote is pressed again, the alarm will arm & lock the doors as per normal operation. Particularly useful
feature for tradespeople.
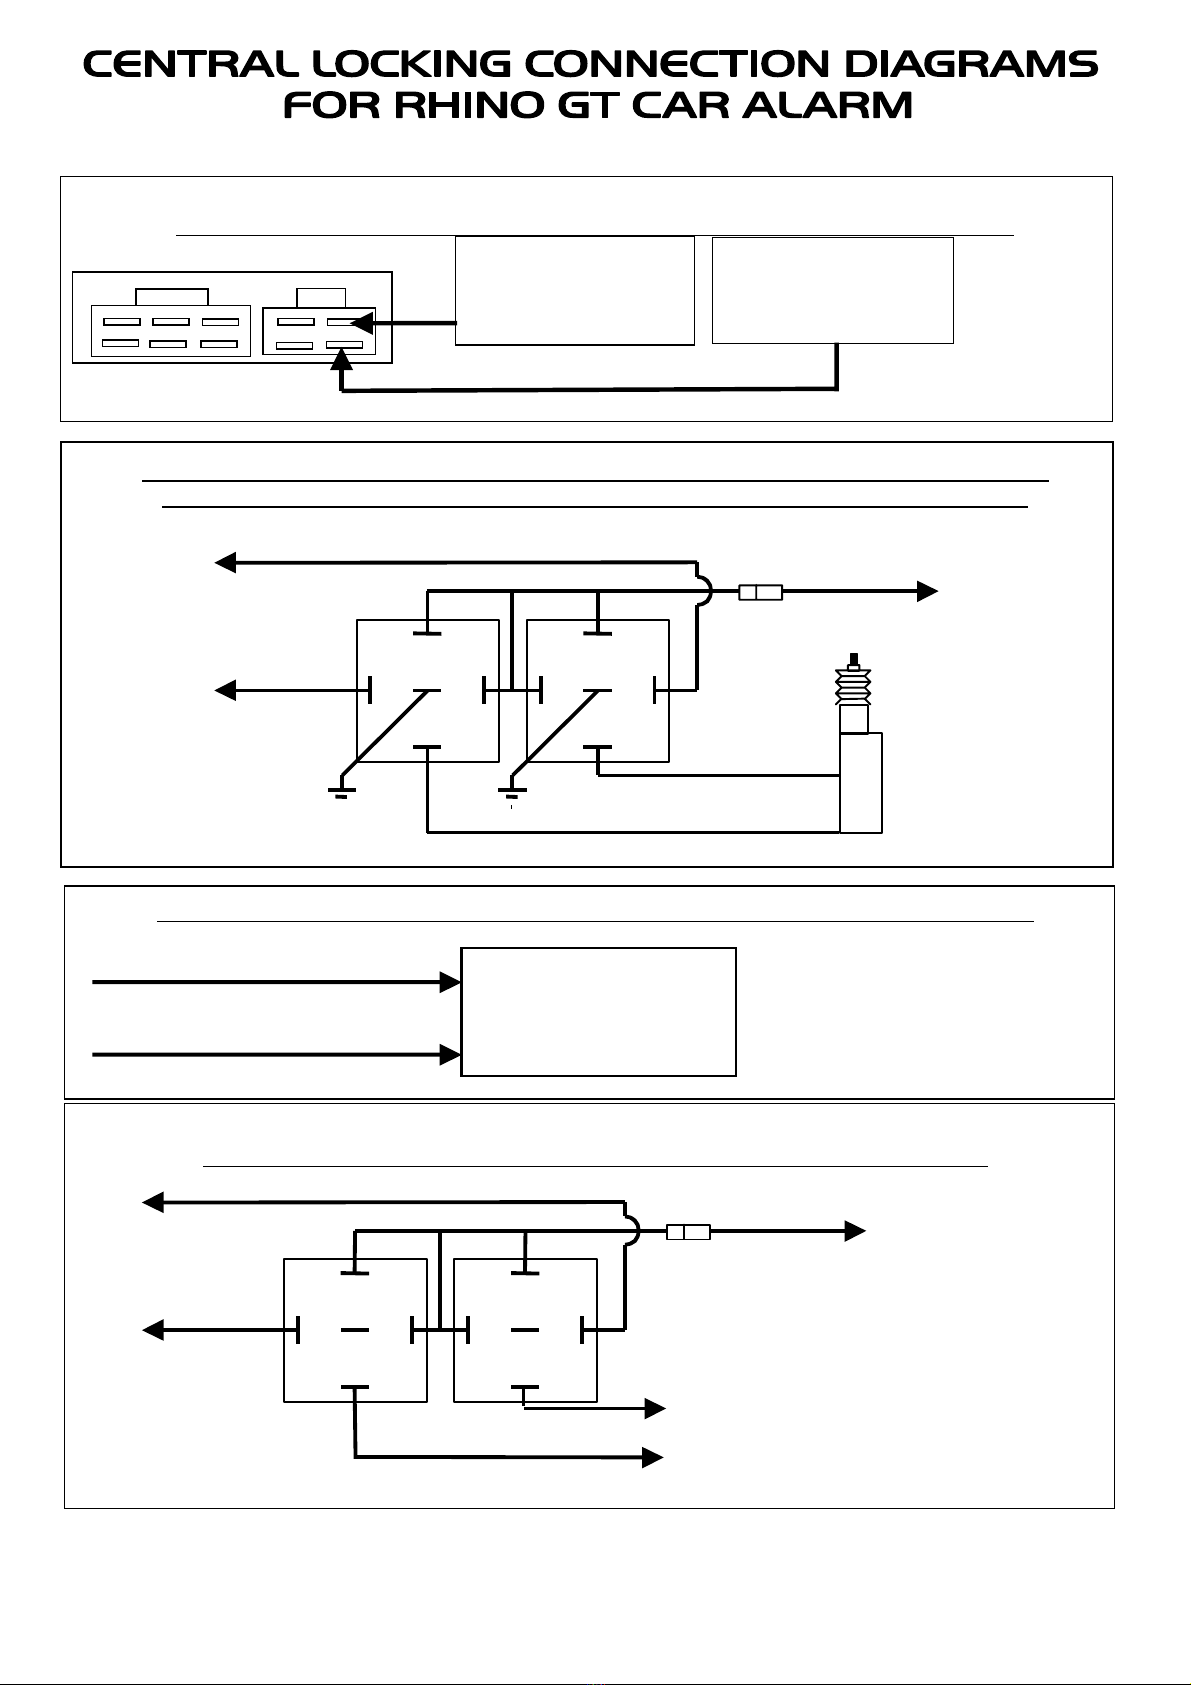
DOOR LOCK ON IGNITION: When this feature is on, the doors will lock when the ignition is turned to on, and
unlock when the ignition is turned to off. (Where central locking is connected).
PERIMETER NIGHT LIGHT: When this feature is on, the indicators will stay on constantly for 20 seconds on
disarm, or until the ignition is turned on. This allows for illumination around the vehicle at night.
INSTANT BOOT RELEASE: When this feature is on, the boot release button (right) will only require to be
pressed once rather than held down for 3 seconds to open an electric boot.
LEARNING NEW TRANSMITTERS
To add a new transmitter to your alarm, simply follow the procedure below:
A. Turn the vehicle’s ignition on.
B. Immediately press and hold the LEFT button on the original remote control until the siren starts to
beep (approximately 4 seconds) and then release the button.
C. Immediately press and hold the LEFT button on the new remote control for at least 4 seconds.
D. Turn the vehicle’s ignition off.
E. The new remote control is now programmed into the alarm.
.

STANDARD SYSTEM FEATURES
~ All Microprocessor Controlled
~ Rolling Code Technology (Anti-Scanning, Anti-Code Grabbing)
~ Two SSR™ Solid State Remote Controls with Multi Function Operation
~ Long Life Lithium Cell Remote Control Batteries
~ Ultra-Bright Red Flashing LED Light
~ Personal Panic Button via Remote Control
~ Automatic Siren Reset Period (30 Seconds)
~ Visual Arming and Disarming via Blinkers
~ All Points of Entry Protection
~ PAT™ Past Alarm Trigger Memory History Reporting Mode
~ Service and Override Mechanical Keyswitch
~ Safety Circuit Prevents Arming While Ignition On
~ Learning Mode for Optional Transmitters (Remote Controls)
~ Negative Pulse Central Locking Outputs
~ Engine Immobilisation
~ Battery Backup System
~ Automatic Battery Test via Dash LED Light
~ Two Stage Shock Sensor
SELECTABLE SYSTEM FEATURES (Can be turned on or off)
~ Arming and Disarming Confirmation Beep
~ Passive Arming
~ Auto Immobilise
~ Door Ajar Warning (If a Door is Left Open)
~ Automatic Re-arm in case of Accidental Disarm
~ Auto Re-lock for Accidental Disarm where Central Locking is connected
~ Quiet Arming Selectable via Remote Control
~ Impact Sensor and Ultrasonic Isolation
~ Electric Boot Release Output - Instant or 3 Seconds
~ Lock Pulse on Alarm Trigger
~ Multiple Vehicle Remote Controls
~ Silent Operation
~ Valet Mode
~ Central Closure
~ Door Lock on Ignition
~ 2 Second Exit Delay
~ Perimeter Night Light
~ External Pre-Warn Output
~ Selectable Current Sensing Circuit
~ Passive Arm From Ignition Only
~ Shock Sensor Sensitivity Adjustment By Remote
3

Your Rhino Security system incorporates the latest in high security & convenience features. It is possible to customise
your security system so that it suits your requirements perfectly. Detailed below is the full list of programmable
features that can either be turned on or turned off.
We have set at the factory, the most common configuration chosen and these settings are listed in the REGISTER
Settings listed below. Once the desired features have been selected, the selection is permanently retained in memory,
even if power is removed, or the override keyswitch is turned to off. This includes the Past Alarm Trigger Memory.
To turn on or turn off any feature use the following procedure: eg
to disable passive arming.
1.
F
ind the REGISTER (1, 2 or 3) in which the feature is located. (eg passive arming is located in REGISTER 1).
2. Set the vehicle up as described to access REGISTER 1, (doors closed, bonnet closed, turning the ignition on
last).
3. Press the LEFT remote control button an equal number of times to the selected feature’s code number (eg 5
times for passive arming).
4. Turn the ignition to off.
5. The system will then confirm which features are activated via audible readout. If a feature is enabled the
siren will chirp out its code in beeps from the siren corresponding to the number shown in the column “Press
Remote This Many Times”. The siren in this example will beep in order Once, then Twice, etc. up to Eight times. The
system misses the passive arming code of 5 Beeps as this feature has been disabled. Please note that feature 9
is excluded from the confirming number of beeps on all 3 Registers.
How to Change REGISTER 1:
Vehicle Set Up: A
LL
D
OORS
C
LOSED
, B
ONNET
C
LOSED
, A
ND
T
HE
I
GNITION
T
URNED
O
N
L
AST
Remote Key action : T
URN
O
N
/ O
FF
F
EATURES
V
IA
T
HE
LEFT B
UTTON
O
N
T
HE
R
EMOTE
PROGRAMMABLE
FEATURE
Press
Remote
This Many
Times
INITIAL
FACTORY
SETTING
DESCRIPTION
Arming Beep 1 ON 1 Beep on Arm
Disarm Beep 2 ON 2 Beeps on Disarm
Auxiliary Detection 3 ON Activate Ultrasonics, Microwave if fitted.
Shock Sensor 4 ON Activate Two Stage Shock Sensor.
Passive Arm 5 OFF System arms automatically 60 seconds after exit
- the doors will not lock.
Auto Re-arm 6 OFF If system is disarmed and a door is not opened
within 60 seconds, the system will rearm &
relock.
Lock Pulse on Alarm
Trigger
7 ON When the alarm is triggered, the doors will be
sent a lock pulse. ie the would be thief picks the
door lock, the alarm triggers on voltage drop due
to the central locking operating, then the doors
immediately re-lock to foil the would be thief.
Not Used 8 OFF
Shock Sensor Adjustment 9 6
SELECT the
level
required.
After pressing the remote 9 times to enter this
mode, turn the ignition to off. There are 8 levels
of adjustment. The factory default setting is level
6. Pressing the remote once will increase the
sensitivity by one level ie to level 7. The LED will
then flash seven times to confirm the new level.
Pressing the remote again will increase the
sensitivity to level 8 (max). Pressing the remote
again will return the adjustment to level 1(least
sensitive). Once you have adjusted the sensitivity
level to the desired setting, turn the ignition on to
exit this mode.
4

5
How to Change REGISTER 2:
Vehicle Set Up:
D
RIVER
’
S
D
OOR
O
PEN
, B
ONNET
C
LOSED
, A
ND
T
HE
I
GNITION
T
URNED
O
N
LAST
Remote Key action : T
URN
O
N
/ O
FF
F
EATURES
V
IA
T
HE
LEFT B
UTTON
O
N
T
HE
R
EMOTE
PROGRAMMABLE
FEATURE
Press
Remote
This Many
Times
INITIAL
FACTORY
SETTING
DESCRIPTION
Right Button Used For
Another Vehicle
1 OFF Allows your remote keys to be divided to act like
two separate single button remote keys to control
two separate vehicles., i.e. left button controls
vehicle "A", right button controls vehicle "B". - 5 -
Simply “teach” the remote into the other vehicle as
detailed in section “learning new transmitters”.
Only LEFT button features can be accessed. (i.e.
boot release control is unavailable).
Right Button Used To
Arm/Disarm This Vehicle
2 OFF Turn this feature on in your second vehicle (not
this alarm system) if you are utilising the above
feature.
Not Used
3 OFF
Not Used
4 OFF
Silent Operation 5 OFF When on, this feature stops the siren from
sounding. The alarm will still trigger, flashing the
indicators etc. Indication via optional paging system
may be desired instead of siren noise.
Valet Mode 6 OFF When on, this feature allows five engine starts
before the system returns to its normal operation
ie if you take the vehicle to valet parking, and you
normally use passive arming, they will be able to
start the car 5 times before passive arming re-
engages.
Central Closure 7 OFF When on, the lock & unlock outputs become a 15
second negative pulse instead of 0.5 seconds. This
feature is for certain vehicles with vacuum central
locking or those with a central closure wire (some
BMW, Mercedes) ie doors lock, electric windows
wind up, sunroof closes automatically.
Auto Immobilise 8 OFF Enables the alarm system to act as an engine
immobiliser only. The immobiliser activates 38
seconds after the ignition is turned off. The dash
mounted LED will stay on constantly to confirm the
system’s special status. The vehicle can not be
started unless the remote is pressed. If the
remote is pressed again, the alarm will arm & lock
the doors as per normal operation. Particularly
useful feature for tradespeople.
Installer Mode 9 SELECT The
Mode
Required
After pressing the remote 9 times to enter this
mode, turn the ignition to off. This mode allows the
installer / owner to verify that each trigger of the
alarm system is working, without having to arm &
disarm the system each time & set off the siren.
The siren will beep and the blinkers will flash to
indicate a trigger eg push the bonnet switch, open
a door, hit the vehicle. The siren will beep four
times to indicate a pre-warning impact sensor
detection, or once to indicate full alarm trigger
level. Turn the ignition to on to exit this mode.

6
How to Change REGISTER 3:
Vehicle Set Up:
D
RIVER
’
S
D
OOR
O
PEN
, B
ONNET
O
PEN
, A
ND
T
HE
I
GNITION
T
URNED
O
N
LAST
Remote Key action : T
URN
O
N
/ O
FF
F
EATURES
V
IA
T
HE
LEFT B
UTTON
O
N
T
HE
R
EMOTE
PROGRAMMABLE
FEATURE
Press
Remote
This Many
Times
INITIAL
FACTORY
SETTING
DESCRIPTION
Current Sensing Override 1 OFF If activated, this feature prevents the alarm
triggering via sensing a drop in voltage in the
vehicle’s electrical system. This may be necessary
where engine thermo fans cut in automatically or
there are other accessories active even when the
ignition is turned off eg fridges, car phones.
Door Lock on Ignition 2 OFF When this feature is on, the doors will lock when
the ignition is turned to on, and unlock when the
ignition is turned to off.
2 Second Exit Delay 3 OFF When this feature is on, the normal 20 second exit
delay is reduced to 2 seconds ie the alarm is fully
armed 2 seconds after pressing the remote.
No Door Ajar Warning 4 OFF When this feature is on, the door ajar warning
feature is removed (the siren & indicators will not
beep & flash for 3 sec. if a door is not closed
properly).
Passive Arm from Ignition
Off Only
5 OFF
When this feature is on, the system arms
automatically 60 seconds after exit -even though
the doors are not closed - the doors will not lock.
Perimeter Night Light 6 OFF When this feature is on, the indicators will stay on
constantly for 20 seconds on disarm, or until the
ignition is turned on. This allows for illumination
around the vehicle at night.
Instant Boot Release 7 OFF When this feature is on, the boot release button
(right) will only require to be pressed once rather
than held down for 3 seconds to open an electric
boot.
External Pre-Warn Output 8 OFF When on, the internal alarm pre-warn is disabled &
a two second output from the boot wire is given.
PAT™ Past Alarm Trigger
Memory
9 SELECT
to replay
memory.
After pressing the remote 9 times to enter this
mode, turn the ignition off. Your Rhino Alarm offers
a unique memory that stores the ten last reasons
why the alarm was triggered. This memory cannot
be erased.
1 Beep, 1 Flash - Voltage Drop Alarm
2 Beep, 2 Flashes - Not Used On This Model
3 Beep, 3 Flashes - Shock Sensor Alarm
4 Beep, 4 Flashes - Power Fail Alarm
5 Beep, 5 Flashes - Ignition Alarm
6 Beep, 6 Flashes - Aux Alarm
7 Beep, 7 Flashes - Door Alarms
8 Beep, 8 Flashes - Bonnet / Boot Alarm
If two previous alarms were recorded ie voltage
drop and shock sensor the LED will flash and the
siren will beep once for voltage drop, then no noise
for 1 second then beep three times for shock
sensor. The last memory heard is the most
recent alarm sector triggered. Turn the ignition to
on to exit this mode.

FEATURES USED BY INSTALLERS / SERVICEMEN
1. INSTALLER / SERVICE MODE:
Service mode is accessed by turning the key switch to the off position. This enables complete deactivation of the
system without using the remote control. This is normally done when other mechanical/electrical work is performed
on the vehicle. Installer mode is used to quickly test and fault find; it is used to check each sector input when door,
hood, aux or voltage drop is triggered. A signal is given via the blinkers, the dash LED light and the siren. See Register
2 in programming.
2. RECOMMENDED MOUNTING INSTRUCTIONS: The recommended position to mount the unit is vertically as
illustrated below. Where possible, mount the unit as close as possible to the centre of the firewall. Unit should be at
least 25cm away from high tension leads, distributor, or ignition coil. Keep the unit away from water run off areas
such as overflow bottles & drain tubes. Horizontal mounting increases the sensitivity of the shock sensor.
IMPORTANT: Do not allow any part of the vehicle to touch the unit - no hosing, wiring, or other car components should
be able to touch or rub on the unit, as this will affect the sensitivity of the shock sensor. The unit must only be
connected to the vehicle by the mounting bracket. To adjust the sensitivity level of the impact sensor via the remote
controls, please refer to Register 1 in “Programmable Features” located on page 4 of this manual.
Wiring loom and keyswitch must be
furthest away from firewall.
Mount the unit in a
vertical position.
Horizontal mounting causes Do not run the loom
increased sensitivity. inside the bracket.
Warning sticker is fixed Screw bracket
securely
this side. to the firewall.
DONOTALLOWTHE
UNIT TO TOUCH ANY
PARTOFTHEVEHICLE
DOINGSOWILLEFFEC
IMPACTSENSITIVITY.
RECOMMENDED INSTALLATION POSITION OF UNIT
:
T
IMPORTANT NOTE FOR INSTALLERS
:
V ehicles fitted w ith negative
or positive sw itching doors.
In order for the alarm system to function correctly, it is necessary for the doors to be
hard w ired to the system . Please follow the w iring diagram s below :
N EG A TIV E SW IT C H IN G D O O R S: PO SIT IV E SW IT C H IN G D O O R S: Use relay.
+12V Interior light
W hite w ire A LA R M 86
30 87a 87 W hite wire ALARM
Door Switch
85
Door Switch
+12V
7

8
WIRING INSTRUCTIONS FOR GT ALARM
RED -
CONNECT TO CONSTANT +12 VOLTS VIA THE FUSE BOX AT THE POINT WHERE THE INTERIOR LIGHT
CIRCUIT IS POWERED. CURRENT (VOLTAGE) SENSING WILL NOT WORK IF THIS PROCEDURE IS NOT
FOLLOWED.
BLACK -
CONNECT TO A SUITABLE EARTH ON THE CAR BODY (MOUNTING BOLT)
ORANGE
(x2)
-
CONNECT TO THE LEFT AND RIGHT INDICATOR CIRCUITS OF THE VEHICLE TO FLASH THE INDICATORS
YELLOW -
CONNECT TO A +12 VOLTS IGNITION SWITCHED LEAD, WHICH
DOES NOT FALL TO 0 VOLT WHEN THE
ENGINE IS CRANKED
WHITE -
CONNECT TO EXISTING DOOR SWITCHES.
(PLEASE NOTE: ONLY NEGATIVE SWITCHING DOORS, IF POSITIVE DOOR SWITCHING - MUST USE RELAYS TO
REVERSE TO NEGATIVE - SEE DIAGRAM CONTAINED LATER IN THIS MANUAL)
LONG BLUE
(Outside main
harness)
- CONNECT TO PINSWITCH FOR BONNET
LONG BLUE
(Taped up in main
harness)
-
THIS IS A NEGATIVE TRIGGER INPUT, AND SHOULD BE CONNECTED TO THE OUTPUT CIRCUIT WIRE ON ANY
AUXILLIARY SENSOR BEING USED. (ie ULTRASONIC OR MICROWAVE, DETECTORS, ETC.).
SHORT BLUE
(From main harness
connector plug)
-
CONNECT TO PIN SWITCH FOR BOOT (PLEASE NOTE: ALTERNATIVELY YOU MAY WISH TO WIRE THE BOOT
TO THE DOOR SWITCHES: THIS WILL PROVIDE “DOOR AJAR” WARNING ON THE BOOT, AND ALSO SIGNAL
THE AUTO RE-ARM FEATURE TO CANCEL IF THE BOOT IS OPENED BY THE OWNER ON DISARMING THE
SYSTEM.)
GREEN (X2) -
LOCATE THE POSITIVE FEED WIRE TO THE STARTER SOLENOID, CUT THAT WIRE AND JOIN THE TWO GREEN
WIRES TO EITHER END OF THE STARTER FEED WIRE WHICH YOU HAVE JUST CUT WARNING: CUT OUT
RELAYS HAVE 12A MAX RATING. DISABLE ONLY STARTER SOLENOID, FUEL PUMP, OR IGNITION COIL IF
VEHICLE IS NOT EFI. UNDER NO CIRCUMSTANCES SHOULD YOU CUT THE VEHICLE’S MAIN IGNITION
SYSTEM.
YELLOW/ BLACK -
THIS IS A SWITCHED NEGATIVE OUTPUT ON ARM (-VE 150mA). CONNECT TO THE NEGATIVE WIRE
(USUALLY BLACK) ON ANY ACCESSORY USED ie. ULTRASONIC OR MICROWAVE DETECTORS ETC.
BROWN
-
THIS IS THE NEGATIVE OUTPUT (150mA MAXIMUM) FOR THE BOOT RELEASE.
PLEASE REFER TO THE ILLUSTRATED DIAGRAM FOR CONNECTION DETAILS.
VIOLET/BLACK -
NEGATIVE TRIGGER ON ALARM TO BE USED TO INTERFACE TO PAGER OR ADDITIONAL SIREN (150mA
MAXIMUM)
ORANGE/BLACK -
NEGATIVE PULSE LOCK SIGNAL
PINK/YELLOW -
NEGATIVE PULSE UNLOCK SIGNAL
CURRENT SENSING
The alarm is fitted standard with current sensing. This feature incorporated in Rhino systems has been
proven to be very reliable. The alarm will detect any sudden drop in voltage in the vehicle’s electrical system,
for example if the interior light comes on, or if the electrical system shows a voltage drop through
tampering.
PLEASE NOTE:If removal of this feature is necessary i.e. if engine cooling fans run after the ignition key is
turned off, please refer to Register 3 in the Programmable Features section of this manual. You are able to
disable the current sensing feature so that a false alarm condition can not occur.

GT ALARM WIRING DIAGRAM
Red 15A FUSE +12 VOLTS
Short Blue from connector – Boot Pinswitch Orange Right Indictors
Brown - Boot Release Output (see below) Orange Left Indicators
Yellow IGNITION INPUT
Green CUT HERE STARTER OR
FUEL PUMP
C
O Green
N
PIN
N Long Blue Outside Harness BONNET
SWITCH
E
C Orange/Black LOCK (NEG PULSE 150mA)
T
O Pink/Yellow UNLOCK (NEG PULSE 150mA)
R
White DOOR SWITCH (NEG. TYPES ONLY)
Long Blue Inside Main Bunch AUX. INPUT (Neg. Trig)
Violet/Black NEGATIVE OUT ON ALARM (150mA)
CONNECT THE BLACK
RING TO THE Yellow/Black NEGATIVE OUT ON ARM (150mA)
MOUNTING BOLT EARTH WIRE
TO YELLOW BLACK WIRE, NEG. TO BROWN WIRE, NEG OUTPUT FROM ALARM
OUT ON ARM FROM THE ALARM
+12V
40A Changeover 15A FUSE
IGN 87 Relay
86 87A 85
87
30 86 87A 85
CUT
WIRE
BOOT MOTOR
Original Wire to Fuel Pump
OPTIONAL FUEL PUMP OPTIONAL BOOT RELEASE
CUT OUT RELAY WIRING DIAGRAM
(For vehicles with electric boot motors)
30
9

10
All relays depicted are changeover type.
CONNECTING TO RHINO CENTRAL LOCKING KIT (CLK)
INSTALLING A NEW MOTOR – often required in vehicles that have factory locking but
have no motor in the driver’s door, or you would like “keyless entry” on driver’s door.
LOCK PULSE
15A FUSE +12V
87 87
UNLOCK 87a 87a
PULSE 86 85 86 85
30 30
LOCK OUTPUT
UNLOCK OUTPUT
NEGATIVE TRIGGER” ORIGINAL CENTRAL LOCKING SYSTEM (LOW CURRENT)
LOCK PULSE WIRE
TO EXISTING
ELECTRONIC INTERFACE
UNLOCK PULSE WIRE
FOR INTEFACING TO “POSITIVE PULSE” CENTRAL LOCKING SYSTEMS
Connect Lock Wire to
Pin 8 on CLK Control
Module
Connect Unlock Wire to
Pin 10 on CLK Control
Module
LOCK PULSE WIRE
15A FUSE +12V
87 87
UNLOCK 87a 87a
86 85 86 85
30 30
LOCK OUTPUT TO VEHICLE
UNLOCK OUTPUT TO VEHICLE

FOR POSITIVE AT REST THEN GOING NEGATIVE “OR” NEGATIVE AT REST THEN GOING
POSITIVE PUT 87’S TO 12V & CONNECT RELAYS AS SHOWN
LOCK
+12V +12V OR GROUND (SUPPLY “A”)
15A Fuse
87 87
UNLOCK 87a 87a
86 85 86 85
30 30
+12V
CAR’S CAR
EXISTING CUT CENTRAL
CENTRAL LOCKING
LOCKING INTERFACE
SWITCH
FOR FLOATING SWITCHES - NEITHER +12V OR GROUND AT REST
Hook up the following extra relays & connect Supply “A” to +12V. Both pairs of lock / unlock wires
must be connected.
+12V
87 87
86 85 86 85
UNLOCK LOCK
30 30
15A Fuse
IMPORTANT NOTE:Vehicles fitted with an interior light delay.
Vehicles fitted with an interior light delay require a diode to be added
to prevent the system giving a door ajar warning.
Please follow the wiring diagram below:
Interior light
DOOR DELAY
CIRCUIT
zzzz
zzzz
+12V
White wire Place a diode here
RHINO
Door Switches
VEHICLES FITTED WITH TURBO TIMERS:
It is necessary to fit a relay as shown below to allow the
systemto armwhile the car is still running on a timer.
Constant +12V
87
86 87a 85
Positivestarter
wire at the
vehicles keyswitch
.
Yellowwirefromsystem(ignition sense).
To vehicles
accessorywire.
N.B. It will also be necessary to override current (voltage) sensing.
Please refer to section 3 of programmable features on page 6.
Youmayalso needto adjust theimpact sensor sensitivity,
to prevent triggering when the engine stops.
30
11

ACTION RESPONSE OPTIONS AVAILABLE HOW TO MAKE THE CHANGE
(Alarm must be disarmed before changing
programming) Refer to section marked “Rhino
Programmable Features” for futher details.
Press the left button on the
remote control once while the
system is disarmed.
The siren beeps once & the indicators
flash once. The LED comes on - it will
begin to flash after 20 seconds (The
alarm is now armed) Doors will lock
where central locking is connected.
You can disable the arming beep so
that only the indicators flash.
You can change the exit delay from
20 seconds to 2 seconds.
Sit in the car. Close all doors. Bonnet closed. Turn
the ignition on. Press the left button on the remote
once. Turn the ignition to off.
Sit in the car. Driver’s door open. Bonnet open. Turn
the ignition on. Press the left button on the remote 3
times. Turn the ignition to off.
Press the left button on the
remote control once while the
system is armed.
The siren beeps twice & the indicators
flash twice. (The alarm is disarmed).
Doors will unlock where central locking is
connected.
You can disable the disarming beep
so that only the indicators flash.
You can have the indicators flash &
then stay on for twenty seconds to
illuminate around the vehicle at night
(Perimeter Night Light).
Sit in the car. Close all doors. Bonnet closed. Turn
the ignition on. Press the left button on the remote
twice. Turn the ignition to off.
Sit in the car. Driver’s door open. Bonnet open. Turn
the ignition on. Press the left button on the remote 6
times. Turn the ignition to off.
You disarm the alarm but do
not open a door within sixty
seconds.
Nothing happens. You can enable the Auto-rearm
feature. The alarm at the sixty second
mark will beep once - it has now
automatically rearmed. Doors will lock
where central locking is connected.
Sit in the car. Close all doors. Bonnet closed. Turn
the ignition on. Press the left button on the remote
six times. Turn the ignition to off.
Sit in the vehicle and turn the
ignition on.
Nothing happens. You can enable the door lock on
ignition feature so that where central
locking is connected, the doors will
automatically lock when the ignition is
turned on & unlock when the ignition
is turned off.
Sit in the car. Driver’s door open. Bonnet open. Turn
the ignition on. Press the left button on the remote
twice. Turn the ignition to off.
12

ACTION RESPONSE OPTIONS AVAILABLE HOW TO MAKE THE CHANGE
(Alarm must be disarmed before changing
programming)
You drive the car and then
stop & get out of the vehicle.
You do not press the remote
control within 60 seconds.
Nothing happens. You can enable the Passive Arm
Feature. The alarm will passively
arm at the sixty second mark. The
siren will beep once. Doors will not
lock where central locking is
connected. (You can not lock your
keys in the car).
You can enable the Auto
Immobilise feature.
Enables the
alarm system to act as an engine
immobiliser only. The immobiliser
activates 38 seconds after the
ignition is turned off. The dash
mounted LED will stay on constantly
to confirm the system’s special
status. The vehicle can not be
started unless the remote is
pressed. If the remote is pressed
again, the alarm will arm & lock the
doors as per normal operation.
Particularly useful feature for
tradespeople.
Sit in the car. Close all doors. Bonnet closed.
Turn the ignition on. Press the left button on the
remote 5 times. Turn the ignition to off.
Sit in the car. Driver’s door open. Bonnet closed.
Turn the ignition on. Press the left button on the
remote 8 times. Turn the ignition to off.
You press & hold the left
button on the remote for
three seconds.
Where an electric boot release is
connected, the boot will pop open &
the system will disarm. Please note
that the auto-rearm feature will still
function if a door is not opened within
60 seconds, unless the installer has
wired the boot to the door circuit.
You can change the time required
for pressing the left button from 3
seconds to simply pressing once.
(Instant boot release).
Sit in the car. Driver’s door open. Bonnet open.
Turn the ignition on. Press the left button on the
remote seven times. Turn the ignition to off.
Your vehicle has no pin
switches in the doors i.e. no
interior light circuit.
Passive arming & auto re-arm will not
function as there is no input to tell the
alarm that a door is being open or
closed.
You can enable Passive Arming
From Ignition Off Only i.e. the alarm
will automatically arm 60 seconds
after the ignition is turned off.
Sit in the vehicle. Driver’s door open.
Bonnet open. Turn the ignition on. Press the left
button on the remote 5 times. Turn the ignition
off.
13

14
ACTION RESPONSE OPTIONS AVAILABLE HOW TO MAKE THE CHANGE
(Alarm must be disarmed before changing
programming)
While the system is armed,
you hit the vehicle at a
relatively low level i.e. kick the
wheel.
The siren should give four warning
beeps.
You can adjust the sensitivity level
to make the pre-warning & impact
sensor more or less sensitive.
You can disable the pre-warning
system (four beeps), and if you
prefer a different pre-warning
device can be wired to the boot
release output wire. This means
that if you disable the pre-
warning system you will also
disable the boot release feature.
The boot release wire becomes a
two second negative output.
Sit in the car. Close all doors. Bonnet closed.
Turn the ignition on. Press the left button on the
remote 9 times.
After pressing the remote 9 times to enter this
mode, turn the ignition to off. There are 8 levels
of adjustment. The factory default setting is level
6. Pressing the remote once will increase the
sensitivity by one level ie to level 7. The LED will
then flash seven times to confirm the new level.
Pressing the remote again will increase the
sensitivity to level 8 (max). Pressing the remote
again will return the adjustment to level 1(least
sensitive). Once you have adjusted the sensitivity
level to the desired setting, turn the ignition on to
exit this mode.
Sit in the vehicle. Driver’s door open.
Bonnet open. Turn the ignition on. Press the left
button on the remote 8 times. Turn the ignition
off.
You have optional
Ultrasonics or a Microwave
Internal Movement Sensor
fitted and arm the alarm
with a pet inside the vehicle.
The system may false trigger as the
pet moves around.
You can disable your auxiliary
sensors.
You can disable the shock sensor.
Sit in the car. Close all doors. Bonnet closed.
Turn the ignition on. Press the left button on the
remote 3 times. Turn the ignition to off.
Sit in the car. Close all doors. Bonnet closed.
Turn the ignition on. Press the left button on the
remote 4 times. Turn the ignition to off.

ACTION RESPONSE OPTIONS AVAILABLE HOW TO MAKE THE CHANGE
(Alarm must be disarmed before changing
programming)
You wish to function test the
alarm system fully without
having to arm the alarm
each time & the wait twenty
seconds before triggering
each individual input i.e.
bonnet, doors, shock sensor
etc.
Select Installer Mode.
This mode allows the installer /
owner to verify that each trigger of
the alarm system is working,
without having to arm & disarm the
system each time & set off the
siren. The siren will beep and the
blinkers will flash to indicate a
trigger eg push the bonnet switch,
open a door, hit the vehicle. The
siren will beep four times to indicate
a pre-warning impact sensor
detection, or once to indicate full
alarm trigger level.
Sit in the vehicle. Driver’s door open.
Bonnet closed. Turn the ignition on. Press the
left button on the remote 9 times.Turn the
ignition to off. Now test each input trigger.
Turn
the ignition to on to exit this mode.
Your alarm has been
triggered.
The siren sounds for 30 seconds &
then automatically rearms. When you
disarm the alarm four beeps will be
given instead of two.
You can access the Past Alarm
Trigger Memory to find out what
caused the alarm to trigger.
Your Rhino Alarm offers a unique memory that
stores the ten last reasons why the alarm was
tri
gg
ered. This memor
y
cannot be erased. Sit in the
car. Driver’s door open. Bonnet open. Turn the
ignition on. Press the left button on the remote 9
times. Turn the ignition to off.
If two previous alarms were recorded ie voltage
drop and shock sensor the LED will flash and the
siren will beep once for voltage drop, then no noise
for 1 second then beep three times for shock
sensor. sensor. The last memory heard is the most
recent alarm sector triggered. Turn the ignition to
on to exit this mode.
1 Beep, 1 Flash - Voltage Drop Alarm
2 Beep, 2 Flashes - Not Used
3 Beep, 3 Flashes - Shock Sensor Alarm
4 Beep, 4 Flashes - Power Fail Alarm
5 Beep, 5 Flashes - Ignition Alarm
6 Beep, 6 Flashes - Aux Alarm
7 Beep, 7 Flashes - Door Alarms
8 Beep, 8 Flashes - Bonnet/Boot Alarm
15
Table of contents
Other RHINO Car Alarm manuals