manuals.online logo
Brands
  1. Home
  2. •
  3. Brands
  4. •
  5. ricoo
  6. •
  7. TV Mount
  8. •
  9. ricoo F0522 User manual

ricoo F0522 User manual

Other ricoo TV Mount manuals

ricoo N0222 User manual

ricoo

ricoo N0222 User manual

ricoo F0244 User manual

ricoo

ricoo F0244 User manual

ricoo FS0344 User manual

ricoo

ricoo FS0344 User manual

ricoo S7544 Series User manual

ricoo

ricoo S7544 Series User manual

ricoo S1011 User manual

ricoo

ricoo S1011 User manual

ricoo S2544 User manual

ricoo

ricoo S2544 User manual

ricoo N2344 User manual

ricoo

ricoo N2344 User manual

ricoo S4322 User manual

ricoo

ricoo S4322 User manual

ricoo S1211 User manual

ricoo

ricoo S1211 User manual

ricoo ENZ F0711 User manual

ricoo

ricoo ENZ F0711 User manual

ricoo F0344 User manual

ricoo

ricoo F0344 User manual

ricoo S5064 User manual

ricoo

ricoo S5064 User manual

ricoo S0822 User manual

ricoo

ricoo S0822 User manual

ricoo N0222 User manual

ricoo

ricoo N0222 User manual

ricoo F2044 User manual

ricoo

ricoo F2044 User manual

ricoo TS3611 User manual

ricoo

ricoo TS3611 User manual

ricoo TS2311 User manual

ricoo

ricoo TS2311 User manual

ricoo F0342 User manual

ricoo

ricoo F0342 User manual

ricoo S5744 User manual

ricoo

ricoo S5744 User manual

ricoo S4964 User manual

ricoo

ricoo S4964 User manual

ricoo S1611 User manual

ricoo

ricoo S1611 User manual

ricoo S5044 User manual

ricoo

ricoo S5044 User manual

ricoo S7264 User manual

ricoo

ricoo S7264 User manual

ricoo S0144 User manual

ricoo

ricoo S0144 User manual

Popular TV Mount manuals by other brands

Krüger & Matz KM1300 owner's manual

Krüger & Matz

Krüger & Matz KM1300 owner's manual

Barkan E220 manual

Barkan

Barkan E220 manual

Bauhn ACTVB-1120 installation guide

Bauhn

Bauhn ACTVB-1120 installation guide

Vantage Point Products CB01 instructions

Vantage Point Products

Vantage Point Products CB01 instructions

Ergotron Neo Flex Cantilever UHD user guide

Ergotron

Ergotron Neo Flex Cantilever UHD user guide

ECG LD 174203 instruction manual

ECG

ECG LD 174203 instruction manual

StarTech.com FPCEILBTB user manual

StarTech.com

StarTech.com FPCEILBTB user manual

VonHaus 05/038 instruction manual

VonHaus

VonHaus 05/038 instruction manual

Techlink ECHO TV manual

Techlink

Techlink ECHO TV manual

Sandstrom SSTVMC12X instruction manual

Sandstrom

Sandstrom SSTVMC12X instruction manual

Kanto RCAD590 user manual

Kanto

Kanto RCAD590 user manual

Forging Mount HY9440 instruction manual

Forging Mount

Forging Mount HY9440 instruction manual

ICW SCACC18 installation instructions

ICW

ICW SCACC18 installation instructions

LG WM-L640V owner's manual

LG

LG WM-L640V owner's manual

Gembird WM-65ST-01 user manual

Gembird

Gembird WM-65ST-01 user manual

ERARD FiTUP XXL 035320 quick start guide

ERARD

ERARD FiTUP XXL 035320 quick start guide

PEERLESS PLCK-1 Installation and assembly

PEERLESS

PEERLESS PLCK-1 Installation and assembly

GEM GEM GP001 instructions

GEM

GEM GEM GP001 instructions

manuals.online logo
manuals.online logoBrands
  • About & Mission
  • Contact us
  • Privacy Policy
  • Terms and Conditions

Copyright 2025 Manuals.Online. All Rights Reserved.

A B C D
G H I
F
M5 x 25MM
4 pcs/Stk.
M6 x 25MM
4 pcs/Stk.
M8 x 25MM
4 pcs/Stk.
M4 x 25MM
4 pcs/Stk.
Metal washer M6
Metallscheibe M6
4 pcs/Stk.
S8 x 40MM
4 pcs/Stk.
M6 x 50MM
4 pcs/Stk.
5mm
Small spacers
Abstandshalter
8 pcs/Stk.
v.17.10
Assembly manual
Montageanleitung
DE
EN
F0522
12
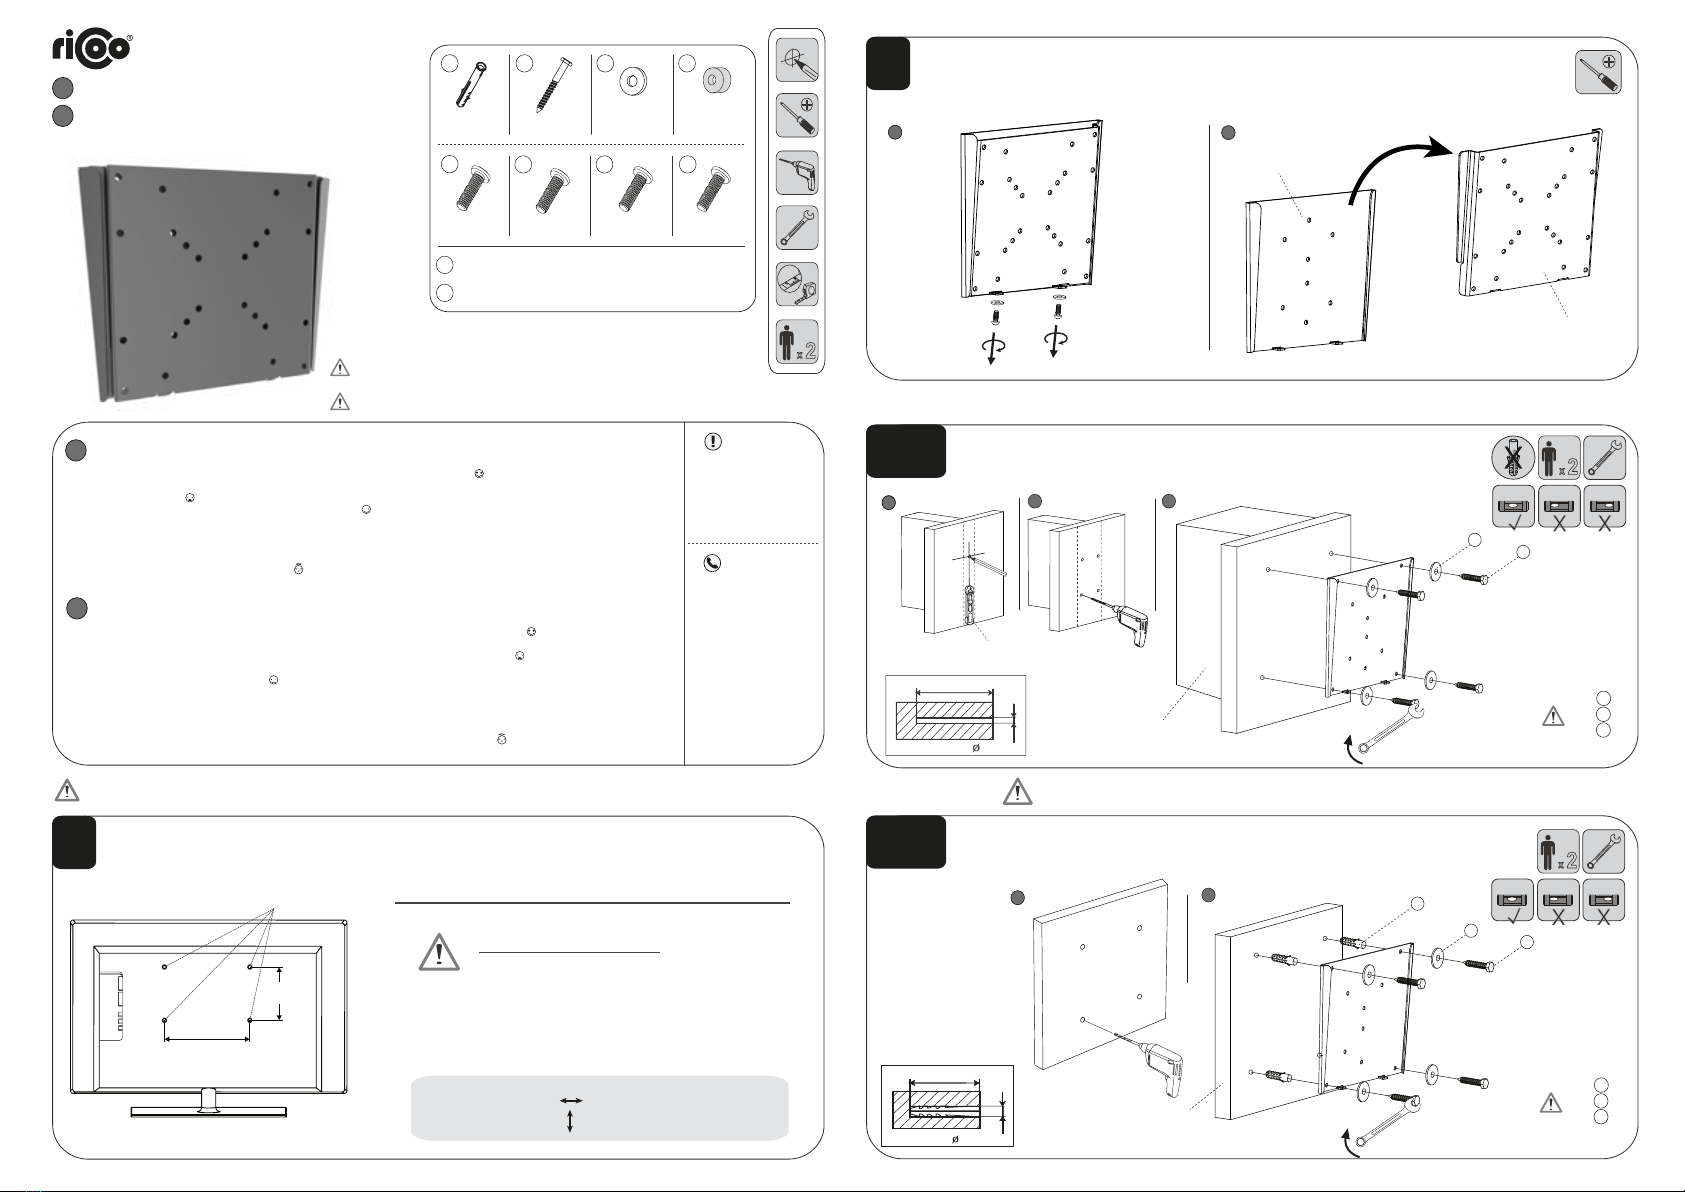
Scope of the delivery / Lieferumfang
The installation of this product may only be carried out by skilled personnel / specialist fitter!
Warning: Supplied plastic anchors are only suitable for solid concrete walls!
Die Montage dieses Produktes darf nur durch Fachpersonal / Fachmonteur erfolgen!
Achtung: Mitgelieferte Dübel sind nur für Massivbetonwände geeignet!
!
!
Horizontal / Waagerecht:
Vertical / Senkrecht :
Please measure distance between VESA mounting holes.
Bitte den VESA-Lochabstand vor der Montage nachmessen.
1
Please check BEFORE installation distance between
VESA mounting holes on your display!
Bitte überprüfen Sie VOR der Montage
den VESA Lochabstand zwischen den Befestigungs-
löchern an Ihrem Bildschirm!
This wall mount supports the following distance between holes:
Diese Wandhalterung unterstützt folgende Lochabstände:
Horizontal / Waagerecht
Vertical /
Senkrecht
Display back
Bildschirm Rückseite
VESA-Mounting holes
VESA-Befestigungslöcher
Wir empfehlen jedoch den Einsatz einer professionelen Wasserwaage.
We recommend using a professional level.
Liebe Kundin, lieber Kunde,
wir freuen uns, dass Sie sich für ein Produkt der Marke "RICOO" entschieden haben . Manchmal trotz aller
Bemühungen unsererseits Ihnen ein qualitativ hochwertiges Produkt zu liefern, kann es vorkommen, dass
einmal ein Zubehörteil fehlt oder ein Teil während des Transports beschädigt wird . In diesem Fall senden
Sie den Artikel bitte nicht zurück, sondern fordern Sie einfach Ersatz für das fehlende bzw. beschädigte Teil
bei unserer Kunden-Hotline an . Kontaktdaten von unserer Kunden-Hotline sind auf der rechten Seite
aufgeführt.
Bitte nennen Sie bei der Kontaktaufnahme die Artikeldaten (auf der rechten Seite aufgeführt),
Artikelfarbe sowie die benötigten Teilnummern (inkl. benötigter Stückzahl), wie sie in dieser Anleitung
unter dem Punkt "Lieferumfang" angegeben sind. Halten Sie ebenfalls Ihre Bestellnummer / Order-ID für
unsere Kunden-Hotline bereit. Wir werden Ihre Anfrage umgehend bearbeiten !
Product data
Artikeldaten
Customer hotline
Kunden-Hotline
F0522
E.N.Z. Engineering GmbH
Gewerbestr. 11
79364 Malterdingen
(Germany)
Tel: +49 (0) 7644-565310
Fax: +49 (0) 7644-5653199
E-Mail: [email protected]
www.ricoo.eu
Dear customer,
we are pleased that you have decided for a product of the brand "RICOO" . Sometimes, despite our efforts to
provide you with a high-quality product, it may happen that an accessory is missing or a part is damaged
during transport . Please do not return the item in such a case, simply request replacement for the
missing or damaged part at our customer hotline . Contact details from our customer hotline are listed
below.
When contacting us, please mention the article data (listed below), article color as well as the
required spare part numbers (including the required quantity of items), as indicated in the "Scope of
delivery" section of this manual. Please keep ready your order number / order ID for our customer hotline. We
will process your request immediately !
DE
EN
50mm, 75mm, 100mm, 200mm
Please note: The numbering on the plastic bag may differ!
Please note: Some parts may already be factory-mounted!
Bitte beachten: die Durchnummerierung auf dem Plastikbeutel kann abweichen!
Bitte beachten: Manche Teile können bereits ab Werk montiert sein!
Wood stud
Holzbalken
Drilling
Bohrung
1
23
Stud finder
Balkenfinder

50 mm
3
mm
50 mm
8
mm
Concrete Wall
Betonwand
Drilling
Bohrung
1
2

A

B
Warning: Supplied plastic anchors are only suitable for solid concrete walls!
Achtung: Mitgelieferte Dübel sind nur für Massivbetonwände geeignet!
12
Separating the front panel from the wall plate
Trennung der Frontplatte von der Wandplatte
Front plate
Frontplatte
Wall plate
Wandplatte
4 x
B
4 x
C
0 x
A
2
Wood stud mounting
Befestigung an der Holzbalkenwand
3-a
Solid concrete mounting
Befestigung an der Massivbetonwand
3-b
4 x
B
4 x
C
4 x
A
C
B
C
Display back
Bildschirm Rückseite
Display
Bildschirm
Wall
Wand Wall
Wand
Display
Bildschirm
Done
Fertig
1
2
Errors and Misprints are excepted. / Irrtümer und Tippfehler vorbehalten.
Hanging display to wall plate. Done!
Aufhängung des Bildschirms an die Wandhalterung. Fertig!
5
* Use the matching screws and spacers (when required) for your display.
* Benutzen Sie die für Ihren Bildschirm passende Schrauben und Abstandshalter (bei Bedarf).
For display‘s with a curved back
Für Bildschirme mit gewölbter Rückseite
4-a
Display back
Bildschirm Rückseite
* Use the matching screws and spacers for your display.
* Benutzen Sie die für Ihren Bildschirm passende Schrauben und Abstandshalter.
** Wenn die Schrauben "G, H, I, J" zu lang sind, verwenden Sie die Plastikzylinder / Abstandshalter "D" (wie im Schritt 4 A).
** If the screws "G, H, I, J" are too long, use the plastic spacers "D" (like in Step 4 A).
For display‘s with a flat back
Für Bildschirme mit flacher Rückseite
4-b
FGHI
, , , */**
D
FGHI
, , , *
D