Ridder RB40 User manual

Ridder Drive Systems BV HARDERWIJK NEDERLAND Tel.: +31 (0)341 416 854 Fax: +31 (0)341 416 611
Gebruikshandleiding
User manual
Betriebsanleitung
Mode d’emploi
Modo de empleo
RB50/
RB40
Ridder Buismotoren
Ridder tube motors
Ridder Rohrmotoren
Ridder Moteurs tubulaires
Ridder Motores tubulares
0505

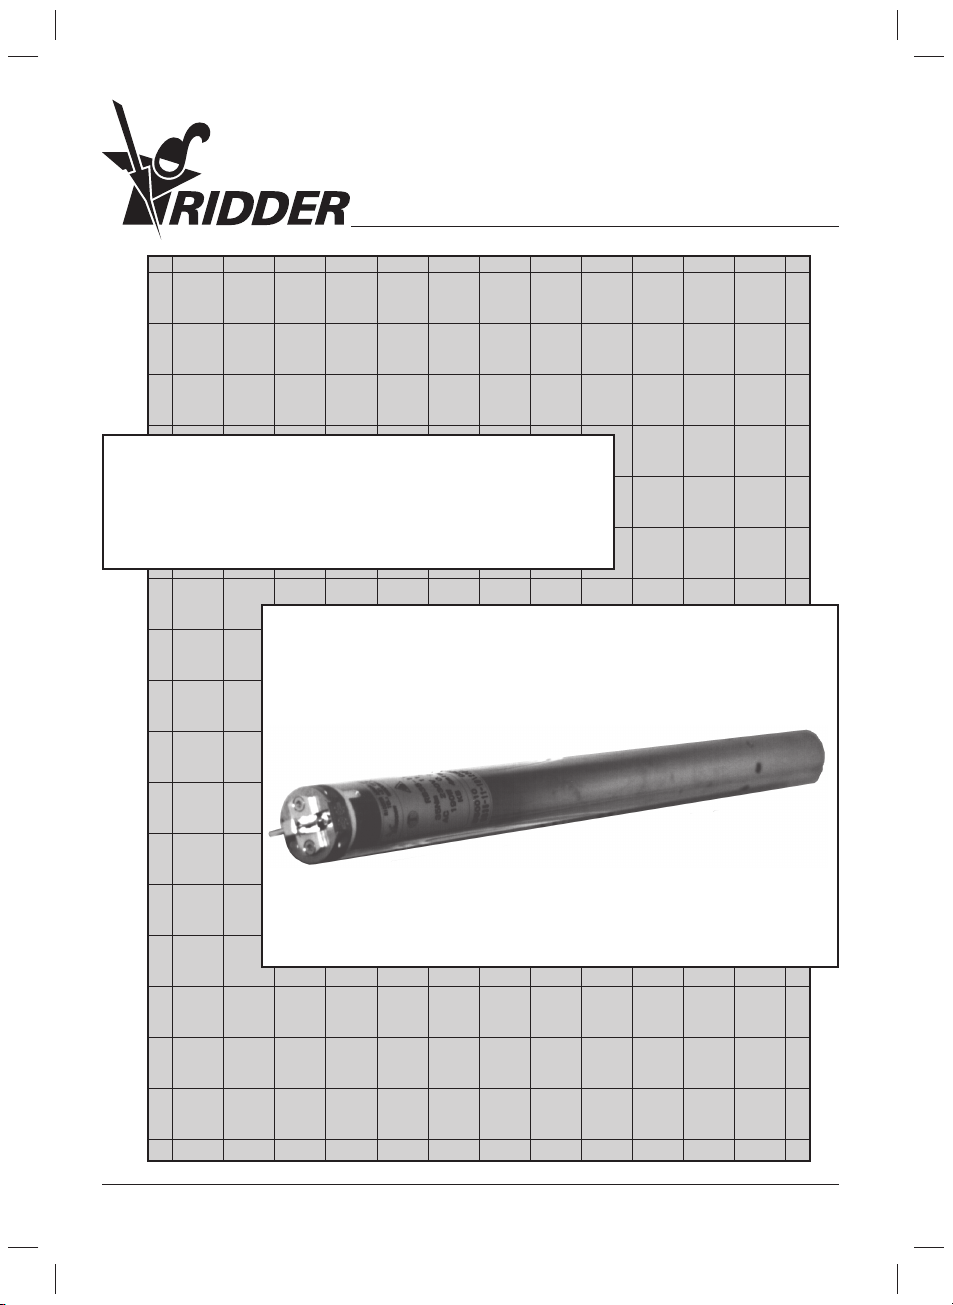
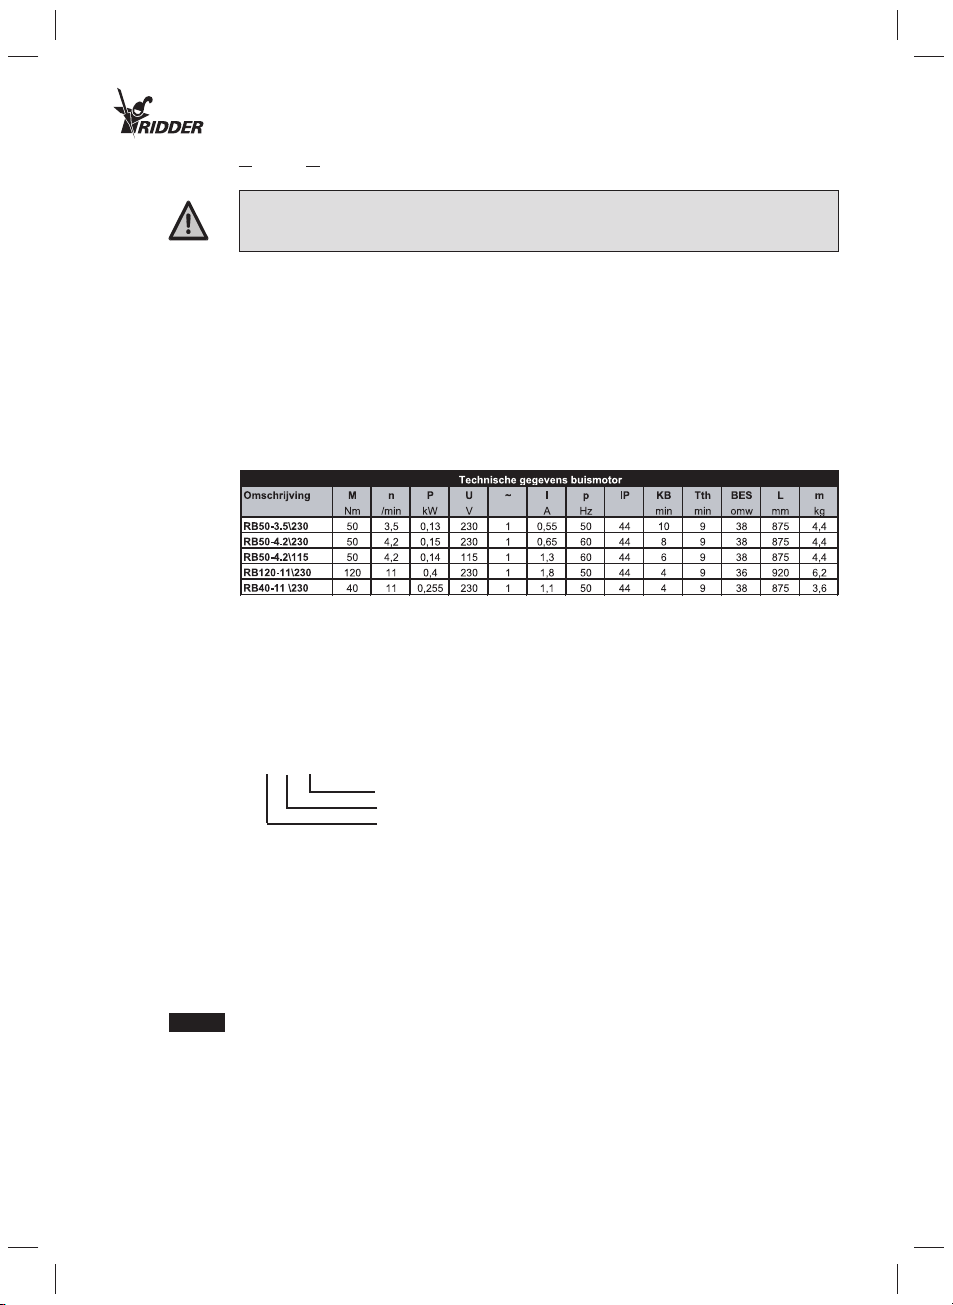
Ridder buismotoren RB . . . . . . . . . . . . . . . . . . . . . . . . . . . . . . . . . . . NL-11
Accessoires . . . . . . . . . . . . . . . . . . . . . . . . . . . . . . . . . . . . . . . . . . . . NL-11
Mechanische installatie buismotor . . . . . . . . . . . . . . . . . . . . . . . . . . . NL-12
Afstellen systeem . . . . . . . . . . . . . . . . . . . . . . . . . . . . . . . . . . . . . . . . NL-13
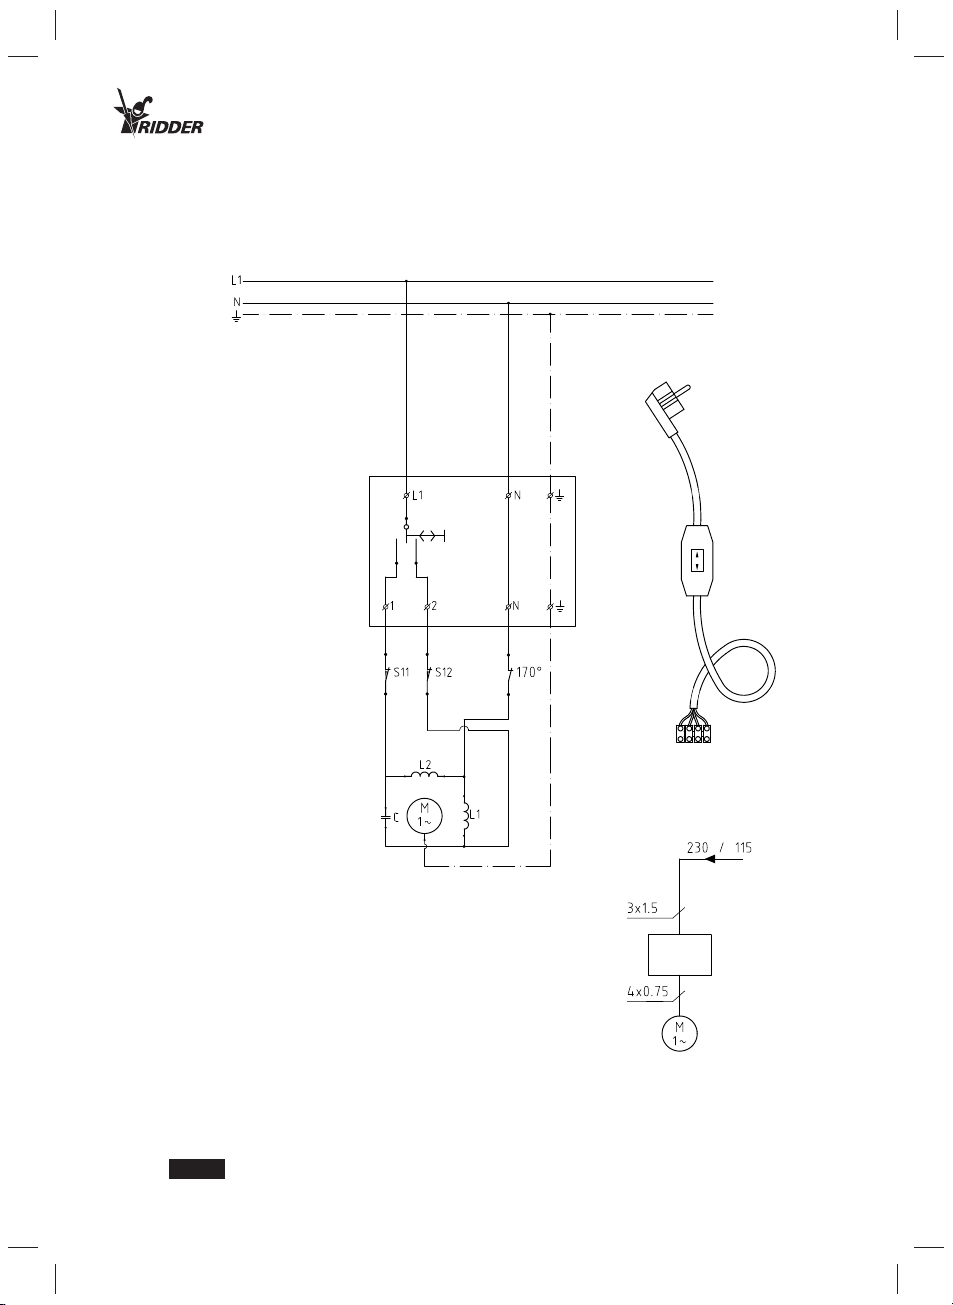
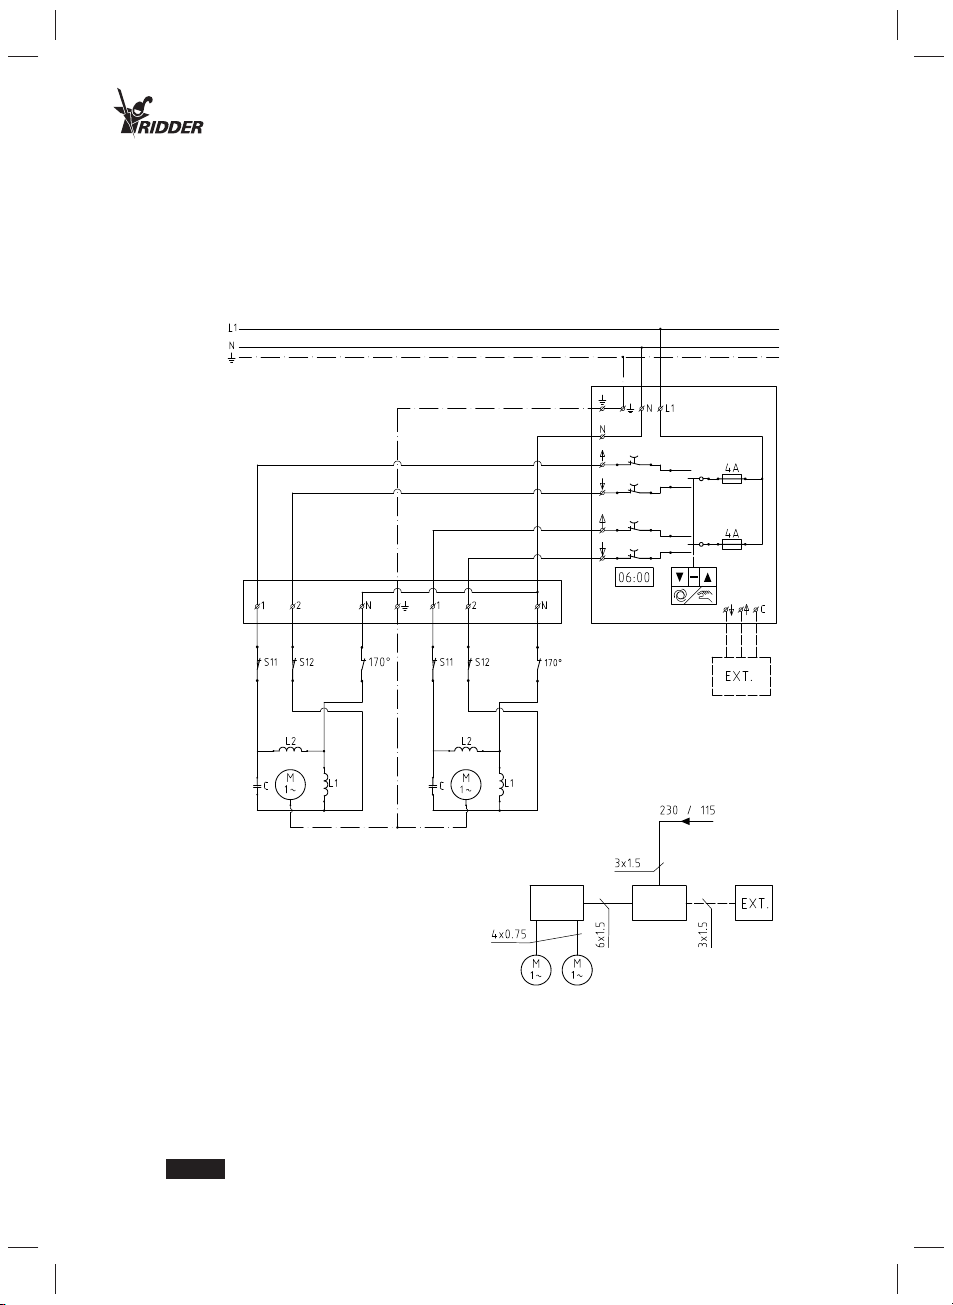
Elektrische installatie buismotor . . . . . . . . . . . . . . . . . . . . . . . . . . . . . NL-15
Storing-/ probleemoplossing . . . . . . . . . . . . . . . . . . . . . . . . . . . . . . . . NL-15
Nederlands INHOUDSOPGAVE
Ridder tube motors RB . . . . . . . . . . . . . . . . . . . . . . . . . . . . . . . . . . . . GB-16
Accessories . . . . . . . . . . . . . . . . . . . . . . . . . . . . . . . . . . . . . . . . . . . . GB-16
Tube motor: mechanical installation . . . . . . . . . . . . . . . . . . . . . . . . . . GB-17
System adjustment . . . . . . . . . . . . . . . . . . . . . . . . . . . . . . . . . . . . . . GB-18
Tube motor: electrical installation . . . . . . . . . . . . . . . . . . . . . . . . . . . GB-19
Problem solving . . . . . . . . . . . . . . . . . . . . . . . . . . . . . . . . . . . . . . . . GB-20
English CONTENTS
Ridder Rohrmotoren RB . . . . . . . . . . . . . . . . . . . . . . . . . . . . . . . . . . . . D-21
Zubehör . . . . . . . . . . . . . . . . . . . . . . . . . . . . . . . . . . . . . . . . . . . . . . . . D-21
Mechanische Installation des Rohrmotors. . . . . . . . . . . . . . . . . . . . . . . D-22
Einstellen des Systems . . . . . . . . . . . . . . . . . . . . . . . . . . . . . . . . . . . D-23
Elektrische Installation des Rohrmotors . . . . . . . . . . . . . . . . . . . . . . . D-24
Störungen und Störungsabhilfe . . . . . . . . . . . . . . . . . . . . . . . . . . . . . D-25
Deutsch INHALTSANGABE
Moteurs tubulaires Ridder RB . . . . . . . . . . . . . . . . . . . . . . . . . . . . . . . . F-26
Accessoires . . . . . . . . . . . . . . . . . . . . . . . . . . . . . . . . . . . . . . . . . . . . . F-26
Installation mécanique du moteur tubulaire . . . . . . . . . . . . . . . . . . . . . F-27
Réglage le systéme. . . . . . . . . . . . . . . . . . . . . . . . . . . . . . . . . . . . . . . . F-28
Raccordement électrique du moteur tubulaire . . . . . . . . . . . . . . . . . . . F-29
Guide de dépannage . . . . . . . . . . . . . . . . . . . . . . . . . . . . . . . . . . . . . . . F-30
Francais TABLE DES MATIÈRES
Motores tubulares Ridder RB . . . . . . . . . . . . . . . . . . . . . . . . . . . . . . . . E-31
Accesorios . . . . . . . . . . . . . . . . . . . . . . . . . . . . . . . . . . . . . . . . . . . . . . E-31
Instalación mecánica del motor tubular. . . . . . . . . . . . . . . . . . . . . . . . . E-32
Ajuste del sistema. . . . . . . . . . . . . . . . . . . . . . . . . . . . . . . . . . . . . . . . E-33
Instalación eléctrica del motor tubular . . . . . . . . . . . . . . . . . . . . . . . . . E-34
Averías y soluciones . . . . . . . . . . . . . . . . . . . . . . . . . . . . . . . . . . . . . . E-35
Español INDICE

Ridder Drive Systems BV HARDERWIJK NEDERLAND Tel.: +31 (0)341 416 8 54
Fax: +31 (0)341 416 611
RB50 / 0505 4
Fig. 1
Fig. 1

Ridder Drive Systems BV HARDERWIJK NEDERLAND Tel.: +31 (0)341-416 854
Fax: +31 (0)341 416 611
RB50 / 0505 5
Fig. 2
Fig. 2
Fig. 3
Fig. 3
Fig. 4
Fig. 4
Fig. 5
Fig. 5

Ridder Drive Systems BV HARDERWIJK NEDERLAND Tel.: +31 (0)341 416 8 54
Fax: +31 (0)341 416 611
RB50 / 0505 6
Fig. 6
Fig. 6

Ridder Drive Systems BV HARDERWIJK NEDERLAND Tel.: +31 (0)341-416 854
Fax: +31 (0)341 416 611
RB50 / 0505 7
Fig. 7
Fig. 7

Ridder Drive Systems BV HARDERWIJK NEDERLAND Tel.: +31 (0)341 416 8 54
Fax: +31 (0)341 416 611
RB50 / 0505 8
Fig. 8
Fig. 8

Ridder Drive Systems BV HARDERWIJK NEDERLAND Tel.: +31 (0)341-416 854
Fax: +31 (0)341 416 611
RB50 / 0505 9
Fig. 9
Fig. 9

Ridder Drive Systems BV HARDERWIJK NEDERLAND Tel.: +31 (0)341 416 8 54
Fax: +31 (0)341 416 611
RB50 / 0505 10
Fig. 10
Fig. 10

Ridder Drive Systems BV HARDERWIJK NEDERLAND Tel.: +31 (0)341-416 854
Fax: +31 (0)341 416 611
RB50 / 0505 11
Ridder Buismotoren.
De Ridder buismotor is een onderhoudsvrije, geluidsarme aandrijving, voor het aandrijven van
een rolschermsysteem met een wikkelbuis van ø50 mm. De ingebouwde eindschakelaar heeft
een bereik tot 38 omwentelingen.
De voornaamste toepassingen van een rolscherm zijn:
- Dekscherm met een minimale dekhelling van 20º
- Gevelscherm
Technische gegevens buismotor.
Accessoires voor de buismotor.
- Loopwagen buismotor met loopwagenprofiel en montagebeugel loopwagenprofiel
- Kabelrups met montageset kabelrups
- SH40 haakse tandwielkast
- RMC50 Buismotorcontrolunit met looptijdbeveiliging
- Proefschakelaar buismotor
Verklaring namen hoofdgroepen met hun onderdelen.
1. [a b c] Buismotor 1a. motor 1b. splitpen 1c. zeskantsleutel
2. Loopwagen buismotor
3. Loopwagenprofiel
4. Montagebeugel loopwagenprofiel
5. Kabelrups
6. [a b c d e] Montageset kabelrups 6a. gezette plaat 6b. ty-rap 6c. rechte plaat
6d. blindklinknagel 6e. eindschakel
IP beschermingsklasse
KB nominale looptijd
Tth looptijd thermische uitschakeling
BES bereik eindschakelaar
L totale lengte buismotor
m massa buismotor
M koppel uitgaand
n toerental
P toegevoerd vermogen
U netspanning
~ fase
I stroom
p frequentie
RB50-3.5\230
spanning
toerental omw/min
Nm
RIDDER BUISMOTOREN ZIJN SPECIAAL ONTWIKKELD VOOR ROLSCHERMSYSTEMEN.
ANDERE TOEPASSINGEN ZIJN ALLEEN NA GOEDKEURING VAN
RIDDER AANDRIJFSYSTEMEN BV TOEGESTAAN.
Fig. 1
Fig. 1

Ridder Drive Systems BV HARDERWIJK NEDERLAND Tel.: +31 (0)341 416 8 54
Fax: +31 (0)341 416 611
RB50 / 0505 12
Mechanische installatie buismotor.
Plaatsen geleiding buismotor.
Er mag alleen in de onderzijde van het loopwagenprofiel geboord worden. Zorg ervoor dat de
motorkabel of kabelrups "vrij" loopt tijdens de volledige loopweg.
Het heeft de voorkeur, indien de constructie waaraan de scherminstallatie wordt bevestigd op
afschot is gebouwd, de buismotor en geleiding op het hoogste punt te plaatsen (schotzijde). Dit
i.v.m. condens dat dan van de motor wegstroomt.
Maak het loopwagenprofiel op maat. Boor de gaten en monteer de montagebeugels met een
M6x16 bout (niet langer). Plaats de loopwagen zodanig, dat bij een gesloten scherm geen spleet
tussen scherm en constructie ontstaat. Bevestig de compleet gemonteerde geleiding aan de
constructie.
Buismotor aan wikkelbuis bevestigen.
Alleen in de vrije uitloop van de buismotor boren.
Schuif de verbindingsbuis van de wikkelbuis (profielbuis) in de vrije uitloop van de buismotor
(í50x1.5). Boor de buizen vier keer, op ca. 90º t.o.v. elkaar, door en verbind de buizen m.b.v. vier
blindklinknagels.
Bij vervanging van de buismotor kan men de borgpen verwijderen, de kale buismotor uit de buis
trekken en vervolgens een andere buismotor plaatsen.
Buismotor aan geleiding bevestigen.
Om de eindschakelaar af te stellen moet deze goed bereikbaar zijn. Indien een kabelrups wordt
toegepast, dient de montageset voor de kabelrups gelijk mee gemonteerd te worden.
Schuif de astap 10x10 van de buismotor, in de daarvoor bestemde buismotoraansluiting van de
loopwagen. Borg de buismotor met de bijgeleverde splitpen.
Aansluiten motorkabel.
Sluit de motorkabel aan. De motorkabel kan direct op de besturingskast aangesloten worden,
maar i.v.m. afstellen is het aan te bevelen om deze eerst aan te sluiten op de proefschakelaar.
Eindafstelling uitgangspositie.
Voor het eenvoudig verkrijgen van een eindstand van de uitgangspositie. Sluit de buismotor met
rolbuis elektrisch aan en laat deze vervolgens in de "afwikkelrichting" lopen totdat de eindscha-
kelaar de buismotor stopt. Dit is de "onderste" uitgangspositie.
Bevestig het schermdoek.
Trek de pees van het schermdoek door de daarvoor bestemde sleuf in de wikkelbuis. Verwijder
de pees ter hoogte van de aansluiting met de buismotor en bevestig het laatste deel van het
schermdoek met dubbelzijdig plakband op de buis van de buismotor. Laat de eindschakelaar-afs-
telling minimaal 4 cm vrij, i.v.m. de bereikbaarheid. Trek het doek aan de andere zijde van de wik-
kelbuis strak. Bevestig het doek aan de andere zijde van de te schermen constructie.
ER MAG NOOITTER HOOGTE VAN DE BUISMOTOR IN DE
WIKKELBUIS GEBOORD WORDEN!
Fig. 2
Fig. 2
Fig. 3
Fig. 3
Fig. 4
Fig. 4
Fig. 8
Fig. 8
Fig. 5
Fig. 5

Ridder Drive Systems BV HARDERWIJK NEDERLAND Tel.: +31 (0)341-416 854
Fax: +31 (0)341 416 611
RB50 / 0505 13
Monteren kabelrups.
Kabelrups voor het monteren op lengte maken en met de "nokjes" op de schakel, richting buis-
motor over de motorkabel schuiven. De eindschakel van de kabelrups aan de juiste zijde op de
montageplaat voormonteren, m.b.v. bijgeleverde blindklinknagels (zie figuur).
Maak de kabelrups op lengte, minimaal de ½L + 0.2 [m] lang (L = loopweg buismotor). Schuif
deze over de motorkabel. Trek de motorkabel nadat de buismotor en de montageplaat aan de
loopwagen gemonteerd zijn, strak en druk de kabelrups in de kabelrupseindschakel. Borg de
motorkabel m.b.v. een ty-rap op de montageplaat kabelrups.
Het verdient de voorkeur om de eindschakel voor te monteren op de montageplaat. Voor de
duidelijkheid zie ook fig.1.
Afstellen systeem.
Afstellen eindschakelaar.
Voor een juiste afstelling dient het doek zonder plooien op en af te rollen. Plooivorming of
obstakels kunnen de eindafstelling nadelig beïnvloeden.
M.b.v. bijgeleverde zeskantsleutel is de eindschakelaar af te stellen.
De "grote" pijl geeft de draairichting van de wikkelbuis weer.
De "gebogen" pijl geeft aan welke kant op te draaien voor het vergroten "+" (plus) of verkleinen "-"
(min) van de loopweg.
Stel de eindstand in, door de buismotor vlak voor zijn eindstand te stoppen en de desbetref-
fende eindschakelaar in de min-richting (linksom) te verdraaien. Laat de buismotor nu een kwart
omwenteling terug lopen en verdraai de eindschakelaar nu in plus-richting (rechtsom), laat de
buismotor nu weer heen lopen. Herhaal de voorgaande acties en bepaal zo de juiste eindstand.
Stel de andere eindstand op dezelfde manier af.
Functiecontrole.
Bij de functiecontrole laat men de buismotor meerdere malen, in beide richtingen, tot zijn eind-
stand lopen. Hierbij controleert men of de eindstanden iedere keer juist gehaald worden.
Ridder buismotoren hebben een inschakelduur van KB 4, KB 6, KB 8 of KB 10 min. De
ingebouwde thermische beveiliging schakelt de motor uit zodra deze te warm wordt Dat is
mogelijk nadat de motor diverse keren op en neer gelopen is zonder af te koelen. Indien de
motor thermisch is uitgeschakeld, zal deze na een korte afkoelperiode weer functioneren.
Fig. 6
Fig. 6
Fig. 7
Fig. 7

Ridder Drive Systems BV HARDERWIJK NEDERLAND Tel.: +31 (0)341 416 8 54
Fax: +31 (0)341 416 611
RB50 / 0505 14
Elektrische installatie buismotor.
Aansluiten motorkabel.
De aansluitkabel is een 4-aderige kabel, behorende bij de 2-polige asynchrone (condensator)
motor. Hiermee kan de motor zowel links- als rechtsom gestuurd worden.
Looptijdbeveiliging.
Wanneer de buismotor in een automatisch systeem wordt toegepast dient deze beveiligd te
worden met een looptijdbeveiliging. D.w.z. de motor wordt na een bepaalde tijd uitgeschakeld,
wanneer deze niet door zijn eindschakelaars is gestopt. De looptijdbeveiliging heeft als doel het
niet laten oververhitten van de buismotor dat eventueel doorbranden tot gevolg kan hebben. Bij
een buismotor wordt de theoretisch maximale looptijd aangegeven met KB.
Parallel aansluiten buismotor.
Buismotoren mogen nooit direct parallel aangesloten worden. De motor die als eerste zijn eind-
schakelaar heeft bereikt wordt door een inductieve en capacitieve spanning, van de nog lopende
buismotor, op zijn tegenwikkeling bekrachtigd. Deze spanning, die op kan lopen tot 1000 Volt,
zet de eerst afgeslagen motor in de tegenrichting in beweging tot de motor weer de voedingss-
panning krijgt via de weer gesloten eindschakelaar. Hierdoor ontstaat er een pendelende beweg-
ing van de reeds afgeslagen buismotor, welke zich voortzet tot de eindschakelaar onder de
enorme belasting beschadigd wordt.
De buismotor mag alleen parrallel aangestuurd worden, wanneer de voeding gescheiden aan het
lichtnet wordt aangesloten.
ELEKTRISCHE AANSLUITINGEN MOGEN ALLEEN DOOR EEN
ELEKTROTECHNISCH INSTALLATEUR GEMAAKT WORDEN!
BUISMOTOREN MOGEN NOOIT DIREKT PARALLEL AANGESLOTEN WORDEN!
Fig. 9
Fig. 9
Fig. 8
Fig. 8
Fig. 10
Fig. 10

Ridder Drive Systems BV HARDERWIJK NEDERLAND Tel.: +31 (0)341-416 854
Fax: +31 (0)341 416 611
RB50 / 0505 15
Storing-/ probleemoplossing.
Probleem: De motor loopt niet.
Oorzaak: De netspanning is niet aangesloten.
Oplossing: Sluit de netspanning aan.
Oorzaak: De motor is thermisch uitgeschakeld.
Oplossing: Laat de motor afkoelen.
Oorzaak: Verkeerde netspanning.
Oplossing: Raadpleeg het typeplaatje van de motor en vergelijk dit met de
aangesloten netspanning. Indien deze niet overeenkomen, raadpleeg Ridder.
Oorzaak: Draadbreuk.
Oplossing: Raadpleeg uw installateur / leverancier.
Probleem: De motor loopt alleen één kant uit.
Oorzaak: De eindschakelaar is geschakeld.
Oplossing: Verstel de eindschakelaar tot de motor weer kan lopen.
Oorzaak: Één fase is defect.
Oplossing: Raadpleeg uw installateur / leverancier.
Probleem: De motor stopt niet op de eindschakelaar.
Oorzaak: De eindschakelaar is niet vergenoeg doorgedraaid.
Oplossing: Verstel de eindschakelaar.
(De eindschakelaar heeft maximaal 38 omwentelingen. De stelschroef
van de eindschakelaar heeft een verhouding van 1:12 t.o.v. de
eindschakelas. D.w.z. dat de eindschakelaar 12 omwentelingen
verdraaid moet worden om één omwenteling op de buis te verkrijgen.
Indien de eindschakelaar over zijn gehele bereik versteld moet worden,
moet men de stelschroef 456 omwentelingen verdraaien.)
Oorzaak: De eindschakelaar is defect.
Oplossing: Raadpleeg uw installateur / leverancier.

Ridder Drive Systems BV HARDERWIJK NEDERLAND Tel.: +31 (0)341 416 8 54
Fax: +31 (0)341 416 611
RB50 / 0505 16
Ridder tube motors.
The Ridder tube motor is a maintenance free, low noise system for driving roll screen systems
with a winding tube of ø50 mm.The built-in limit switch has a range of up to 38 rotations.
The main roll screen applications are:
- Roof screen with a minimum pitch of 20°
- Side screens
Tube motor technical data.
Tube motor accessories.
- Tube motor guiding unit with guiding profile and mounting bow guiding profile
- Cable thread with mounting set
- SH40 square headed gearbox
- RMC50 tube motor control unit with run time protection
- Tube motor testing switch
Explanation of the names in main groups with their parts.
1. [a b c] Tube motor 1a. motor 1b. split pin 1c. hexagonal key
2. Tube motor guiding unit
3. Guiding profile
4. Mounting bow guiding profile
5. Cable thread
6. [a b c d e] Mounting set cable thread 6a. square plate 6b. ty-rap 6c. straight plate
6d.blind rivet 6e. end connector
IP protection class
KB nominal run time
Tth run-time thermal cut-off
BES limit switch range
L tube motor length
m tube motor weight
M couple output
n number of revolutions
P supplied capacity
U mains voltage
~ phase
I current
p frequency
RB50-3.5\230
voltage
number of revolutions per minute
Nm
RIDDER TUBE MOTORS ARE SPECIALLY DEVELOPED FOR ROLL SCREEN SYSTEMS.
OTHER APPLICATIONS ARE ONLY PERMITTED AFTER RECEIVING SPECIFIC APPROVAL
FROM RIDDER AANDRIJFSYSTEMEN BV.
Fig. 1
Fig. 1

Ridder Drive Systems BV HARDERWIJK NEDERLAND Tel.: +31 (0)341-416 854
Fax: +31 (0)341 416 611
RB50 / 0505 17
Tube motor: mechanical installation.
Positioning the tube motor guiding.
It is only permitted to drill into the underside of the guiding unit profile. Ensure that the motor
cable or cable thread run free during the full extent of travel.
If the surface, to which the screen has to be attached, is built at an angle, then it is preferable to
install the tube motor and guiding at the highest point on the protected side. This is to ensure
that condensation will run away from the motor.
Cut the guiding unit profile to size. Drill the holes and secure the mounting bows with an M6x16
bolt (maximum length). Position the guiding unit so that when the screen is shut there are no
gaps between it and the construction. Attach the completely assembled guiding to the construc-
tion.
Connecting the tube motor to the winding tube.
Only drill in the tube motor’s free end
Slide the winding tube’s (profile tube) connecting tube into the tube motor’s free end (i50x1,5).
Drill four holes through the tubes at 90° to each other, and connect the tubes with four blind riv-
ets.
When replacing the tube motor, it is possible to remove the locking pin, pull the bare tube out of
the tube and then position a new tube motor.
Connecting the tube motor to the guiding.
In order to adjust the limit switch it has to be within easy reach. If cable protection is used, then
the cable protection mounting set has to be attached at the same time.
Slide the tube motor’s conical shaft 10x10 into the tube motor connection of the guidingunit that
is intended for this purpose. Lock the tube motor in position with the locking pin supplied.
Motor cable protection.
Connect the motor cable. The motor cable can be connected directly to the control unit, but,
given the need for adjustment and setting, it is recommended that it first is connected to the
test switch.
End adjustment starting point.
A simple way of establishing the end position from the starting position is to let the tube motor,
with the winding tube that is already connected electrically, run in the "unwinding direction" until
the limit switch stops the tube motor. This is the "bottom" starting position.
Attaching the shading screen.
Pull the shading screen string through the slit in the winding tube intended to this purpose.
Remove the string at the point of connection with the tube motor and attach the last part of the
screen with double-sided adhesive tape to the tube motor’s tube. Adjust the limit switch so that
it remains at least 4cm free to allow for access. Pull the screen tight to the other side of the
winding tube and connect it to the other side of the construction that must be screened.
IT IS NEVER ALLOWEDTO DRILL INTOTHE WINDING
TUBE NEAR THE TUBE MOTOR!
Fig. 2
Fig. 2
Fig. 3
Fig. 3
Fig. 4
Fig. 4
Fig. 8
Fig. 8
Fig. 5
Fig. 5

Ridder Drive Systems BV HARDERWIJK NEDERLAND Tel.: +31 (0)341 416 8 54
Fax: +31 (0)341 416 611
RB50 / 0505 18
Mounting cable protection.
Before mounting, cut the cable protection to length and slide with the "cams" on the link over
the motor cable, in the direction of the tube motor. Attach the cable protection’s end link in
advance to the correct side of the mounting plate using the blind rivets supplied (see figure).
Cut the cable protection to length, at least ½ L + 0.2[m] long (L=the tube motor’s running exten-
sion). Slide these over the motor cable. After mounting the tube motor and mounting plate to
the guiding unit, pull the motor cable tight and press the cable protection into the cable protec-
tion end limit. Secure the motor cable on the mounting plate cable protection with a ty-rap.
Prior mounting of the limit switch to the mounting plate is recommended (refer to figure 1)
System adjustment.
Adjusting limit switch.
For correct adjustment the screen must roll up and down without folding. Folds or obstructions
can cause inaccurate end adjustment
The limit switch can be adjusted using the hexagonal key supplied.
The "large" arrow indicates the winding tube’s rotational direction. The "broken" arrow indicates
the direction to turn to increase "+" (plus) or reduce "-" (minus) the extent of travel.
The end position is set by stopping the tube motor shortly before it reaches the end of its run,
and then turning the appropriate end limit switch in the minus direction (to the left). Now make
the motor reverse for one quarter of a rotation and adjust the limit switch in the plus direction
(to the right). Now allow the tube motor to run forward again. Repeat this process until the cor-
rect position is determined. Adjust the other end position in the same way.
Function check.
In function check the tube motor is allowed to run a number of times in both directions until it
reaches its end position. Doing this, check if the final points are correctly reached each time.
Ridder tube motors have a switch duration of KB 4, KB 6, KB 8 or KB 10 min. The built-in ther-
mal protection deactivates the motor if it becomes too warm. This can happen if the motor has
run up and down several times without having time to cool. If the thermal protection deactivates
the motor, it will resume functioning after a short time, once it has coolled off.
Fig. 6
Fig. 6
Fig. 7
Fig. 7

Ridder Drive Systems BV HARDERWIJK NEDERLAND Tel.: +31 (0)341-416 854
Fax: +31 (0)341 416 611
RB50 / 0505 19
Tube motor: electrical installation.
Motor cable connection.
The connection cable is a 4-core cable belonging to the 2-pole asynchronous (condensor) motor.
This allows the motor to rotate to both the left and the right.
Run-time protection.
When the tube motor is used in an automatic system it needs a run-time protection safety. This
ensures that the motor will switch off after a specific time in the event of it not being stopped
by its limit switches. The purpose of the run-time protection is to stop the tube motor from over-
heating which could be possibly result in its burning out. The theoretical maximum running time
of a tube motor is indicated in KB.
Parallel connection of the tube motor.
Tube motors must never be connected directly in parallel. If this were to happen then the motor
that first reached its end switch would be powered into reverse by inductive and capacitive
charge that would come from the tube motor that is still running. This charge, that can run as
high as 1000 volts, re-starts the motor that had already stopped, by moving in the opposite posi-
tion until the motor receives mains supply from the now re-connected end switch. In this way a
pendulum action builds up with the tube motor that had already stalled, which would continue
until the end switch was damaged by the enormous load.
The tube motor can only be installed in parallel when the power supply is separate to the mains
supply.
THE CONNECTION OR INSTALLATION OF ELECTRONIC COMPONENTS MAY ONLY BE
MADE BY A QUALIFIED ELECTRO-TECHNICIAN!
TUBE MOTORS MUST NEVER BE CONNECTED IN PARALLEL!
Fig. 9
Fig. 9
Fig. 8
Fig. 8
Fig. 10
Fig. 10

Ridder Drive Systems BV HARDERWIJK NEDERLAND Tel.: +31 (0)341 416 8 54
Fax: +31 (0)341 416 611
RB50 / 0505 20
Problem solving.
Problem: The motor does not run.
Cause: The mains supply is not switched on.
Solution: Turn on the mains supply.
Cause: The thermal cut out has activated.
Solution: Allow the motor to cool down.
Cause: Incorrect mains voltage.
Solution: Refer to the motor’s type plate and compare the recommended mains voltage to
the one in use. If they are not the same consult Ridder.
Cause: Broken wire.
Solution: Contact your installer/supplier.
Problem: The motor only runs in one direction.
Cause: The limit switch is in operation.
Solution: Adjust the limit switch until the motor runs again.
Cause: One phase has a defect.
Solution: Contact your installer/supplier.
Problem: The motor does not stop at the limit switch.
Cause: The limit switch has not been adjusted far enough.
Solution: Adjust the limit switch. The limit switch has a maximum of 38 revolutions and its
adjusting screw has a ratio of 1:12 in relation to the end limit shaft. This means
that the limit switch has to be turned 12 times to rotate the tube once.
If the limit switch had to be adjusted over its whole range, then the adjusting
screw would have tobe turned 456 times.
Cause: The limit switch is defective.
Solution: Contact your installer/supplier.

Ridder Drive Systems BV HARDERWIJK NEDERLAND Tel.: +31 (0)341-416 854
Fax: +31 (0)341 416 611
RB50 / 0505 21
Die Ridder Rohrmotoren.
Der Ridder Rohrmotor ist ein wartungsfreier, geräuscharmer Antrieb für ein Rollschirmsystem
mit einem Wickelrohr ø50mm. Der eingebaute Endschalter hat einen Bereich bis 38 Umdre-
hungen.
Rollschirme werden hauptsächlich verwendet für:
- Dachschirme mit einer Dachneigung von mindestens 20º
- Seitenwandschirme
Technische Angaben Rohrmotor.
Zubehör Rohrmotor.
- Führungsgehäuse für den Rohrmotor mit Führungsprofil und zugehörigem Montagebügel
- Kabelschutz mit zugehörigem Montagesatz
- SH40 rechtwinkliges Zahnradgehäuse
- RMC50 Rohrmotorkontrollunit mit Laufzeitsicherung
- Prüfschalter für den Rohrmotor
Erklärung der Hauptgruppenbezeichnungen mit entsprechenden Einzelteilen.
1. [a b c] Rohrmotor 1a. Motor 1b. Splint 1c. Inbusschlüssel
2. Führungsgehäuse des Rohrmotors
3. Führungsprofil
4. Montagebügel für das Führungsprofil
5. Kabelschutz
6. [a b c d e] Montagesatz für den Kabelschutz 6a.rechtwinklige Platte 6b.ty-rap 6c. rechte
Platte 6d. Blindnietnagel 6e. Endschalter
IP Schutzgrad
KB nominale Laufzeit
Tth Laufzeit der thermischen Ausschaltung
BES Bereich des Endschalters
L Gesamtlänge des Rohrmotors
m Masse des Rohrmotors
M Drehmoment ausgehend
n Umdrehungszahl
P Leistung
U Netzspannung
~ Phase
I Strom
p Frequenz
RB50-3.5\230
Spannung
Umdrehungszahl Umd/Min
Nm
DIE RIDDER ROHRMOTOREN WURDEN SPEZIELL FÜR ROLLSCHIRMSYSTEME ENTWICK-
ELT. ANDERE ANWENDUNGEN SIND NUR MIT GENEHMIGUNG DER RIDDER
AANDRIJFSYSTEMEN BV ERLAUBT.
Fig. 1
Fig. 1
This manual suits for next models
6
Table of contents
Languages:
Other Ridder Engine manuals
Popular Engine manuals by other brands

Field Controls
Field Controls SWG Removal and installation

Grizzly
Grizzly G2908 instruction sheet

Stiga
Stiga RS100 Workshop manual

STEYR MOTORS
STEYR MOTORS MO286H43 Operation, maintenance and warranty manual

Omron
Omron SMARTSTEP SERVO MOTORS System configuration

O.S. engine
O.S. engine MAX-91FX Owner's instruction manual