RIDGID SeeSnake DVDPak User manual

GB p.1
FR p.17
ES p.35
DE p.53
NL p.69
PT p.85
IT p.101
SV p.117
DA p.133
FI p.149
NO p.165
HR p.181
PO p.197
RO p.213
CZ p.229
HU p.245
EL p.261
RU p.277
TR p.293
SL p.309
SK p.325
SB p.341
RIDGE TOOL COMPANY
SeeSnake
®
DVDPak
OLED LCD

Rid e Tool Company
ii
Table of Contents
Recording Form for achine Serial Number..............................................................................................................1
Safety Symbols..............................................................................................................................................................2
General Safety Rules
Work Area Safety........................................................................................................................................................2
Electrical Safety ..........................................................................................................................................................2
Personal Safety ..........................................................................................................................................................2
Equipment Use and Care............................................................................................................................................3
Battery Use and Care ................................................................................................................................................3
Service........................................................................................................................................................................3
Specific Safety Information..........................................................................................................................................3
DVDPa Safety ..........................................................................................................................................................4
Description, Specifications and Standard Equipment
Description..................................................................................................................................................................4
Specifications..............................................................................................................................................................5
Standard Equipment ..................................................................................................................................................5
Optional Equipment ....................................................................................................................................................5
DVDPak Components ..................................................................................................................................................5
DVDR Button Controls................................................................................................................................................5
Pre-Operation Inspection ............................................................................................................................................6
Work Area and Equipment Set Up ..............................................................................................................................6
DVDPa Placement ....................................................................................................................................................6
Connecting The DVDPa ............................................................................................................................................7
Connection Icons ........................................................................................................................................................7
Powering The SeeSnake DVDPa ............................................................................................................................7
Monitor And DVDR Power-up ....................................................................................................................................8
DVDPak Settings ..........................................................................................................................................................9
DVDPak Controls ........................................................................................................................................................10
Keypad Controls ......................................................................................................................................................10
DVDR Button Controls..............................................................................................................................................10
DVDPa Display Icons..............................................................................................................................................10
Operating Instructions................................................................................................................................................11
Starting Up................................................................................................................................................................11
Inspecting The Line ..................................................................................................................................................11
Recording An Inspection ..........................................................................................................................................12
Playing Back Recorded Video ..................................................................................................................................13
Locating The Camera Using The Sonde ..................................................................................................................13
Line Tracing The SeeSnake Push Cable..................................................................................................................13
aintenance Instructions ..........................................................................................................................................14
Cleaning....................................................................................................................................................................14
Accessories ................................................................................................................................................................14
Transport And Storage ..............................................................................................................................................14
Service And Repair ....................................................................................................................................................14
Disposal ......................................................................................................................................................................14
Battery Disposal..........................................................................................................................................................15
Troubleshooting..........................................................................................................................................................16
SeeSnake®DVDPak

SeeSnake®D DPak
SeeSnake®DVDPak
SeeSnake®DVDPak
Record Serial Number below and retain product serial number which is located on nameplate.
Serial
No.
OLED
LCD
WARNING!
Read this Operator’s Manual
carefully before usin this
tool. Failure to understand
and follow the contents of
this manual may result in
electrical shock, fire and/or
serious personal injury.

Rid e Tool Company
2
SeeSnake®DVDPak
General Safety Rules
WARNING
Read all safety warnings and instructions. Failure to follow
the warnings and instructions may result in electric shock,
fire and/or serious injury.
SA E ALL WARNINGS AND INSTRUCTIONS
FOR FUTURE REFERENCE!
Work Area
•Keep work area clean and well lit. Cluttered or dark
areas invite accidents.
•Do not operate equipment in explosive atmo-
spheres, such as in the presence of flammable
liquids, gases, or dust. Equipment can create sparks
which may ignite the dust or fumes.
•Keep children and by-standers away while oper-
ating equipment. Distractions can cause you to lose
control.
Electrical Safety
•Avoid body contact with earthed or grounded sur-
faces such as pipes, radiators, ranges and refrig-
erators. There is an increased risk of electrical shock
if your body is earthed or grounded.
•Do not expose equipment to rain or wet condi-
tions. Water entering equipment will increase the risk
of electrical shock.
•Do not abuse the cord. Never use the cord for
carrying, pulling or unplugging the equipment.
Keep cord away from heat, oil, sharp edges or
moving parts. Damaged or entangled cords increase
the risk of electric shock.
•If operating equipment in a damp location is un-
avoidable, use a ground fault circuit interrupter
(GFCI) protected supply. Use of a FCI reduces
the risk of electric shock.
•Keep all electrical connections dry and off the
ground. Do not touch equipment or plugs with
wet hands. This reduces the risk of electrical shock.
Personal Safety
•Stay alert, watch what you are doing and use com-
mon sense when operating equipment. Do not
use equipment while you are tired or under the in-
fluence of drugs, alcohol or medication. A moment
of inattention while operating equipment may result in
serious personal injury.
•Use personal protective equipment. Always wear
eye protection. Protective equipment such as dust
mask, non-skid safety shoes, hard hat, or hearing
protection used for appropriate conditions will reduce
personal injuries.
•Do not overreach. Keep proper footing and balance
at all times. This enables better control of the equip-
ment in unexpected situations.
•Dress properly. Do not wear loose clothing or jew-
elry. Keep your hair, clothing, and gloves away
from moving parts. Loose clothes, jewelry, or long
hair can be caught in moving parts.
Safety Symbols
In this operatorʼs manual and on the product, safety symbols and signal words are used to communicate important safety
information. This section is provided to improve understanding of these signal words and symbols.
This is the safety alert symbol. It is used to alert you to potential personal injury hazards. Obey all safety messages that follow this
symbol to avoid possible injury or death.
DAN ER indicates a hazardous situation which, if not avoided, will result in death or serious injury.
WARNIN indicates a hazardous situation which, if not avoided, could result in death or serious injury.
CAUTION indicates a hazardous situation which, if not avoided, could result in minor or moderate injury.
NOTICE indicates information that relates to the protection of property.
This symbol means read the operatorʼs manual carefully before using the equipment. The operatorʼs manual contains important
information on the safe and proper operation of the equipment.
This symbol means always wear safety glasses with side shields or goggles when handling or using this equipment to reduce
the risk of eye injury.
This symbol indicates the risk of electrical shock.
NOTICE
DANGER
WARNING
CAUTION

Rid e Tool Company 3
SeeSnake®DVDPak
Equipment Use and Care
•Do not force equipment. Use the correct equipment
for your application. The correct equipment will do the
job better and safer at the rate for which it is designed.
•Do not use equipment if the switch does not turn it
ON and OFF. Any equipment that cannot be con-
trolled with the switch is dangerous and must be re-
paired.
•Disconnect the plug from the power source and/or
the battery pack from the equipment before making
any adjustments, changing accessories, or storing.
Such preventive safety measures reduce the risk of in-
jury.
•Store idle equipment out of the reach of children
and do not allow persons unfamiliar with the equip-
ment or these instructions to operate the equip-
ment. Equipment can be dangerous in the hands of
untrained users.
•aintain equipment. Check for misalignment or bind-
ing of moving parts, missing parts, breakage of parts
and any other condition that may affect the equip-
mentʼs operation. If damaged, have the equipment
repaired before use. Many accidents are caused by
poorly maintained equipment.
•Use the equipment and accessories in accordance
with these instructions, taking into account the
working conditions and the work to be performed.
Use of the equipment for operations different from
those intended could result in a hazardous situation.
•Use only accessories that are recommended by
the manufacturer for your equipment. Accessories
that may be suitable for one piece of equipment may
become hazardous when used with other equipment.
•Keep handles dry and clean; free from oil and
grease. Allows for better control of the equipment.
Battery Tool Use And Care
•Recharge only with the charger specified by the
manufacturer. A charger that is suitable for one type
of battery pack may create a risk of fire when used with
another battery pack.
•Use equipment only with specifically designated
battery packs. Use of any other battery packs may
create a risk of injury and fire.
•Do not probe battery with conductive objects.
When battery pack is not in use, keep it away
from other metal objects, like paper clips, coins,
keys, nails, screws or other small metal objects
that can make a connection from one terminal to
another. Shorting the battery terminals together may
cause burns or a fire.
•Under abusive conditions, liquid may be ejected
from the battery; avoid contact. If contact acci-
dentally occurs, flush with water. If liquid con-
tacts eyes, additionally seek medical help. Liquid
ejected from the battery may cause irritation or burns.
•Use and store batteries and chargers in dry, ap-
propriate temperature areas. Extreme temperatures
and moisture can damage batteries and result in leak-
age, electrical shock, fire or burns. See charger man-
ual for more information.
•Do not cover charger while in use. Proper ventilation
is required for correct operation. Covering charger in
use could result in fire.
•Properly dispose of batteries. Exposure to high
temperatures can cause the batteries to explode, so do
not dispose of in a fire. Some countries have regula-
tions concerning battery disposal. Please follow all
applicable regulations.
Service
•Have your equipment serviced by a qualified repair
person using only identical replacement parts. This
will ensure that the safety of the equipment is main-
tained.
• Remove the batteries and refer servicing to qualified
service personnel under any of the following conditions:
• If liquid has been spilled or objects have fallen into
product;
• If product does not operate normally by following
the operating instructions;
• If the product has been dropped or damaged in
any way; or,
• When the product exhibits a distinct change in
performance.
Specific Safety Information
WARNING
This section contains important safety information that is
specific to this equipment.
Read these precautions carefully before using the DVDPak
to reduce the risk of electrical shock or other serious per-
sonal injury.
SA E THESE INSTRUCTIONS!
Keep this manual with the machine for use by the operator.

Rid e Tool Company
4
SeeSnake®DVDPak
If you have any question concerning this Ridge Tool
product:
– Contact your local RID ID®distributor.
– Visit www.RID ID.com or www.RID ID.eu to find
your local Ridge Tool contact point.
– Contact Ridge Tool Technical Services Department
and Canada call (800) 519-3456.
D DPak Safety
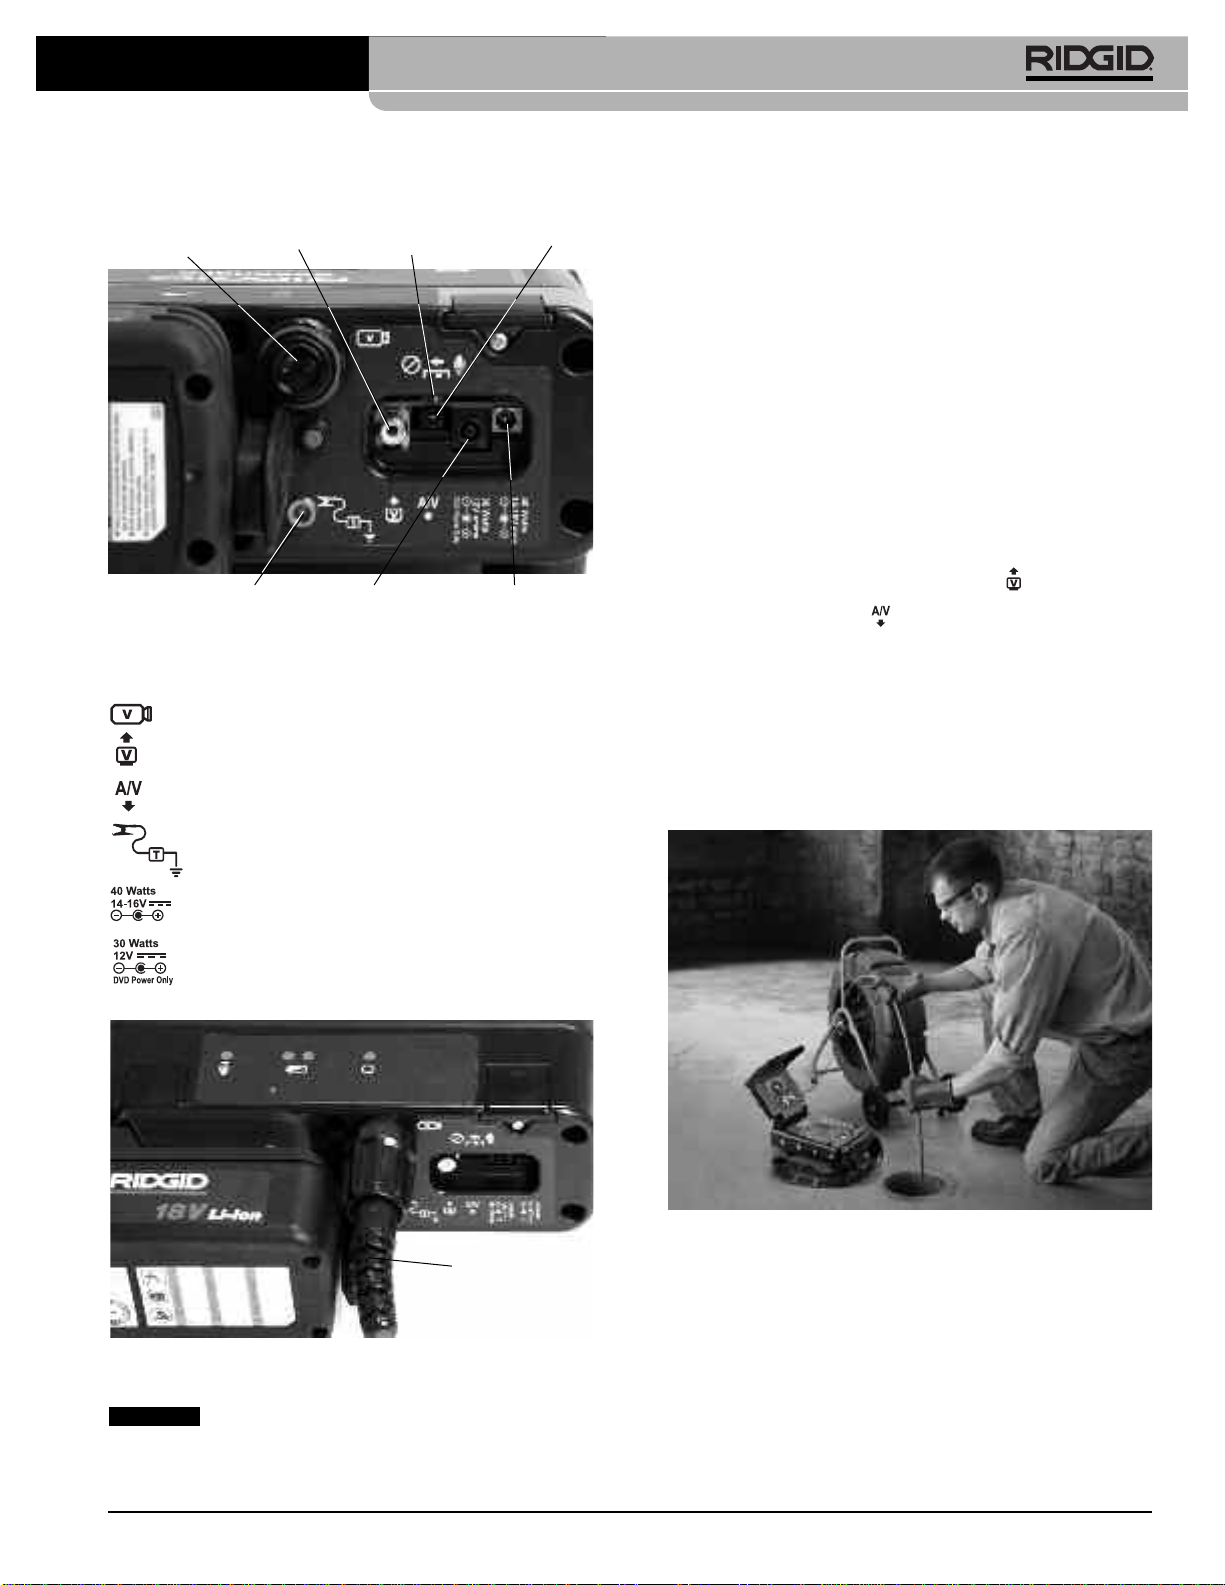
•An improperly grounded electrical outlet can cause
electrical shock and or severely damage equip-
ment. Always check work area for a properly grounded
electrical outlet. Presence of a three prong or FCI out-
let does not insure that the outlet is properly grounded.
If in doubt, have the outlet inspected by a licensed elec-
trician.
•Power the DVD Pak only with a specifically desig-
nated battery or a double insulated power supply.
•Do not operate this equipment if operator or ma-
chine is standing in water. Operating machine while
in water increases the risk of electrical shock.
•The DVDPak is not water resistant. Only the camera
and push cable are waterproof. Do not expose the
equipment to water or rain. This increases the risk of
electrical shock.
•Do not use where a danger of high voltage contact
is present. The equipment is not designed to pro-
vide high voltage protection and isolation.
•Read and understand this operatorʼs manual, the
reel operatorsʼ manual, and the instructions for any
other equipment in use and all warnings before op-
erating the DVDPak.Failure to follow all instruction
may result in property damage and/or serious per-
sonal injury.
•Always use appropriate personal protective equip-
ment while handling and using equipment in drains.
Drains may contain chemicals, bacteria and other sub-
stances that may be toxic, infectious, cause burns or
other issues. Appropriate personal protective equip-
ment always includes safety glasses, and may include
equipment such as drain cleaning gloves or mitts, latex
or rubber gloves, face shields, goggles, protective
clothing, respirators and steel toed footwear.
•If using drain cleaning equipment at the same time
as using drain inspection equipment, only wear
RIDGID Drain Cleaning Gloves. Never grasp the ro-
tating drain cleaning cable with anything else, including
other gloves or a rag. They can become wrapped
around the cable, causing hand injuries. Only wear
latex or rubber gloves under RID ID Drain Cleaner
loves. Do not use damaged drain cleaning gloves.
•Practice good hygiene. Use hot, soapy water to wash
hands and other exposed body parts exposed to drain
contents after handling or using drain inspection equip-
ment. Do not eat or smoke while operating or han-
dling drain inspection equipment. This will help prevent
contamination with toxic or infectious material.
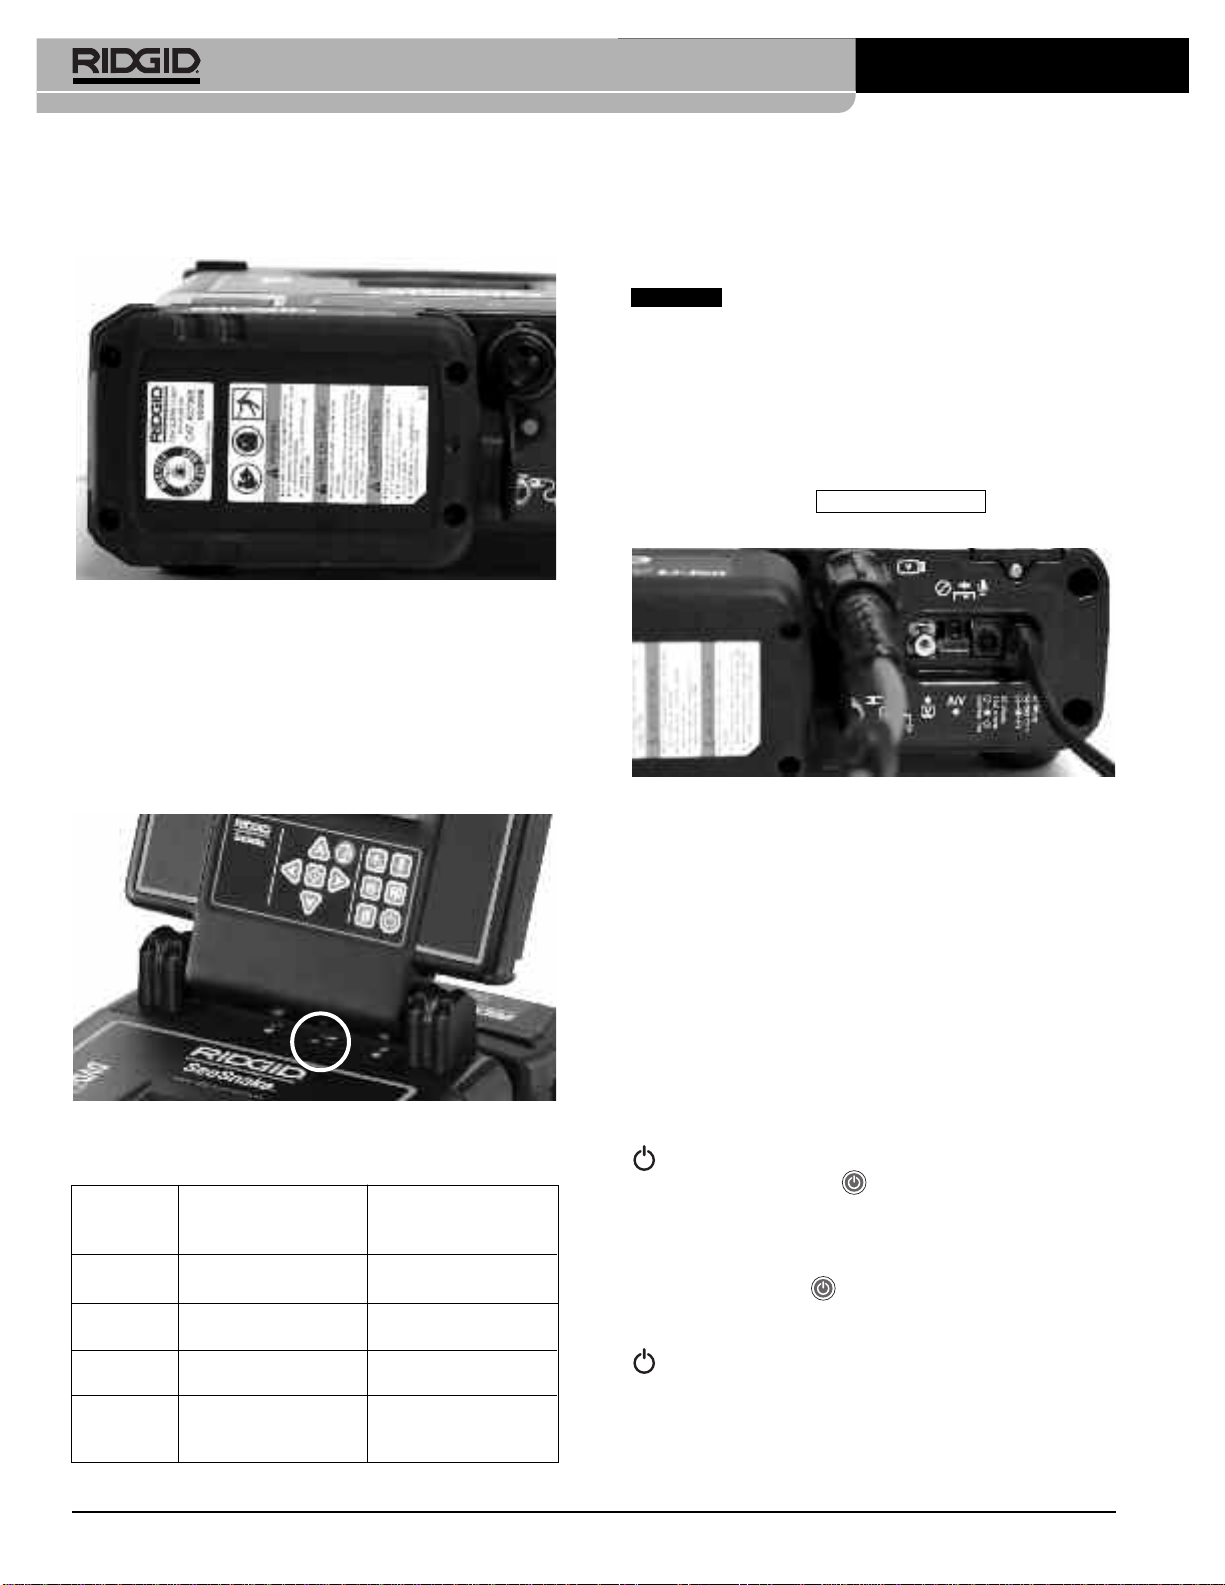
For detailed instructions on the operation of the Sony®
DVDR unit, see the manual provided by the unitʼs manu-
facturer.
Description, Specifications And
Standard Equipment
Description
The SeeSnake®DVDPa is a robust, lightweight weather-
resistant camera monitor, control and recording unit for use
with a SeeSnake Pipe Inspection System. Combined
with the Sony®Multi-Function Digital Video Disc Recorder
(DVDR), the DVDPa can be used to monitor, record
and store video in convenient DVD format.
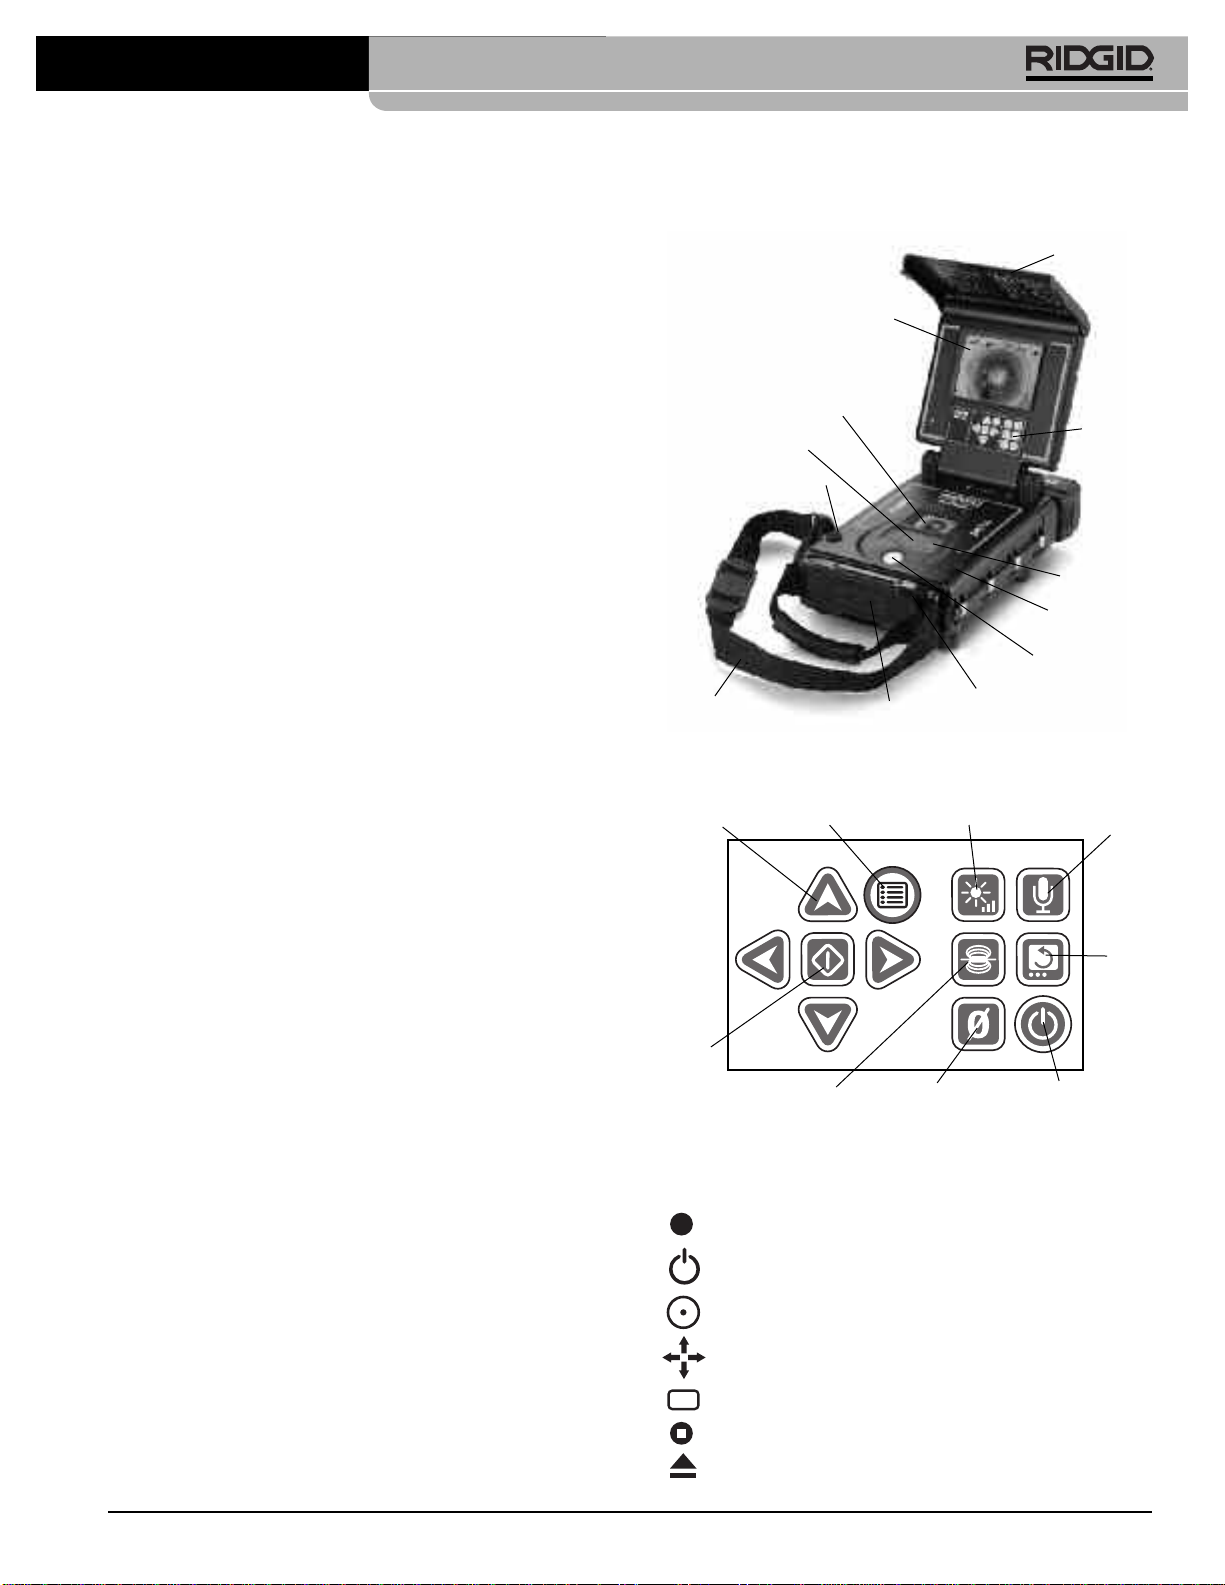
The DVDPa is designed to easily connect with a
SeeSnake reel and camera and monitor and record the
view from the camera. It can also be used with a
SeeSnake Pipe Inspection System with a separate mon-
itor, to record pipe inspection views to DVD. It provides
readily accessible controls for using the Sony Multi-
Function recorder, while protecting the recorder in a
durable, easily portable case.
Other auxiliary equipment used with the SeeSnake
DVDPa may include:
• Rechargeable battery.
• A RID ID locator/receiver (such as the SR-20, the
SR-60, the Scout™ or the NaviTrack®II).
• A RID ID transmitter (such as the ST-510, the ST-305,
the NaviTrack®Brick or the NaviTrack®10-watt trans-
mitter).
• The CountPlus Cable Counter cable-measurement
system, normally built in to SeeSnake pipe inspec-
tion systems.
Specifications
Weight (with DVDR) ......9.25 lbs (4.2kg) w/o Battery
10.65 lbs. (4.8 kg) with Battery
Weight (w/o DVDR).......5.75 lbs (2.6 kg) w/o Battery
7.15 lbs. (3.2 kg) with Battery

Rid e Tool Company 5
SeeSnake®DVDPak
Return Button: Brings up the Sony DVDR Menu.
D DR Button Controls
Figure 1 – DVDPak Components
D DPak Components
Sun Shade
DVDR Eject
Button
Shoulder Strap
DVDPak Display
DVDR Arrow
Buttons
DVDR Display
DVDR Enter/Select
Button
Disc Tray
DVDPak
Keypad
DVDR Power Button
DVDR Record
Button
Disc Tray Plug Seal
Dimensions (Closed):
Length .........................(35 cm) w/o Battery
Width ...........................9.1" (23 cm)
Height..........................5.3" (13'4 cm)
Power Source................100-240VAC/50-60Hz, AC or
18 VDC Rechargeable Battery
Battery Type..................1 x 18 V Li-Ion, 2.2 Ah
Power Rating.................14-16VDC 40W
12 VDC 30 W (DVR Only)
Operating Environment:
Temperature................40°F to 95°F (5°C to 35°C)
Humidity ......................5% to 95% RH
Storage Temperature....-4°F to 158°F (-20°C to 70°C)
Altitude ........................13120 feet (4000 meters)
Display...........................4.3" OLED (10.9 cm) or
5.7 LCD (14.47 cm)
Resolution .....................480 x 272 (OLED)
320 x 240 (LCD)
Operating temperature ranges for Display Only operation
(not using the DVDR):
4.3" OLED Display ......-40°F to 185°F (-40°C to 85°C)
5.7" LCD Display .........-4°F to 158°F (-20°C to 70°C)
Standard Equipment
• DVDPa
• 100-220VAC to 15VDC Power Converter and Supply
• Operatorʼs Manual
• Sony VRD-MC5 Digital Video Disc Recorder (DVDR)
• Instructional DVD
• RCA Cable
• Shoulder Strap
• Sony DVDR Operatorʼs Manual
Optional Equipment Cat # (US) Cat # (EU)
18 V Li-Ion Rechargeable Battery 32743 28218
Battery Charger 32068 32073
Dual Battery Kit with Charger 32648 32693
Single Battery Kit with Charger 32708 32713
The DVDPak is protected under U.S. and international
patents and patents pending.
Figure 2 – DVDPak Keypad
Sonde Key
Select
Key
DVDPak Display
Power Key
Zero Key
Arrow Keys
Flip
Key
icrophone
ute Key
enu Key Brightness Key
Power Button: Turns the DVDPa system ON or OFF. Also
controls display power.
Record Button: Starts the Sony DVDR recording.
Arrow Buttons: Highlight a menu selection.
Enter/Select Button: Chooses a highlighted menu option.
Stop Button: Stops recording or playback.
Eject Button: Opens the disc tray.

• Flammable liquids, vapors or dust that may ignite.
If present, do not work in area until sources have
been identified and corrected. The DVDPa is not
explosion proof. Electrical connections can cause
sparks.
• Clear, level, stable dry place for operator. Do not use
the machine while standing in water.
• Clear path to electrical outlet, that does not contain
any potential sources of damage for the power
cord, when using external power.
2. Inspect the work to be done If possible, determine the
drain access point(s), size(s) and length(s), pres-
ence of drain cleaning chemicals or other chemi-
cals, etc. If chemicals are present, it is important to
understand the specific safety measures required to
work around those chemicals. Contact the chemi-
cal manufacturer for required information.
3. Determine the correct equipment for the application.
The SeeSnake DVDPa is made to is made to view
and record inspections done with an inspection cam-
era. Inspection equipment for other applications can
be found by consulting the Ridge Tool Catalog, online
at www.RID ID.com or www.RID ID.eu.
4. Make sure all equipment has been properly inspected.
5. Evaluate the work area and determine if any barriers
are needed to keep bystanders away. Bystanders can
distract the operator during use. If working near traf-
fic, erect cones or other barriers to alert drivers.
6. If needed, remove fixture (water closet, sink, etc.)
to allow access.
D DPak Placement
Open the DVDPa sunshade and display and place it to
allow easy access and viewing while manipulating the
camera and pushrod for an inspection. Make sure that the
location is not wet and will not let the DVDPa and other
equipment get wet during use. The DVDPa is not water
resistant and exposure to wet conditions can cause elec-
trical shock or equipment damage.
Place camera and reel as instructed in their Operatorʼs
Manual. Ensure the DVDPa and cable reel are stable.
Pre-Operation Inspection
WARNING
Before each use, inspect your SeeSnake D DPak
and correct any problems to reduce the risk of se-
rious injury from electrical shock or other causes
and prevent machine damage.
1. Confirm that the power is off, any external power
and cords are disconnected, and the battery is re-
moved. Inspect the cords, cables and connectors
for damage or modification.
2. Clean any dirt, oil or other contamination from the
SeeSnake DVDPa to aid in inspection and to prevent
the unit from slipping from your grip while transporting
or using.
3. Inspect the DVDPa for any broken, worn, missing,
misaligned or binding parts, or any other condition
which might prevent safe, normal operation.
4. Inspect any other equipment being used per its in-
structions to make sure it is in good usable condition.
5. If any problems are found, do not use the unit until the
problems are corrected.
Work Area and Equipment
Set Up
WARNING
Set up the D DPak and work area according to
these procedures to reduce the risk of injury from
electrical shock, fire, and other causes, and to pre-
vent damage to the D DPak.
1. Check work area for:
• Adequate lighting.
Rid e Tool Company
6
SeeSnake®DVDPak

Rid e Tool Company 7
SeeSnake®DVDPak
Connecting the D DPak
Figure 4 – Connecting System Plug to DVDPak System
Connector
When connecting/disconnecting the SeeSnake
system cable, turn only the locking sleeve. To prevent
damage, do not bend or twist the connector or cable.
SeeSnake System Cable
Unwrap the SeeSnake System Cable from its holder and
match the System Cable plug to the matching SeeSnake
System Connector on the DVDPa . To join the con-
nectors, align the guide pin to the guide socket, push the
connector straight in and tighten the outer locking sleeve.
NOTE! A guide ridge molded into the top of the cable
connector will point up when the plug is correctly
aligned.
External onitor Options
1. The DVDPa may be used with an external SeeSnake
monitor by connecting an RCA cable found in the
pouch attached to the shoulder strap, from the Video
Out port on the monitor. Connect the other end of the
cable to the yellow DVDPa video input port on the
back of the DVDPa , marked with .
2. The A/V out port will pass through live video
from the camera and live audio from the microphone
out to another DVDR or monitor. (If connected to a
monitor which has speakers it may cause a feedback
squeal; this can be prevented by muting the micro-
phone with the Mute Switch).
The A/V out port does not transmit recorded video or
audio output from the Sony DVDR.
Figure 5 – DVDPak with SeeSnake
Powering The SeeSnake D DPak
The SeeSnake DVDPa can either be powered with
RID ID Li-Ion rechargeable battery or plugged in to
an outlet using a supplied AC/DC power converter.
Battery power is the preferred powering method to re-
duce the risk of electrical shock. Additionally, the
power converter is not rated for outdoor use and
should only be used indoors.
SeeSnake System Connector
Connection Icons
Figure 3 – DVDPak Connections
Transmitter Clip-on
Terminal
Power Input For
DVDPak
Power Input For
Sony DVDR Only
SeeSnake
System
Connector A/V Out
Video In icrophone
ute Switch
Video In Plug
A/V out Jack
Transmitter Clip-on Terminal
DVDPak Power Jack
DVDR-Only Power Jack
Guide Ridge
NOTICE

Rid e Tool Company
8
SeeSnake®DVDPak
Battery Power
With dry hands, slide a fully charged battery onto the bat-
tery dock on the back of the DVDPa .
Figure 6 – Battery Installed
Make sure that the battery locks onto the dock. See the
Battery Charger operator’s manual for more information.
Batteries supplied for the DVDPa are rated at 2.2 amp-
hours. When fully charged, depending on use (recording
time, etc.) the DVDPa will run for approximately 2.5 to 3
hours. Battery Status LEDʼs indicate battery charge level
(Figure 7).See Battery Status LEDs Chart.
Figure 7 – Battery Status LEDs
Battery Status LEDs Chart
Outlet Power
For plug in operation, a double insulated AC/DC power
supply is supplied to reduce wall outlet voltage to the cor-
rect voltage for the DVDPa .
The external power supply is intended for in-
door use only.
To power the system up with the power cord, locate
the power supply. The power supply cord has two sec-
tions, one of which plugs into a standard 110-120V two-
bladed outlet (US) at one end and plugs into a power
supply at the other end. The second section runs from
the power supply to the back of the DVDPa and plugs
into the jack marked 40 Watts—14-16V at the far right
side of the back of the unit (Figure 8).
Figure 8 – Connected External Power Supply
With dry hands, connect the two sections together and in-
sert the jack plug into the jack on the back of the DVDPa .
Route the cord along a clear path and with dry hands plug
the power supply into a matching outlet. If using an ex-
tension cord ensure it is of adequate wire gauge. For
cords of 25 feet, a minimum gauge of 18AW is re-
quired. For cords greater than 25 feet, a minimum gauge
of 16 AW is required.
Monitor And D DR Power-up
Once connections are in place and batteries installed (if
used), you can power up the DVD Recorder and the
DVDPa monitor with a single press of the Power Button
. You can also power the monitor independently by
pressing the Power Key on the keypad. This lets you
use the monitor without powering up the recorder to con-
serve battery power.
If you power the monitor on separately using the
display Power Key , remember to turn it off using
the display Power Key. If you power both monitor
and DVDR up by pressing only the Power Button
on the DVDPak, they can both be turned off using
the same button.
Battery External External
Status Power Not Power
Connected Connected
FULL Solid green Green blinking
(5 sec OFF 0.2 ON)
MED Solid green and red Green and red blinking
(5 sec OFF 0.2 ON)
LOW Solid red, 4 beeps Red blinking
(5 sec OFF 0.2 ON)
DEAD Solid red for 5 sec,
5 sec long beep
and shutdown
NOTICE

Units Setting
The DVDPa can be set to display distance in meters or
feet, or to allow the setting to be selected automati-
cally. (This applies to SeeSnake systems equipped with
CountPlus digital distance counters only.) To set the
unit option:
1. With the DVDPa powered on, press the Menu Key
.
2. Use the Arrow Keys to scroll down to Unit.
3. Use the Select Key to move from Feet to Meters
or Auto.
4. When the choice you prefer is highlighted, simply
press the Menu Key again to close the menu.
Color Setting
The DVDPa display can be adjusted for greater color
density in the display. To adjust the color:
1. With the DVDPak powered on and connected to a
See Snake camera, press the Menu Key .
2. If the Color option is not highlighted on the Menu, use
the Arrow Keys to scroll to the Color option.
3. Use the Arrow Keys to adjust the color to your
preference.
4. When the display suits your requirements, simply
press the Menu Key again to close the menu.
Contrast and Brightness Setting
Use the same steps shown under Color Setup to adjust
the Contrast and Brightness settings of the display.
Note that you may want to adjust these again during the
inspection depending on light and color conditions inside
the pipe. You can also access the Brightness control di-
rectly simply by pressing the Brightness Key .
Rid e Tool Company 9
SeeSnake®DVDPak
D DPak Settings
The following settings may need to be checked or modi-
fied depending on where and how you are using the
DVDPa .
Video Display Setting
If you do not see the camera view in the display, you
may need to do the following (Figure 9):
1. Press the Return button on the left side of the
DVDPa control pad. A menu will appear.
2. Using the Arrow Buttons highlight the Video
DVD option and press the Enter button.
3. Using the Arrow Buttons highlight the VIDEO IN
option and press the Enter button.
These steps inform the unit of the correct source for dis-
play.
Auto-Chapter Setting
The Auto-Chapter setting will serve best if it is set to
“Off”, meaning that the recorder will start a new chapter
each time you pause the recording. To do this, press the
Return Button to access the Main Menu and select
“Setup”. Arrow down to Auto-Chapter and press Enter
. Toggle the setting to “Off” using the Arrow Buttons
and press Enter .
NTSC/PAL Video Setting
It may be necessary to set your recorder to format discs
to the same color format as the camera is sending it. The
Color System options are NTSC (U.S.) or PAL (Europe).
The unit will not record if the color system conflicts with
the disc format. To set the Color System option:
1. Press the Return button to access the main menu.
2. Press the Arrows to highlight Setup and press
Enter to bring up the Setup Menu.
3. Arrow down to Color System and press Enter.
4. Use the Arrow Buttons to highlight the correct
color system (NTSC for U.S. and PAL for Europe, for
example).
5. Press Return to go up to the Main Menu, and repeat
steps 2 and 3 of Video Display Setting (on page 9).
The setting that is in place in the setup menu at the
time of formatting the disc determines the discʼs for-
mat. You can display either PAL or NTSC input on the
DVDPak, regardless of how the “Color System” is set
in the Sony Unit. However, after you have formatted a
DVD, you can only record in the color system that
was in effect when the disc was formatted.

Rid e Tool Company
10
SeeSnake®DVDPak
Arrow Keys: Used to move among menu choices and adjust
variables (such as contrast) up and down.
Keypad Controls
Select Key: Used to choose options in the Units menu (Auto,
Meters and Feet).
enu Key: Used to bring up a menu of display options such
as Color, Brightness, Contrast, Units.
Brightness Key: Used to directly control the camera LEDʼs
brightness up or down.
icrophone ute Key: Used to mute the microphone while
recording or activate it to record comments during an inspec-
tion.
Sonde Key: Used to activate the built-in Sonde for tracing
the location of the camera head.
Flip Key: Used to flip the image on the display vertically
(5.7" LCD display only).
Return Button: Brings up the Sony DVDR Menu.
D DR Button Controls
Power Button: Turns the DVDPa system ON or OFF. Also
controls display power.
Record Button: Starts the Sony DVDR recording.
Arrow Buttons: Highlight a menu selection.
Enter/Select Button: Chooses a highlighted menu option.
Stop Button: Stops recording or playback.
Eject Button: Opens the disc tray.
D DPak Controls
Zero Key: Used to establish a temporary zero-point for the
distance counter for units equipped with the CountPlus.
Display Power Key: Used to power the DVDPa display
on or off. Does not control DVDR power.
Battery Level: Indicates the charge state of the battery.
D DPak Display Icons
icrophone Off: Appears when the microphone has been
switched off.
Sonde: Appears when the Sonde is switched on.
Brightness Control: Appears when adjusting the display
brightness.
Figure 9 – DVDPak Controls
Eject Button
icrophone
Arrow
Buttons
Keypad
Power Button
Record Button
Stop Button
Return Button
Figure 10 – DVDR Buttons
Eject
Button
Arrow
Buttons
Power Button Stop
Button
Return Button
Record Button
DVDR Enter/Select
Button
DVDR Display

Rid e Tool Company 11
SeeSnake®DVDPak
Operating Instructions
WARNING
Always wear eye protection to protect your eyes
against dirt and other foreign objects.
When inspecting drains that might contain haz-
ardous chemicals or bacteria, wear appropriate
protective equipment, such as latex gloves, goggles,
face shields or respirators, to prevent burns and in-
fections.
Do not operate this equipment if operator or ma-
chine is standing in water. Operating machine while
in water increases the risk of electrical shock.
Rubber soled, non-slip shoes can help prevent slip-
ping and electric shock, especially on wet sur-
faces.
Follow operating instructions to reduce the risk of
injury from electrical shock and other causes.
Starting Up
1. Check the unit is properly set up.
2. Connect the DVDPa either to the SeeSnake camera
directly or to an external SeeSnake monitor using the
RCA cable.
3. Place the camera head into the reelʼs guide hoop and
turn the DVDPa ʼs power on .
4. If there is a disc in the DVD tray, the system will do a
disc check. It will ask for a disc if none is found.
5. To insert a disc, press the Eject button and insert
a blank DVD-R or DVD-RW into the tray. Close the
tray by pressing the Eject Button.
ake sure the plug seal is opened before
ejecting the disc tray. This will avoid damaging the
tray mechanism.
6. If the system finds an unformatted disc it will ask
permission to format it. Press RETURN to format.
The unit will not record to an unformatted disc.
7. Close the DVDPa disc tray front plug seal to protect
against dust and moisture.
Figure 11 – DVD Tray Open
Once a formatted disc is detected, the camera view
should appear on both the DVDR screen and the DVDPa
monitor. If you do not see the camera view on the display,
the source for the display needs to be changed. (See
Video Display Settings on page 9.)
Figure 12 – Camera Image Display On DVDR Screen
Inspecting The Line
1. Power up the DVDPa if it is off.
2. Put the camera head in the line.
3. Proceed with pipe inspection as described in your
SeeSnake manual.
Brightness Adjustment
You may find you need to increase or decrease the
camera LED brightness while inspecting the inside of a
NOTICE

Rid e Tool Company
12
line, depending on conditions. To do so simply press the
Brightness Key and raise or lower the brightness
level using the Arrow Key . Press the Menu Key
when done.
Image Rotation
While doing an inspection the camera may become ro-
tated in the line and present an inverted image. If you are
using a DVDPa with a 5.7" LCD display, the Flip Key
will rotate the image on the screen (flip it vertically)
for easier viewing. (This feature is not supported on
the 4.3" OLED display.) The recorder will capture the
image as it is displayed.
CountPlus Control
If you are using a SeeSnake reel equipped with the
CountPlus distance counter, the measured distance will
appear on the DVDPa display. If you want to set an in-
terim zero-point to measure distance from some loca-
tion (such as a junction or pipe-head) pressing the
DVDPa Zero Key will start a temporary distance
count, with the number displayed in square brackets
[0.0]. A second short press will return to the main count.
A long press (3 seconds) will re-zero the main distance
counter.
For details on using the CountPlus see the CountPlus
manual. CountPlus parameters such as date and time are
set using the CountPlus menu key and going to the
CountPlus Tools menu. CountPlus text overlays are man-
aged with the CountPlus keypad as described in the
CountPlus Operator's Manual.
Recording An Inspection
When a new disc is inserted the DVDR will format the disc
for recording, providing a camera is connected.
If necessary, follow the steps under Video Display Settings
(page 9) to choose Video In as the input.
Jogging or moving the unit during recording
may physically damage the disc and cause the DVD to be
unplayable. Losing power to the unit during recording
will cause the loss of unsaved chapters.
Basic Recording
The basic technique for recording is straightforward.
1. Position the camera in the line where you would like
to start recording.
2. Press the Record button. The display will show
“Recording”. Audio is being recorded automatically
through the built-in microphone unless it has been
muted with the Microphone Mute Key (See Figure
3.)
3. To PAUSE press the Record button. Press it a-
gain to resume.
4. To STOP recording press the Stop button . After a
brief pause to end the current chapter, the display will
again show the present camera view with the amount
of remaining recording time available on the current
disc showing under it.
Sound Recording
The built-in microphone for DVDPa sound recording is
located just to the right of the monitor display screen. In
a windy or noisy environment you may prefer to have the
microphone muted during an inspection while recording
only the video from the camera. You may want to turn
the microphone on to record comments during the in-
spection. To toggle the microphone on and off, simply
press the Microphone Mute Key . An audio mute icon
will appear when the microphone is muted and will
disappear when the microphone is active.
Finalizing a Disc
When using a DVD/R disc for recording, the DVD cannot
be played back on any other unit until the DVD is finalized.
Once a disc has been finalized, it cannot be recorded to
again. A disc that has been finalized will show a row of se-
lectable chapters on start up. RW discs do not require fi-
nalizing and can be added to
1. Once you have been prompted to finalize the disc, if
you choose to finalize it, use the arrow buttons to high-
light “Yes” and press Enter. (See Figure 13.) If you do
not want to finalize the disc, highlight “No” with the
Arrow Buttons and press the Enter Button.
Figure 13 – “Finalize a Disc” Option
2. A notice will be displayed stating that after finalizing,
no further recording is allowed. (See Figure 14.)
Select “OK” to start finalizing.
SeeSnake®DVDPak
NOTICE

Rid e Tool Company 13
Figure 14 – Finalization Warning
3. The finalizing process may take several minutes de-
pending on the amount of recorded material. Once fi-
nalizing is complete, the disc will eject.
Discs can also be finalized by pressing the Return
Button, choosing Setup and then choosing Finalize
from the menu.
Playing Back Recorded ideo
To play back a recorded chapter, press the RETURN
button to bring up the Menu and highlight DVD
Preview. Then press the Select button .
If the disc has not been finalized, the last recorded video
will appear and play back in the DVDR screen.
If the disc has been finalized, a series of thumbnails for
the existing chapters recorded on the disc will be dis-
played. Highlight the one you want to play and press the
Select button again to start it. (Audio will not be heard
when previewing video on the DVDPa but will play on a
DVD player or computer if recorded.) To return to the
recording mode, press the Return button to go back to
the Menu and highlight Video DVD. Press Select, high-
light Video In and press Select again. The unit is now
ready to record to either an RW or an un-finalized disc.
Locating The Camera Using The Sonde
Many SeeSnake pipe inspection systems have a built-in
Sonde which transmits a locatable 512 Hz signal. When
the Sonde is turned on, a locator such as the RID ID
SR-20, SR-60, Scout™ or NaviTrack®II set to 512 Hz will
be able to detect it, allowing you to detect the cameraʼs lo-
cation underground.
To turn the SeeSnake Sonde on while using the DVDPa ,
press the Sonde Key . A Sonde icon will appear on the
display while the Sonde is on. The display may also
show some lines of interference from the Sondeʼs trans-
mission.
These will vanish when the Sonde is turned off by again
pressing the Sonde Key .
The most workable approach to tracking the Sonde is to
run the pushrod into the pipe about five or ten feet (1.5
to 3 meters) and use the locator to find the Sondeʼs po-
sition. If desired, you can then extend the pushrod a sim-
ilar distance further down-pipe and locate the Sonde
again starting from the previous located position. To
locate the Sonde, turn the locator on and set it to Sonde
mode. Scan in the direction of the Sondeʼs probable lo-
cation until the locator detects the Sonde. Once you
have detected the Sonde, use the locator indications to
zero in on its location precisely. For detailed instructions
on Sonde locating, consult the Operatorʼs Manual for the
locator model you are using.
Line Tracing The SeeSnake Push Cable
In addition to being able to trace a Sonde built into the
system camera, the DVDPa also enables you to trace
the line of the SeeSnake push cable underground, using
a standard RID ID locator such as the NaviTrack®II,
the Scout™, the SR-20 or the SR-60. To line-trace the
SeeSnake push cable, simply connect a line transmitter
with one connector well-grounded using the grounding
stake, and the other connector clipped to the DVDPa ʼs
Transmitter Clip-on Terminal. The Transmitter Clip-on
Terminal is a metal lug located just to the right of the bat-
tery. (See Figure 3.)
Set the line transmitter and the locator to the same fre-
quency, such as 33 kHz and use the locator to trace the
line (Figure 15). The cameraʼs built-in Sonde may be on
at the same time, and if your locator is equipped with
SimulTrace™ capability, you can follow the pushrod all the
way to the cameraʼs location and then detect the Sonde in
the camera as you approach it above ground.
Figure 15 – Line Tracing the Pushrod
SeeSnake®DVDPak

Rid e Tool Company
14
SeeSnake®DVDPak
If you donʼt have the SimulTrace™ feature, use a line
transmitter and a locator to line-trace the pushrod. When
the signal fades, switch the locator to Sonde mode at the
frequency of the in-line Sonde, usually 512 Hz. Pick the
signal up from where the line-trace frequency started to
weaken and zero in on the in-line Sonde. Because locat-
ing frequencies from transmitters can cause distortion of
the image on the monitor, it is best to turn Sonde and line
transmitters off while inspecting the interior of a line and
turn them on only when ready to do a locate.
Maintenance Instructions
Cleaning
WARNING
Make sure all cords and cables are disconnected
and the battery removed prior to cleaning the
D DPak to reduce the risk of electrical shock.
Do not use liquid or abrasive cleaners on the DVDPa .
Clean the DVDPa with damp cloth. Only use cleaners ap-
proved for use on LCD screens to clean the screens.
Do not allow any liquid to enter the DVDPa .
Accessories
WARNING
The following accessories have been designed to
function with the D DPak. Other accessories suit-
able for use with other equipment may become
hazardous when used with the D DPak. To reduce
the risk of serious injury, only use accessories
specifically designed and recommended for use
with the D DPak, such as those listed below.
Transport And Storage
Remove batteries before shipping. Do not expose to
heavy shocks or impacts during transport. If storing for an
extended period, remove batteries. Store within temper-
ature range of -4°F to 158°F (-20°C to. 70°C).
Store electrical devices in a dry place to reduce the risk of
electrical shock.
Protect against excessive heat. The unit should be situated
away from heat sources such as radiators, heat registers,
stoves or other products (including amplifiers) that produce
heat.
Service And Repair
WARNING
Improper service or repair can make the D DPak un-
safe to operate.
Service and repair of the DVDPa must be performed by
a RID ID Independent Authorized Service Center.
For information on your nearest RID ID Independent
Service Center or any service or repair questions:
• Contact your local RID ID distributor.
• Visit www.RID ID.com or www.RID ID.eu to find
your local Ridge Tool contact point.
• Contact Ridge Tool Technical Services Department
at rtctechservices@emerson.com, or in the U.S. and
Canada call (800) 519-3456.
Disposal
Parts of the unit contain valuable materials and can be re-
cycled. There are companies that specialize in recycling
that may be found locally. Dispose of the components in
compliance with all applicable regulations. Contact your
local waste management authority for more information.
For EC Countries: Do not dispose of electrical equip-
ment with household waste!
According to the European uideline
2002/96/EC for Waste Electrical and
Electronic Equipment and its implemen-
tation into national legislation, electrical
equipment that is no longer usable must
be collected separately and disposed of in an environ-
mentally correct manner.
Catalo # Description
US EU
32743 28218 18 V Li-Ion rechargeable battery
32068 32073 Battery charger
32648 32693 Dual battery kit with charger
32708 32713 Single battery kit with charger
Various RIDGID SeekTech®or NaviTrack®Locator
Various RIDGID SeekTech®or NaviTrack®
Transmitters

Rid e Tool Company 15
Battery Disposal
For USA and Canada: The RBRC™
(Rechargeable Battery Recycling Cor-
poration) Seal on the battery packs
means that RID ID has already paid
the cost of recycling the lithium-ion
battery packs once they have reached
the end of their useful life.
RBRC™, RID ID®, and other battery suppliers have de-
veloped programs in the USA and Canada to collect and
recycle rechargeable batteries. Normal and recharge-
able batteries contain materials that should not be di-
rectly disposed of in nature, and contain valuable materials
that can be recycled. Help to protect the environment
and conserve natural resources by returning your used
batteries to your local retailer or an authorized RID ID ser-
vice center for recycling. Your local recycling center can
also provide you with additional drop off locations.
RBRC™ is a registered trademark of the Rechargeable
Battery Recycling Corporation.
For EC countries: Defective or used battery packs/bat-
teries must be recycled according to the guideline
2006/66/EC.
SeeSnake®DVDPak

Rid e Tool Company
16
SeeSnake®DVDPak
Camera video image not
seen.
Flashing Battery Warning
appears.
No power to SeeSnake.
Connections faulty.
Display set to wrong source.
Batteries Low.
DVDPa 18 V batteries low.
Check power is correctly plugged in or battery is
charged.
Check switch on on DVDPa .
Check connection to DVDPa unit from SeeSnake.
Check seating, and pins in SeeSnake connection.
Set-up as described in Video Display Set-up.
Recharge batteries or connect external power sup-
ply.
Recharge DVDPa batteries. Switch to AC power
(110/220VAC).
PROBLEM PROBABLE FAULT LOCATION SOLUTION
Chart 1 Troubleshooting

SeeSnake®D DPak
SeeSnake®DVDPak
OLED LCD
SeeSnake®DVDPak
Notez ci-dessous, pour future référence, le numéro de série indiqué sur la plaque signalétique de l’appareil.
Nº de
série
A ERTISSEMENT
Familiarisez-vous bien avec le
mode d’emploi avant d’utiliser
l’appareil. L’incompréhension ou
le non-respect des consi nes ci-
après au menteraient les risques
de choc électrique, d’incendie
et/ou d’accident rave.

Rid e Tool Company
18
Table des matières
Fiche d’enregistrement du numéro de série de l’appareil ......................................................................................17
Symboles de sécurité ................................................................................................................................................19
Consignes générales de sécurité
Sécurité des lieux......................................................................................................................................................19
Sécurité électrique ....................................................................................................................................................19
Sécurité individuelle..................................................................................................................................................19
Utilisation et entretien du matériel ............................................................................................................................20
Utilisation et entretien des piles ................................................................................................................................20
Service après-vente..................................................................................................................................................20
Consignes de sécurité spécifiques ..........................................................................................................................21
Sécurité du DVDPak ................................................................................................................................................21
Description, caractéristiques techniques et équipements de base
Description................................................................................................................................................................21
Caractéristiques techniques......................................................................................................................................22
Équipements de base ..............................................................................................................................................22
Accessoires disponibles............................................................................................................................................22
Composants du DVDPak............................................................................................................................................22
Touches du DVDR....................................................................................................................................................23
Contrôle préalable ......................................................................................................................................................23
Préparation des lieux et du matériel..........................................................................................................................23
Positionnement du DVDPak ....................................................................................................................................24
Raccordement du DVDPak ......................................................................................................................................24
Icônes de branchement ............................................................................................................................................24
Mise en route du SeeSnake DVDPak ......................................................................................................................25
Mise en route du moniteur et du DVDR....................................................................................................................26
Réglages du DVDPak..................................................................................................................................................26
Commandes du DVDPak ............................................................................................................................................28
Touches du clavier....................................................................................................................................................28
Touches du DVDR....................................................................................................................................................28
Icônes dʼaffichage du DVDPak ................................................................................................................................28
Consignes d’utilisation ..............................................................................................................................................29
Mise en route ............................................................................................................................................................29
Inspection des canalisations ....................................................................................................................................29
Enregistrement dʼune inspection ..............................................................................................................................30
Lecture dʼune vidéo enregistrée................................................................................................................................31
Localisation de la caméra à lʼaide de la sonde ........................................................................................................31
Traçage du câble SeeSnake à lʼintérieur dʼune conduite..........................................................................................32
Consignes d’entretien ................................................................................................................................................32
Nettoyage..................................................................................................................................................................32
Accessoires ................................................................................................................................................................32
Transport et stockage ................................................................................................................................................32
Révisions et réparations ............................................................................................................................................33
Recyclage ....................................................................................................................................................................33
Recyclage des piles....................................................................................................................................................33
Dépannage ..................................................................................................................................................................34
SeeSnake®DVDPak
Other manuals for SeeSnake DVDPak
1
This manual suits for next models
1
Table of contents
Languages: