Rieber thermoport Series User manual

CE
thermoport
®
•A patended system from Rieber which does more than just transport
•For cooling / hot holding / regenerating / cooking – or several tasks at the same time
•Various stainless steel and plastic thermoport
®
- versions available
Original user guide
Edition 28.05.2010

2 05/2010 Rieber GmbH & Co KG
1. Introduction
This guide contains important information about how you can use the product safely and correctly.
IMPORTANT
Protect yourself against potential hazards and prevent damage to your product.
•It is essential that you read the user guide before using the product for the
first time.
•Keep this user guide in a safe place and pass it onto the next owner should you wish to
part with the product.
Customers have often expressed their demand for a compact manual, as an alternative
to numerous instructions for product variants with similar functions.
If there are any deficits from your point of view, please do not hesitate to let us know.
With your help, we will try to get even better.
Address of manufacturer:
Rieber GmbH & Co. KG
Hoffmannstraße 44
D-72770 Reutlingen
Germany
Internet www.rieber.de
Tel +49 7121 518-0
Fax +49 7121 518-300

Rieber GmbH & Co KG 05/2010 3
Contents
1.
Introduction...........................................................................................................................................................2
2.
Description of product...........................................................................................................................................4
2.1 Brief description of appliances...................................................................................................................................4
2.2 Identification of components......................................................................................................................................4
2.3 Operating and display elements................................................................................................................................5
2.4 Product data..............................................................................................................................................................5
3.
Purpose ................................................................................................................................................................6
3.1 Applies to thermoport
®
...............................................................................................................................................6
3.2
thermoport
®
hybrid 140 and hybrid 200..........................................................................................................6
3.3 thermoport
®
with controllable circulating air heating .................................................................................................7
3.4 thermoport
®
with non-controllable circulating air heating...........................................................................................7
3.5 thermoport
®
toploader with non-controllable heating ................................................................................................7
3.6 thermoport
®
with controllable cooling........................................................................................................................7
4.
General safety instructions ...................................................................................................................................7
4.1 Basic rules.................................................................................................................................................................7
4.2 On use of electrical appliances.................................................................................................................................8
4.3 Warnings and explanation of icons............................................................................................................................8
4.4 Appliance-specific safety instructions........................................................................................................................9
4.4.1 Safety and monitoring devices...........................................................................................................................9
4.4.2 Dangers due to electricity.................................................................................................................................10
4.4.3 Danger by unstable position..............................................................................................................................10
4.4.4 Dangers due to hot surfaces, burns and explosions ........................................................................................10
4.4.5 Avoid material damage during transport ..........................................................................................................11
4.5
Information about regulations to be followed..................................................................................................11
4.6
What to do in an emergency ..........................................................................................................................11
5.
Before first use....................................................................................................................................................11
5.1 Transport................................................................................................................................................................11
5.1.1 Check / handle any transport damage .............................................................................................................11
5.1.2
Unpacking .................................................................................................................................................11
5.1.3 Dispose of packaging material.........................................................................................................................12
5.1.4
Clean the appliance...................................................................................................................................12
5.2 Commissioning / recommissioning .........................................................................................................................12
5.2.1
Preconditions.............................................................................................................................................12
5.2.2
Applies to all heatable versions of thermoport
®
.........................................................................................12
5.2.3
thermoport
®
with controllable cooling .......................................................................................................12
6.
Use of control panels..........................................................................................................................................13
6.1 Use of the thermoport
®
hybrid .................................................................................................................................13
6.1.1
The control panel of the thermoport
®
hybrid..............................................................................................13
6.1.2
Use............................................................................................................................................................14
6.1.3
Besonderheit des thermoporthybrid
®
200..................................................................................................19
6.2
Use of thermoport
®
with controllable circulating air heating ...............................................................................20
6.3
Use of thermoport
®
with non-controllable circulated air heating.........................................................................20
6.4
Use of the thermoport
®
toploader with non controllable heating.........................................................................20
6.5
Use of thermoport
®
with controllable cooling......................................................................................................21
6.6
The control panel of the thermoport
®
..................................................................................................................21
7.
General information on using the product...........................................................................................................22
7.1 Keep to the basic rules for operating the product...................................................................................................22
7.2 Before use..............................................................................................................................................................23
7.3 After use.................................................................................................................................................................23
8
Cleaning, maintenance and care ........................................................................................................................24
8.1 Avoid dangers due to hot parts and surfaces .........................................................................................................24
8.2 Avoid dangers due to electricity..............................................................................................................................24
8.3 Choose the correct cleaning method.......................................................................................................................25
8.4 Clean and service stainless steel parts...................................................................................................................25
8.5 Clean and service plastic parts...............................................................................................................................25
8.6 Cleaning the casters................................................................................................................................................25
8.7 Clean the seal(s)......................................................................................................................................................26
8.8
Clean ventilation grille at least every 4 weeks.....................................................................................................26
8.9
Dry the appliance to keep it ready for next use...................................................................................................26
9
Fault - What now?...............................................................................................................................................27
10.
Warranty and liability...........................................................................................................................................27
11.
Information about applicable standards, laws, guidelines...................................................................................28
12.
Technical data.....................................................................................................................................................28

4 05/2010 Rieber GmbH & Co KG
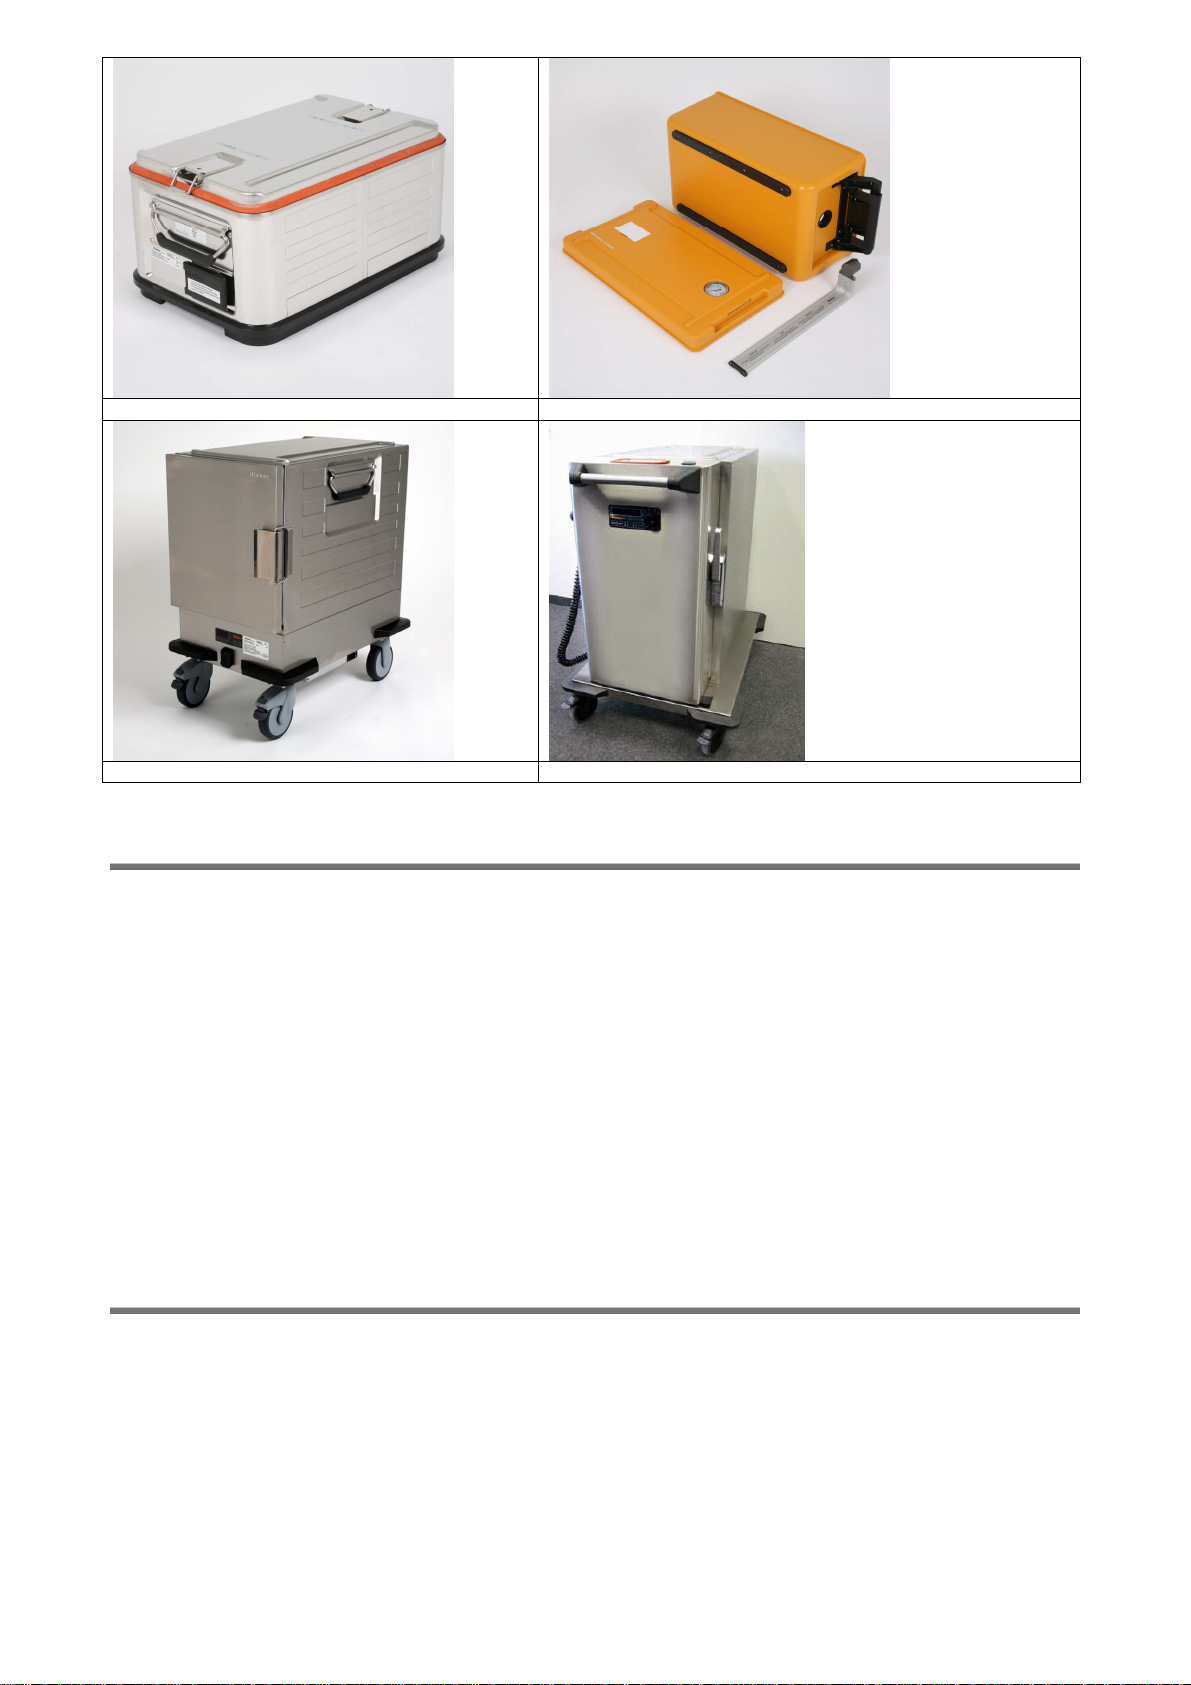
2. Description of product
2.1 Brief description of appliances
thermoport
®
- for hot holding, cooling, transporting and serving of meals. In plastic and stainless steel.
thermoporthybrid
®
– for cooking, baking, regenerating, cooling and serving of meals.
2.2 Identification of components
Identifies the parts which are important for understanding the subsequent sections.
1. Retainer for electrical mains plug
2. Impact protection
3. Wearing strips, replaceable
4. Caster
5. Ventilation grille
6. Type plate
Thermoporthybrid
®
140 thermoport
®
with controllable circulating air heating
thermoport
®
with controllable circulating air heating thermoport
®
with non-controllable circulating air heating
6
2
4
18
7
9
8
10
5
1
1
14
12
13
12
11
Rieber GmbH & Co KG 05/2010 5
thermoport
®
toploader with non controllable heating thermoport
®
toploader with non controllable heating
thermoport
®
with controllable cooling thermoporthybrid
®
200
2.3 Operating and display elements
7 Handle
8 Lock
9 Locking bar
10 Water tank
11 Removeable door / lid
12 Removeable heating / ventilation
13 Core temperature sensor
14 Steam valve opening
15 Control panel
16 Temperature display
17 Cover / use as required
18 Insulated divider
2.4 Product data
The product data is indicated on the type plate (control panel).
For detailed information on dimensions, order number, accessories:
Please refer to the catalogue
If you have any questions, please contact your local Rieber Service.
6
8
16
2
3
6 7
15
17
12
8
15
10

6 05/2010 Rieber GmbH & Co KG
3. Purpose
3.1 Applies to thermoport
®
Generally, the following are intended uses for the product:
•For mobile meal services in catering, hotels and restaurants; but also for managed
care facilities and schools.
•Depending on the specific intended use, only use the product for pre-cooled or pre-
heated meals.
•To prevent persons from burning themselves on hot surfaces, use of the product in
public / for self-service should only be allowed under constant supervision.
•Wear personal safety gear such as protective gloves which will prevent you from
burning your arms or hands on the hot parts, such as the heating, hot parts, objects
and meals.
•For use by instructed adults only.
CAUTION! During transport of thermoport
®
dors / lids must be closed and locked.
•Comply with hygiene requirements according to HACCP.
Prevent any potential misuse in advance:
WARNING! Never operate the product unsupervised.
•Not intended for private use at home.
•Do not lean against or sit on this product.
•Keep any combustible or explosive fluids away from heatable appliances. Otherwise
a fire or explosion may arise.
•Never heat anything other than food.
•Do not use to heat up a room.
•Do not push or pull the product over sharp edges; otherwise the casters may be
damaged.
•Do not use this product under unfavorable floor conditions.
We are not able to rule out the possibility of marks appearing on the floor due to
friction with casters or the formation of scratches due to split cracks in the casters.
We are not able to rule out the possibility that the castors may be damaged or
become unusable due to swelling or sharp edges on the floor.
•Mobile appliances may only be moved manually. Machine-aided transport, e.g. using
fork lift trucks or lift trucks, is not permissible. Risk of injury and risk of damaging the
appliance.
3.2 thermoport
®
hybrid 140 and hybrid 200
The special functional door with separately controlled heating systems and fans gives the hybrid kitchen its
unique hybrid functionality.
The electronic control offers the choice of four settings as well as the combi-steamer mode.
Using the product as per the specific specifications:
•For hot holding and / or cooling.
•For simmering – chamber temperature, time and steam can be adjusted.
•Core temperature — Core temperature, Chamber temperature and steam can be
adjusted.
•Fan (passive cooling) — passive cooling with cooling pellets + circulating air
•Hybrid — passive cooling with cooling pellets and circulating air (top);
chamber temperature, time and steam can be adjusted at the bottom.
•Chamber temperatures — chamber temperature and time can be adjusted at the top
chamber temperature, time and steam can be adjusted at the bottom.

Rieber GmbH & Co KG 05/2010 7
•Heating up to a maximum temperature 140°C. / 200°C
3.3 thermoport
®
with controllable circulating air heating
The circulating air ensures a particulary uniform and quick temperature distribution.
Using the product as per the specific specifications:
•For hot holding of meals with heated circulating air.
•Heating up to100°C with type 1000 - 3000/CN;
Heating up to 85°C with type 1000 K unit.
3.4 thermoport
®
with non-controllable circulating air heating
Using the product as per the specific specifications:
•For hot holding of meals with heated circulating air.
•Heating up to 95°C with type 600 K / 1000 K / 6000 K.
3.5 thermoport
®
toploader with non-controllable heating
Using the product as per the specific specifications:
•For hot holding of meals with heated water / water vapour.
•Heating up to 95°C with type 50 KB / 100 KB / 105.
3.6 thermoport
®
with controllable cooling
Using the product as per the specific specifications:
•For cold holding meals.
•Cool holding at +2 to +8°C.
4. General safety instructions
This section covers residual risks and hazards associated with the intended use of the product. We have provided a list
of all generally valid safety instructions which must be followed.
Safety information relating to a particular operation or situation are placed before the appropriate operation step or
description of the situation in the following section.
4.1 Basic rules
This product meets the current state of the art and complies with all acknowledged
technical safety-related regulations. Nevertheless hazards may still arise.
•Only use this product when it is in fault-free condition and according to the
instructions in this user guide.
•During all phases of the product's life please ensure that the product is safely
integrated into its environment.
•Do not make any conversions or modifications to the product.

8 05/2010 Rieber GmbH & Co KG
4.2 On use of electrical appliances
Work area
•Keep your work area clean and tidy. A messy or unlit work area can cause
accidents.
•Keep children and other persons at a distance when using the product.
Electrical safety
•The plug on the unit must fit in the socket. Do not modify the plug in any way.
Never use an adapter in combination with earthed appliances. Using an
unmodified plug and a suitable socket will reduce the risk of an electric shock.
•Avoid bodily contact with earthed surfaces such as pipes, heating units,
cookers and refrigerators. The risk of an electric shock is greater when your body
is earthed.
•Keep the appliance away from rain or damp. Allowing water to get into an electric
appliance will increase the risk of electric shock.
•Do not misuse the cable by using it to remove the plug from the socket. Always
remove whilst holding onto the plug. Keep the cable away from heat, oil, sharp
edges or the moving parts of other appliances. Using damaged or tangled cables
increases the risk of electric shock.
•When working with an appliance outdoors, only use extension cables which
are permitted for outdoor use. Using an extension cable suitable for outdoor use
reduces the risk of electric shock.
Safety guidelines for persons
•Be attentive and pay attention to what you are doing, act rationally when
working with an electrical appliance. Do not use the appliance when tired or
under the influence of drugs, alcohol or medication.
Just one moment of inattention whilst using the appliance can result in serious injury.
•Make sure the appliance cannot be switched on unintentionally. Double check
that the main switch is in the "OFF" position before inserting the plug in the
socket. Connecting the appliance to the power supply while it is switched on
can cause an accident.
Careful handling and use of electrical appliances
•Never use an electrical appliance with a faulty switch. An electrical appliance
which can no longer be switched on or off is dangerous and must be repaired.
•Keep unused electrical appliances in places where children are not able to
reach them. Do not allow the appliance to be used by persons who are not
familiar with it or persons who are not familiar with this user guide. Electrical
appliances are dangerous when in the hands of inexperienced persons.
•Handle the appliance carefully. Make sure all moving parts of the appliance
work perfectly and are not jammed, also check whether any parts are broken or
damaged to the extent that operation of the appliance is impaired. Have any
damaged parts repaired before using the appliance. Many accidents are caused
by poorly-maintained electric appliances.
•Use electrical appliances, accessories etc in accordance with these guidelines
and in a manner that is specified for this particular appliance type. When using
the appliance, please take into account the working conditions and the work
being carried out. Using electrical appliances for other uses than that intended
can lead to hazardous situations.
Service
•Only have the device repaired by qualified and authorized staff. Only use
original spare parts. In this way you can ensure that the appliance remains safe.
4.3 Warnings and explanation of icons
The signal words DANGER - WARNING - CAUTION classify the possible degree of risk of bodily injury in an actual
situation. Injuries can be prevented provided that the relevant instructions are followed.
The warning triangle symbol indicates a "General Danger".

Rieber GmbH & Co KG 05/2010 9
DANGER!
indicates imminent danger.
Failure to follow these warning instructions may cause serious bodily injury or even
death.
WARNING!
indicates a potentially hazardous situation.
Failure to follow these warning instructions may cause serious bodily injury or even
death.
CAUTION!
indicates a potentially harmful situation.
Failure to follow these warning instructions may cause minor bodily injury.
Special warning icons
Special hazard types are indicated using special icons.
Electrical current
Risk of burns or scalding
Wear protective gloves
Risk of fire
NOTE
indicates potential damage to property without any personal injury.
Failure to follow these instructions may cause damage to property.
4.4 Appliance-specific safety instructions
This section provides information on general product-specific safety instructions of the appliances of these modular
product series. In the following section, additional safety information relating to a particular operation or situation is
placed before the appropriate operation step or description of the situation.
4.4.1 Safety and monitoring devices
•The product features a safety cut-out.
The product switches itself off automatically in the event of a fault to the
control system.
•To increase your safety we recommend you install an earth leakage circuit
breaker with a tripping current of 30 mA upstream of the appliance.

10 05/2010 Rieber GmbH & Co KG
4.4.2 Dangers due to electricity
WARNING!
Potential electrical hazard in the case of incorrect electrical connection.
•The unit may only be commissioned by an instructed person
or a qualified electrician.
•Check the mains voltage, type of current and connected load. Check that these
match the specifications on the type plate.
•The socket outlet must be easily accessible so that the unit can be disconnected
from power supply at any time.
•
The cable must be routed such that it cannot be squeezed or overheated.
WARNING!
Potential risk of fire due to heat build-up.
•Unwind the cable from the spool to prevent any heat build-up or cable fire. The
coupling must have splash protection, must be made of rubber or be rubber-
coated. The cable cross-section must be an appropriate size for the power
consumption of the modules.
•Before connecting the product, compare the connection data (voltage and
frequency) on the type plate with that for the power supply.
DANGER!
Danger of electric shock. Risk of death.
•Before each use, inspect the product, the connecting plug and electric cable for
any visible signs of damage.
4.4.3 Danger by unstable position
WARNING!
•Prevent the product from running away accidentally using the two parking brakes.
•Only park the product on flat surfaces.
4.4.4 Dangers due to hot surfaces, burns and explosions
WARNING!
One can burn one´s hands and arms on the hot surfaces around the heating and its
environment.
When you remove the door or cover from the appliance during hot holding of meals, hot
water vapour might escape and cause scalding.
•Where possible wear protective gloves.
•Open doors or covers carefully.
•Keep combustible materials away from the product.
•Keep unauthorised persons away from the product.
•Never operate the product unsupervised.
•Only use Gastronorm containers made from heat-resistant or non flammable materials, otherwise there
is a risk of fire.

Rieber GmbH & Co KG 05/2010 11
4.4.5 Avoid material damage during transport
NOTE
Improper transport may damage the appliance.
•Disconnect the electrical connection cable.
•Remove accessories and transport them separately.
•In the case of mobile units, note that the maximum height of a level is 4 mm.
4.5 Information about regulations to be followed
Alongside this user guide there are a range of health and safety and other regulations
that are relevant for the operation of this cooking station; these include HACCP food
hygiene regulations for example.
4.6 What to do in an emergency
First aid in the case of burns and scalding or electric shock:
•Inform yourself on this before commissioning the appliance.
•Store the emergency equipment, including the relevant instructions, at a readily
accessible place near the place of use.
User tip
•Inform yourself in detail taking the company-internal instructions as a reference.
Remember the rules of conduct.
•We recommend that half-yearly emergency training sessions should be carried out.
5. Before first use
5.1 Transport
5.1.1 Check / handle any transport damage
•Immediately after delivery, visually check the appliance for any transport damage.
•Document any potential transport damage on the consignment note in the presence of the haulage
contractor.
•Have the damage confirmed by the haulage contractor (with signature).
•Decide: Keep the appliance and report damage with consignment note
or reject the appliance.
•This procedure ensures proper loss adjustment.
5.1.2 Unpacking
•Remove any packaging residues. When doing this, follow the product-specific
instructions given on the dispatch note / label on the appliance.
•Open transport packaging at the positions provided for this purpose. Do not tear or cut.
•Check scope of delivery using the dispatch note.
•Remove any protective foils from the appliance.

12 05/2010 Rieber GmbH & Co KG
5.1.3 Dispose of packaging material
•Dispose of packaging material in a proper and environmentally compatible manner.
5.1.4 Clean the appliance
•Clean the appliance thoroughly before using for the first time.
Clean with a damp cloth and rub dry with a clean cloth.
Rinse the accessories.
Please refer to "Cleaning and maintenance" on Page 25ff
5.2 Commissioning / recommissioning
5.2.1 Preconditions
•The appliance has no defects or visible damage.
•The appliance has room temperature and is dry.
NOTE
Protective foils or heat-sensitive objects at/in the appliance might damage the appliance during heating.
•Ensure that there are no protective foils on the appliance.
Mechanical requirements for the installation site must be met.
•The place of installation must be horizontal. The place of installation must have sufficient load capacity to
carry the appliance.
•The casters must be secured by parking brakes to prevent accidental running away.
•A minimum distance to walls must be kept to prevent fingers, clothes, etc. from getting caught when
placing/taking out crockery.
Applicable electrical regulations must be observed.
•Before commissioning, check the mains voltage and type of current.
Check that these match the specifications on the type plate.
•The electrical requirements of VDE 0100 ff. as well as the technical
connection requirements of the local power utility must be met.
•The socket outlet must be easily accessible so that the unit can be disconnected from power supply at any
time.
5.2.2 Applies to all heatable versions of thermoport
®
The heating method is indicated on each appliance – „dry heating“ or with „water vapour“ as well as the water
quantity. Preheat your new thermoport once before first use.
5.2.3 thermoport
®
with controllable cooling
CAUTION
After transporting electrical cooling appliances, allow the cooling liquid to
settle. Otherwise, the appliance may be damaged.
•
••
•
After transport, put the appliance in ist correct position and allow it to rest for at least
one hour before switching it on.

Rieber GmbH & Co KG 05/2010 13
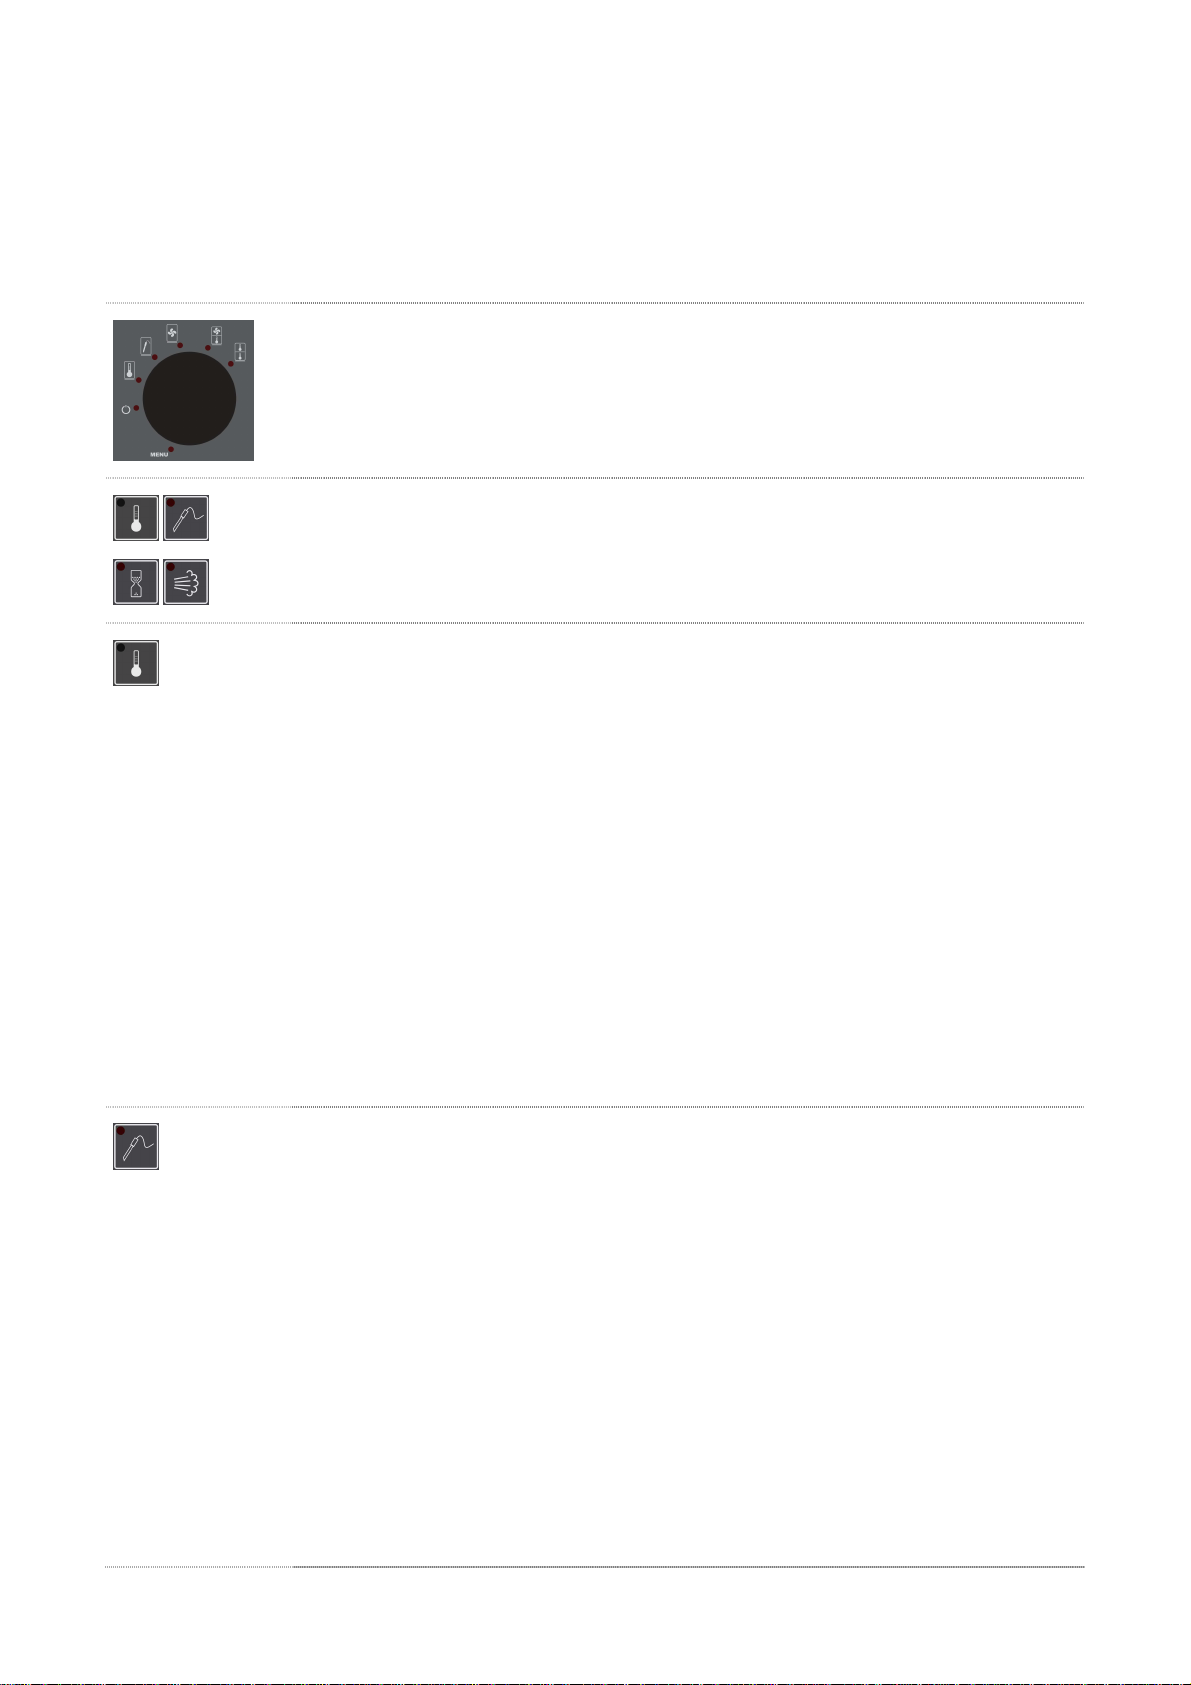
6. Use of control panels
6.1 Use of the thermoport
®
hybrid
6.1.1 The control panel of the thermoport
®
hybrid
Programs
1 Cook
2 Core temperature
3 Menu
4 Fan
5 Hybrid
6 Two chamber temperatures
Control panel
7 Control dial
8 Infrared interface
Function buttons
9 Steam
10 Time
11 Core temperature
12 Chamber temperature
13 STOP
14 START
Program 1: Cook
Options for setting chamber temperature, time and steam.
Program 2: Core temperature
Options for setting core temperature, chamber temperature and steam.
Program 3: Fans (passive cooling)
Passive cooling with cooling pellets + circulating air
Program 4: Hybrid
Top: passive cooling with cooling pellets and circulating air.
Bottom: Options for setting chamber temperature, time and steam.
Program 5: Two chamber temperatures
Top: Options for setting chamber temperature and time.
Bottom: Options for setting chamber temperature, time and steam.
Program 6: Menu
For selecting stored programs.
14
13
7
6
5
4
3
2
1
12
11
10
9
8
14 05/2010 Rieber GmbH & Co KG
6.1.2 Use
General
Switching on the appliance
•For heating with water / steam, please fill in water before.
•Plug in the connecting plug.
•Standby indicator will light up.
Turn the control dial (7) until the indicator for the required program lights up.
Press the dial to open the required program.
•The corresponding indicator lights up.
Depending on the selected program you can now set the chamber temperature, core temperature,
time and steam using the function buttons .
•The corresponding indicators on the function buttons flash.
Chamber temperature function button
During operation:
•
The current chamber temperature is displayed.
LED flashes:
•
Press the button to display the target temperature.
Adjusting the target chamber temperature:
Keep pressed function button (12). Turn the dial (7) to set the target chamber temperature.
Release the function button.
•The adjusted value is saved automatically.
Calling up the target temperature:
Press the chamber temperature function button.
•The target temperature is displayed.
•After approx. 10 seconds the display will revert to the current chamber
temperature.
Core temperature function button
During operation
•
The current core temperature is displayed.
LED flashes:
•
Press the button to display the target temperature.
Adjusting the target core temperature:
Keep pressed function button (11). Turn the dial to set the target core temperature.
Release the function button.
•The adjusted value is saved automatically.
Calling up the target core temperature:
Press the core temperature function button.
•The target temperature is displayed.
•After approx. 10 seconds the display will revert to the current core temperature.

Rieber GmbH & Co KG 05/2010 15
Time function button
During operation:
•
The current time is displayed.
LED flashes:
•
Press the button to display the target time.
Adjusting the target time:
Keep pressed time function button (10). Turn the dial to set target time.
Select “—“ for continuous operation.
Release the function button.
•The adjusted value is saved automatically.
Calling up the target time:
Press the time function button.
•The target time is displayed.
•After approx. 10 seconds the display will revert to the current time.
Steam function button
During operation:
•
The steam level is displayed.
LED flashes:
•
Press the button to display the target level.
Adjusting the steam level:
Keep pressed steam function button (9).
Select “0” for steam OFF.
Release the function button.
•The adjusted value is saved automatically.
START - button
Start programs:
Press the START - button (14).
•The selected program starts with the stored settings.
STOP - button
Re-adjusting functions:
Keep pressed the STOP - button (13) for approx. 5 seconds:
•Back to the functions. These can be reset as described above. The program
currently running will not be interrupted.
Stopping programs:
Press STOP – button (13) again and keep it pressed for approx. 5 seconds:
•Back to program selection. The program currently running will be stopped.
Activating standby - mode:
Press STOP – button (13) again and keep it pressed for approx. 5 seconds:
•Standby mode is activated.

16 05/2010 Rieber GmbH & Co KG
Program 1: Cook
•The indicators of chamber temperature, time and steam function buttons
will flash (flashing = may be changed).
Set the chamber temperature, time and steam.
Press the START - button.
•The “Cook” program starts with the stored settings.
Press STOP – button and keep it pressed for approx. 5 seconds:
•Back to functions. These can be re-adjusted. The program currently
running will not be interrupted.
Press STOP – button again and keep it pressed for approx. 5 seconds:
•Back to program selection. The program currently running will be
stopped.
Press STOP – button again and keep it pressed for approx. 5 seconds:
•Standby mode is activated.
Program 2: core temperature
•The indicators of core temperature, chamber temperature, time and
steam function buttons will flash (flashing = may be changed).
Set the core temperature, chamber temperature, time and steam.
Press the START - button.
•The “Cook” program starts with the stored settings.
Press STOP – button and keep it pressed for approx. 5 seconds:
•Back to functions. These can be re-adjusted. The program currently
running will not be interrupted.
Press STOP – button again and keep it pressed for approx. 5 seconds:
•Back to program selection. The program currently running will be
stopped.
Press STOP – button again and keep it pressed for approx. 5 seconds:
•Standby mode is activated.
Program 3: Fan
•Put in the cooling pellets, otherwise cooling is not possible.
Passive cooling with circulating air + cooling pellets.
•Air circulation begins when this program is started.
•The current chamber temperature is shown in the display.

Rieber GmbH & Co KG 05/2010 17
Press STOP – button and keep it pressed for approx. 5 seconds:
•Back to program selection. The program currently running will be
stopped.
Press STOP – button again and keep it pressed for approx. 5 seconds:
•Standby mode is activated.
Program 4: Hybrid
•Put in the insulated divider.
•On the top of the upper compartment, put in cooling pellets, otherwise cooling is not possible.
Top: passive cooling with cooling pellets and circulating air.
•Bottom: Options for setting chamber temperature, time and steam.
•The indicator flashes on the time function button (flashing = may be
changed).
Adjust the time.
•At top:
Passive cooling with circulating air + cooling pellets.
Air circulation begins when the program is started.
•At bottom:
The indicators flash on the chamber temperature and steam function
buttons
•(flashing = may be changed).
Set temperature, time and steam.
Press the START - button.
•The selected program starts with the stored settings.
Press STOP – button and keep it pressed for approx. 5 seconds:
•Back to functions. These can be re-adjusted. The program currently
running will not be interrupted.
Press STOP – button again and keep it pressed for approx. 5 seconds:
•Back to program selection. The program currently running will be
stopped.
Press STOP – button again and keep it pressed for approx. 5 seconds:
•Standby mode is activated.
Program 5: 2 chamber temperatures
•Put in the insulated divider.
For the “2 chamber temperatures” program, the lower chamber temperature is set via the
core temperature button.
•
The indicator flashes on the time function button
(flashing = may be changed)

18 05/2010 Rieber GmbH & Co KG
Adjust the time.
•At top:
The indicator flashes on the chamber temperature function button
•(flashing = may be changed)
Adjust the temperature.
•At bottom:
The indicators flash on the buttons for core temperature and steam
(only possible at bottom) (flashing = may be changed).
Adjust lower core temperature:
Press the core temperature function button.
•Setting is done like in the case of the temperature function button.
Adjust the steam (steam only possible for lower chamber).
Press the Start -button.
•The selected program starts with the stored settings.
Press STOP – button and keep it pressed for approx. 5 seconds:
•Back to functions. These can be re-adjusted. The program currently
running will not be interrupted.
Press STOP – button again an keep it pressed for approx. 5 seconds:
•Back to program selection. The program currently running will be
stopped.
Press STOP – button again and keep it pressed for approx. 5 seconds:
•Standby mode is activated.
Program 6: Menu (for calling up stored menus)
•Menu no. flashes in the display.
Turn the dial to select required menu no. Y.
•Indicator of program symbol for menu no. Y flashes.
Press the dial to open menu no. Y.
Press the Start - button.
•Menu No. Y starts (stored menu No. 1, 2 , 3, 4 or 5 with the relevant
settings).
Press STOP – button and keep it pressed for approx. 5 seconds:
•Back to the functions of the program stored under menu no. Y. These
can be re-adjusted.
•Stored menu no. Y is not overwritten. The altered settings are
performed once through.
•The program currently running will not be interrupted.
Press STOP – button again and keep it pressed for approx. 5 seconds:
Back to program selection.
•The program currently running will be stopped.
Press STOP – button again and keep it pressed for approx. 5 seconds:
•Standby mode is activated.

Rieber GmbH & Co KG 05/2010 19
Saving a menu
•Set the required program as described.
•Press the dial for approx. 3 seconds.
The next free menue number flashes in the display.
•Select the menu number required using the dial.
A menu number which is already in use is indicated by a „*“.
•Press the dial to save your program settings under the selected menu number XX. Up to 31 different menus can
be saved.
Default menus
Menu Function chamber-
temperature
Time
(min)
Steam Core-
temperature
Remarks
1 Regenerate 140°C 90 2 Cook & Chill
2 Regenerate 140°C 15 1 Hotel
3 Cook 40°C 60 2 Rice
4 Cook 40°C 75 0 Pork
5 Core temp 85°C 0 58°C Roast beef
6 Core temp. 130°C 0 50°C Turkey breast
7 Hybrid 80°C top
passive bottom Hot / cold serving
8 2 chamber 80°C top
140°C bottom
90 1 Hot holding
Regenerate
9 2 chamber 120°C top
Passive bottom
Cook
Hot holding
10 Circulating air passive Pellets
•
6.1.3 Special feature of thermoporthybrid
®
200
Door lock:
Charging:
You can find a spreadsheet with advices for optimal charging of thermoport hybrid 200 under:
www.Rieber.de / service center / users guides.
The door lock of thermoporthybrid 200 works for reasons of safety in two
Steps:
•By the first pull of the look the door opens only for 1 cm.
•Now overpressure in form of hot air or water vapour can disappear.
•By the second pull of the lock the door opens completely.

20 05/2010 Rieber GmbH & Co KG
6.2 Use of thermoport
®
with controllable circulating air heating
There are 2 Heaters for thermoport.
Left side shown heater operates up to 100°C and fits only on stainless steel thermoport
®
and not for thermoport
®
Unit
Right side shown heater operates up to 85°C and fits for all thermoport
®
.
•Connect electrically.
•Star the appliance. (see page 22: The control panel of the thermoport
®
)
After approx. 30 minutes, with door closed, the operating temperature is reached.
6.3 Use of thermoport
®
with non-controllable circulated air heating
•Connect electrically.
After approx. 30 minutes, with lid closed, the operating temperature of apprx. 95°C is reached.
6.4 Use of the thermoport
®
toploader with non controllable heating
•Fill in water; 20 mm high or 2 liters!
•Connect electrically.
After approx. 30 minutes, with lid closed, the operating temperature of apprx. 95°C is reached.
This manual suits for next models
38
Table of contents
Other Rieber Kitchen Appliance manuals


