Riester ri-focus 130627 User manual

Gebrauchsanweisung
Stirnspiegel und Stirnlampen
Instructions
Head mirrors and head lamps
Mode d’ emploi
Miroirs frontaux et lampes frontales
Instrucciones para el uso
Frontoespejos y frontoluces
Istruzioni per I’ uso
Lampade frontali e specchi frontali
all models

Inhaltsverzeichnis Seite
1. Wichtige Information zur Beachtung vor Inbetriebnahme 05
2. Stirnlampen und Stirnspiegel 05
3. Ersatzteile 10
4. Technische Daten 10
5. Wartung 11
6. Entsorgung 11
Garantie 52
Table of Contents Page
1. Important information to be observed before operation 13
2. Headlights and head mirrors 13
3. Replacement parts 18
4. Technical data 18
5. Maintenance 18
6. Disposal 19
Warranty 52
Sommaire Page
1. Informations importantes à lire attentivement avant utilisation 21
2. Lampes frontales et miroirs frontaux 21
3. Pièces de rechange 26
4. Caractéristiques techniques 26
5. Maintenance 26
6. Elimination 27
Garantie 53
Índice Página
1. Información importante que debe tenerse en cuenta antes del uso 29
2. Lámparas frontales y espejos frontales 29
3. Accesorios 34
4. Datos técnicos 34
5. Mantenimiento 35
6. Eliminación de residuos 35
Garantía 53

Sommario Pagina
1. Informazioni importanti da leggere prima dell‘uso 45
2. Lampade frontali e specchi frontali 45
3. Pezzi di ricambio 50
4. Dati tecnici 50
5. Manutenzione 50
6. Smaltimento 51
Garanzia 55

04
Achtung Bedienungsanleitung beachten!
Gerät der Schutzklasse II
Achtung:
Nicht in den Strahl blicken.
Achtung:
Gebrauchte elektrische und elektronische Geräte sollten nicht in den normalen
Hausmüll gelangen sondern gemäß nationaler bzw. EU- Richtlinien separat entsorgt werden.
Typ B
Nicht im Freien verwenden
Wechselstrom
Gleichstrom
LED Licht
Nicht in den Strahl blicken
Klasse 2 LED
LED Licht
Klasse 1 LED
~
LED LIGHT
DO NOT STARE
INTO THE BEAM!
CLASS 2 LED
LED LIGHT
CLASS 1 LED

05
1. Wichtige Informationen zur Beachtung vor Inbetriebnahme
Sie haben ein hochwertiges Riester Produkt erworben, welches entsprechend der Richtlinie 93/42/EWG für Medizinprodukte hergestellt wurde
und ständigen strengsten Qualitätskontrollen unterliegt. Die hervorragende Qualität wird Ihnen zuverlässige Diagnosen garantieren.
Bitte lesen Sie die Gebrauchsanweisung vor Inbetriebnahme sorgfältig durch, und bewahren Sie sie gut auf.
Sollten Sie Fragen haben, stehen wir, oder der für Sie zuständige Vertreter für Riester Produkte, Ihnen jederzeit gerne zur Verfügung. Unsere
Adresse finden Sie auf der letzten Seite dieser Gebrauchsanweisung. Die Adresse unseres Vertreters erhalten Sie gerne auf Anfrage.
Bitte beachten Sie, dass alle in dieser Gebrauchsanweisung beschriebenen Instrumente ausschließlich für die Anwendung durch entsprechend
ausgebildete Personen geeignet sind.
Bitte beachten Sie ferner, dass die einwandfreie und sichere Funktion unserer Instrumente nur dann gewährleistet wird, wenn sowohl die Instru-
mente als auch deren Zubehör ausschließlich aus dem Hause Riester verwendet werden.
Hinweise zur elektromagnetischen Verträglichkeit
Es gibt derzeit keine Hinweise darauf, dass während der bestimmungsgemäßen Anwendung der Geräte elektromagnetische Wechselwirkungen
mit anderen Geräten auftauchen können.
Dennoch können unter verstärktem Einfluss ungünstiger Feldstärken, z.B. beim Betrieb von Funktelefonen und radiologischen Instrumenten,
Störungen nicht vollständig ausgeschlossen werden.
2. Stirnlampen und Stirnspiegel
2.1. Zweckbestimmung
Die in dieser Gebrauchsanweisung beschriebenen Stirnlampen und Stirnspiegel wurden zur Beleuchtung bzw. Ausleuchtung der zu untersuchen-
den Körperstellen hergestellt.
2.2. Stirnlampen und Stirnspiegel
Vorbereitung zur Inbetriebnahme
Achtung!
Die Untersuchungsleuchte nicht für Augenuntersuchungen verwenden.
Es besteht evtl. die Gefahr der Enzündung, wenn das Gerät in Anwesenheit von brennbaren Gemischen von Arzneimitteln mit Luft bzw. mit Sau-
erstoff, Lachgas oder Anästhesiegasen betrieben wird!
2.3 Inbetriebnahme und Funktion
2.3.1 Einstellen des Stirnbandes
Das Einstellen des Stirnbandes ist bei allen Modellen gleich.
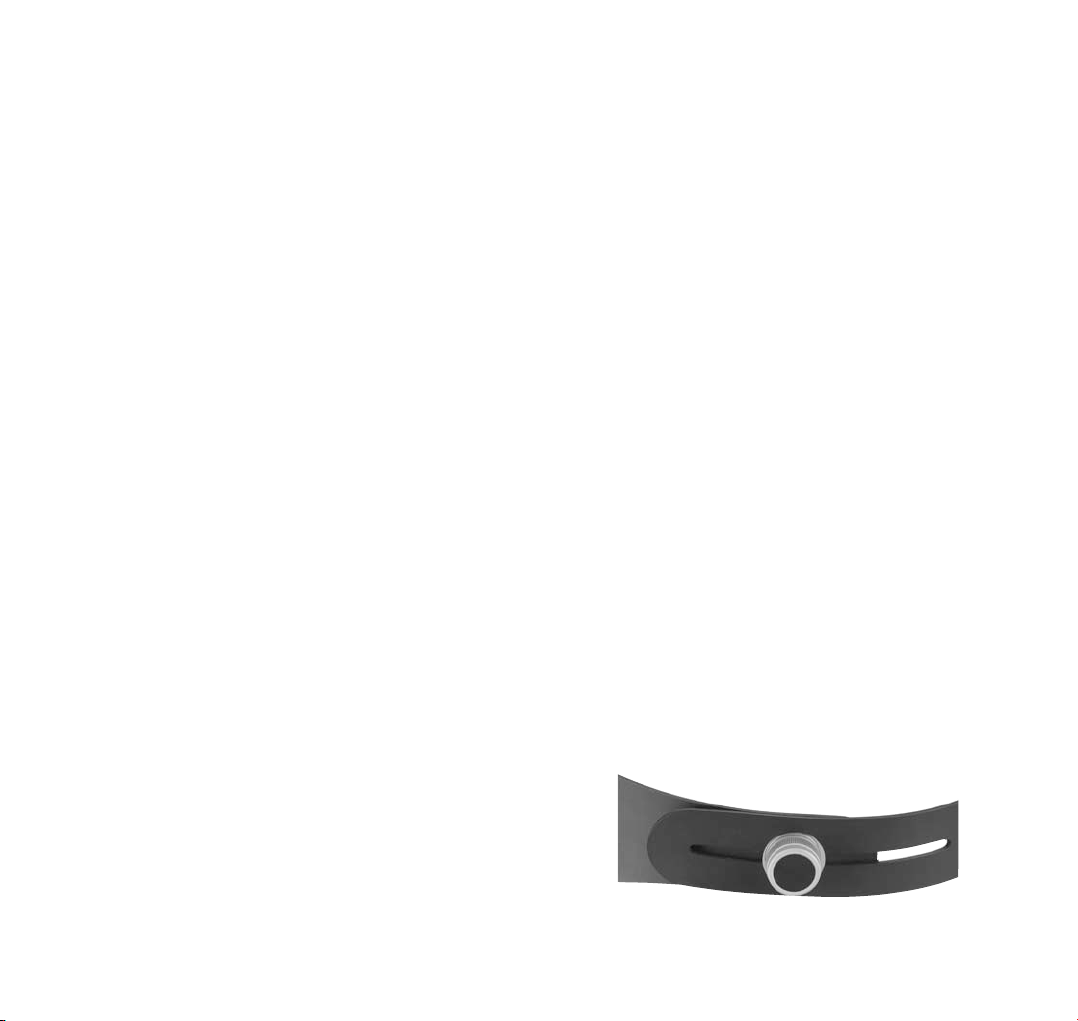
Alu-Drehknopf im Gegenuhrzeigersinn lösen. Stirnband anpassen
und durch drehen des Drehknopfes im Uhrzeigersinn in der
gewünschten Position fixieren.

06
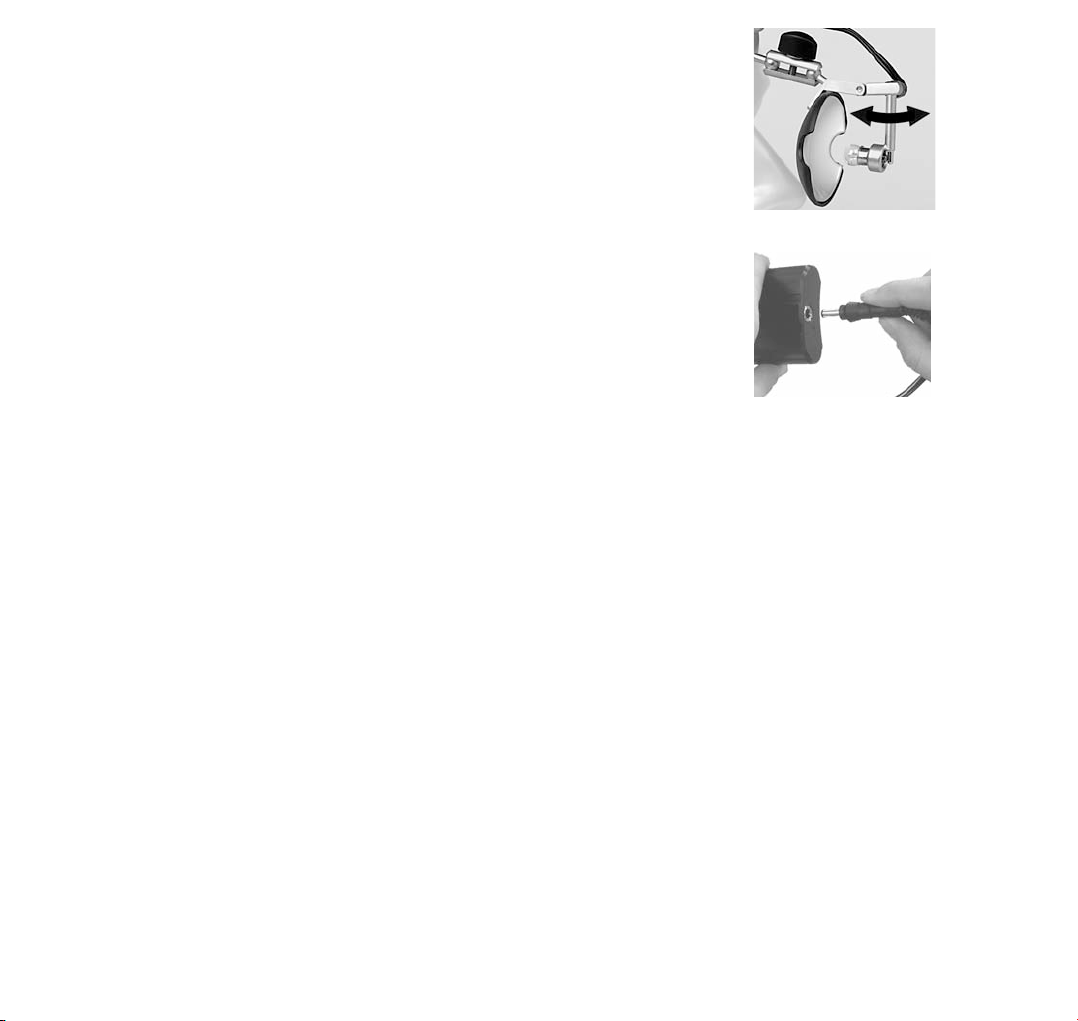
2.3.2 Einstellen des Lampenkopfes ri-focus®LED
Individuelle Voreinstellung des Lampenkopfes mit dem flexiblen Lampenarm
Bild 1 parallel zum Strahlengang der Augen.
Individuelle Feineinstellung des Lampenkopfes mit dem flexiblen Lampenarm
Achtung!
Der biegsame Leuchtenarm sollte nicht zu eng gebogen werden, da dies
zu einer vorzeitigen Materialermüdung führen könnte.
Beim Erreichen des spürbaren Anschlags ist ein Weiterdrehen zu unterlassen,
da dies sonst zu einer Beschädigung der Lampe führt.
clar N 55 mm
Kunststoffdrehknopf am Gelenk lösen, Spiegel einstellen und Knopf wieder festdrehen.

07
2.3.3 Einsetzen der Batterien bzw. der Accus ri-focus®LED und clar N
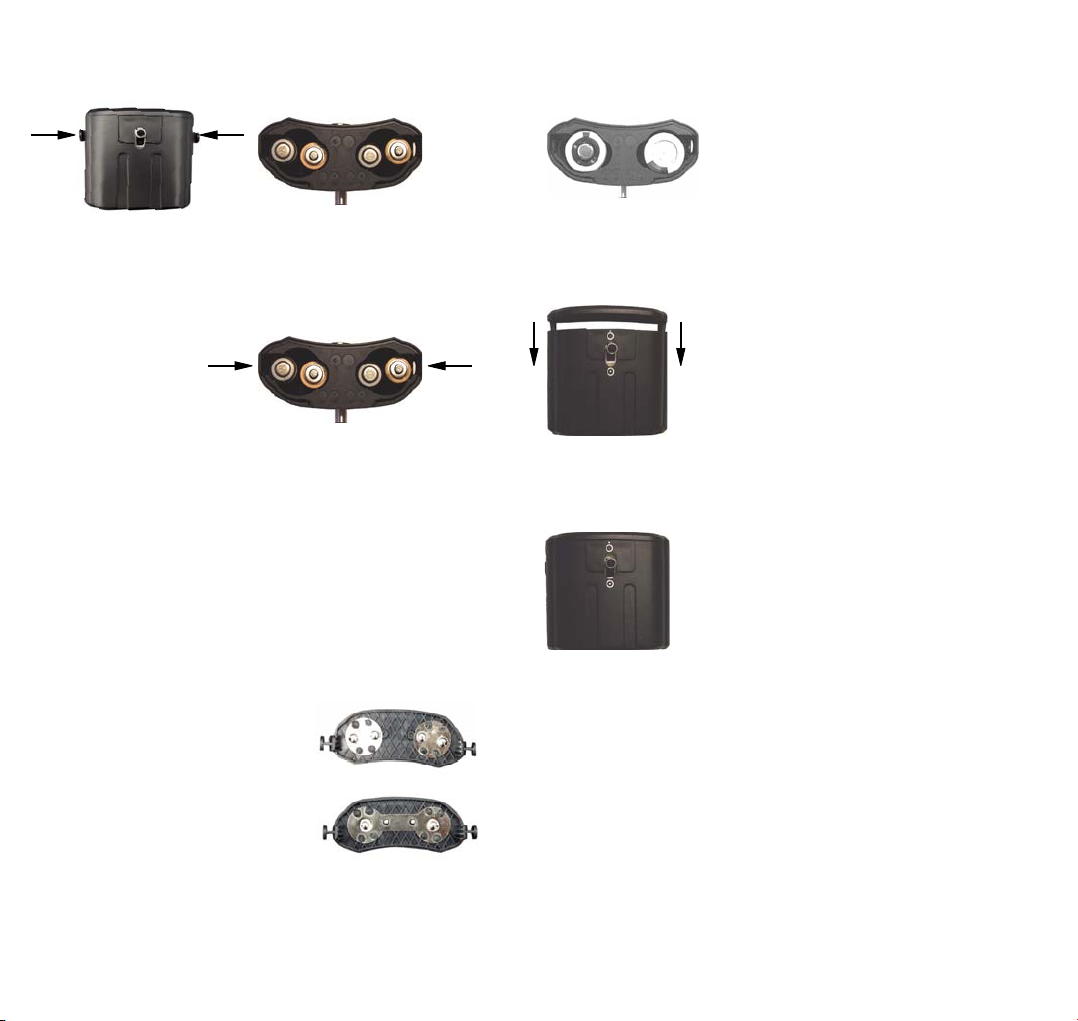
Um das Batteriefach zu öffnen Drücken Sie die beiden Druckknöpfe und ziehen Sie den Batteriefachdeckel nach oben ab.
Polarität Batterien Typ AAA Polarität Batterien Lithium CR 123A
bzw. Accus Typ AAA
Achtung: Es ist unbedingt auf die richtige Polarität zu achten.
Batteriefachdeckel in die Führungsschienen (1) des Batteriefaches einführen und bis zum einrasten nach unten schieben.
2.3.4 Ein und Ausschalten ri-focus®LED und clar N
Einfaches Ein und Ausschalten am Batteriefach.
2.3.5 Batteriefachdeckel
Batteriefachdeckel für Batterien und
Akkus Typ AAA (4 Stück)
Batteriefachdeckel für
Batterien Typ CR123 (2 Stück)
Achtung: Stellen Sie sicher, dass Sie den richtigen Batteriefachdeckel benutzen da ansonsten keine Funktion besteht.
OFF
ON
11

08
2.3.6 Fokussierung ri-focus®LED
Die Fokussierung erfolgt durch Drehen
des vorderen Lampenkopfes.
clar N 55
Manuelle Bewegung der Lampenfassung zum Spiegel
hin und vom Spiegel weg.
2.3.7 Anbringen der Stirnlampe/ des Stirnspiegels ri-focus®LED
Der Lampenkopf ist fest mit dem Stirnband verbunden und kann nur in
verbindung mit dem Stirnband ausgetauscht werden.
clar N
Durch Öffnen der Kunststoffschraube wird die sich am Stirnband befindliche
Klemmeinheit so weit geöffnet, bis sich das Kugelgelenk am Spiegel einsetzen
lässt. Fixieren des Spiegels durch Festdrehen der Kunststoffschraube am Stirnband.
Achtung!
Vor dem Wechseln des kompletten Spiegels muss der elektrische Stecker, welcher sich
am Gelenk der Lampe befindet, abgezogen werden. Nachdem der Spiegel gewechselt
wurde, wird der Stecker wieder eingesteckt.
Sollte die Lampe nach Einstecken des Kabels nicht funktionieren, muss der Stecker um
180° versetzt eingesteckt werden.
Achtung!
• Fassen Sie niemals die Lampen während des Betriebes an.
Sie können sehr heiß werden!
• Achten Sie beim Modell ri-focus®LED darauf, dass Sie während des Betriebs nur den Ring vorne
am Lampenkopf oder den Griff hinten am Lampenkopf anfassen. Alle anderen Teile können sich stark erwärmen.
• Beim Modell clar N können Sie folgende Teile während des Betriebes berühren: die Plastikschale am Spiegel, den
Stellknopf und den Schwenkarm.
e
hen Entfernung 400 mm
200 mm
200 mm
40 mm
120 mm
30 mm
Lichtkreis max. ø
Lichtkreis min. ø

09
2.3.8 Lampen
Auswechseln der Lampe
clar N 55
Lampe mit Hilfe des verstellbaren Lampengelenks vom Spiegel wegdrehen
(Abstand vergrößern). Lampe kann dann herausgedreht und eine neue Lampe
eingedreht werden.
Achtung! Lassen Sie die Lampen vor dem Lampenwechsel zuerst einige Zeit abkühlen!
2.3.9 Inbetriebnahme des Ladegerätes
ri-focus®LED und clar N 55
Stecken Sie das Ladegerät in die Netzsteckdose, dann stellen Sie die Verbindung
mit dem Batteriefach her. Ist die Verbindung zum Batteriefach hergestellt, leuchtet
die Ladeanzeige des Ladegerätes, und die Akkus werden geladen.
Ladezeit: Erstladung min. 24 H
Folgeladung über Nacht oder nach Bedarf möglich.
Achtung:
• Es dürfen mit diesem Ladegerät nur die Handelsüblichen Akku´s Typ AAA aufgeladen werden. Ein Aufladen
nicht aufladbarer Batterien kann zur Zerstörung der Batterien oder des Ladegeräts führen.
• Das Ladegerät darf nur in geschlossenen Räumen verwendet werden.
• Entfernen Sie das Gerät aus der Steckdose, wenn es nicht gebraucht wird.
• Gerät bei Beschädigung des Gehäuses oder des Netzsteckers nicht in Betrieb nehmen.
• Gerät nicht öffnen.
• Sollten Sie das Gerät längere Zeit nicht benutzen oder auf Reisen mitnehmen, entfernen Sie bitte die Batterien
bzw. Akkus aus dem Batteriefach
• Neue Batterien sollten dann eingelegt bzw der Akku sollte aufgeladen werden, wenn die Lichtintensität des
• Instrumentes schwächer wird und die Untersuchung beeinträchtigen könnte.
• Um eine optimale Lichtausbeute zu erhalten, empfehlen wir, beim Batteriewechsel immer neue hochwertige
Batterien einzulegen.
2.3.10 Technische Daten
Bezeichnung Spannung Stromstärke durchschnittliche Lebensdauer
Lampe für clar N Vakuum 55 mm 6 V 0,4 A ca. 220 h
Lampe für clar N LED 55 mm 6 V 0,35 A ca. 15.000 h
LED for ri-focus®LED 6 V 0,525 A 50.000 h

10
2.3.11 Auswechseln des Stirnbandpolsters
Die Schaumstoffpolsterung kann einfach vom Klettband abgezogen werden
und durch ein neues Schaumstoffpolster ersetzt werden.
2.3.12 Pflegehinweise
Allgemeiner Hinweis
Die Reinigung und Desinfektion der Medizinprodukte dient zum Schutz des Patienten, des Anwenders und Dritter und zum
Werterhalt der Medizinprodukte.
Aufgrund des Produktdesigns und der verwendeten Materialien, kann kein definiertes Limit von max. durchführbaren
Aufbereitungszyklen festgelegt werden. Die Lebensdauer der Medizinprodukte wird durch deren Funktion und den schonenden
Umgang bestimmt.
Defekte Produkte müssen vor Rücksendung zur Reparatur den beschriebenen Wiederaufbereitungsprozess durchlaufen
haben.
Reinigung und Desinfektion
Stirnspiegel und Stirnlampen können außen mit einem feuchten Tuch gereinigt werden bis optische Sauberkeit erreicht ist.
Wischdesinfektion nach Vorgaben des Herstellers des Desinfektionsmittels. Es sollten nur Mittel mit nachgewiesener
Wirksamkeit unter Berücksichtigung der Nationalen Anforderungen zur Anwendung kommen.
Nach der Desinfektion Abwischen des Instrumentes mit einem feuchten Tuch um mögliche Desinfektionsmittelreste zu entfernen.
Achtung!
Legen Sie die Stirnspiegel und Stirnlampen niemals in Flüssigkeiten!
Der Artikel ist für maschinelle Aufbereitung und Sterilisation nicht freigegeben. Es kommt hierbei zu irreparablen Schäden!
3. Ersatzteile
LED Beleuchtung
Art. Nr. 11302 Lampen 6 V für clar N LED
Standardbeleuchtung:
Art. Nr. 11301 Pack. à 6 St. Lampen 6 V für clar N Vakuum
4. Technische Daten
Modelle: clar N Vakuum 55 mm, clar N LED 55 mm
ri-focus®LED
Energiequelle: Siehe Hinweise auf dem jeweiligen Netzgerät bzw. auf den Batterien, Akkus
Ausgangswerte: Entsprechend den Angaben auf den Netzgeräten bzw. den eingesetzten Batterien
Arbeitstemperatur: +10 bis +40°, relative Luftfeuchtigkeit zwischen 30 und 75% (nicht kondensierend)
Ort der Aufbewahrung: -5°C bis 50°C, bis zu 85% relative Luftfeuchtigkeit, nicht kondensierend

11
5. Wartung
Die Instrumente und deren Zubehör bedürfen keiner speziellen Wartung.
Sollte ein Instrument aus irgendwelchen Gründen überprüft werden müssen, schicken Sie es bitte an uns oder an einen
autorisierten RIESTER Fachhändler in Ihrer Nähe, den wir Ihnen auf Anfrage gerne benennen.
6. Entsorgung
Bitte beachten Sie, dass Batterien und Elektrogeräte speziell entsorgt werden müssen. Informationen hierzu erhalten Sie
bei der kommunalen Sammelstelle.
Hersteller: siehe letzte Seite dieser Gebrauchsanweisung

12
Caution: Observe the operating instructions
Device belongs to protective class II
Attention:
Do not stare into the beam
Attention: Dispose of the device in accordance with valid regulations
Type B
Not for outdoor use
Alternating current
Direct current
LED light
Do not stare into the beam
Class 2 LED
LED Light
Class 1 LED
~
LED LIGHT
DO NOT STARE
INTO THE BEAM!
CLASS 2 LED
LED LIGHT
CLASS 1 LED
13
1. Important information to be observed before operation
You have purchased a high quality Riester product, which has been manufactured according to the Directive 93/42/EEC for
medical devices and is subject to the strictest quality controls at all times. The outstanding quality is a guarantee for reliable diagnosis.
Please read the Instructions for Use carefully before operating the unit and keep them in a safe place.
If you should have any questions, we or your responsible Riester product representative are available to answer queries at any
time. Our address can be found on the last page of these Instructions for Use. The address of our sales representative will be
provided upon request.
Please note that the instruments described in these Instructions for Use are only to be used by suitably trained personnel.
The user should ensure that the instrument is working safely and is in good condition before use.
Furthermore, please note that the perfect and safe functioning of our instruments is only guaranteed when both the instruments
as well as the accessories used are from Riester.
Remarks on electromagnetic tolerability
There are currently no indications that electromagnetic interactions with other devices can occur when this device is used correctly.
However, interference cannot be completely excluded under the strong influence of unfavourable field strengths, e.g. when operating
a cell telephone and from radiological instruments.
2. Headlights und head mirrors
2.1. Intended use
The headlights and head mirrors described in these Instructions for Use have been manufactured to illuminate or throw light on
the areas of the body to be examined.
2.2. Headlights and head mirrors
Preparation prior to operation
Attention!
• Don’t use the examination light for eye-examination
• There may be a risk of gas ignition when the light is used in the presence of inflammable drug mixtures such as air and/or
oxygen or laughing gas!
2.3 Putting into initial service and function
2.3.1 Adjusting the headband
The adjustment of the headband is the same for all models.
Loosen the aluminium turning knob in a counter-clockwise direction.
Adjust the headband and fix it in the required position by turning the
knob clockwise.

14
2.3.2 Adjusting the lamp head ri-focus®LED
Individual adjustment of the lamp head with the flexible light arm: see Picture 1
parallel to the optical path of the eyes.
Individual fine adjustment of the lamp head (during the examination)
with the flexible light arm
Caution!
The flexible arm of the light should not be bent in a too small radius
in order to prevent premature material fatigue.
Don´t continue with focussing when you realize the stop as this can
damage the lamp.
clar N 55 mm
Loosen the plastic turning knob on the joint, adjust the mirror and tighten the knob again.
ri-focus®LED
clar N 55 mm
15
2.3.3 Fitting batteries or rechargeable batteries ri-focus®LED und clar N
In order to open the battery compartment, press the two push buttons and pull off the cover of the battery compartment
Polarity of batteries type AAA Polarity of batteries lithium CR 123A
or rechargeable batteries Type AAA
Attention: It is important to ensure that the polarity is correct.
Push the battery compartment cover back into the tracks of the battery compartment and push downwards until it snaps into place.
2.3.4 Switching on and off ri-focus®LED und clar N
Simple on-off switch located on the battery compartment.
2.3.5 Battery case cover
Battery case cover 1 is for
batteries/accus type AAA (4 pieces)
Battery case cover 2 is for
batteries/accus type Lithium
CR123A 2 pieces)
Attention! Please take care that there is no function if the wrong battery case cover is used.
OFF
ON
11

16
2.3.6 Focussing ri-focus®LED
Focus by turning the front lamp head.
clar N 55
Manually moving the lamp fixture towards and
away from the mirror.
2.3.7 Attaching the headlight / the head mirror ri-focus®LED
The lamp head is firmly fixed to the headband and can only be exchanged together with the
headband.
clar N
By opening the plastic screw, the clamping unit located on the headband is opened up
until the ball-and-socket joint on the mirror fits. Attach the mirror by turning the plastic
screw tightly on the headband.
Attention!
Before exchanging the complete mirror, the electric plug located on the joint of the
lamp has to be pulled out. After the mirror has been exchanged, the plug can be pushed
back in again.
If the lamp does not function after plugging the cable back in again, the plug has to be rotated
180° and plugged in again.
Attention!
• Never touch the lamps during use.
They can get very hot!
• In the case of model ri-focus®LED only touch the ring at the front of the lamp head or the grip at the rear
• of the lamp head during operation. All other parts can heat up considerably.
• In the case of clar N model, you can touch the following parts during operation: the plastic shell on the mirror, the adjusting
knob and the swivel arm.
e
ad.Distance 400 mm
200 mm
200 mm
40 mm
120 mm
30 mm
Circleoflight max. diam.
Circleoflight min. diam.
17
2.3.8 Lamps
Exchanging the lamp
clar N 55
Turn the lamp away from the mirror with the help of the adjustable lamp joint
(enlarge the clearance). The lamp can then be unscrewed and a new lamp screwed
back into place.
Atention! Allow the lamp to cool down first before exchanging the lamp!
2.3.9 Operation of the battery charger
ri-focus®LED and clar N 55
Plug the charger into the mains socket and then connect it to the battery compartment.
As soon as a connection to the battery compartment has been made, the charging
indicator of the unit lights up and the rechargeable batteries will be charged up.
Charging time: First charge minimum 24 hours.
Following charges are possible over night or as required.
Atention:
• Only commercially available rechargeable batteries Type AAA may be charged with this charging device.
• Charging non-rechargeable batteries may lead to the destruction of the batteries or the charging device.
• The charging device may only be used in closed rooms.
• Remove the device from the mains point when not in use.
• Do not operate, if either the case or the mains plug is damaged.
• Do not open the device.
• If the device is not used for a longer period of time or is to be taken with when travelling, please remove the
batteries or the rechargeable batteries from the battery compartment
• New batteries should be used or the rechargeable batteries should be charged up, if the light intensity of the
instrument becomes weaker and could compromise examination results.
• In order to obtain an optimal light yield, we recommend the use of new, high quality batteries when exchanging
batteries.
2.3.10 Technical data
Description Voltage Amperage Average service life
Lamp for clar N vacuum 55 mm 6 V 0,4 A approx. 200 hours
Lamp for clar N LED 55 mm 6 V 0,35 A approx. 15.000 hours
LED for ri-focus®LED 6 V 0,525 A approx. 50.000 hours

18
2.3.11 Exchanging the headband padding
The foam padding can be simply removed from the Velcro and replaced
by new foam padding.
2.3.12 Instruction for care
General information
The goal of cleaning and disinfection of medical products is the protection of patients, users and third persons and conserving
the value of the medical products. On account of the product design and the used material, no defined limit of maximum processing
cycles can be fixed. The lifetime of the medical products depends on their function and on a appropriate treatment of
the devices. Before returning faulty products for repair they must have gone through the described reprocessing process.
Cleaning and disinfection
Head mirrors and headlights can be cleaned outside with a humid cloth until optical cleanness
is given.
Wipe disinfection according to the regulations given by the disinfectant manufacturer. Only disinfectants with approved
efficiency and in accordance with the national standards can be used.
After disinfection the device must be cleaned with a humid cloth to remove all possible deposits of disinfectants.
Caution!
Never place the head mirror and headlights in liquid!
The items are not permitted for machine cleaning and sterilisation as they will damaged!
3. Replacement parts
LED illumination
Art. No. 11302 Lamps 6 V for clar N LED
Standard illumination:
Art. No. 11301 Pack of 6 lamps à 6 V for clar N vacuum
4. Technical data
Models: clar N vacuum 55 mm, clar N LED 55 mm
ri-focus®LED
Energy sources: See remarks on the respective mains device or on the batteries, rechargeable batteries
Initial values: According to the details on the mains devices or the batteries used
Working temperature: +10 to +40°, relative air humidity between 30 and 75% (non-condensing)
Storage location: -5°C to 50°C, up to 85% relative air humidity, non-condensing
5. Maintenance
The instruments and their accessories do not require any special maintenance. If an instrument has to be checked for

19
any reason, send it to us or to an authorised Riester dealer near you, whom we shall be pleased to name upon request.
6. Disposal
Please note that batteries and electrical appliances have to be disposed of in a special way. You can obtain information
about this from municipal collection points.
Manufacturer: see last page of these Instructions for Use.

20
Attention: Veuillez suivre le mode dÐemploi
Appareil de classe de protection
Attention:
ne pas regarder directement dans la lumière
Attention: Les dispositifs électriques et électroniques usagés ne doivent pas être éliminés avec les déchets
domestiques non triés et doiventêtre collectés séparément conformément à la réglementation nationale/eropéenne en
vigueur.
Pièce d‘utilisation de type B
Ne peut pas utiliser à l‘exterieur
courant alternatif
courant direct
LED lumière
Ne pas regarder directement dans la lumière
Class 2 LED
LED lumière
Class 1 LED
~
LED LIGHT
DO NOT STARE
INTO THE BEAM!
CLASS 2 LED
LED LIGHT
CLASS 1 LED
This manual suits for next models
1
Table of contents
Languages:
Other Riester Headlamp manuals


