Rigid Industries dmx led effects User manual

dmx led effects
®
OWNER'S MANUAL
IMPORTANT
It is strongly recommended that this product
be installed by a professional.
• 3M®VHB Mounting Pad
• Mounting Hardware
KIT INCLUDES
PART # 40040

1. PRODUCT DESCRIPTION.....................................................................3
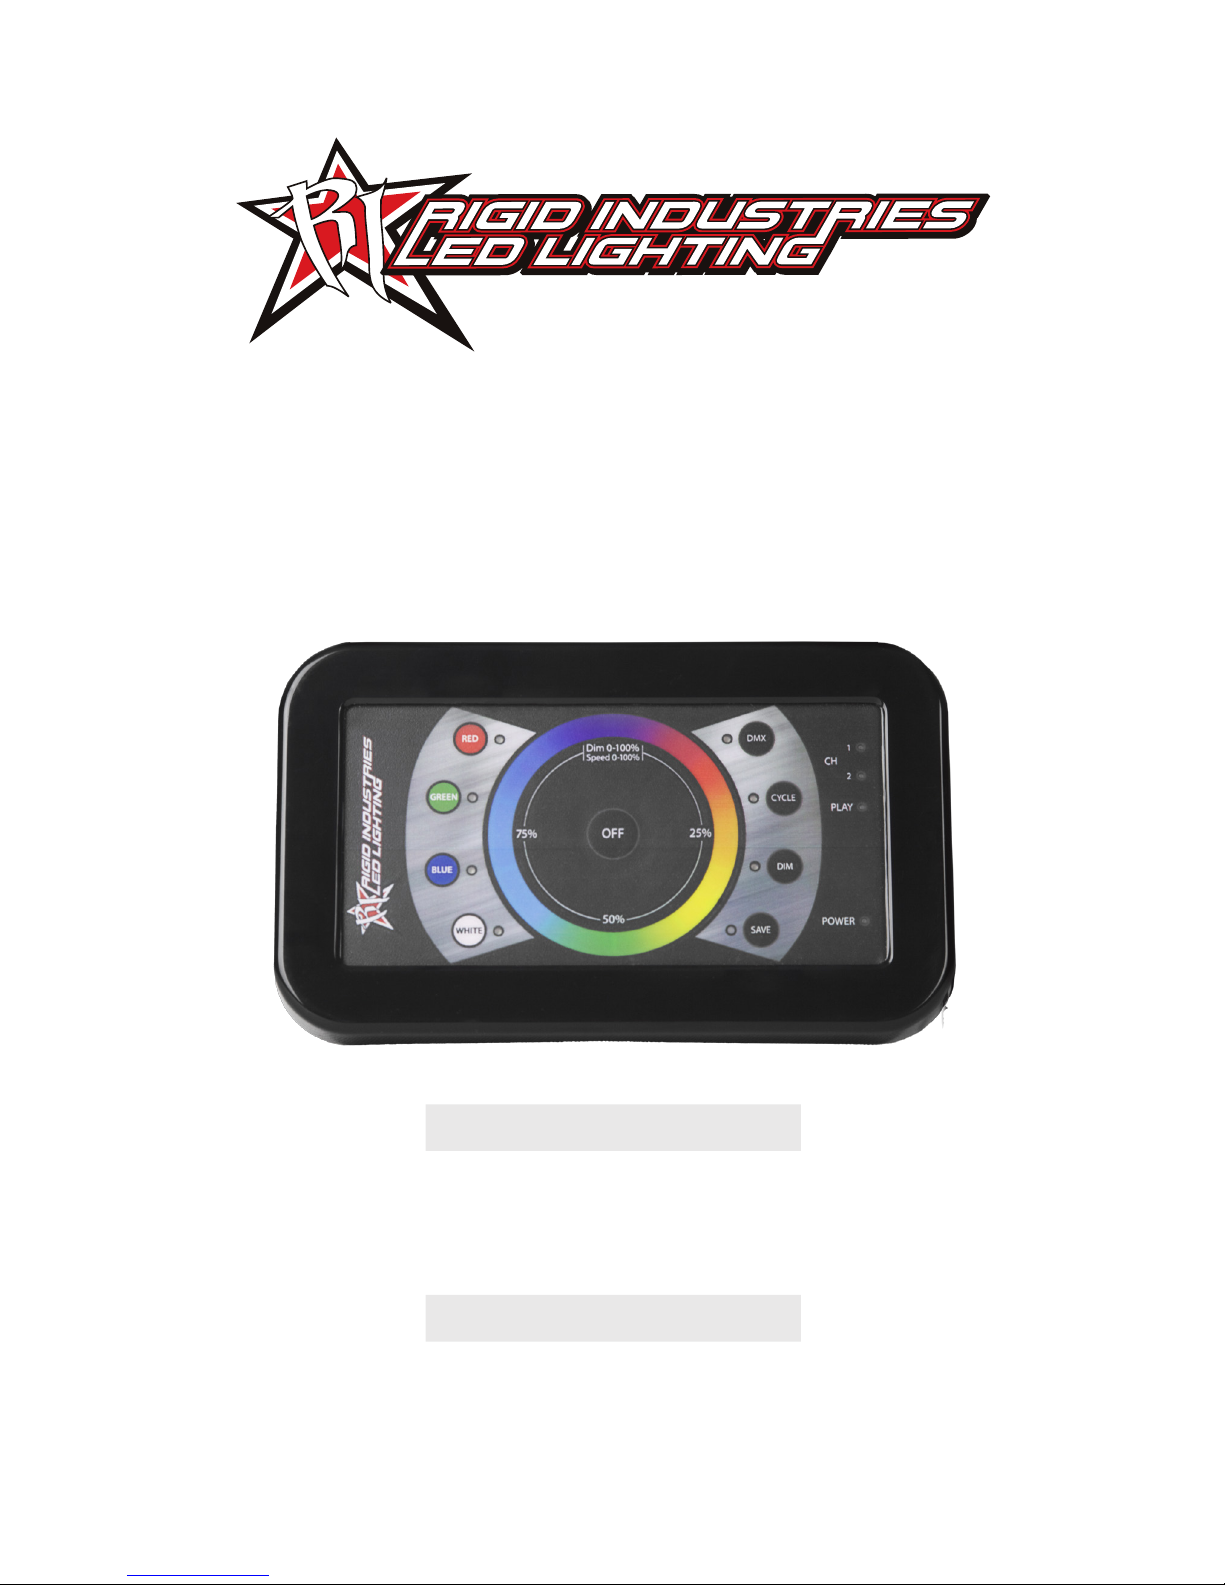
1.1 Panel Properties.......................................................................3
1.2 Control Properties................................................................... 3
1.3 Networking Properties............................................................ 3
1.4 Solid State Lighting Applications...........................................3
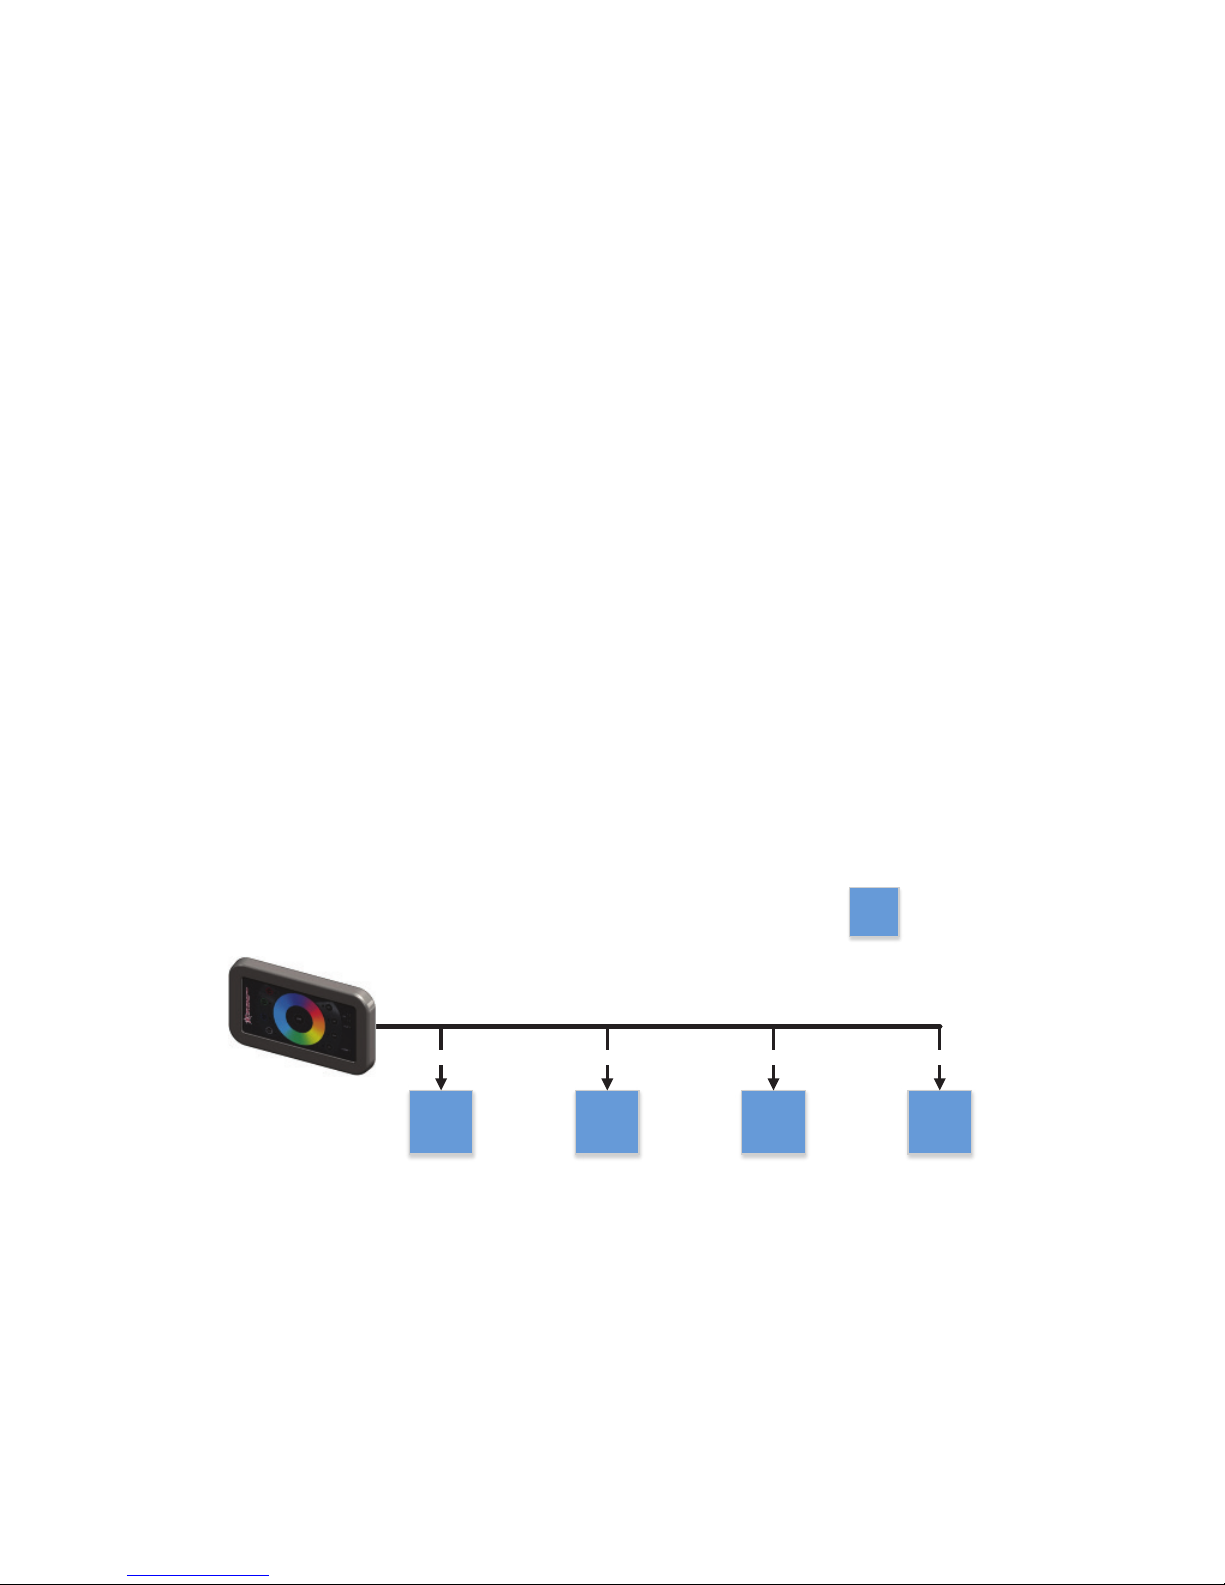
1.5 Control Diagram...................................................................... 4
1.6 DMX Modes............................................................................. 4
1.6.1 DMX Universe Selection............................................4
2. COLOR SELECTION............................................................................. 5
2.1 RGBW Color Selection............................................................ 5
2.1.1 Red.............................................................................. 5
2.1.2 Green.......................................................................... 5
2.1.3 Blue............................................................................. 5
2.1.4 White.......................................................................... 5
2.2 COLOR MIXING...................................................................... 5
2.2.1 Color Wheel............................................................... 5
3. ADVANCED FEATURES........................................................................ 6
3.1 Cycle......................................................................................... 6
3.1.1 Cycle Speed............................................................... 6
3.2 Dimming...................................................................................6
3.2.1 Dimming Solid Colors............................................... 6
3.2.2 Dimming in Cycle Mode........................................... 6
3.3 Saving Colors........................................................................... 6
3.3.1 Saving Mixed Colors..................................................7
3.3.2 Saving RGBW Colors................................................. 7
3.3.3 Saving a Cycle............................................................ 7
3.3.4 Recalling a Saved Scheme........................................ 7
4. INSTALLATION INSTRUCTIONS ......................................................... 7
4.1 Install Location......................................................................... 7
4.1.1 Environmental Considerations..................................7
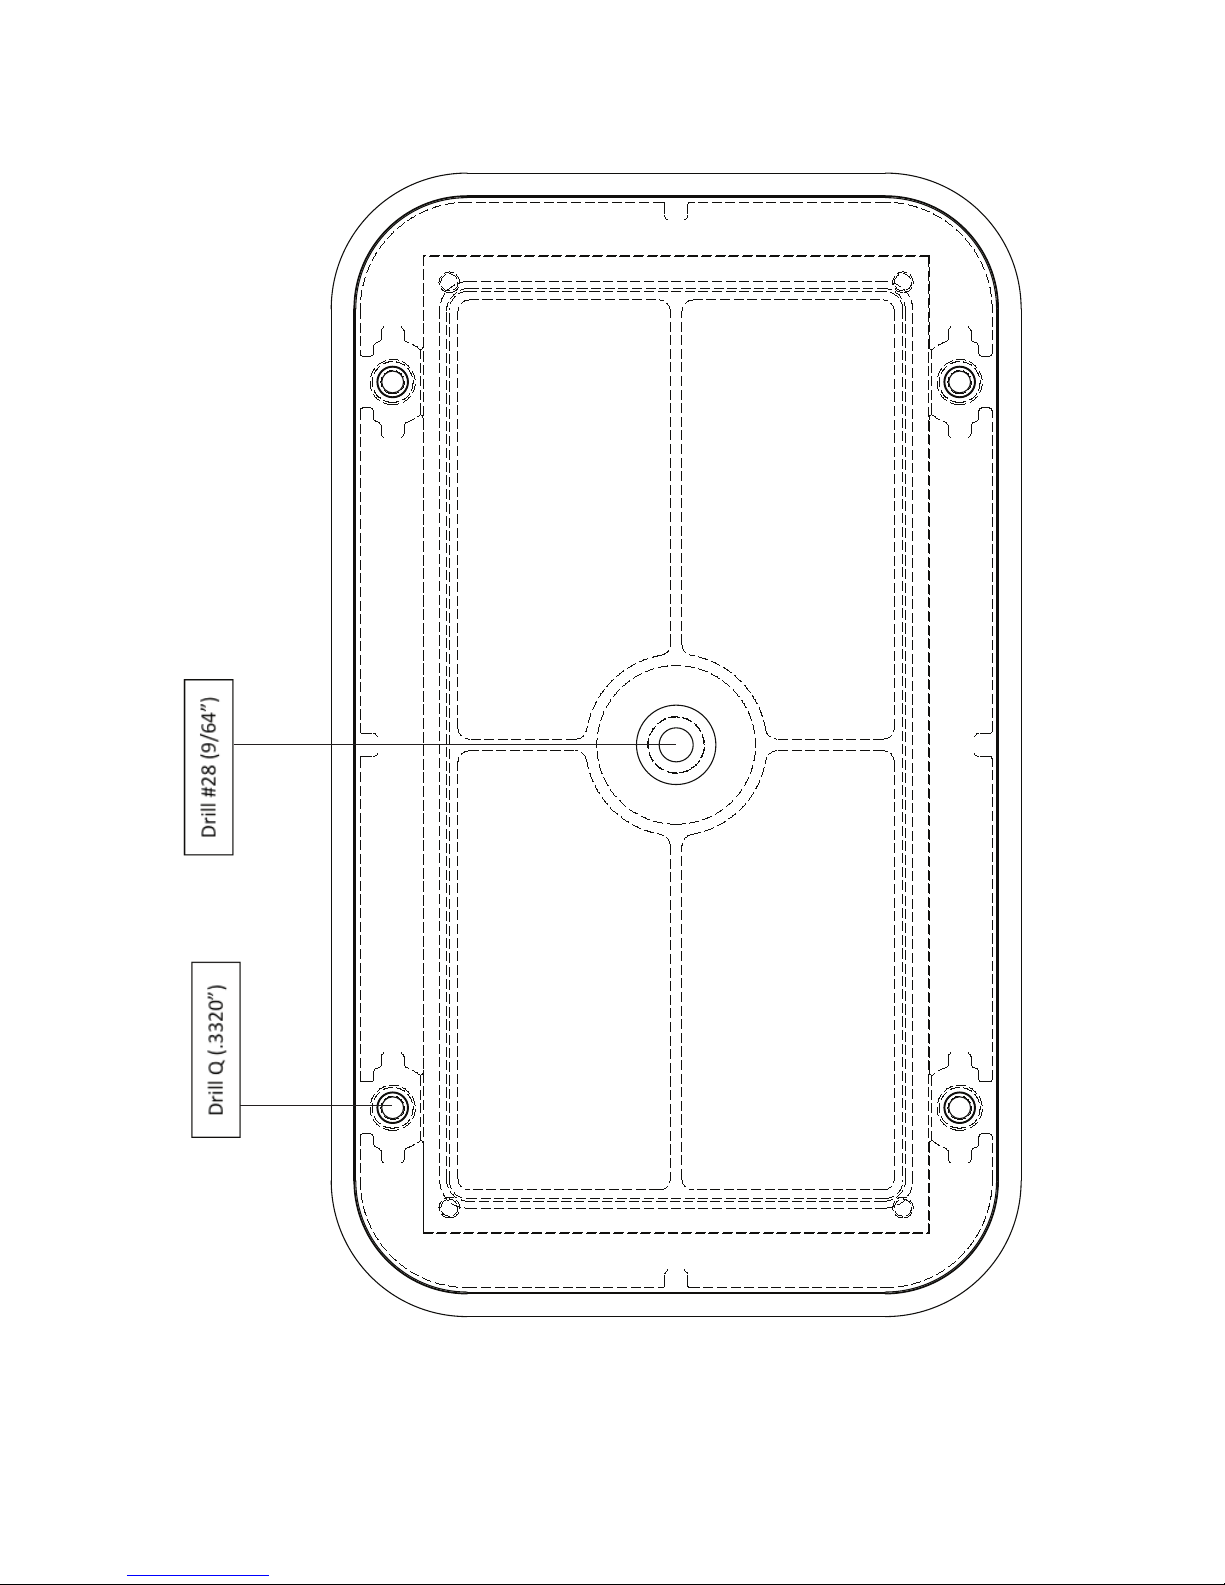
4.2 Drilling Pattern.........................................................................7
4.2.1 Drill Size...................................................................... 8
4.2.2 Screw Pitch................................................................. 8
4.3 Wiring Connections.................................................................8
4.3.1 Connection Code.......................................................8
4.3.2 Connectors................................................................. 8
5. DMX NETWORK ARCHITECTURE AND TOPOLOGY........................8
5.1 Setting Up Your Rigid DMX Controller...................................8
5.1.1 DMX Network Protocol............................................. 9
5.1.2 DMX Network Architecture.......................................9
5.1.2.1 DMX Network Start Address.....................................9
6. SPECIFICATIONS............................................................................................ 11

3
1 PRODUCT DESCRIPTION
The Rigid Industries DMX LED Effects control panel is a nine button dual
universe DMX controller with a center rotary slider. The control panel lets you
set colors from red, green, blue and white, the dimming level, almost infinite
color mixing, and automatic play color changing rate (speed). It is designed to
control the Rigid Underwater LED Light that hosts red, green, blue and white
LEDs with a separate DMX channel or slot. In addition, two independent DMX
universes are supported to allow for above and underwater zone control.
1.1 Panel Properties
The Rigid Industries DMX LED Effects control panel hosts dual DMX universes
output RS-485 channels. A single button (DMX) allows the selection of the
DMX universe to control, with settings for both, universe 1 (CH1) or universe 2
(CH2) individually. The panel will change the output to the chosen color or
mode depending on the DMX universe selection. The panel can operate on a
wide range of input voltages from 10-36V DC.
1.2 Control Properties
The Rigid Industries DMX LED Effects control panel features the following
lighting control properties:
• Dual DMX universes (DMX)
• RGBW color selection (RED, GREEN, BLUE, WHITE)
• 8-bit dimming resolution
• Dimming percentage (DIM)
• Color changing show or play mode (CYCLE)
• Adjustable show speed
• Save color selection or show speed (SAVE)
1.3 Networking Properties
The Rigid Industries DMX LED Effects control panel is compatible with DMX-
512A using the RS-485 transmission protocol. Cable lengths of up to 4000ft are
possible using DMX. This controller uses unidirectional data transmission for
remote device or slave color command.
1.4 Solid State Lighting Applications
This panel is packaged into a 6.3” x 3.8 x 0.50” (L x W x H) IP67 water resistant
enclosure, giving you freedom to mount the panel in many environments.

4
1.5 Control Diagram
1.6 DMX Modes
The Rigid Industries DMX LED Effects control panel has two programmable
DMX universes.
1.6.1 DMX Universe Selection
The Rigid Industries DMX LED Effects control panel will power on with both universe
one (CH1) and universe two (CH2) selected. Touching the DMX button (see figure 1) will
cycle though the Universes starting with CH1. The panel will function with both, 1 or 2.
For save functions, consider it to have 3 selections, with unique functions for both, 1 or
2. It may be best to split the universes up into zones (example: on a boat, above and
below water.)
75% 25%
50%
Dim 0-100%
Speed 0-100%
Off
OFF
RED
GREEN
WHITE
BLUE
DMX
CYCLE
DIM
1
2
PLAY
POWER
SAVE
CH
®
Figure 1 - Touch Panel
Figure 2 - Zones
DMX
Above Water
DMX DMXDMX DMX DMX
LED LIGHT

5
2 COLOR SELECTION
This section will cover the color selection process and various color modes the
Rigid Industries DMX LED Effects control panel can control. The buttons on the
Rigid Industries DMX LED Effects control panel use capacitive touch
technology and will not physically depress when pushed. The electrical
characteristics of your skin are enough for the panel to detect that a selection
has been made.
2.1 RGBW Color Selection
Solid colors can be selected using the buttons on the left side of the DMX
control panel.
Note: Only one solid color can be selected at a time. If color mixing is desired
use the color wheel. See section 3.2.
2.1.1 Red
A single press of the red button will turn all the red channels (DMX slot 1) to full power.
2.1.2 Green
A single press of the green button will turn all the green channels (DMX slot 2) to full
power.
2.1.3 Blue
A single press of the blue button will turn all the blue channels (DMX slot 3) to full
power.
2.1.4 White
A single press of the white button will turn all the white channels (DMX slot 4) to full
power. Pressing and holding the White button for 3 seconds will go to all channels. The
light output color is slightly pink shade of white. This is due to all the color dies on at
once. It provides the absolute most light out of an RGB unit, albeit in a slightly
odd color.
2.2 Color Mixing
Color mixing is possible by using the color wheel. The Cycle button also allows
color mixing as it cycles through the color spectrum. Cycle speed can be
increased or decreased by the center rotary control.
2.2.1 Color Wheel
The color wheel is a fast way to select a color mix shown on the color wheel. When
using any color with no other mode selected, just touch the color you would like.
Note that the center color wheel will also allow for dimming and changing the speed of
the CYCLE mode, so it is important to know that using the color wheel will take charge
of the output only when not in the DIM or CYCLE mode.

6
3 ADVANCED FEATURES
3.1 Cycle
The Cycle button will put the selected DMX universe (CH1, CH2, or both CH1
and CH2) into a preprogrammed light show cycling though all available colors
at a predetermined rate.
The color wheel changes functions to ONLY a speed selector while the panel is
in cycle mode. To use the color wheel as a color selector after cycle mode has
been activated, the cycle must first be turned off. To turn off the cycle program,
touch any dedicated color, off, or save to bring up a different mode.
3.1.1 Cycle Speed
In Cycle mode the color wheel function changes to a cycle speed selector. The cycle
speed can be changed by touching different places on the color wheel. Refer to the
control diagram in figure 1 for the speed indication from 1-100%. Fastest cycle rate
would be in the 11 o’ clock position, slowest in the 1 o’ clock position.
3.2 Dimming
Selecting the Dim button will allow you to use the color wheel as a brightness
controller sending a DMX signal between 0-255 in increments between 1-100%.
The lowest brightness setting will be at the 1 o’clock position and the brightest
will be at 11 o’clock. When dimming is selected, the indicator LED on the
panel next to the Dim button will be flashing. To turn off dim function, touch
the Dim button again. The LED will stop flashing and the system will revert to
the previously used mode.
3.2.1 Dimming Solid Colors
After a solid color has been selected it can be dimmed to the desired level by touching
the Dim button and then selecting the desired brightness on the color wheel.
3.2.2 Dimming in Cycle Mode
Dimming works the same way in Cycle mode as in any other mode. Touch Cycle, then
touch Dim. The indicator LED next to Dim will be flashing. Set the desired brightness,
then touch Dim again. It will revert back to standard Cycle logic (speed vs. dimming on
the wheel).
3.3 Saving Colors
A color can be saved in each of the three DMX universe modes. CH1, CH2, or
both (CH1 and CH2 conjointly).

7
3.3.1 Saving Mixed Colors
After you have selected a color from the color wheel and dimmed it to the desired level,
hold the SAVE key with a “long press” until you see the LED fixture flash. The LED fixture
flashing indicates the color has been saved, and you can now let go of the Save button.
3.3.2 Saving RGBW Colors
After you have selected red, green, blue, or white and dimmed it to the desired level,
touch the save key until you see the color flash. The flash indicates the color has been
saved.
3.3.3 Saving a Cycle
A cycle can be saved by the same way mixed and solid colors are saved. Touching and
holding Save after the desired speed and dim level have been established will save the
cycle to memory. The flashing LED indicates the color has been saved.
3.3.4 Recalling a Saved Scheme
A saved scheme can be recalled by briefly touching Save. The scheme that was last
saved to that specific universe will be displayed.
4 INSTALLATION INSTRUCTIONS
4.1 Install Location
When installing the Rigid Industries DMX LED Effects control panel to your
vehicle care should be taken to ensure that the panel is correctly secured on a
flat surface. Do not install the Rigid Industries DMX LED Effects control panel
on uneven surfaces, DAMAGE TO THE INTERNAL CIRCUITRY CAN RESULT.
4.1.1 Environmental Considerations
The Rigid Industries DMX LED Effects control panel was designed to operate in extreme
conditions. However, it should not be completely submerged in water, or installed in a
location that will be exposed to temperatures greater than 65°C (150°F). The enclosure
has an ingress protection rating of IP67.
4.2 Drilling Pattern
Use the mounting template seen on Page 10 for the five mounting holes.

8
4.2.1 Drill Size
The four outer mounting holes should be drilled with a #28 (9/64”) size drill. The center
hole for the cable should be drilled with at least a Q (0.332”) size drill for adequate cable
and grommet clearance.
4.2.2 Screw Pitch
If you require different length mounting screws or studs than those provided, the correct
thread pitch is #8-32. PLEASE USE CAUTION. Using screws that are of the wrong
length can cause them to bottom out and structurally damage the case.
4.3 Wiring Connections
Use the following instructions for connecting the Rigid Industries DMX LED
Effects control panel to your LED lights.
4.3.1 Connection Wire Color Code
4.3.2 Connectors
The connection between the LED light and the Rigid Industries DMX LED Effects control
panel should be kept free of moisture. If the panel is installed in a marine environment,
a marine grade dry connector must be used.
5 DMX NETWORK ARCHITECTURE AND TOPOLOGY
5.1 Setting up your DMX LED Effects
The Rigid Industries DMX LED Effects will act as a DMX master in your DMX
network. Use this section to understand how the Rigid Industries DMX LED
Effects should be used with your DMX capable LED lights. Note that only one
DMX master may connect to a single DMX universe, if more than one is
connected DMX data will be corrupted.
COLOR
Red
Black
Yellow
Green
Orange
Brown
White
USE
Positive (+) DC Input 10-36V
Negative (-) DC Input 10-36V
DMX Universe 1 Positive(+)
DMX Universe 1 Negative (-)
DMX Universe 2 Positive (+)
DMX Universe 2 Negative (-)
No Connect

9
5.1.1 DMX Network Protocol
The Rigid Industries DMX LED Effects control panel supports unidirectional DMX
communication. DMX is the communication protocol between the master device, the
Rigid Industries DMX LED Effects control panel, and the LED light by individual address-
ing. The panel expects that all slaves are assigned to color channels in this order:
Red – slot 1
Green – slot 2
Blue – slot 3
White – slot 4
This Rigid Industries DMX LED Effects control panel will work on a DMX network with
other DMX devices as long as they accept standard DMX signals, but will only drive the
first four slots on the DMX universe. The panel conforms to all DMX512A for
compatibility.
5.1.2 DMX Network Architecture
You can setup the DMX topology as follows:
• The Rigid Industries DMX LED Effects control panel will output over
DMX slots 1, 2, 3 and 4, corresponding to red, green, blue and white.
5.1.2.1 DMX Network Start Address
The start address of the device is permanently set to DMX slot 1. Only DMX slots 1, 2, 3,
and 4 will be broadcast over the DMX network connected to Rigid Industries DMX LED
Effects control panel. See Figure 3.
Slave Slave Slave Slave
DMX
Address 1
Red
8-Bit DMX51 2 BUS
DMX
Address 1, 2, 3, 4
Red, Green, Blue, White
Address 3
Blue
Address 1, 2, 3, 4
Red, Green, Blue, White
DMX DMX
LED LIGHT
Figure 3 – 8-bit DMX Bus Network Architecture

10
Mounting Template
*If printing from a printer, choose ACTUAL SIZE print option

11
6 SPECIFICATIONS
Physical
• Dimensions 6.3” x 3.8 x 0.50” (L x W x H)
• Weight: 250g
Dimming resolution
• 8-bit DMX512A
Electrical
• Operating supply voltage: 10V-36V DC
• Output short circuit protected
• Input reverse polarity protected
Environmental characteristics
• Case temperature -31°F to 149°F
• Ambient temperature 113°F
• Expected design lifetime at 77°F 10 years in operation
• Ingress Protection: IP66
Network Control
• Communication protocol: DMX512A
• Network standard based on RS-485
• Signal rate: 8ms
• Network resolution: 8 -bit
• Communication: unidirectional (master mode only)
• Network DMX start address:
Slot 1 = red, slot 2 = green, slot 3 = blue, slot 4 = white
Thermal
• On board thermistor

®
Your installation is now complete.
Welcome to the Rigid Nation!
PKG-IS-021 REV3
779 N Colorado St, Gilbert, AZ 85233 • 855-760-5337 ext 1008 • www.rigidindustries.com
Follow us on facebook at
Facebook.com/RigidIndustries
Rigid Industries, Rigid, and DMX are registered and/or unregistered trademarks of JST Performance, Inc. d/b/a Rigid Industries.
Warranty Periods:
• All LED Lights – Limited Lifetime
• Accessories and Mounts – 2 years
Warranty Coverage:
To begin your warranty claim, you must have a Return Merchandise Authorization (RMA) number. To get your RMA
number, please contact our warranty department by phone at 480-655-0100 ext. 1008, or by lling out the Return
Merchandise Authorization Form on our website.
All of the following will immediately void all warranties:
• Customer negligence – The customer has modied the light and/or is not using it for the recommend application.
• Customer abuse – Damage to the light beyond normal wear and tear.
• Repair work done by unauthorized personnel without Rigid Industries’approval.
• If the light has been opened or any screws have been removed.
All warranties are non-transferable. Warranty terms and policies are subject to change without notice.
*For all information regarding the Rigid Industries’ Limited Lifetime Warranty please call 855-760-5337 ext. 1008, email
• Flashlights – 1 year
• Batteries – 90 days
Rigid Industries warrants that this product will be free from defects in material and workmanship. If
you believe your Rigid Industries product is defective, it must be returned to Rigid Industries for
inspection by our warranty claims department. If, after inspection, Rigid Industries veries that the
defect was not caused by negligence, abuse, unauthorized repair or disassembly, Rigid Industries will
determine whether the product will be repaired or replaced in accordance with Rigid Industries
Limited Lifetime Warranty*.
Warranty Information
Table of contents
Other Rigid Industries Lighting Equipment manuals
Popular Lighting Equipment manuals by other brands

TM Technologie
TM Technologie iTECH Z E2 102 S installation instructions

Vision & Control
Vision & Control LDLF60x420-IR850/24V Instructions for use

Avlite
Avlite AV60 Installation & service manual

Blumfeldt
Blumfeldt 10030254 quick start guide

Larson Electronics
Larson Electronics LEDLB-4-IR instruction manual

Emos
Emos LED600 Ultra installation instructions