Ringler RA 240 D2x3 IE2 User manual

Ringler GmbH
73550 Waldstetten [Germany] Fax +49 (0)7171-94 888-28 www.ringler-gmbh.de
Fon +49(0)7171-94888-0
Translation of the Original Operating Manual
RA 240 D3,0 / D5,5 / D2x3,0 IE2
GERMANY
2015-12-10
GBR

2/56
Copyright
Copyright by
Ringler GmbH
Robert-Bosch-Straße 4-8
73550 Waldstetten
GERMANY

3/56
1Safety Instructions.................................................................................................................................7
1.1 Terms................................................................................................................................................. 7
1.1.1 Operation....................................................................................................................................... 7
1.1.2 Maintenance .................................................................................................................................. 7
1.1.3 Qualified Staff ................................................................................................................................ 7
1.2 Symbols............................................................................................................................................. 7
1.3 General safety information................................................................................................................. 9
2Delivery, internal transportation, unpacking.....................................................................................10
2.1 Delivery............................................................................................................................................ 10
2.2 Internal transport.............................................................................................................................. 10
2.2.1 Dimensions and weight................................................................................................................ 10
2.3 Unpacking........................................................................................................................................ 10
2.4 Packaging material.......................................................................................................................... 10
2.5 Storage conditions........................................................................................................................... 11
2.5.1 Information for storage................................................................................................................. 11
3Appliance description..........................................................................................................................12
3.1 Intended Use ................................................................................................................................... 12
3.1.1 Dust class "L"............................................................................................................................... 12
3.1.2 Dust class "M".............................................................................................................................. 12
3.2 Non-Intended Use............................................................................................................................ 13
3.2.1 Dust class "L"............................................................................................................................... 13
3.2.2 Dust class "M".............................................................................................................................. 13
4Layout and function.............................................................................................................................14
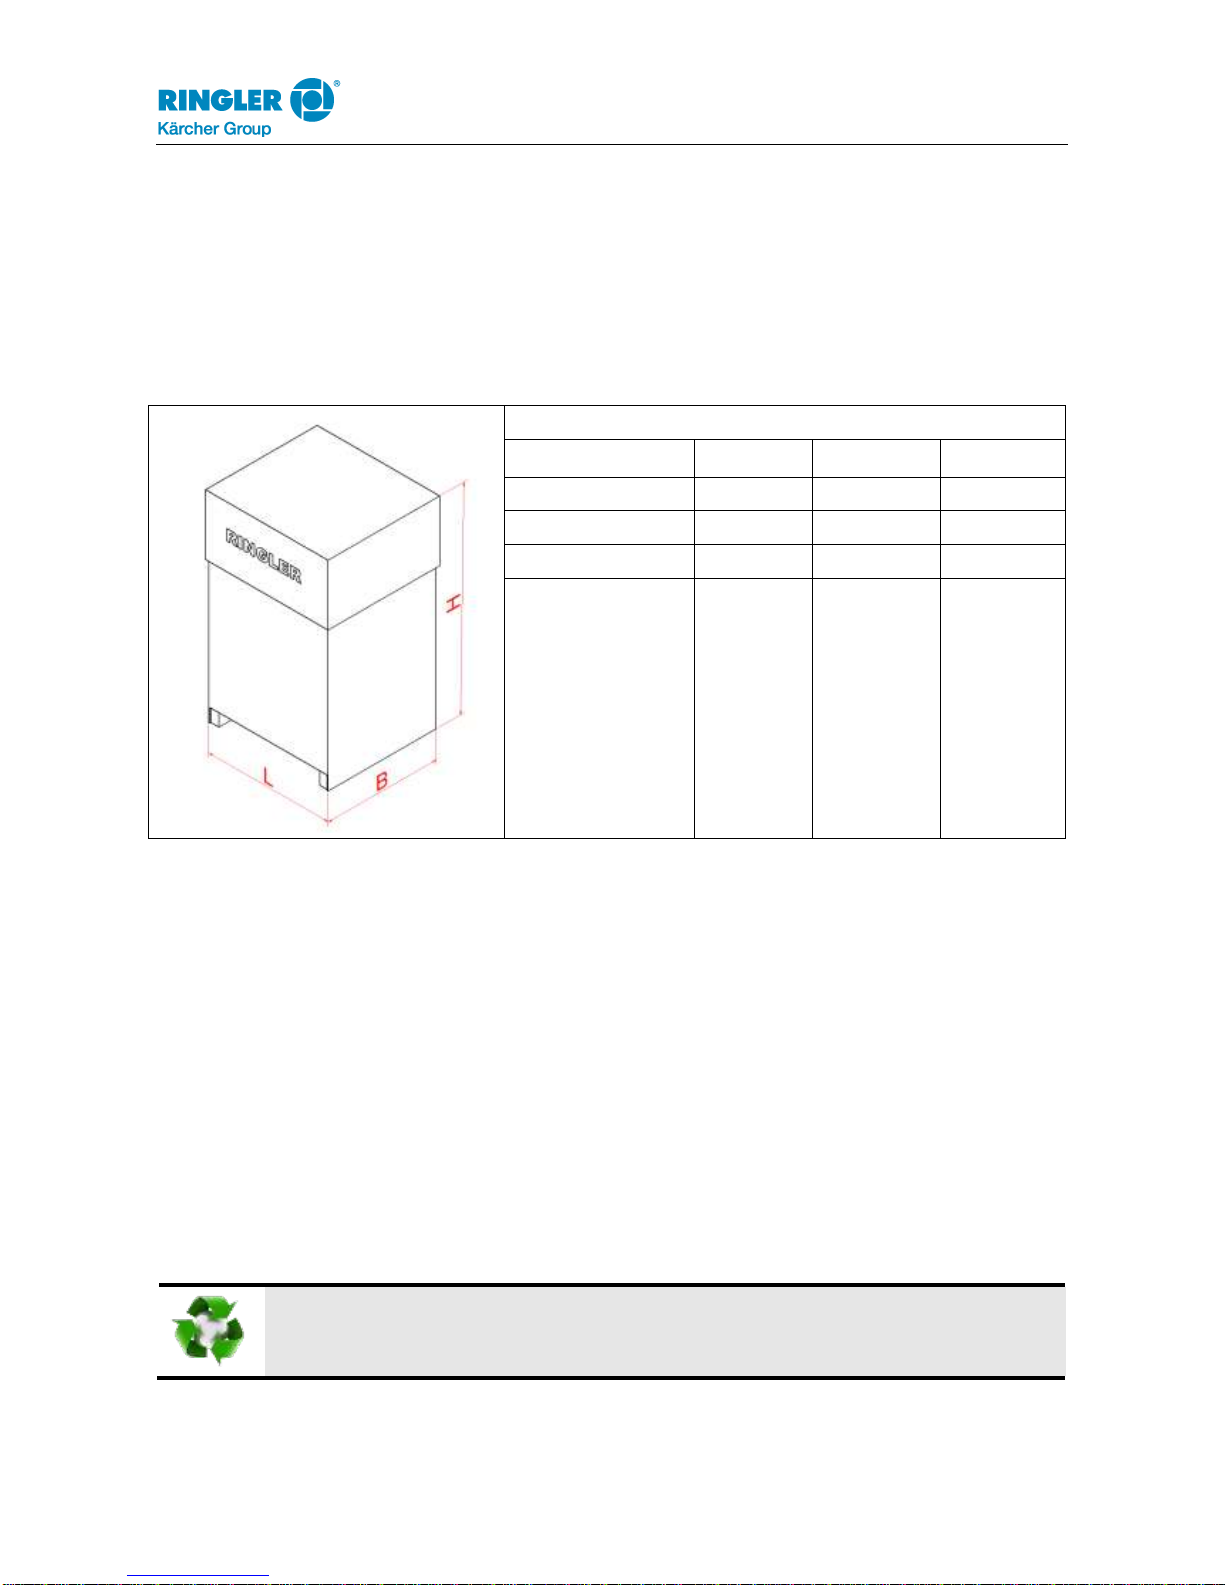
4.1 Main dimensions.............................................................................................................................. 14
4.2 Technical data total device RA 240................................................................................................. 14
4.3 Technical Data D3 IE2..................................................................................................................... 15
4.4 Technical Data D2x3 IE2................................................................................................................. 15
4.5 Technical Data D5.5 IE2.................................................................................................................. 15
5Main components.................................................................................................................................16
5.1 Components RA 240 ....................................................................................................................... 16
5.2 Function Description........................................................................................................................ 16
6Initiation.................................................................................................................................................17
6.1 Assembly Instructions...................................................................................................................... 17
6.2 Initial operation ................................................................................................................................ 17
6.3 Connection to the electric mains ..................................................................................................... 17
6.4 Switching the suction system on and off at the control cabinet....................................................... 18
6.5 Incorrect rotational direction ............................................................................................................ 18
6.6 Check the following before switching it on:...................................................................................... 18
7Operation...............................................................................................................................................19
7.1 Operation......................................................................................................................................... 19
7.1.1 ON / OFF switch Three-phase current ........................................................................................ 19
7.2 Function description Ringler control cabinets.................................................................................. 19
7.3 Button for manual mode .................................................................................................................. 19
7.4 Indicator lamps ................................................................................................................................ 20
7.5 Suction process ............................................................................................................................... 21
7.6 Filter cleaning .................................................................................................................................. 21

4/56
7.6.1 Manual filter cleaning................................................................................................................... 21
7.6.2 Electrical filter cleaning................................................................................................................ 21
8Troubleshooting and fault elimination...............................................................................................22
8.1 Safety instructions ........................................................................................................................... 22
8.2 Initial fault elimination measures ..................................................................................................... 22
9Maintenance/Repair..............................................................................................................................23
9.1 Maintenance regulations.................................................................................................................. 23
9.2 Maintenance intervals table............................................................................................................. 25
9.3 Cleaning........................................................................................................................................... 25
9.4 Changing the filter cloth for the bag-type filter................................................................................. 26
9.4.1 Work steps for pocket filter change ............................................................................................. 27
9.5 Disassembly of the suction turbine.................................................................................................. 29
9.6 Circuit diagram to motor protection switch D 2x3 kW...................................................................... 30
9.7 Circuit diagram for systems with control unit................................................................................... 30
9.8 Warnings on the suction device....................................................................................................... 30
9.8.1 Warning sign for devices in class "L"........................................................................................... 30
9.8.2 Warning sign for devices in class "M".......................................................................................... 31
9.8.3 Marking: Vacuum cleaner............................................................................................................ 31
9.8.4 Type sign ..................................................................................................................................... 31
9.9 Wear parts list.................................................................................................................................. 32
10 Decommissioning, storage .................................................................................................................33
11 Disposal.................................................................................................................................................34
12 Spare Parts List ....................................................................................................................................35
12.1 Drawing/spare parts list RA 240 IE2................................................................................................ 35
12.2 Drawing/spare parts list RA 240 IE2................................................................................................ 36
12.3 Spare parts list/drawing RA drive unit D3 kW IE2 Harting (3401051)............................................. 37
12.4 Spare parts list/drawing RA drive unit D3 kW IE2 Harting (3401051)............................................. 37
12.5 Spare parts list/drawing RA drive unit D 5,5 kW IE2 Harting (3401023)......................................... 39
12.6 Spare parts list/drawing RA drive unit D 5,5 kW IE2 Harting (3401023)......................................... 39
12.7 Spare parts list/drawing RA drive unit D2x3 kW IE2 with Harting (3401052).................................. 41
12.8 Spare parts list/drawing RA drive unit D2x3 kW IE2 with Harting (3401052).................................. 41
12.9 Side channel blowers 3kW IE2 preassembled (2401014)............................................................... 43
12.10 Side channel blowers 3kW IE2 preassembled (2401014)........................................................... 43
12.11 Spare parts list/drawing pre-separator interim ring (2321026).................................................... 44
12.12 Spare parts list/drawing pre-separator interim ring (2321026).................................................... 44
12.13 Spare parts list/drawing basic bracket type RI 751 / RI 750 / RA 701 / RA 240 / RA 250 .......... 45
12.14 Spare parts list/drawing basic bracket type RI 751 / RI 750 / RA 701 / RA 240 / RA 250 .......... 45
12.15 Spare parts list/drawing of filter container 3.2m² (2300230)........................................................ 46
12.16 Spare parts list/drawing of filter container 3.2m² (2300230)........................................................ 46
12.17 Spare Parts List Hood.................................................................................................................. 47
12.18 Spare Parts List Hood.................................................................................................................. 47
12.19 Spare parts list/drawing collection container with emptying flaps ............................................... 48
12.20 Spare parts list/drawing collection container with emptying flaps ............................................... 48
12.21 El. pneumatic set Unloading flap (3240175)................................................................................ 49
12.22 El. pneumatic set Unloading flap (3240175)................................................................................ 49
12.23 Construction kit hand emptying flap (3240194)........................................................................... 50

5/56
12.24 Construction kit hand emptying flap (3240194)........................................................................... 50
12.25 Construction kit pendulum emptying flap (3240189)................................................................... 51
12.26 Construction kit pendulum emptying flap (3240189)................................................................... 51
12.27 Chip funnel upper part, complete with screw-on tabs (2611065)................................................ 52
12.28 Chip funnel upper part, complete with screw-on tabs (2611065)................................................ 52
12.29 Spare parts list/drawing pocket filter 3.2m², Kat. "L" as / "L" as (2350202/2350115) ................. 53
12.30 Spare parts list/drawing pocket filter 3.2m², Kat. "L" as / "L" as (2350202/2350115) ................. 53
12.31 Spacer rake for pocket filter 1.75/3.2/5.2m², (2381000), (2381001), (2381002)......................... 54
12.32 Spacer rake for pocket filter 1.75/3.2/5.2m², (2381000), (2381001), (2381002)......................... 54
12.33 List of spare parts/drawing suction hose unit DN 50, pipeline connection, all types................... 55
12.34 List of spare parts/drawing suction hose unit DN 50, pipeline connection, all types................... 55
13 EEC-Declaration of Conformity...........................................................................................................56

Safety Instructions
6/56
Pos: 1.1 /1 Grundlegend e Sicherheitshin weise/Kapitelüberschrif t 1A ngaben zur Sicher heit@ 0\mod_1261472663260_ 131.docx @ 973 @ 1 @ 1

Safety Instructions
7/56
1 Safety Instructions
Pos: 1.2 /1 Grundlegend e Sicherheitshin weise/Kapitelüberschrif t 2B egriffe @ 0\mod _1261472746655_ 131.docx @ 980 @ 2 @ 1
1.1 Terms
Pos: 1.3 /1 Grundlegend e Sicherheitshin weise/Begriffe-Betri eb @ 0\mod_12614 86420512_131.doc x @1 040 @ 3 @ 1
1.1.1 Operation
includes installation, initiation (placing at disposal for usage), operation (handling, connection,
disconnection, etc.)
Pos: 1.4 /1 Grundlegend e Sicherheitshin weise/Begriffe-Inst andhaltung @ 0\mo d_126148670478 3_131.docx @ 1046 @ 3 @ 1
1.1.2 Maintenance
includes control and attendance (inspections, revisions), maintenance and repair (detection of errors
and their elimination).
Pos: 1.5/ 1 Grundlegende Sicher heitshinweise/Begriff e-qu alifiziertes Personal @ 0\mod_1 261486829253_1 31.docx @ 1052 @ 3@ 1
1.1.3 Qualified Staff
are employees authorised by the person responsible for the security of the installation to carry out
the operations required in each case and who are able to recognise and avoid possible dangers by
reason of their training, experience and instructions as well as their knowledge of relevant norms,
prescriptions, accident-prevention rules and working conditions.
Pos: 1.6 /1 Grundlegend e Sicherheitshin weise/Kapitelüberschrif t 2S ymbole @ 0\mo d_1261473167732_ 131.docx @ 987 @ 2 @ 1
1.2 Symbols
Pos: 1.7 /1 Grundlegend e Sicherheitshin weise/Signalwort-F eld"Hi nweis" @ 0\ mod_126140496043 9_131.docx @ 905 @ @1
NOTICE
Pos: 1.8/ 1 Grundlegende Sicher heitshinweise/Text zu Hinweiss ymbol @ 0\mod_12614773 45812_131.docx @ 1014 @ @ 1
Denotes information that does not relate to personal injuries.
This information contains additional directions or general hints.
Pos: 1.9 /1 Grundlegend e Sicherheitshin weise/Signalwort-F eld" Vorsicht" @ 0\mo d_126140489817 1_131.docx @ 899 @ @1
CAUTION
Pos: 1.10 /1 Grundlegen deSi cherheitshinweis e/Text zu Vorsichtss ymbol @ 0\mod_ 1261475623349_ 131.docx @ 1000 @ @1
Dangerous situation, which could result in minor to moderate injury if it is not avoided.
This information must be regarded strictly to avoid damages to the installation or environment!
Pos: 1.11 /1 Grundlegen deSi cherheitshinweis e/Signalwort-Fel d" Warnung" @ 0\ mod_1261404807 286_131.docx @ 893 @ @ 1
WARNING
Pos: 1.12 /1 Grundlegen deSi cherheitshinweis e/Text zu Warns ymbol, Allgemein @ 0\ mod_12614754346 12_131.doc x@ 994 @ @1
Dangerous situation, which could result in serious injury or death if it is not avoided.
Pos: 1.13 /1 Grundlegen deSi cherheitshinweis e/Signalwort-Fel d" Gefahr" @ 0\mod_12614047 09797_131.docx @ 887 @ @1
DANGER
Pos: 1.14 /1 Grundlegen deSi cherheitshinweis e/Text zu Gefahrensym bol @ 0\mod _1261477187354_1 31.docx @ 1007 @ @ 1
Dangerous situation, which will definitely result in serious injury or death if it is not avoided.
Pos: 1.15 /1 Grundlegen deSi cherheitshinweis e/Hinweis Bedeutu ng der Betriebsanleit ung @ 0\mod_12 61470697948_131.d ocx @ 960 @ @1
Significance of the Operating Manual
This Operating Manual is part of the supplied product.
The Operating Manual remains valid throughout the product's lifetime, provided that no
technical changes are made.
If the product is sold, the Operating Manual must be handed over to the next owner or user.
Pos: 1.16 /1 Grundlegen deSi cherheitshinweis e/Hinweis Leses ymbol @ 0\mod_12 61405473678_13 1.docx @ 911 @ @1
This information must be read before first commissioning.
Pos: 1.17 /1 Grundlegen deSi cherheitshinweis e/Hinweis WARNUNG -Vor Ben utzung der Maschine @ 4\ mod_135850004 6626_131.doc x@ 3749 2 @ @ 1
WARNING - Read the instructions before using the machine
Pos: 1.18 /1 Grundlegen deSi cherheitshinweis e/Hinweis CE-Zeic hen @ 0\mod_1 261407630923_131. docx @ 953 @ @1
CE marking
The CE marking means "Communautés Européennes". It is the external symbol which states
that a product fulfils the requirements imposed on the manufacturer by the European

Safety Instructions
8/56
Community.
Pos: 1.19 /1 Grundlegen deSi cherheitshinweis e/Hinweis Sicher heitsschuhe @ 0\mo d_126140651644 6_131.docx @ 925 @ @ 1
Only use with safety shoes (acc. to EN ISO 20345)
Pos: 1.20 /1 Grundlegen deSi cherheitshinweis e/Hinweis Arbeitsh andschuhe @ 0\ mod_1261407294 655_131.docx @ 932 @ @ 1
Only use with work gloves
Pos: 1.21 /1 Grundlegen deSi cherheitshinweis e/Hinweis Ate mschutz @ 4\mod_13 58754071540_13 1.docx @ 37562 @ @ 1
Respiratory protection (EN 149:2001)
Pos: 1.22 /1 Grundlegen deSi cherheitshinweis e/Hinweis Schutz kleidung benutze n@ 4 \mod_13588490 45279_131.doc x@ 37727 @ @1
Use protective clothing (acc. to EN 13982-1)
Pos: 1.23 /1 Grundlegen deSi cherheitshinweis e/Hinweis Schutz brilleb enutzen @ 4\ mod_13588670322 29_131.doc x@ 37 738 @ @ 1
Use protective glasses (acc. to DIN EN 166 1349-BT)
Pos: 1.24 /1 Grundlegen deSi cherheitshinweis e/Hinweis Netzst ecker ziehen @ 0\mo d_1261407392098 _131.docx @ 939 @ @ 1
Before starting work remove the plug from the wall socket!
Pos: 1.25 /1 Grundlegen deSi cherheitshinweis e/Hinweis Vor Begin n der Arbeiten freischalt en@ 4\mod_1362652119939_ 131.docx @ 41545 @ @ 1
Disconnect before starting work
Pos: 1.26 /1 Grundlegen deSi cherheitshinweis e/Hinweis ele ktrische Spannung @ 0\ mod_126140762 8039_131.docx @ 9 46@ @ 1
While operating electrical machines, certain parts of them are inevitable alive dangerously or
under mechanical stress.
Pos: 1.27 /1 Grundlegen deSi cherheitshinweis e/Warnung vor H andverletzungen @ 4 \mod_1361977 699198_131.docx @ 4 0751@ @ 1
Hand injury warning sign!
Pos: 1.28 /1 Grundlegen deSi cherheitshin weise/Hinweis Recycl ingsymbol @ 0\m od_1261489835239 _131.docx @ 1060 @ @ 1
Recycling symbol
This information must be observed in order to preserve the environment!
Pos: 2/ 0 Allgemeines/Seit enumbruch @ 0\ mod_12652720 07940_0.docx @ 2191 @ @ 1

Safety Instructions
9/56
Pos: 3.1 /1 Grundlegend e Sicherheitshin weise/Sicherheitsinfor mationen Wechsels trom-Geräte/Üb erschrift: Allgem eine Sicherheitsinfor mationen @ 0\mod_1 269504752362 _131.docx @ 3486 @ 2 @ 1
1.3 General safety information
Pos: 3.2 /1 Grundlegend e Sicherheitshin weise/Signalwort-F eld" Warnung" @ 0\mod _12614048072 86_131.docx @ 893 @ @ 1
WARNING
Pos: 3.3/ 1 Grundlegende Sicher heitshinweise/Hinweis ele ktrischeS pannung @ 0\mod_12 61407628039_13 1.docx@ 9 46@ @ 1
While operating electrical machines, certain parts of them are inevitable alive dangerously or
under mechanical stress.
Pos: 3.4 /1 Grundlegend e Sicherheitshin weise/Sicherheitsinfor mationen Wechsels trom-Geräte/A ufgrund ihrer funktion ellb edingten elektrisc hen @ 0\mod_12695 04589175_131. docx@ 3480@ @1
Due to their electrical and mechanical functional properties, machines can cause severe injuries
and damage to property. This particularly applies in the event of incorrect use, operation or
maintenance, or in the event of unauthorized interventions!
Pos: 3.5 /1 Grundlegend e Sicherheitshin weise/Sicherheitsinfor mationen Wechsels trom-Geräte/All e elektrischen und mech anischen Tätig keiten@ 4 \mod_1361 281988815_131.doc x@ 39784@ @1
All electrical work must be performed by a qualified electrician. All mechanical work must be carried
out according to instructions (see Maintenance / Repair). The device may be operated only by
qualified personnel who have read and understood the operating instructions.
Pos: 3.6 /1 Grundlegend e Sicherheitshin weise/Sicherheitsinf ormationen Wec hselstrom-Geräte/V or dem Gebrauch muss di e Bedienperson mit Infor mationen,... @ 4\mo d_136128438804 0_131.docx @ 39794 @ @ 1
The operator must be provided with information, instructions and training on the materials to be
absorbed, including a secure procedure for removal of the absorbed material, before use.
Pos: 3.7 /1 Grundlegend e Sicherheitshin weise/Sicherheitsinfor mationen Wechsels trom-Geräte/All eHi nweise und Angab en aufd en Maschinen müssen beachtet werd en @ 0\mod_12 69504980970_131.d ocx @ 3498 @ @1
All notes and data on the machines must be observed!
Pos: 3.8 /1 Grundlegend e Sicherheitshin weise/Sicherheitsinfor mationen Wechsels trom-Geräte/Di e einwandfreie und sich ereN utzung dieser Maschi ne setzt @ 0\mod_ 126950505024 0_131.docx @ 3504 @ @1
Faultless and safe use of this machine includes correct transport and storage, as well as operation
in accordance with regulations and careful maintenance!
Pos: 3.9 /1 Grundlegend e Sicherheitshin weise/Sicherheitsinf ormationen Wec hselstrom-Geräte/Di eses Gerät ist nicht dafür b estimmt....... @ 4\mo d_136128495724 2_131.docx @ 39812 @ @ 1
This device is not intended for being used by persons (including) with limited physical, sensory or
mental skills or lack of experience and/or lack of knowledge except if they are supervised by a
person responsible for their safety or were instructed in how to use the device by this person.
Children should be supervised to ensure that they do not play with the device.
Pos: 3.10 /1Gr undlegende Sich erheitshinweise/D erBetrie b des Gerätsis t nur auf bisz u 10°g eneigtem Untergru nd mit ausreichender Tragfähig keit z @ 6\mod_14018 94237321_131.docx @ 6042 7@ @ 1
•Operation of the device is only permitted on underground sloping no more than 10° and with
sufficient load-bearing capacity.
Pos: 3.11 /1 Grundlegen deSi cherheitshinweis e/Signalwort-Fel d" Vorsicht" @ 0\m od_12614048981 71_131.docx @ 899 @ @ 1
CAUTION
Pos: 3.12 /1 Grundlegen deSi cherheitshinweis e/Hinweis Sicher heitsschuhe @ 0\mo d_126140651644 6_131.docx @ 925 @ @ 1
Only use with safety shoes (acc. to EN ISO 20345)
Pos: 3.13 /6 Inbetriebnah me/Gliedmaßen hera usziehen @ 6\ mod_1401955740 123_131.docx @ 6048 4@ @ 1
•Do not place any limbs between parts to be joined during assembly of the machine parts. When
moving the parts, pull limbs from tightening spaces in time.
Pos: 3.14 /6 Inbetriebnah me/Spänesauger/N etzanschlussl eitungen überprüfe n@ 0 \mod_1269349 980705_131.doc x@ 3197@ @1
•Make sure that the power supply cord is not damaged by being run over, crushed, tugged etc..
Stop the industrial vacuum cleaner immediately if necessary!
•The power supply cord must be regularly inspected for signs of damage or ageing!
•Connectors of power supply cords must at least be splash-proof!
Pos: 3.15 /6 Inbetriebnah me/Spänesauger/Di e Inbetriebnahm e ohneF ilter oder einem besc hädigten Filter ist nicht zuläs sig @ 0\mod_ 1269350986591_13 1.docx @ 3227 @ @1
•Starting without a filter or with a damaged filter is not allowed
Pos: 3.16 /1 Grundlegen deSi cherheitshinweis e/Sicherheitsi nformationen Wechselstr om-Geräte/D as Sauggerät darf nicht b etrieben werden, wenn an Verschlüsse n@ 0 \mod_126950 5708187_131.doc x@ 3510@ @1
The suction device must not be operated if wear is detected on fasteners or mounting brackets.
Please arrange for a service immediately, or send the industrial vacuum cleaner for repair to:
Pos: 3.17 /1 Grundlegen deSi cherheitshinweis e/Sicherheitsi nformationen Wechselstr om-Geräte/ Service Adressse Ringl er @ 0\mod_12695 05846364_131.doc x@ 3516@ @1
Ringler GmbH
Abt. Service
Robert-Bosch-Straße 4-8
73550 Waldstetten
Tel: ++49-7171-94888-23
Pos: 4.1/ 2 Verpackung, Transport, Lager ung/Anlieferung, innerb etrieblicher Transport, Auspac ken@ 0 \mod_1261397 580765_131.docx @ 840 @ 1 @ 1

Delivery, internal transportation, unpacking
10/56
2 Delivery, internal transportation, unpacking
Pos: 4.2/ 2 Verpackung, Transport, Lager ung/Anlieferung @ 0\mo d_1261401230055_ 131.docx @ 853 @ 2@ 1
2.1 Delivery
Unload the scope of delivery on level ground with sufficiently sized industrial trucks.
Pos: 4.3/ 2 Verpackung, Transport, Lager ung/Innerbetrieblich erTra nsport @ 0\mod_1261 401337747_131.doc x@ 860 @ 2 @ 1
2.2 Internal transport
Transport scope of supply to the site of setup secured against movement or tipping with a sufficiently sized
industrial truck.
Pos: 4.4 /2 Verpackung, Tr ansport, Lagerung/Ü berschrift: Abmess ungen und Gewicht @ 0\ mod_12695079 46238_131.docx @ 3 536 @ 3 @ 1
2.2.1 Dimensions and weight
Pos: 4.5 /2 Verpackung, Tr ansport, Lagerung/T abelle: Abmessung enu ndG ewicht RA 240 @ 4\ mod_13612856 37158_131.doc x@ 39 823 @ @1
Packing
without base frame
D 3,0
D 5,5
2xD3,0
L (mm)
660
660
660
B (mm)
840
840
840
H (mm)
1916
1916
1916
Weight incl. packing
(kg)
250
290
280
Pos: 4.6 /2 Verpackung, Tr ansport, Lagerung/ Auspacken @ 0\mo d_1261401340912 _131.docx @ 867 @ 2 @ 1
2.3 Unpacking
Make sure that no components are left in the packaging.
Scope of delivery: -Suction device
-Technical Manual
Pos: 4.7/ 2 Verpackung, Transport, Lager ung/Verpackungs material @ 0\mod_126140 1408372_131.doc x@ 874 @ 2 @ 1
2.4 Packaging material
The packaging materials must be disposed of in accordance with the valid legal requirements.
Correct disposal of this product (electrical waste) (applicable in the countries of the European Union
and other European countries with a separate collection system)
The identification on the product and on the associated literature states that it must not be disposed of
along with normal domestic waste at the end of its service life. Please dispose of this device
separately from other waste, in order to prevent damage to the environment or to human health
through uncontrolled waste disposal. Please recycle this device, in order to promote sustainable re-
use of material resources. Private users should contact the dealer from whom they purchased the
product or the competent authorities, in order to find out how they can recycle the device in an
environmentally-
friendly manner. Commercial users should contact their supplier. This product must not be disposed of
along with other commercial waste.
Pos: 4.8/ 1 Grundlegende Sicher heitshinweise/Hinweis Rec yclingsymbol @ 0\mod_126 1489835239_131. docx @ 1060@ @ 1
Recycling symbol
This information must be observed in order to preserve the environment!
Pos: 5.1/ 2 Verpackung, Transport, Lager ung/Lagerbedingu ngen,Hi nweis zur Lagerung @ 0\mod _1263472277994_13 1.docx @ 1350 @ 23@ 1

Delivery, internal transportation, unpacking
11/56
2.5 Storage conditions
2.5.1 Information for storage
Should the industrial exhauster not be operated for a longer period of time, so it has to be stored in
dry, dust and vibrationless rooms.
Temperature T: -10…+40°C
Humidity: max. 85%
Pos: 6.1 /3 Beschreibung d erM aschine, Verwend ung/Gerätebeschrei bung-Übersc hrift @ 0\mod_12 61493001970_131.d ocx @ 1076 @ 1 @ 1

Appliance description
12/56
3 Appliance description
Pos: 6.2 /3 Beschreibung d erM aschine, Verwend ung/Überschrift: Bes timmungsgemäße V erwendung @ 1\ mod_133518171 4405_131.doc x@ 115 00 @ 2 @ 1
3.1 Intended Use
Pos: 6.3 /1 Grundlegend e Sicherheitshin weise/Signalwort-F eld"Hi nweis" @ 0\ mod_126140496043 9_131.docx @ 905 @ @1
NOTICE
Pos: 6.4 /3 Beschreibung d erM aschine, Verwend ung/Anlage, die in Baugr uppen ausgeliefert für Einsatz in Gewer be(N ass für stationäre G eräte) @ 4\mod_ 1362726130523_13 1.docx @ 41582 @ @ 1
•This plant, which is delivered in assemblies, is designed as a wet and dry vacuum cleaner for
commercial and industrial applications e.g. in hotels, schools, hospitals, factories, shops, offices
and rent transactions. It is particularly suitable for vacuuming up chips, granulate, silt and non-
flammable liquids.
Pos: 6.5 /3 Beschreibung d erM aschine, Verwend ung/Die Maschin e darfn ur betrieben werden, wenn alle Filter richtig eingesetzt u nd unbeschädigt sin d@ 4 \mod_1361286 688952_131.docx @ 3 9834@ @ 1
The machine may only be operated when all filters installed correctly and undamaged.
Pos: 6.6/ 3 Beschreibung der Maschi ne, Verwendung/Bei Sch aum- oderFl üssigkeitsaus tritts ofort abschalten! @ 0\mod _1269510877136 _131.docx @ 3568 @ @1
•Switch off immediately if foam or liquid escapes!
Pos: 6.7 /1 Grundlegend e Sicherheitshin weise/Signalwort-F eld" Warnung" @ 0\mod _12614048072 86_131.docx @ 893 @ @ 1
WARNING
Pos: 6.8.1 /3 Beschreibung der Maschi ne, VerwendungÜberschrift: S taubklasse" L" @ 2\mod_13452 07106541_131.doc x@ 20 618 @ 3@ 1
3.1.1 Dust class "L"
Observe warning sign on the device!
Pos: 6.8.2 /3 Beschreibung der Maschi ne, VerwendungGe eignetf ürtr ockene, gesundheitsg efährliche, nicht brennbar eSt äube nach Staubklass e L@ 2\ mod_1344406097 881_131.docx @ 20190 @ @1
•The device is suitable for dusts hazardous to health and not flammable with workplace
limit >1mg/m³ according to dust class L (max. permeability <1%) according to DIN EN
60335-2-69 Annex AA:2010.
Pos: 6.9.1 /3 Beschreibung der Maschi ne, Verwendung/Überschri ft: Staubklasse "M" @ 2\mod_1345 207107097_131.d ocx@ 2 0627@ 3 @ 1
3.1.2 Dust class "M"
Observe warning sign on the device!
Pos: 6.9.2 /3 Beschr eibung der Mas chine, Verw endung/Staub klasse „M“ beinh altet die Staubklass e „L“. @ 3\mod_1350479 497308_131 .docx @ 3 1982 @ @1
Dust class "M" contains dust class "L".
Pos: 6.9.3 /3 Beschreib ung der Maschine, Verw endung/Geeignet für troc kene, gesundh eitsgefährliche, nicht bre nnbare Stäube nach S taubklasse M @ 2\mo d_13444063311 61_131.docx @ 201 98@ @ 1
•The device is suitable for dusts hazardous to health and not flammable with workplace limit
≥0.1mg/m³ according to dust class M (max. permeability <0.1%) according to DIN EN
60335-2-69 Annex AA:2010.
Pos: 6.10 /0Allg emeines/Seit enumbruch @ 0\mod_1265 272007940_0.doc x@ 219 1@ @1

Appliance description
13/56
Pos: 6.11 /3 Beschreibung derM aschine, Ver wendung/Übersc hrift: Nicht bestim mungsgemäße Ver wendung @ 1\mod_133 5941486446_13 1.docx @ 12040 @ 2 @ 1
3.2 Non-Intended Use
Pos: 6.12 /1 Grundlegen deSi cherheitshinweis e/Signalwort-Fel d"H inweis" @ 0\mod _12614049604 39_131.docx @ 905 @ @ 1
NOTICE
Pos: 6.13 /3 Beschreibung derM aschine, Ver wendung/Pers onen- und Sachschäd en, nicht besti mmungsgemäße Ver wendung @ 4\mod_1 361974611424_131. docx @ 40732 @ @1
For all personal injuries and material damages, which are caused by a not -asdirected-
use, the operator and not the manufacturer of the machine is
responsible for !
Pos: 6.14 /3 Beschreibung derM aschine, Ver wendung/Eins atzi mFr eien nicht gestattet! @6\mod_1 402927556366 _131.docx @ 61608 @ @1
•May not be used outdoors!
Pos: 6.15 /1 Grundlegen deSi cherheitshinweis e/Signalwort-Fel d" Warnung" @ 0\ mod_1261404807 286_131.docx @ 893 @ @ 1
WARNING
Pos: 6.16 /3 Beschreibung derM aschine, V erwendung/Nic htge eignet für brennbare S täube @ 4\mod_136 1865721690_131. docx @ 40592 @ @1
•This device is not suitable for taking up and extracting combustible dusts.
Pos: 6.17 /3 Beschreibung derM aschine, Ver wendung/Nic htgeeig net für brennbare Flü ssigkeiten @ 4\mo d_136057351916 6_131.docx @ 39443 @ @ 1
•This device is not suitable for taking up and extracting flammable liquids (flammable, highly
flammable, highly flammable hazardous substances according to Directive 67/548/EEC)
(Flash Point under 55°C) as well as mixtures of combustible dusts with flammable liquids.
Pos: 6.18 /3 Beschreibung derM aschine, Ver wendung/Nic hti n explosionsgefährde tenR äumen zugelassen! @0\mo d_126951124276 2_131.docx @ 3587 @ @1
•The vacuum cleaner is not approved for operation in potentially explosive areas!
Pos: 6.19 /1 Grundlegen deSi cherheitshinweis e/Signalwort-Fel d" Gefahr" @ 0\mo d_126140470979 7_131.docx @ 887 @ @1
DANGER
Pos: 6.20 /3 Beschreibung derM aschine, Ver wendung/Bei nicht bestimmungsgemäßer Verwe ndung besteht Explosi ons- und Brandgefahr @ 1 \mod_1335941 594717_131.doc x@ 1 2048 @ @ 1
•With improper use may cause explosion and fire!
Pos: 6.21.1 /3 Beschreibung der Maschin e,V erwendungÜbersc hrift:St aubklasse "L" @ 2\mod_1345 207106541_131.d ocx@ 2 0618@ 3 @ 1
3.2.1 Dust class "L"
Observe warning sign on the device!
Pos: 6.21.2 /3 Beschrei bung derM aschine, Ver wendungNicht geeig netf ür Staubklasse M und H @ 2\ mod_134520 5305674_131.d ocx @ 20609 @ @1
•The device is not suitable for dust class Mand H.
Pos: 6.21.3 /3 Beschrei bung derM aschine, Ver wendung/Nicht geeign et für krebserrege nde Gefahrstoffe ge mäßG efStoffV, TRGS @ 8 \mod_142410011 5484_131.doc x@ 784 70@ @ 1
•The device is not suitable for carcinogenic hazardous substances purs. to GefStoffV §10,
TRGS 905 or TRGS 906.
Pos: 6.21.4 /3 Beschrei bung derM aschine, Ver wendungNicht geeig netf ür Asbest @ 2\ mod_134484222280 5_131.docx @ 20352 @ @ 1
•The device is not suitable for asbestos pursuant to TRGS 519.
Pos: 6.22.1 /3 Beschreibung der Maschin e,V erwendungÜbersc hrift:St aubklasse "M" @ 2\mod_ 1345207107097_13 1.docx@ 2 0627 @ 3@ 1
3.2.2 Dust class "M"
Observe warning sign on the device!
Pos: 6.22.2 /3 Beschreibung der Masc hine, VerwendungNicht ge eignetf ür Staubklasse H @ 2\ mod_1344840346272 _131.docx @ 20343 @ @1
•The device is not suitable for dust class H.
Pos: 6.22.3 /3 Beschrei bung derM aschine, Ver wendung/Nicht geeign et für krebserrege nde Gefahrstoffe ge mäßG efStoffV, TRGS @ 8 \mod_142410011 5484_131.doc x@ 784 70 @ @ 1
•The device is not suitable for carcinogenic hazardous substances purs. to GefStoffV §10,
TRGS 905 or TRGS 906.
Pos: 6.22.4 /3 Beschrei bung derM aschine, Ver wendungNicht geeig netf ür Asbest @ 2\ mod_134484222280 5_131.docx @ 20352 @ @ 1
•The device is not suitable for asbestos pursuant to TRGS 519.
Pos: 7.1 /4 Aufbau und Funktio n, Technische Date n/Aufbau und Fun ktion@ 0\mod_1263203845612_ 131.docx @ 1120 @ 1 @ 1

Layout and function
14/56
4 Layout and function
Pos: 7.2 /4 Aufbau und Funktio n, Technische Date n/Ringler Industri esauger und Absauganl ageni n stationärer Ausf ührung werden in Baugr uppen @ 1\mod_1 288959622605_13 1.docx @ 6993 @ @1
Ringler industrial vacuum cleaners and suction systems designed as stationary models are supplied in
components and assembled on site.
Pos: 7.3 /4 Aufbau und Funktio n, Technische Date n/Überschrift: Hauptm aße@ 1\mod_1288959443 995_131.docx @ 6980 @ 2@ 1
4.1 Main dimensions
Pos: 7.4 /4 Aufbau und Funktio n, Technische Date n/RA/Zeichnung RA 240 @ 1\mod_1336398679246_ 131.docx @ 12387 @ @ 1
Pos: 7.5 /4 Aufbau und Funktio n, Technische Date n/IE2/RATechnisc heD aten RA 240 IE2 @ 6\ mod_1403009440 126_131.docx @ 618 27@ 2 @ 1
4.2 Technical data total device RA 240
weight
D3
D5,5
D2x3
approx. 203Kg
approx. 246Kg
approx. 338Kg
Sound pressure level LpA
Determined to EN 60335-2-69
70dB(A)
69dB(A)
72dB(A)
Uncertainty KpA
2dB(A)
Protective class
I
ambient temperature
-15°C to +40°C
intake temperature medium
max. +40°C
Installation altitude
max. 1000m over NN
Pos: 7.6/ 0 Allgemeines/Seite numbruch @ 0\mod_12652 72007940_0.docx @ 2191 @ @ 1

Layout and function
15/56
Pos: 7.7 /4 Aufbau und Funktio n, Technische Date n/IE2/AntriebeTec hnische Daten D3 IE2 @ 7\ mod_14170048 80972_131.docx @ 7 3285 @ 2 @ 1
4.3 Technical Data D3 IE2
Power
3,0kW
3,45kW
Frequency
50Hz
60Hz
Hedging
16A
16A
Voltage/
power consumption
200-260V / 11,4A Δ
230-290V / 10,8A Δ
350-450V / 6,5A Y
400-500V / 6,2A Y
Pressure
-260 / +270mbar
-240 / +230mbar
Blower Output
315m³/h
375m³/h
Degree of protection
IP 55
of efficiency
IE2-85,5
cosφ 0,82
Pos: 7.8 /4 Aufbau und Funktio n, Technische Date n/IE2/AntriebeTec hnische Daten D2x3,0 IE 2 @ 6\mod_14 02990032699_131.d ocx @ 61719 @ 2 @ 1
4.4 Technical Data D2x3 IE2
Power
6,0kW
6,9kW
Frequency
50Hz
60Hz
Hedging
16A
16A
Voltage/
power consumption
200-260V / 22,8A Δ
230-290V / 21,6A Δ
350-450V / 13,0A Y
400-500V / 12,4A Y
Pressure
-260 / +250mbar
-230 / +220mbar
Blower Output
630m³/h
750m³/h
Degree of protection
IP 55
of efficiency
IE2-85,5
cosφ 0,82
Sound pressure level
63dB(A)
Pos: 7.9 /4 Aufbau und Funktio n, Technische Date n/IE2/AntriebeTec hnische Daten D5,5 IE2 @ 6\mod_1402985884820_13 1.docx @ 61638 @ 2 @ 1
4.5 Technical Data D5.5 IE2
Output
5.5 kW
6.3kW
Frequency
50Hz
60Hz
Hedging
25A
25A
Voltage/
Power intake
350-450V / 11.1A Δ
400-500V / 11.0A Δ
610-725V / 6.4A Y
690-725V / 6,4A Y
Pressure
-240 / +220mbar
-180 / +170mbar
Air displacement
volume
495m³/h
595m³/h
Protection type
IP 55
Efficiency
IE2-87.0%
cosφ 0.92
Pos: 8.1/ 5 Anlagenbeschrei bung, Bedienungs- und Anz eigeelemente, Betriebsart en/Hauptkompo nenten, Kapitelüberschrift @ 0\ mod_126338734 9738_131.docx @ 1276 @ 1 @ 1

Main components
16/56
5 Main components
Pos: 8.2 /5 Anlagenbesc hreibung, Bedienu ngs- und Anzeigeele mente, Betriebsart en/RA/Überschrift: B estandteile RA 240 @ 1\m od_133639744 4770_131.docx @ 123 79@ 2@ 1
5.1 Components RA 240
Pos: 8.3 /5 Anlagenbesc hreibung, Bedienu ngs- und Anzeigeele mente, Betriebsart en/RA/Zeichung Haupt komponenten RA 240 @ 2\mod_1342422783749_0.d ocx @ 19591 @ @1
Pos: 8.4 /5 Anlagenbesc hreibung, Bedienu ngs- und Anzeigeele mente, Betriebsart en/RA/Tabelle zu Zeic hnung Hauptkompone nten RA 240 @ 1\mo d_133639725308 4_131.docx @ 12363 @ @ 1
A
Drive unit
B
Hood
C
Filter container
D
Pre-separator interim ring with socket
E
Emptying flap
F
Collection container
G
Frame
H
Shaker
Pos: 8.5 /5 Anlagenbesc hreibung, Bedienu ngs- und Anzeigeele mente, Betriebsart en/RA/Funktionsbesc hreibung RA 240, RA 2 50@ 2\mod_1340975047968_ 131.docx @ 18870 @ 2 @ 1
5.2 Function Description
The device comprises a stationary drive unit and a frame connected by hose to the filter and collection
container. A turbine in the drive part generates a vacuum. This vacuum sucks in contaminated "raw
air" at the suction socket. Heavy particles drop directly down at the input into the hose connection
because of gravity. Dusts and finer particles are separated at the pocket filter. The dedusted "pure air"
flows through the hood and a hose to the turbine from where it is extracted. At the turbine output, the
air exists into the environment through a muffled outlet channel. The collection container is emptied
via the emptying flap/sluice.
Pos: 9.1/ 6In betriebnahme/Inb etriebnahme, Kapitelübersc hrift @ 0\mod_126348 1987997_131.doc x@ 136 2@ 1 @ 1

Initiation
17/56
6 Initiation
Pos: 9.2 /1 Grundlegend e Sicherheitshin weise/Hinweis Sicherh eitsschuhe @ 0\mod _1261406516446 _131.docx @ 925 @ @1
Only use with safety shoes (acc. to EN ISO 20345)
Pos: 9.3/ 6In betriebnahme/Üb erschriftM ontageanweisu ng@ 1\ mod_133645602 5406_131.docx @ 12465 @ 2 @ 1
6.1 Assembly Instructions
Pos: 9.4 /6I nbetriebnahm e/Grundgestell mit S ammelbehälter versc hrauben, im Boden vera nkern @ 1\mod_ 1336456136072_ 131.docx @ 12473 @ @ 1
•Screw basic frame to collection container and anchor in the ground with approved heavy-load
dowels.
Pos: 9.5 /6I nbetriebnahm e/Vorabscheider-Z wischenring ze ntrisch aufsetzten un d Spannring anziehen. @ 1\mod_1336 489372484_131.doc x@ 12747@ @1
•Apply pre-separator interim ring centrically and tighten clamp ring.
Pos: 9.6 /6I nbetriebnahm e/Filterbehälter in kl.Fi lterz entrisch aufsetzt enu nd Spannring anziehen. @ 1\mod _1336456433876 _131.docx @ 12480 @ @1
•Centrically put on filter container incl. filter and tighten clamping ring.
Pos: 9.7 /6I nbetriebnahm e/Haube zentrisc h aufsetzten und Spannring anziehen. Stutzen über Schlauc h mit Antriebseinh eit verbin @ 1\mod_13 36456552701_131.d ocx @ 12488 @ @1
•Apply hood centrically and tighten clamp ring. Connect socket to drive unit via hose and tighten
hose clamps.
Pos: 9.8/ 6In betriebnahme/B eiele kto-pneumatisch erEntl eerklappe dieDr uckluftver bindung herstellen. @ 1\mod_1 336456714866_131.d ocx@ 12 496@ @ 1
•Connect compressed air connection for electro-pneumatic emptying flap.
Pos: 9.9 /6I nbetriebnahm e/Gerät nach VDE-V orschrift elektrisc h anschließen und mo ntieren. @ 1\mod_13 36456820375_131.d ocx @ 12504 @ @1
•Connect and install device electrically according to VDE-provision.
Pos: 9.10 /6 Inbetriebnah me/Verantwortu ngB etreiber Installatio nS chutzeinrichtung Tr ennung Anschlussp hasen @ 6\mod _1401953418877_1 31.docx @ 60458 @ @1
•The operator shall be responsible for installation of protective equipment that will recognise a short-
circuit in case of fault and isolate all connection phases.
Pos: 9.11 /6 Inbetriebnah me/Alle Schlauc h-u ndR ohrleitungs verbindungen herstelle n@ 1 \mod_133645 6942153_131.doc x@ 12512@ @1
•Create all hose and pipe line connections.
Pos: 9.12 /6 Inbetriebnah me/Überschrift : Erstinbetriebnah me@ 1\mod_133 6455358905_131. docx @ 12457 @ 2 @ 1
6.2 Initial operation
Pos: 9.13 /1 Grundlegen deSi cherheitshinweis e/Signalwort-Fel d" Vorsicht" @ 0\m od_12614048981 71_131.docx @ 899 @ @ 1
CAUTION
Pos: 9.14 /6 Inbetriebnah me/Spänesauger/N etzanschlussl eitungen überprüfe n@ 0 \mod_1269349 980705_131.doc x@ 3197@ @1
•Make sure that the power supply cord is not damaged by being run over, crushed, tugged etc..
Stop the industrial vacuum cleaner immediately if necessary!
•The power supply cord must be regularly inspected for signs of damage or ageing!
•Connectors of power supply cords must at least be splash-proof!
Pos: 9.15 /6 Inbetriebnah me/Spänesauger/Di e Betriebsbeding ungen stimmen mit den Sc hildangaben @ 0\m od_126935019 7077_131.docx @ 320 3@ @ 1
•The operating conditions must match the data on the plate and the supplied documentation, if
applicable.
Pos: 9.16 /6 Inbetriebnah me/Spänesauger/Di e Inbetriebnahm e ohneF ilter oder einem besc hädigten Filter ist nicht zulässig @ 0\ mod_12693509865 91_131.doc x@ 3227 @ @ 1
•Starting without a filter or with a damaged filter is not allowed
Pos: 9.17 /6I nbetriebnahme/ Spänesauger/Der Industri esaugeris t ordnungsgemäß montiert ,@ 0 \mod_126935120 4934_131.docx @ 3239 @ @ 1
•The industrial vacuum cleaner must be correctly installed, with all necessary lines and tubes
connected.
Pos: 9.18 /6 Inbetriebnah me/Spänesauger/D er Absaugschlauc h und dasZ ubehör bzw. dieR ohrleitung müss en korrekt verbunden sei n. @ 1\mod_13364 59141674_131.docx @ 1253 6@ @ 1
•The extraction hose and the accessories or pipe lines must be connected correctly.
Pos: 9.19 /6 Inbetriebnah me/Spänesauger/Di e Entleerklappe m uss korrekt verschlosse ns ein.@ 1\mod_133645895391 9_131.docx @ 12520 @ @ 1
•The emptying flap must be closed correctly.
Pos: 9.20 /6 Inbetriebnah me/Spänesauger/Di e Kühlluftführung ist nic ht beeinträchtigt @ 0 \mod_1269351 426579_131.doc x@ 3 245 @ @1
•The cooling air duct must be fully functional, the cooling effect must also not be impaired by soiling
of the cooling surfaces.
Pos: 9.21 /6 Inbetriebnah me/Spänesauger/I ndustriesauger in B etriebs etzen, Steuer ung beachten @ 1\mo d_128983130393 8_131.docx @ 7141 @ @ 1
Start up the industrial vacuum cleaner with the on/off switch located on the drive unit. If the suction
system has a control unit, please observe the information provided in the circuit diagram!
Pos: 9.22 /6 Inbetriebnah meAnschluss an das Str omnetz (Drehstrom) ( mobile Geräte) @ 1\ mod_128983071 0106_131.doc x@ 712 7@ 2 @ 1
6.3 Connection to the electric mains
•Check that the industrial vacuum cleaner is in correct condition before commissioning.
•Before connecting the industrial vacuum cleaner to the mains, make sure that the voltage specified
on the typeplate matches the supply voltage.
•The industrial vacuum cleaner is set to clockwise rotating field at delivery.
•Connect the device cable plug to a socket installed with correct earthing. The industrial vacuum
cleaner must be switched off!
•Check correct connection between plug and socket.
•Only use industrial vacuum cleaners with mains cables in perfect condition (damaged cables can
cause electric shocks!).
•Regularly check the mains lead for damage, cracks or cable wear.
•Always use the plug to remove the mains lead from the socket (do not use the cable itself).
•When replacing the mains lead, always replace it with a type that matches the original lead.
•The mains lead may only be replaced by the manufacturer or its customer service department, or a
similarly qualified person.
Pos: 9.23 /6 Inbetriebnah me/Ein-Aus- Schalten der Sauganlag e amS teuerschrank @ 0 \mod_127798580 9892_131.docx @ 575 4 @2 @ 1

Initiation
18/56
6.4 Switching the suction system on and off at the control cabinet
In manual mode, the suction system is switched on and off via the ON/OFF button. In automatic mode
this is accomplished via a machine contact.
If the suction system does not function after it has been switched on, or runs in the wrong direction, it
must be switched off, the plug must be removed from the socket and the technical specialist staff must
be alerted.
Pos: 9.24 /6 Inbetriebnah me/Falsche Drehri chtung Seitenkanal verdichter @ 0\mod _1263537345108_ 131.docx @ 1390 @ 2 @ 1
6.5 Incorrect rotational direction
If the rotational direction is incorrect, drives with side-channel compressor convey the suction air in the
inverse direction, i.e. an air current is discharged from the raw air suction nozzle of the suction system.
If this is the case, the suction system must be switched off immediately, the mains plug removed from
the mains socket and the technical personnel informed, so that the phase conductors in the mains
lead can be reversed.
Pos: 9.25 /6 Inbetriebnah me/Vor dem Einschal ten prüfen @ 1\mod _1336455105494 _131.docx @ 12450 @ 2 @ 1
6.6 Check the following before switching it on:
Pos: 9.26 /6 Inbetriebnah me/Spänesauger/All eFi lter müssen richtig eingesetzt sei n.@ 1\mod_1336459033816_13 1.docx @ 12528 @ @ 1
•All filters must be inserted correctly.
Pos: 9.27 /6 Inbetriebnah me/Spänesauger/Di e Entleerklappe m uss korrekt versc hlossens ein. @ 1\mod_1 336458953919_1 31.docx @ 12520 @ @1
•The emptying flap must be closed correctly.
Pos: 9.28 /6 Inbetriebnah me/Spänesauger/D er Absaugschlauc h und dasZ ubehör bzw. dieR ohrleitung müss en korrekt verbunden sei n. @ 1\mod _1336459141674 _131.docx @ 12536 @ @1
•The extraction hose and the accessories or pipe lines must be connected correctly.
Pos: 9.29 /6 Inbetriebnah me/Bauart 22/Text z u Warnsymbol, Potenti alausgleichsleitu ngen prüfen @ 0\ mod_126287516408 2_131.docx @ 1100 @ @ 1
Before commissioning, always check that the potential equalization
conductors (earthing conductors) are connected!
Pos: 10.1 /7 Betrieb, Bedie nung/Betrieb, Bedie nung, Kapitelübersc hrift @ 0\mod_12 63539997200_13 1.docx @ 1414 @ 1 @ 1

Operation
19/56
7 Operation
Pos: 10.2 /7 Betrieb, Bedie nung/Betrieb, Übersc hrift 1.1 @ 0\mod_ 1263544263702_ 131.docx @ 1432 @ 2 @ 1
7.1 Operation
Pos: 10.3 /7 Betrieb, Bedie nung/Überschrift: EIN / AU S Schalter Drehstro m @ 1\mod_12899 82526820_131. docx@ 7170@ 3 @ 1
7.1.1 ON / OFF switch Three-phase current
Pos: 10.4 /7 Betrieb, Bedie nung/0=Motor aus, 1=M otor ein @ 1\mod_1 289983926964_ 131.docx @ 7182 @ @1
0 = Motor "OFF"
1 = Motor "ON"
Pos: 10.5 /7 Betrieb, Bedie nung/Skizze: EIN / AUS Sc halterDr ehstrom IE2 @ 8 \mod_1422277 755099_0.docx @ 7 6009@ @ 1
Pos: 10.6.1 /7 Betrieb, Be dienung/Schaltschrä nke/Funktionsb eschreibung Ringler- Steuerschränke @ 5\mod_138 6063493608_131. docx @ 47854 @ 2 @ 1
7.2 Function description Ringler control cabinets
Pos: 10.6.2 /7 Betrieb, Be dienung/Schaltsc hränke/Beschreib ung Haupt-Not-Aus- Schalter @ 5\mod_ 1386061514760 _131.docx @ 47832 @ @ 1
Main/emergency off
switch
Switch to interrupt power supply, connection to the power
supply for individually secured systems.
Pos: 10.6.3 /7 Betrieb, Be dienung/Schaltschrä nke/Beschreibu ng Wahlschalter Hand/ Auto @ 5\mod_1 386061798022_13 1.docx @ 47843 @ @1
Selection switch
Manual / Auto
Switch between manual mode and automatic mode.
Manual operation:
The plant functions can be started manually via buttons
(e.g. start of turbine or filter cleaning)
Automatic operation:
All buttons are non-functional. The system is started
remotely by a switching signal via a potential-free contact.
Filter cleaning takes place programme-controlled.
Pos: 10.6.4 /7 Betrieb, Bedienung/ Schaltschränke/Üb erschrift:T aster fürH andbetrieb @ 5\ mod_1386066866098_ 131.docx @ 47907 @ 2 @ 1
7.3 Button for manual mode
Pos: 10.6.5 /7 Betrieb, Be dienung/Schaltschrä nke/Beschreibu ngT aster Entleerkl appeHa nd@ 5\mod_1386067854 793_131.docx @ 4793 8@ @ 1
Button "emptying flap
hand"
In devices with electro-pneumatically actuated emptying
flap, this can be opened and emptied with the button in
manual mode.
The button has no function in automatic mode.
Pos: 10.6.6 /7 Betrieb, Be dienung/Schaltschrä nke/Beschreibu ng Ein-/Aus-Sch alter Turbine @ 5\mod_1 386063613755 _131.docx @ 47864 @ @ 1

Operation
20/56
On/off switch turbine
In manual mode, the turbine may be manually started with
the green button. The white lamp is now active. The turbine
is stopped with the red button.
The switch has no function in automatic mode.
Pos: 10.6.7 /7 Betrieb, Be dienung/Schaltschrä nke/Beschreibu ngT aster Filterreinigu ng@ 5\mod_1386065088451_ 131.docx @ 47885 @ @ 1
Button "Filter cleaning"
Manual operation: Manual start of filter cleaning.
See chapter "Electrical filter cleaning".
Automatic operation: Button has no function.
Pos: 10.6.8 /7 Betrieb, Be dienung/Schaltschrä nke/Überschrift: M eldeleuchten @ 5\m od_138606691 1739_131.doc x@ 479 17@ 2@ 1
7.4 Indicator lamps
Pos: 10.6.9 /7 Betrieb, Be dienung/Schaltschrä nke/Beschreibu ngM eldeleuchte Ste uerspannung @ 5\ mod_13860663560 12_131.docx @ 478 96@ @ 1
Indicator lamp control
voltage
The lamp indicates whether the control voltage of 24V is
applied.
Pos: 10.6.10 /7 Betrieb, B edienung/Schaltsc hränke/Beschreib ungM eldeleuchte St örung @ 5\mod_138 6067167031_13 1.docx @ 47927 @ @1
Indicator lamp
Interference
General display if something is wrong with the system (e.g.
motor protection tripped, container missing). See chapter
on troubleshooting.
Pos: 10.6.11 /7 Betrieb, B edienung/Schaltsc hränke/Beschreib ungM eldeleuchte Differ enzdruck zu hoch @ 5\ mod_138606 8062081_131.doc x@ 47949 @ @1
Indicator lamp
"differential pressure
too high"
Indicator lamp "differential pressure" lights up:
Version filter clogged:
If the pressure is too high, the indicator lamp lights up and
the filter is clogged and needs to be cleaned or replaced.
Version pipe clogged:
The pipe or nozzle is clogged and must be cleared.
Version plant running:
No vacuum can be built (e.g. defective turbine, missing
tank)
Pos: 10.7 /0Allg emeines/Seit enumbruch @ 0\mod_1265 272007940_0.doc x@ 219 1@ @1
This manual suits for next models
2
Table of contents