Rising HG2011 User manual
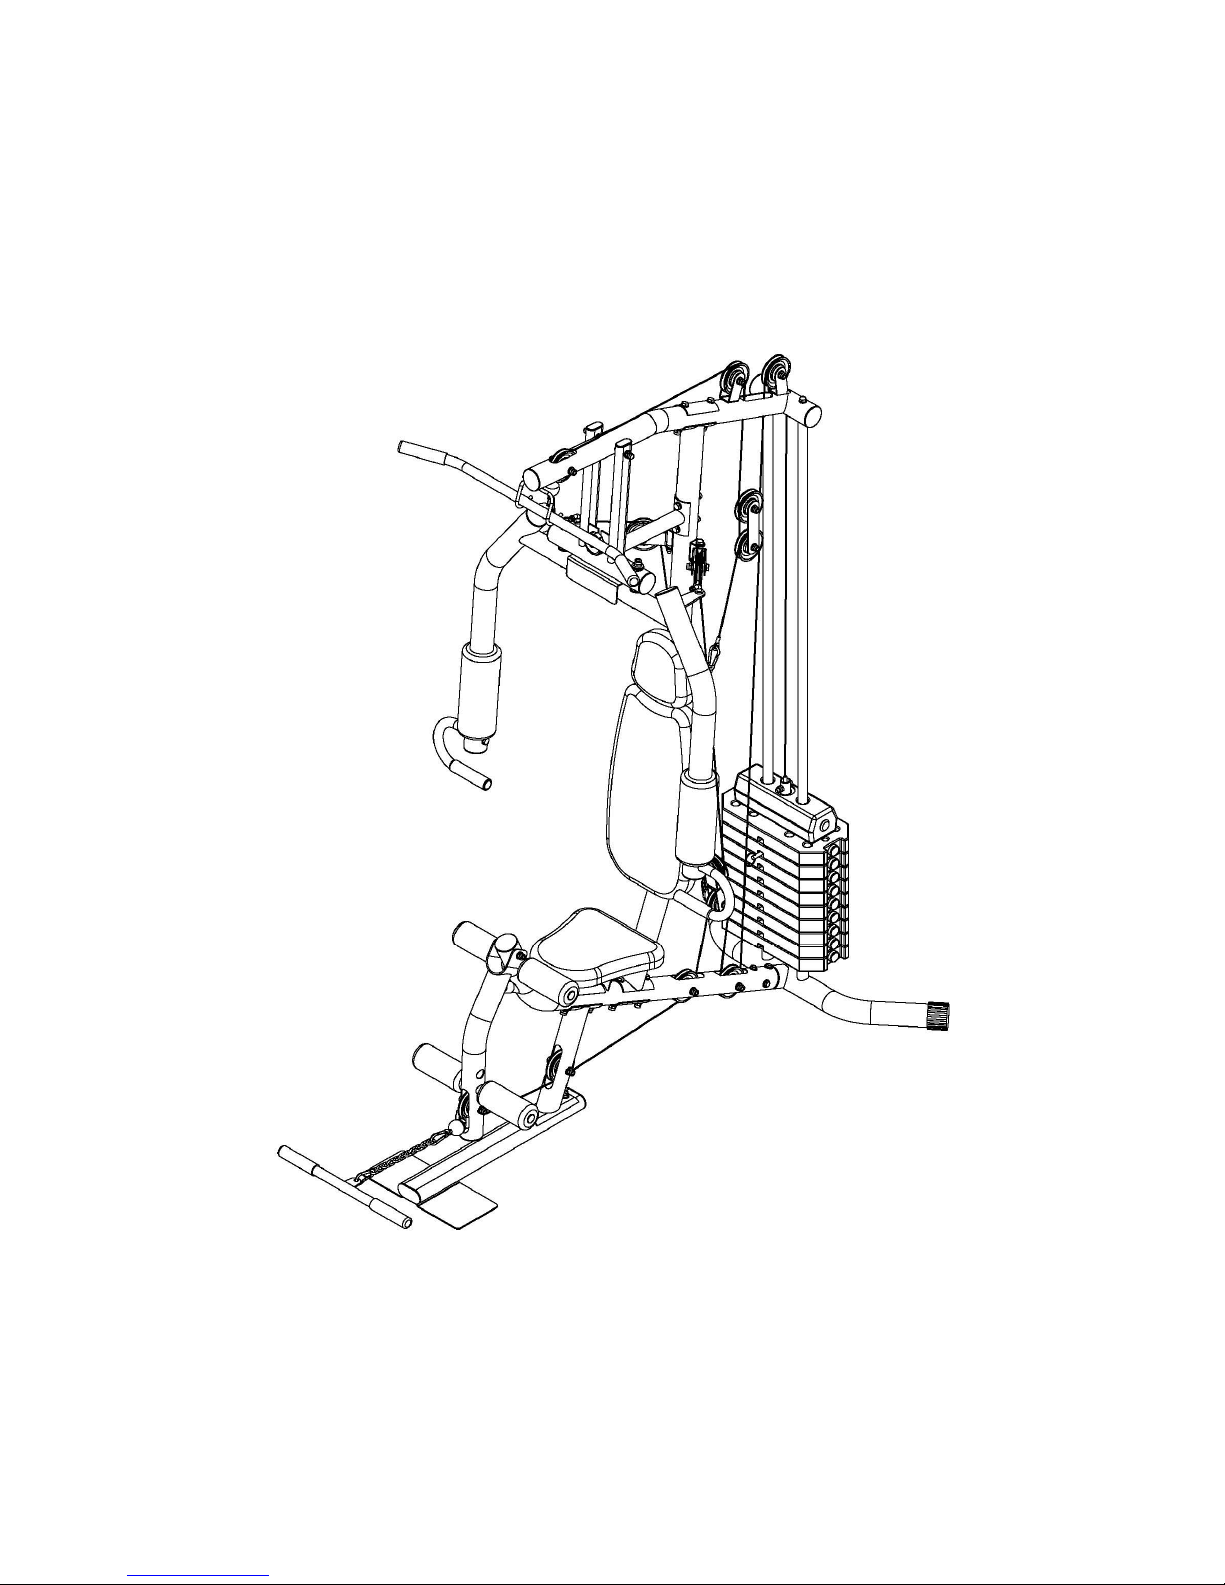
HOME GYM
HG2011
ASSEMBLY INSTRUCTIONS

1) SAFETY INSTRUCTIONS
IMPORTANT!
·This machine is made for home use only and tested up to a maximum body weight of 100 kg.
·This training device should be used only for its intended purpose. Any other use is prohibited
and dangerous. The manufacturer cannot be held liable for damage or injury caused by
improper use of the equipment.
CAUTION!
1. You are using a machine that has been designed and built to the latest safety standards. Any
possible sources of danger that could lead to injury have been extensively eliminated. The
machine is intended for use by adults only.
2. Wrong or excessive training can damage your health. Before commencing a course of fitness
training, arrange for a medical check-up to see if you are in a state of health suited to training on
the machine. The result of the check-up should be used as a basis for your training pr0gram.
3. The machine is never to be looked upon as a toy. Please remember that the nature of children
who are using the machine can lead to unforeseen situations and hazards for which the
manufacturer cannot be held liable.
4. If children are allowed to use the machine, they should be instructed on its correct use and
dangerous situations explained to them.
5. The machine must be carefully assembled by an adult. Place it on a flat and strong ground. It
must be ensured that the machine is not used until it has been fully assembled.
6. When used for regular training/exercising, we recommend checking all parts of the machine
(especially screws, nuts, bolts and ropes) every 1 to 2 months.
7. To maintain the intended level of safety the machine is to be taken out of use if any parts are
worn. The worn parts are to be exchanged immediately.
8. Make sure that no adjustment device is left projecting.
9. Please always wear proper training clothes and shoes.
2) PACKAGING
Environment-friendly and recyclable materials:
Outer packing cardboard
Formparts are made of Polystyrol (PS) No FCKW
Foils and bags are made of PE
Girths are made of PP
3) DISPOSAL
Please dispose packaging properly. Don’t put it in the garbage.
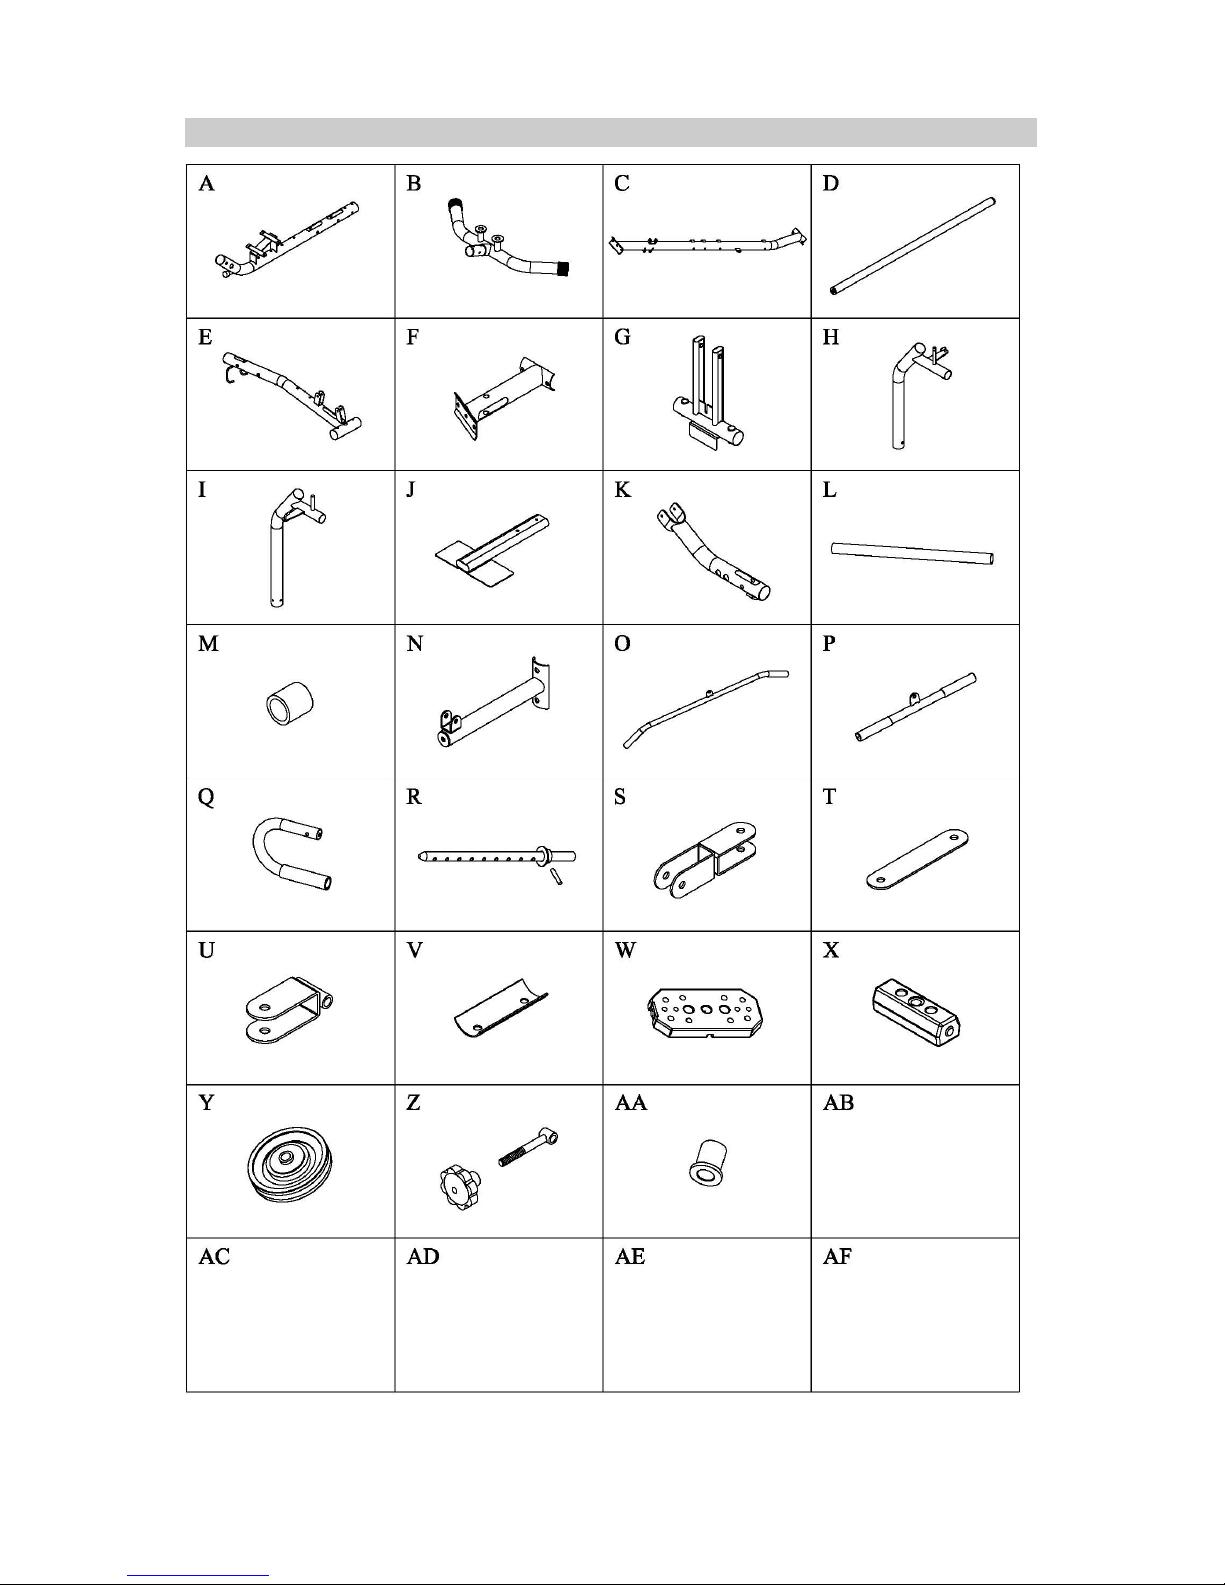
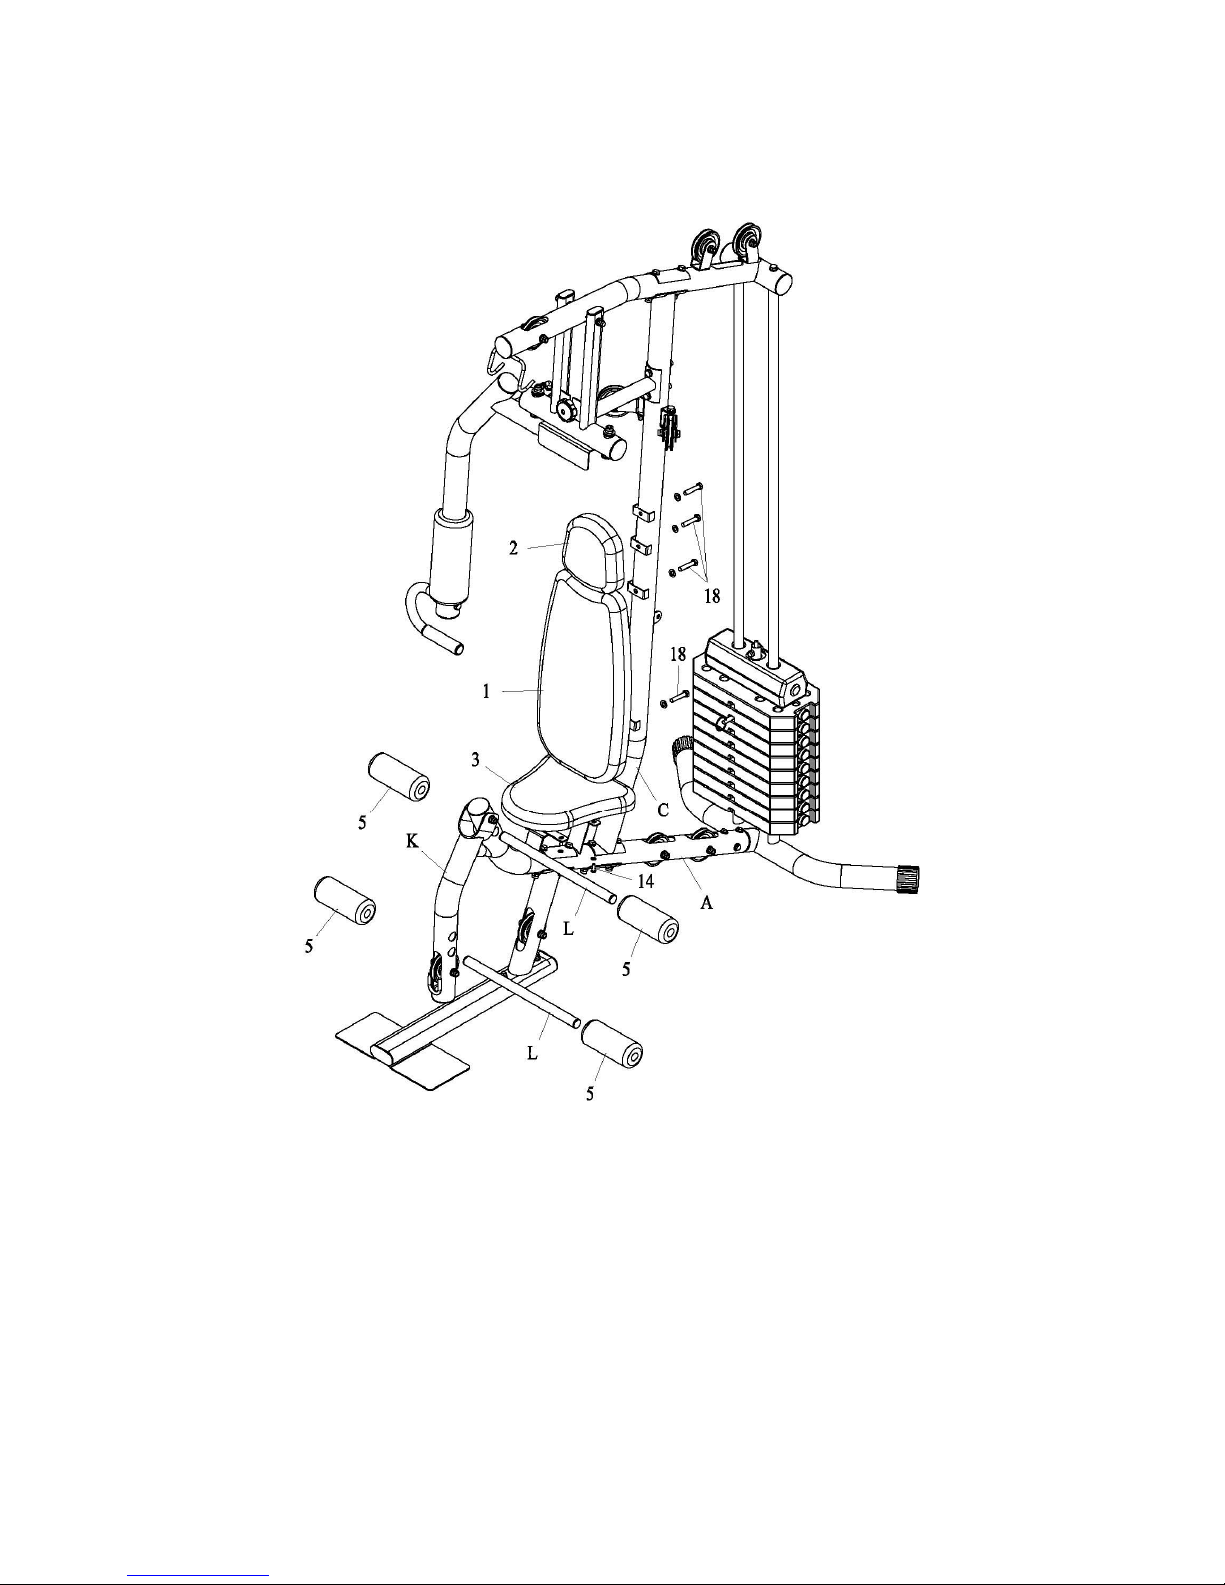
4) PARTS LIST

PART LIST
NUMBER DESCRIPTION QUANTITY
A MAIN FRAME 1
B REAR BASE 1
C MAIN VERTICAL FRAME 1
D GUIDE ROD 2
E TOP CROSS BEAM 1
F SEAT SUPPORT 1
G PRESS BAR 1
H RIGHT CHEST SUPPORT 1
I LEFT CHEST SUPPORT 1
J FRONT BASE 1
K LEG EXTENSION 1
L FOAM TUBE 2
M IRON BUSHING 2
N RESIST BAR 1
O LAT BAR 1
P PULL BAR 1
Q HANDLE BAR 2
R SELECTOR SHARFT 1
S UPRIGHT PULLEY BLOCK 1
T PARALLEL PULLEY BLOCK 2
U ROTATIONAL PULLEY BLOCK 2
V REINFORCEMENT PLATE 3
W WEIGHT PLATE 9
X TOP PLATE 1
Y PULLEY 13
Z LOCK LEVER TUS 1
AA BUSHING 10
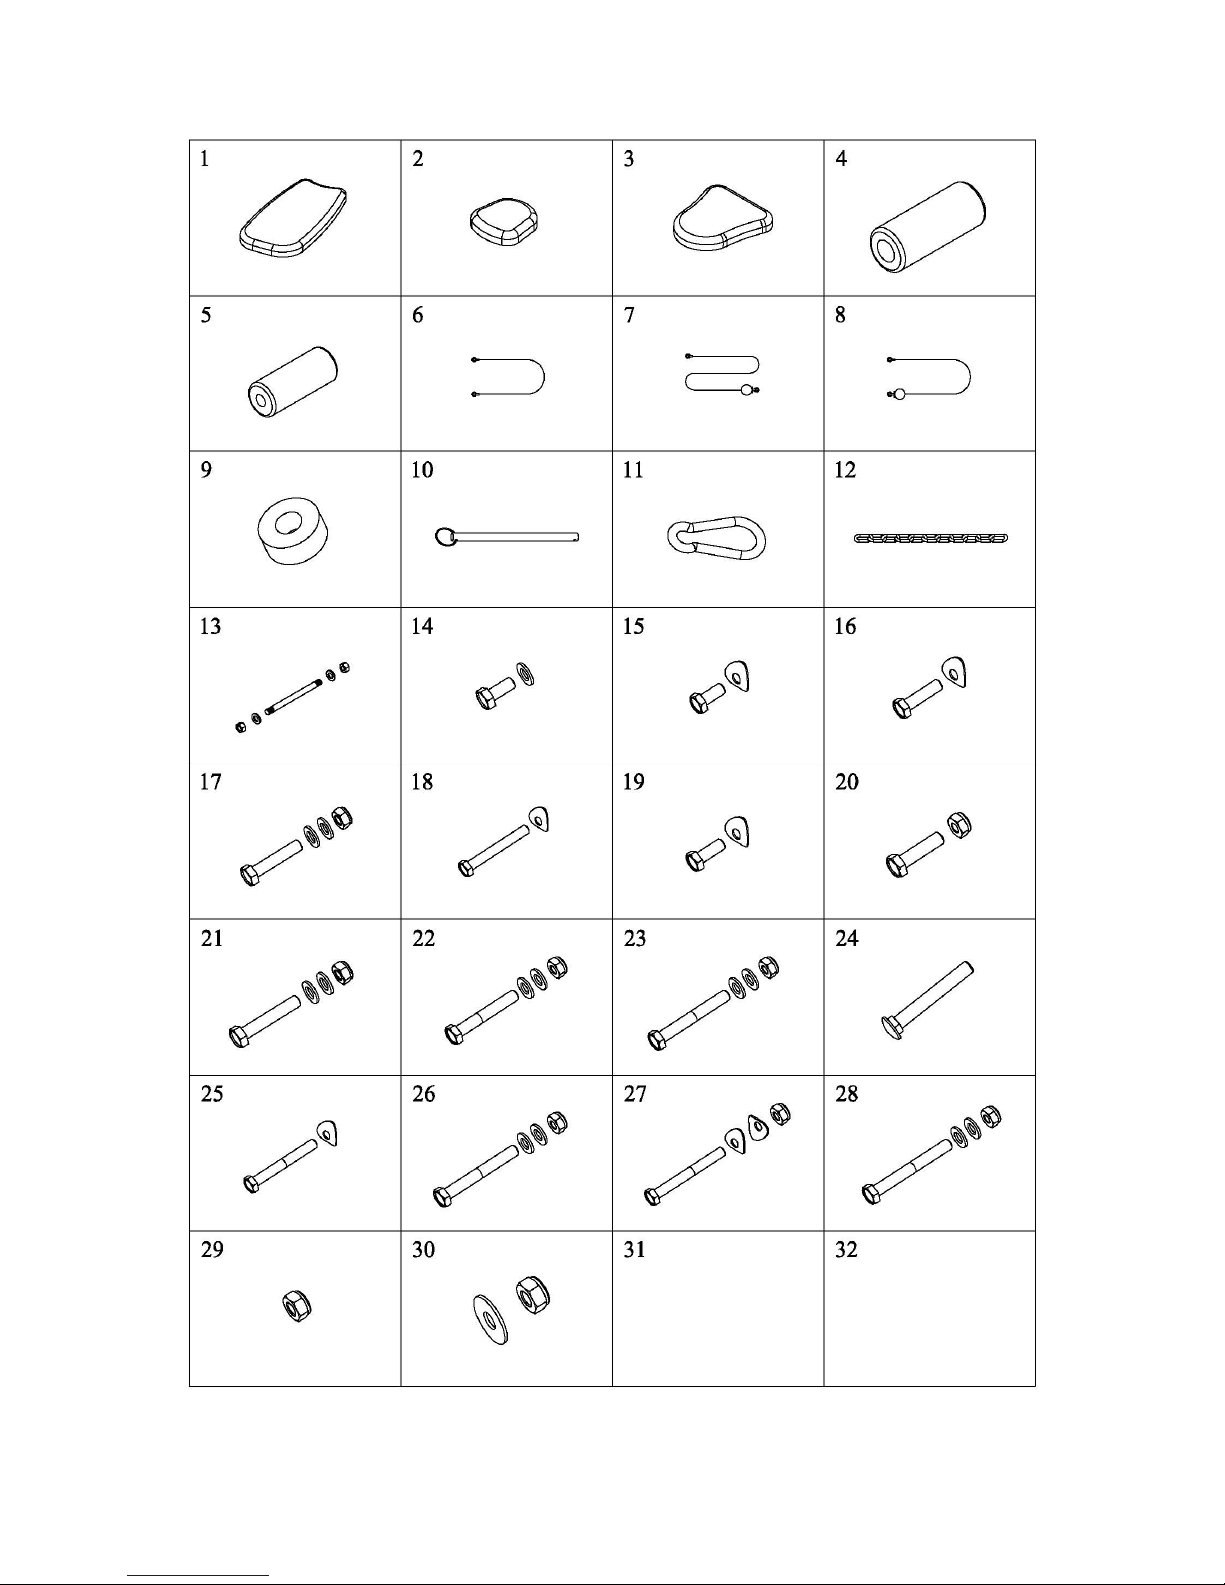

PART LIST
NUMBER
DESCRIPTION QUANTITY
1 BACKREST CUSHION 1
2 HEADREST CUSHION 1
3 SEAT CUSHION 1
4 BIG FOAM ROLLER 2
5 FOAM ROLLER 4
6 CABLE WITH NO BALL 1
7 LONG CABLE WITH ONE BALL 1
8 SHORT CABLE WITH ONE BALL 1
9 RUBBER DONUT 2
10 PIN 1
11 HOOK 5
12 CHAIN 2
13 BOLT M12×165 +WASHERS + LOCK NUTS 1
14 BOLT M6*16 + WASHER 4
15 BOLT M8*16 + BEND WASHER 4
16 BOLT M8*35 + BEND WASHER 2
17 BOLT M8×40 + TWO WASHERS + LOCK NUT 1
18 BOLT M8*80 + BEND WASHER 4
19 BOLT M12×20+BEND WASHER 2
20 BOLT M10×35+LOCK NUT 1
21 BOLT M10×50 + TWO WASHERS + LOCK NUT 8
22 BOLT M10×60 + TWO WASHERS + LOCK NUT 2
23 BOLT M10×70 + TWO WASHERS + LOCK NUT 2
24 SQUARE NECK BOLT M10×75 2
25 BOLT M10×75+BEND WASHER 2
26 BOLT M10×80 + TWO WASHERS + LOCK NUT 5
27 BOLT M10×80+BEND WASHERS+LOCK NUT 8
28 BOLT M10×85 + TWO WASHERS + LOCK NUT 1
29 M8 LOCK NUT 2
30 M12 LOCK NUT + BIG WASHER 2
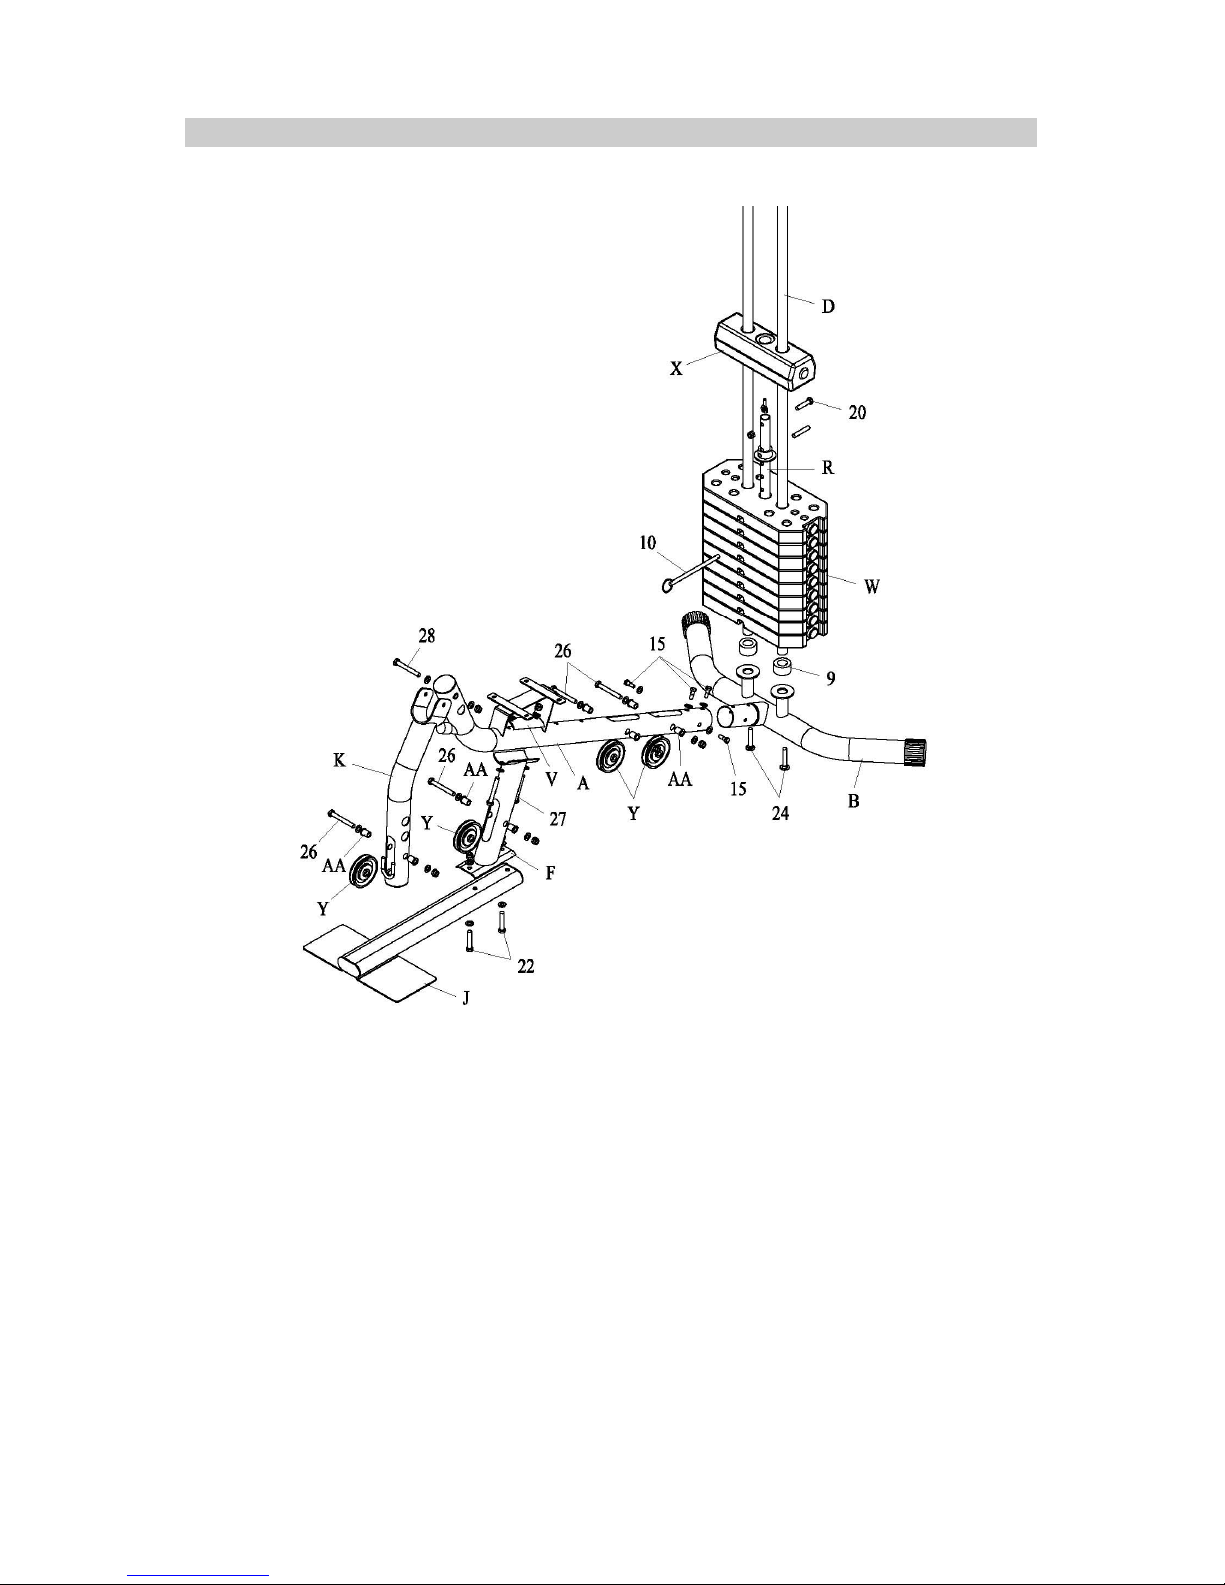
5) ASSEMBLY INSTRUCTION
STEP 01
1.Attach rear base (B) to main frame (A) with four bolts M8*16 + bend washers (15).
2.Attach seat support (F) to front base (J) with two bolts M10*60 + washers + lock nuts
(22).
3.Attach seat support (F) and reinforcement plate (V) to main frame (A) with two bolts
M10*80 + bend washers + lock nuts (27).
4.Insert guide rod (D) into rear base (B) and secure with square neck bolt M10*75 (24).
5.Slide rubber donut (9) and weight plates (W) onto guide rod (D), insert selector sharft (R)
into mid hole of weight plate (W). Then slide top plate (X) onto guide rod (D).
6.Attach leg extension (K) to main frame (A) with blot M10*85 + washers + lock nut (28).
7.Attach pulleys (Y) to main frame (A), seat support (F) and leg extension (K) with blot
M10*80 + washers + lock nut (26) and bushing (AA).

STEP 02
1.Attach main vertical frame (C) and reinforcement plate (V) to main frame (A) with two
bolts M10*80 + bend washers + lock nut (27).
2.Attach top cross beam (E) and reinforcement plate (V) to main frame (C) with two bolts
M10*80 + bend washers + lock nuts (27).
3.Attach guide rod (D) to top cross beam (E) with two bolts M10*75 + bend washers (25).
4.Attach rotational pulley block (U) to main vertical frame (C) with two blots M10*70 +
washers + lock nuts (23).
5.Attach resist bar (N) to main vertical frame (C) with two bolts M10*80 + bend washers +
lock nuts (27).
6.Attach lock lever tus (Z) to resist bar (N) with bolt M8*40 + washers + lock nut (17).
7.Attach one pulley (Y) to front of top cross beam (E) with blot M10*80 + washers + lock
nut (26) and bushing (AA).
8.Attach pulleys (Y) to top cross beam (E) and rotational pulley block (U) with bolt
M10*50 + washers + lock nut (21).

STEP 03
1.Attach press bar (G) to top cross beam (E) with bolt M12*165 + washers + lock nuts
(13).
2.Attach right and left chest support (H&I) to press bar (G) with M12 lock nut + big washer
(30).
3.Push big foam roller (4) onto right and left chest support (H&I).
4.Secure handle bar (Q) to right and left chest support (H&I) with two bolts M12*20 +
bend washers (19) and two bolts M8*35 + bend washers (16).
STEP 04
1. Attach seat cushion (3) to main frame (A) with four bolts M6*16 + washers (14).
2. Attach backrest cushion (1) and headrest cushion (2) to main vertical frame (C) with four
bolts M8*80 + bend washers (18).
3. Insert foam tube (L) into hole of main frame (A) and leg extension (K).
4. Push foam roller (5) onto each side of foam tube (L).

STEP 05

CABLE ASSEMBLY
1. Assembly the cable with no ball (6)
Connect one end of the cable to one of chest support with iron bushing (M) and M8 lock nut (29). Then
thread the other end of the cable over pulley U1, down and round pulley S1 on upright pulley block (S), up
and over pulley U2, secure cable to chest support with iron bushing (M) and M8 lock nut (29).
2. Assembly the short cable with one ball (8)
Run the end with no ball of the cable (8) through the pulley E1 on top cross beam (E), round
the pulley E2 on top cross beam (E), down and under pulley T1 on parallel pulley block (T),
up and round pulley E3 on cross beam (E). Attach the end of the cable to the selector shaft (R)
with bolt M10*35 + lock nut (20).
3. Assembly the long cable with one ball (7)
Run the end with no ball of the cable (7) through the pulley K1 on leg extension (K), under
the pulley F1 on seat support (F), round pulley A2 on main frame (A), up and round pulley
S2 on upright pulley block (S), under and round pulley A1 on main frame (A), up and round
pulley T2 on parallel pulley block (T), then attach the end to the main vertical frame (C) with
hooks (11) and chain (12).
Attach the lat bar (O) to the cable (8) with a hook (11).
Attach the pull bar (P) to the end of the cable (7) on K1 with hooks (11) and chain (12).

6) TRAINING INSTRUCTIONS
IMPORTANT:
Before beginning your training program, consult your doctor to ensure that are fit enough to use
this training device.
Base your program on the result of this medical examination. All following training instructions are
suitable for healthy people only.
This training device is a versatile multi-functional home training unit for optimum fitness training
with special emphasis on muscle- power. To ensure that your exercising is in keeping with your
general health, please read the following instructions and observe them at all times:
1. Newcomers should avoid using excessively heavy weights.
2. During start-up sessions, use weights that can used for 15 repetitions without gasping for
breath.
3. Always breathe regularly: breathe out when pushing against the load (concentric phase) and
breathe in when releasing it (eccentric phase). Avoid forced breathing.
4. Carry out all movements evenly and smoothly without jerking.
5. All movements should be carried out to their full extent to prevent contraction of the muscles.
However, in the bending and stretching positions ensure that the muscles are tense enough
to minimize strain on the joints.
6. Pay particular attention to keeping your back in a stable position. To ensure this, keep the
tension of the belly muscles constant during exercising.
7. Always remember that your tendons and joints do not develop as quickly as your strength and
muscle power. For this reason increase the amount of exercise in the following order:
a. First increase your exercising frequency (number of exercising sessions per week)
b. Increase the length of your exercising sessions (number of sets per exercise)
c. Then increase the exercising strain (i.e. increase the weights used)
Recommendation for exercising
For general fitness and health the most suitable types of training are strength and endurance
training as well as training aimed at building up the muscles (hypertrophy training).
For strength and endurance exercising it is best to use lighter weights (approx. 40-50% of
maximum force*) and brisk but controlled speed of movement. The number of repeats should be
between16 and 20.
For exercises designed to buildup muscles, it is advisable to use heavier weights (approx.
60-80% of maximum force*) with a moderately slow speed of movement.
After about four weeks of strength and endurance exercising, a moderate program of muscular
exercising can be begun. For older people it is especially important to maintain and build up
muscle mass in order to relieve unnecessary strain on the joints.
Always start your session with a set of exercises to warm up. Make use of intervals to do
loosening-up exercises. Exercise 2-3 times per week and take every opportunity to exercise in
different ways e.g. by walking, jogging, cycling and swimming.
You will soon notice that regular exercise increases your general fitness and sense of wellbeing.
WARMING UP
Start with 5 to 10 minutes of stretching and light exercise. A warm-up increases your body
temperature, heart rate, and circulation in preparation for exercise.
COOLING DOWN
Finish with 5 to 10 minutes of stretching. Stretching increases the flexibility of your muscles and
helps to prevent post-exercise problems.
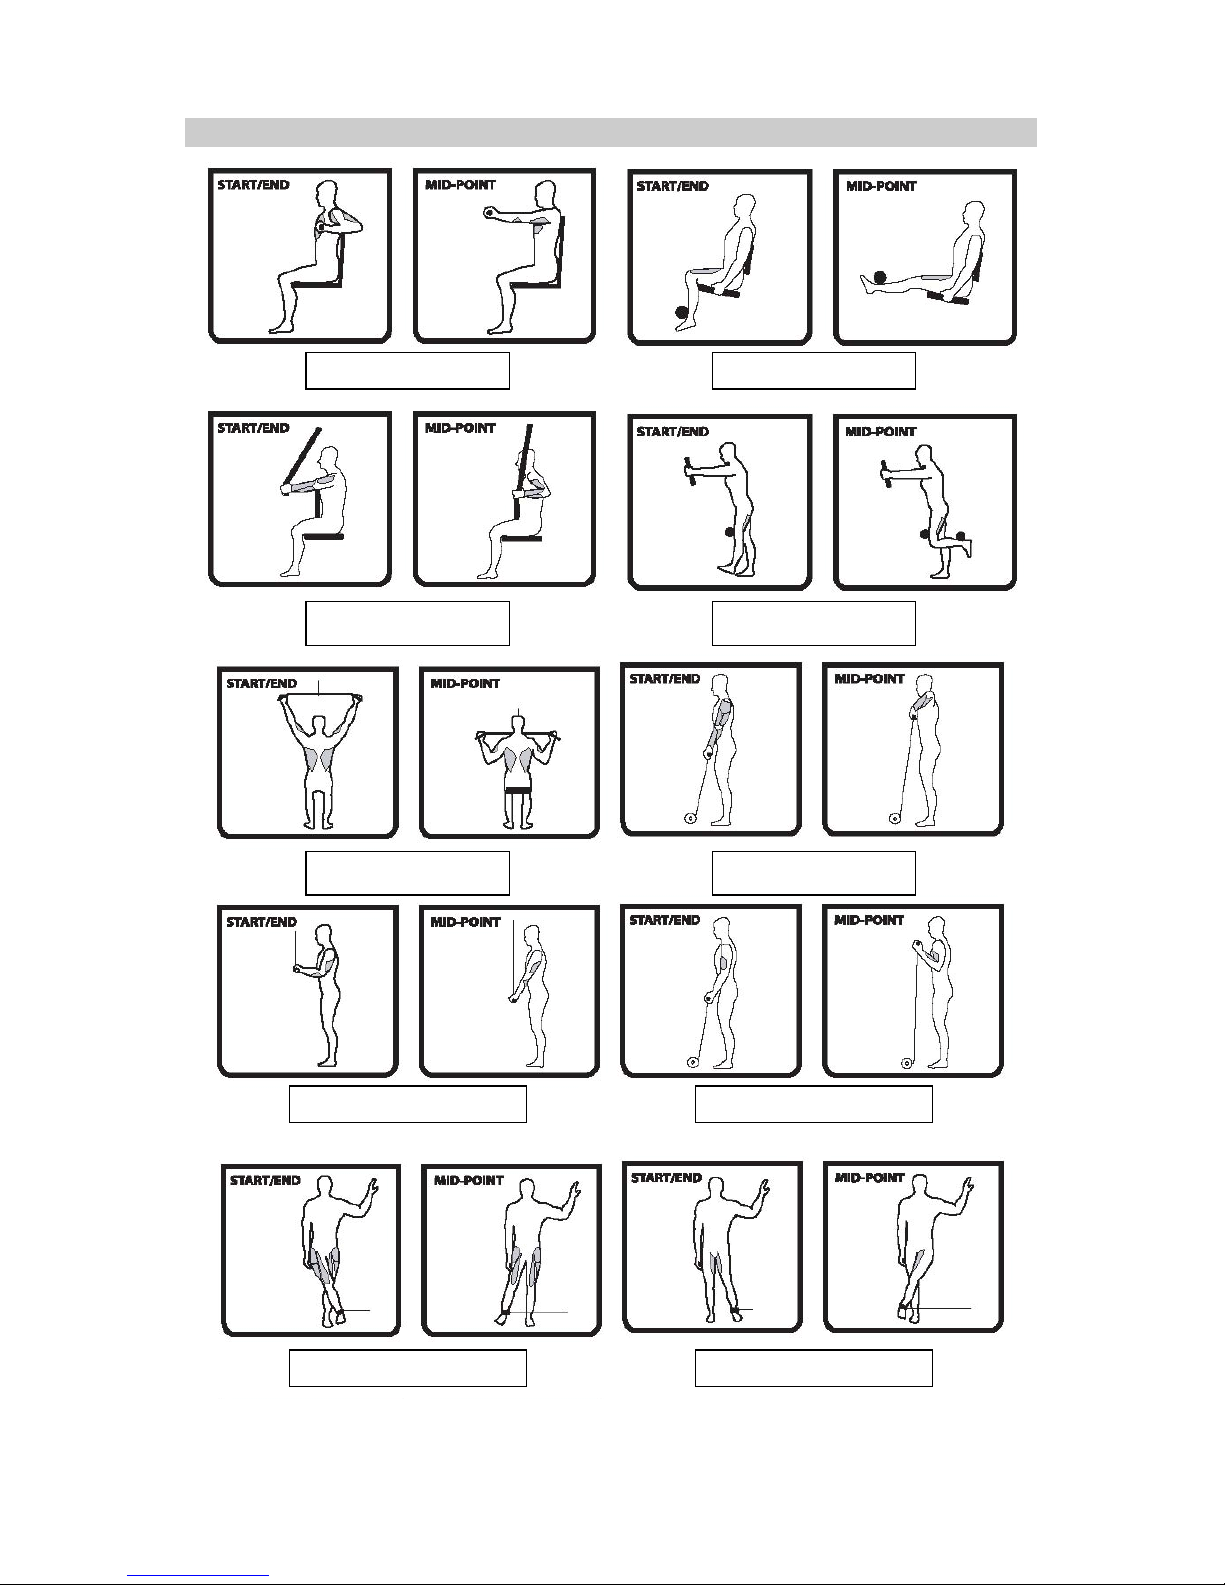
7) EXERCISES
CHEST PRESS
LEG EXTENSION
SEATED MID ROW LEG CURL
LAT PULL DOWN UPRIGHT ROW
TRICEP PUSH DOWN
ARM CURL
OUTER THIGH
INNER THIGH

DELTOID RAISE BACK KICK
SIDE BEND
Table of contents
Other Rising Fitness Equipment manuals


