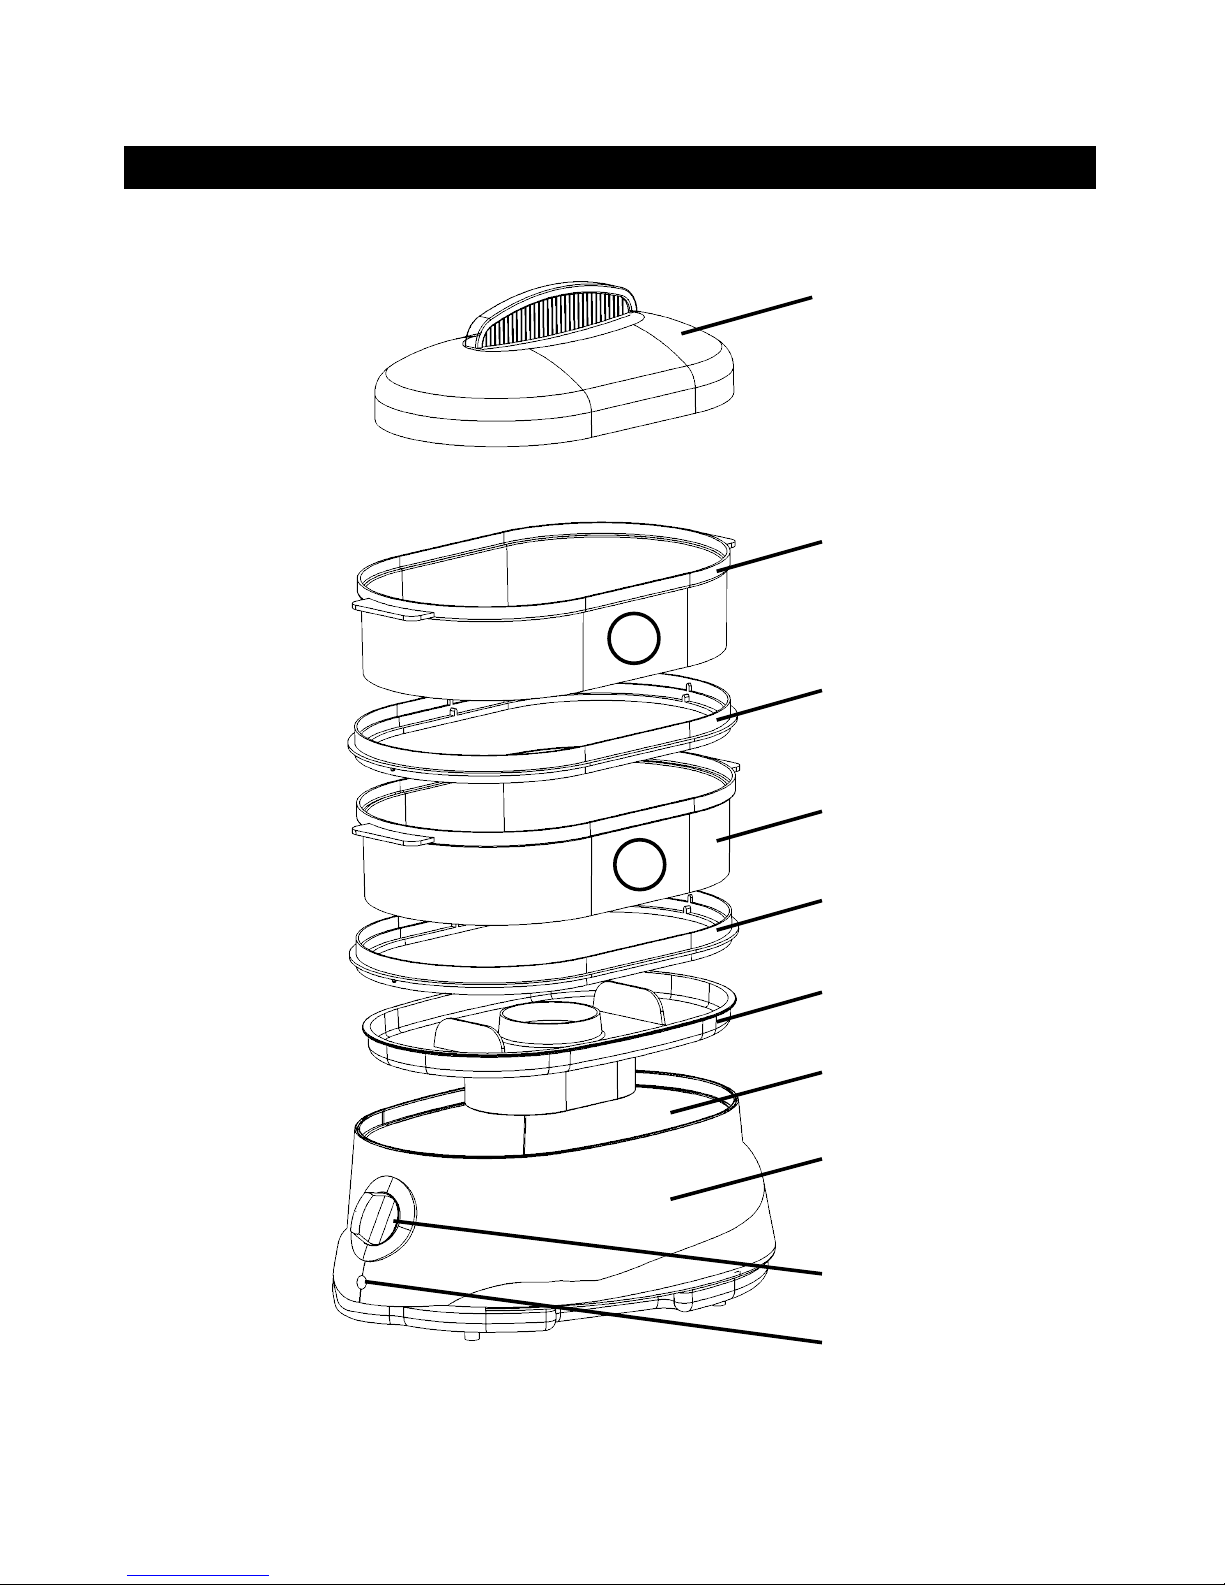
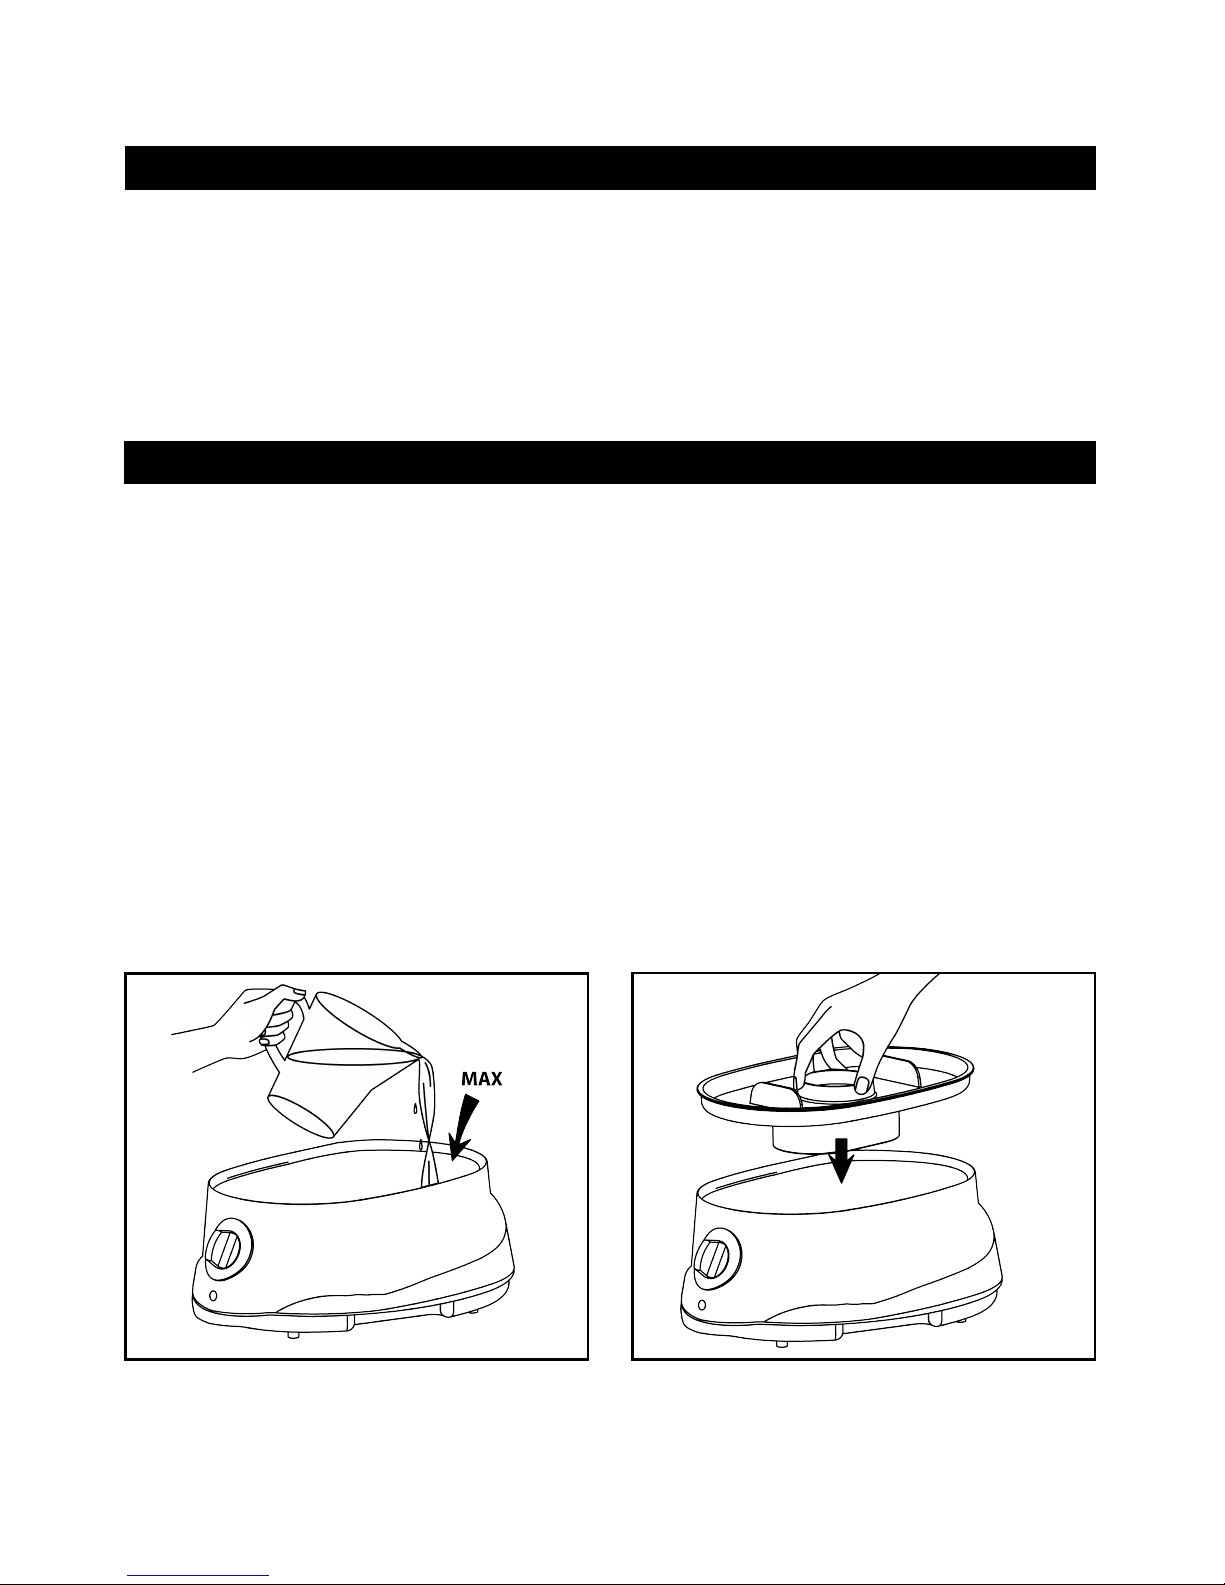
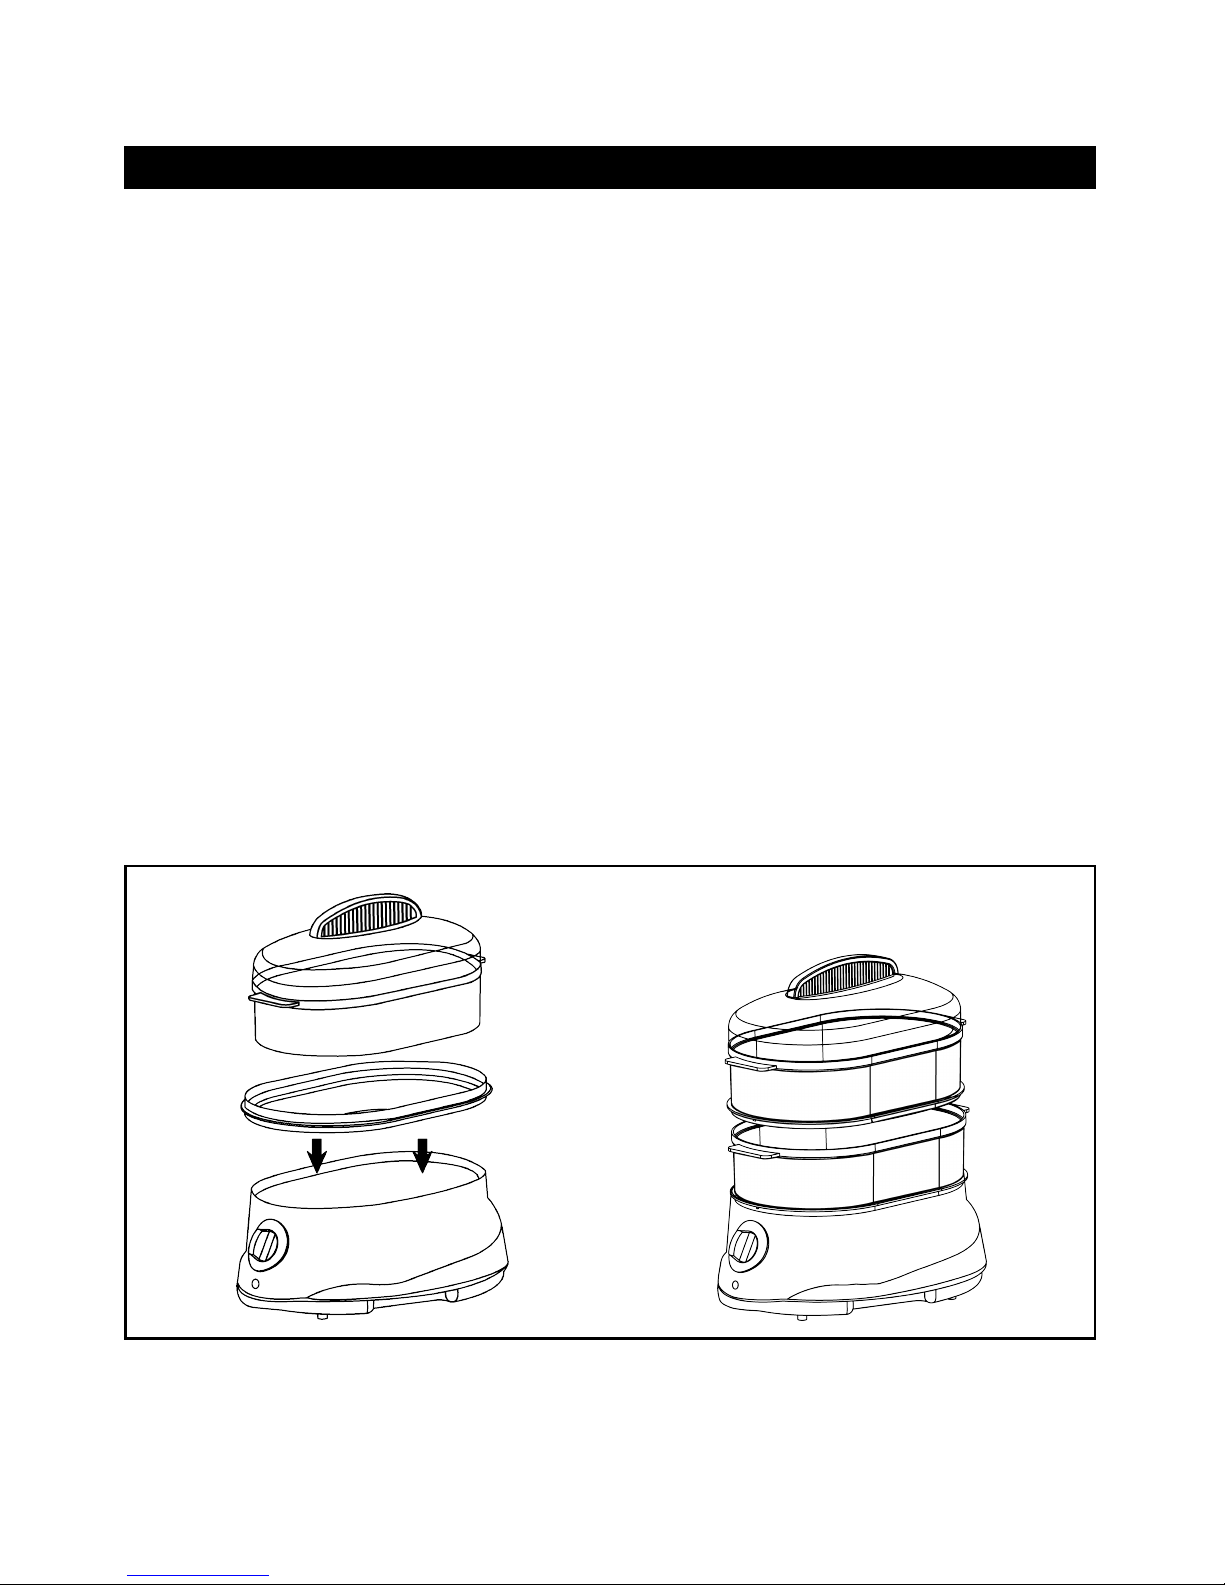
Rival CKRVSTLM20 User manual

CKRVSTLM20
Food Steamer
Olla para cocinar a vapor
Owner’s Guide
Guía del propietario
READ AND SAVE THESE INSTRUCTIONS
LEA Y GUARDE ESTE INSTRUCTIVO
134630

-2-
IMPORTANT SAFEGUARDS
When using electrical appliances, basic safety precautions
should always be followed, including the following:
1. Do not touch hot surfaces. Use potholders when removing
cover or handling hot containers to avoid steam burns.
2. To protect against electrical shock, do not immerse cord,
plug or base unit in water or other liquids.
3. Close supervision is necessary when any appliance is used by
or near children.
4. Unplug from outlet when not in use. Unplug before putting on
or taking off parts, and allow to cool before cleaning.
5. Do not operate any appliance with a damaged cord or plug,
or after the appliance malfunctions or has been damaged in
any manner. Return appliance to an authorized RIVAL®Brand
Service Center for examination, repair or adjustment.
6. Do not use outdoors.
7. Do not let cord hang over edge of table or counter,
or touch hot surfaces.
8. Do not operate appliance while empty or without water
in the reservoir.
9. Do not place on or near a hot gas or electric burner,
or in a heated oven.
10. Extreme caution must be used when moving an appliance
containing hot food or water or other hot liquids.
11. Do not use appliance for other than intended use.
12. Lift and open cover carefully to avoid SCALDING and allow
water to drip into steamer.
13. The use of accessory attachments not recommended by this
appliance manufacturer may cause hazards.

-3-
• This appliance is intended for HOUSEHOLD USE ONLY.
• Make sure the voltage in your outlet is the same as the voltage
indicated on the appliance’s rating label.
• The length of the cord used on this appliance was selected to
reduce the hazards of becoming tangled in, or tripping over a
long cord.
• For safety it is NOT RECOMMENDED to use an electrical
extension cord with this appliance.
• Do not immerse base unit in water or other liquids.
• Use with wall receptacle only.
FOR 120-V AND 127-V MARKETS ONLY
To reduce the risk of electrical shock, this appliance has a polarized
plug (one blade is wider than the other). This plug fits a polarized
outlet only one way. This is a safety feature intended to help reduce
the risk of electrical shock. If the plug does not fit fully into the
outlet, reverse the plug. If it still does not fit, contact a qualified
electrician. Do not attempt to defeat this safety feature.
THIS UNIT IS FOR HOUSEHOLD USE ONLY
SPECIAL INSTRUCTIONS
SAVE THESE INSTRUCTIONS

-4-
KNOW YOUR FOOD STEAMER
Figure 1
Separator ring
Lid
Upper steaming bowl
Lower steaming bowl
Separator ring
Drip Tray
Water reservoir
Steaming base
Timer
Power Indicator Light
1
2

-5-
USING YOUR STEAMER
Place unit on a flat, sturdy surface with adequate clearance (i.e., do
not place under wall cabinets). The steamer unit and components
are not for use in ovens (microwave, convection or conventional)
or on stovetop.
(Step 1) Fill water reservoir with clean water only. Do not put any
other liquids or add any salt, pepper, etc., in the water reservoir.
Make sure the water does not exceed the “MAX” fill level or go
lower than the “MIN” fill level as indicated inside the water
reservoir. Then place the drip tray on the base. (Step 2)
HOW TO USE YOUR FOOD STEAMER
BEFORE THE FIRST USE
• Remove any labels or stickers from appliance.
• Thoroughly wash lid, upper steaming bowl, lower steaming
bowl, drip tray in warm, soapy water before first use, then
rinse and dry carefully.
• Wipe the inside of the water reservoir with a damp cloth.
Step 1 Step 2
Filling Water Reservoir Drip Tray

-6-
TO USE UPPER OR LOWER STEAMING BOWL
(Step 3) Place vegetable, seafood or other foods without sauce or
liquid into the steaming bowl. Arrange food in center of bowl.
Try not to block steam vents.
FOR DOUBLE TIER STEAMER
Place the largest piece of food with longest cooking time in the
lower steaming bowl. Place lower bowl on top of drip tray and
base. Place the upper steaming bowl on top of the base unit, or
you can place upper steaming bowl directly on top of the lower
steaming bowl.
Cooking times are estimates and depend on the quantity, size,
required degree of cooking and temperature of food. Consider all
the cooking time given in the following guide as suggested times
for double tier steamer.
When handling and removing hot components, use POTHOLDERS
to avoid burns from hot steam.
HOW TO USE YOUR FOOD STEAMER
Upper or Lower
Steaming Bowls Multi-Tiered Steaming
Step 3

-7-
HOW TO CLEAN YOUR FOOD STEAMER
• Unplug cord from outlet. Before cleaning, allow Steamer
to cool.
• Never immerse the Base, Cord or Plug in water.
• Empty the drip tray and the water reservoir.
• Wash lid, steaming bowl and drip tray in hot, soapy water.
Rinse and dry all parts, or wash on top rack of dishwasher.
• Clean reservoir with soapy water then wipe with damp cloth.
• Do not use abrasive cleaners
• The lower steaming bowl can be stored inside the upper
steaming bowl with the lid on top.
• In hard water areas, the scale may build up on the heating
element. If scale is allowed to accumulate, the steam could turn
off before the food is cooked. So, after 7-10 uses, pour 3 cups
clear vinegar into the water reservoir then fill with water up to
the “MAX” level. Do not place lid, steaming bowl and drip tray
in this procedure.
• Plug in and set timer to 20 minutes. When the timer is
complete, unplug cord from outlet. Allow the unit to cool
completely before emptying the water reservoir. Use cold
water to rinse the water reservoir several times.
HOW TO USE YOUR FOOD STEAMER
TIMER SETTING (MAXIMUM 60 MINUTES)
Set the timer to the recommended cooking time (experiment with
adjusting steam times to achieve your desired results). The light
turns on and steam will begin to generate. The light will turn off
when cooking is completed and the timer will give a signal bell.

-8-
REHEATING
BREADS AND LEFTOVERS
1. Do not wrap or cover when reheating breads.
2. For leftovers, reheating times are based on foods
at refrigerator temperatures.
3. Experiment with your own leftovers.
1. Clean the vegetables thoroughly. Cut off stems; trim, peel or
chop if necessary. Smaller pieces steam faster than larger ones.
2. Quantity, quality, freshness, size/uniformity and temperature of
frozen food may affect steam timing. Adjust water amounts
and cooking time as desired.
3. Frozen vegetables should not be thawed before steaming.
4. The frozen foods should be separated or stirred after 10-12 minutes.
Use a long-handled fork or spoon to separate or stir foods.
VEGETABLES

-9-
WEIGHT OR APPROX. TIME
VARIETY NUMBER OF PIECES (MINUTES)
Artichokes, Whole 4 whole, tops trimmed 33 – 35
Asparagus, Spears 1 pound 13 – 17
Beans,
Green/Wax 1/2 pound 13 – 17
Cut or Whole 1 pound 15 – 19
Beets 1 pound, cut 28 – 31
Broccoli, Spears 1 pound 13 – 17
Brussels Sprouts 1 pound 18 – 21
Cabbage 1 pound, sliced 19 – 21
Celery 1/2 pound, thinly sliced 17 – 19
Carrots 1 pound, thinly sliced 13 – 17
Cauliflower, Whole 1 pound 13 – 17
Corn on the Cob 3 – 5 ears 28 – 33
Eggplant 1 pound 19 – 21
Mushrooms, Whole 1 pound 28 – 33
Okra 1 pound 21 – 23
Onions 1/2 pound, thinly sliced 15 – 17
Parsnips 1/2 pound 13 – 17
Peas 1 pound shelled 15 – 16
Peppers, Whole Up to 4 medium (not stuffed) 15 – 16
Potatoes, Whole – Red 1 pound, about 6 small 38 – 48
Rutabaga 1 medium, diced 31 – 33
Spinach 1/2 pound 17 – 19
Squash
Summer Yellow and Zucchini 1 pound, sliced 15 – 17
Winter Acorn and Butternut 1 pound 25 – 27
Turnips 1 pound, sliced 23 – 25
All Frozen Vegetables 10 ounces 31 – 53
NOTE: times are for reference. Experiment with adjusting steam times
to achieve your desired results.

-10-
1. The steaming times listed in the chart are for fresh, frozen or fully
thawed seafood and fish. Before steaming, clean and prepare fresh
seafood and fish.
2. Most fish and seafood cook very quickly. Steam in small portions
or in amounts as specified.
3. Clams, oysters and mussels may open at different times.
Check the shells to avoid overcooking.
4. Serve steamed seafood and fish plain or use seasoned butter
or margarine, lemon or favorite sauces.
5. Adjust steaming times accordingly.
WEIGHT OR APPROX. TIME
VARIETY NUMBER OF PIECES (MINUTES)
Clams in Shell
Littlenecks/Cherrystones 1 pound 15 – 17
Crab
King Crab, legs/claws 1/2 pound 23 – 25
Soft Shell 8 – 12 pieces 13 – 15
Lobster
Tails 2 – 4 19 – 21
Split 1 to 1-1/4 pounds 21 – 23
Whole, Live 1 to 1-1/4 pounds 21 – 23
Mussels
(fresh in shell) 1 pound 17 – 19
Oysters
(fresh in shell) 3 pounds 21 – 23
Scallops (fresh)
Bay (shucked) 1 pound 17 – 19
Sea (shucked) 1 pound 21 – 23
Shrimp
Medium in shell 1 pound 15 – 17
Large/Jumbo in shell 1 pound 19 – 21
Fish
Whole 1/2 to 3/4 pound 21 – 28
Dressed 1/2 to 3/4 pound 21 – 28
Fillets 1 pound 21 – 28
Steaks 1 pound, 1-inch thick 23 – 28
NOTE: times are for reference. Experiment with adjusting steam times
to achieve your desired results.
FISH AND SEAFOOD

-11-
WEIGHT OR APPROX. TIME
VARIETY NUMBER OF PIECES (MINUTES)
Beef
Chuck 1 pound 31 – 33
Hamburger 1 pound 21 – 25
Meatballs 1 pound 25 – 27
Chicken
Pieces 1 pound 29 – 33
(2 – 4 pieces)
Lamb
Cubes 1 pound 29 – 31
Pork
Cubes 1 pound 29 – 31
Hot Dogs 1 pound 13 – 19
Pre-Cooked Sausage 1 pound 13 – 19
NOTE: times are for reference. Experiment with adjusting steam times
to achieve your desired results.
MEAT
QUESTIONS
Visit our website, www.rivalproducts.com. Call 1-800-557-4825.

-12-
PRECAUCIONES IMPORTANTES
Cuando use aparatos eléctricos, debe seguir una serie de
precauciones básicas de seguridad, entre ellas:
1. No toque las superficies calientes. Para evitar quemaduras a
causa del vapor, use guantes de cocina cuando quite la cubierta
o maneje recipientes calientes.
2. Para protegerse contra descargas eléctricas, no sumerja el cable,
el enchufe o la base de la unidad en agua ni otros líquidos.
3. Mantenga en vigilancia estrecha la unidad cuando la usen
niños o haya niños en las cercanías.
4. Cuando la unidad no esté en uso, desconéctela del
tomacorriente. Desconecte la unidad antes de poner o quitar
partes y permita que se enfríe antes de limpiarla.
5. No opere ningún aparato con el cable o el enchufe dañados,
ni cuando el aparato funcione mal o haya recibido algún tipo
de daño. Regrese el aparato a un Centro de Servicio de la
Marca RIVAL®para que lo examinen, reparen o ajusten.
6. No lo use en exteriores.
7. No deje el cable colgando de la mesa o mostrador, ni toque las
superficies calientes.
8. No opere el aparato cuando esté vacío o sin agua en el depósito.
9. No coloque el aparato cerca o encima de una estufa eléctrica o
de gas calientes, ni tampoco en un horno caliente.
10. Se debe tener mucho cuidado cuando se mueve un aparato
que contiene comida, agua u otros líquidos calientes.
11. No use el aparato con fines distintos para los que fue diseñado.
12. Levante y abra la cubierta con mucho cuidado en forma
inclinada para evitar QUEMADURAS y permitir que el agua
gotee dentro de la vaporera.
13. El uso de accesorios no recomendados por el fabricante para
este aparato implica riesgos.

-13-
• Este aparato está diseñado para su USO DOMÉSTICO SOLAMENTE.
• Compruebe que el voltaje de su tomacorriente sea el mismo que
el indicado en la etiqueta del valor nominal del aparato.
• La longitud del cable usado en este aparato se seleccionó para
reducir el riesgo de enredarse o tropezarse con él debido a que
sea demasiado largo.
• Por cuestiones de seguridad NO SE RECOMIENDA usar una
extensión eléctrica con este aparato.
• No sumerja la base de la unidad en agua ni en otros líquidos.
• Utilice solo un tomacorriente de pared.
SÓLO PARA TOMACORRIENTES DE 120-127 V
TPara reducir el riesgo de descarga eléctrica, este aparato tiene un
enchufe polarizado (una pata es más ancha que la otra). Este enchufe
se ajusta de una sola forma en un tomacorriente polarizado, lo cual
es una característica diseñada para reducir el riesgo de descargas
eléctricas. Si el enchufe no se ajusta completamente en el tomacorriente,
dele la vuelta. Si todavía no se ajusta, contacte a un electricista
calificado. No intente forzar este dispositivo de seguridad
ESTA UNIDAD ESTÁ DISEÑADA PARA SU
USO DOMÉSTICO SOLAMENTE
INSTRUCCIONES ESPECIALES
GUARDE ESTE INSTRUCTIVO

-14-
CONOZCA SU VAPORERA
Figura 1
Anillo separador
Tapa
Tazón superior
Tazón inferior
Anillo separador
Bandeja colectora
Depósito de agua
Base de la vaporera
Cronómetro
Luz indicadora
de encendido
1
2

-15-
USO DE SU VAPORERA
Coloque la unidad en una superficie plana y firme con un espacio
adecuado (por ejemplo, no la coloque bajo gabinetes de pared).
La vaporera y sus componentes no están diseñados para usarse
en hornos (microondas, convección o convencional) o sobre los
quemadores de una estufa.
(Paso 1) Llene el depósito de agua solamente con agua limpia.
No agregue ningún otro líquido, tampoco sal, pimienta, etc.
en el depósito de agua.
Compruebe que el agua no exceda la marca “MAX" o esté por
debajo de la marca "MIN" que se encuentran dentro del depósito
de agua. Luego coloque la bandeja colectora en la base. (Paso 2)
CÓMO USAR SU VAPORERA
ANTES DE USARLA POR PRIMERA VEZ
• Quite todas las etiquetas y calcomanías del aparato.
• Lave completamente en agua tibia y jabonosa la tapa, los
tazones superior e inferior y la bandeja colectora, luego
enjuague y seque con cuidado.
• Seque el interior del depósito de agua con un paño húmedo
Llenado del depósito de agua Bandeja colectora
Paso 1 Paso 2

-16-
USO DEL TAZÓN SUPERIOR O INFERIOR
(Paso 3) Ponga en la vaporera las verduras, mariscos u otros
alimentos sin salsa ni otros líquidos. Coloque la comida en el
centro del tazón. No bloquee las ventilas de vapor.
USO DE AMBOS TAZONES
Coloque las piezas de comida más grandes y las de tiempo de
cocción más largo en el tazón inferior de la vaporera. Coloque el
tazón inferior en la parte superior de la bandeja colectora y la base.
Ponga el tazón superior encima de la base, o también puede
ponerlo directamente sobre la parte superior del tazón inferior.
Los tiempos de cocción son estimados y dependen de la cantidad,
tamaño, grado de cocción requerido y temperatura de la comida.
Considere todos los tiempos de cocción indicados en la siguiente
guía como tiempos sugeridos para cocinar con los dos tazones.
Cuando maneje y quite componentes calientes, use GUANTES DE
COCINA para evitar quemaduras debidas al vapor caliente
CÓMO USAR SU VAPORERA
Tazones superior o inferior Cocina al vapor con
varios niveles
Paso 3

-17-
CÓMO LIMPIAR SU VAPORERA
• Desconecte el cable del tomacorriente. Antes de limpiar, deje
que se enfríe la vaporera.
• Nunca sumerja en líquidos la base, el cable o el enchufe.
• Vacíe la bandeja colectora y el depósito de agua.
• Lave la tapa, los tazones y la bandeja colectora con agua
jabonosa y caliente. Enjuague y seque todas las partes o lávelas
en la rejilla superior de un lavavajillas.
• Limpie el depósito con agua jabonosa, luego seque con un
paño limpio.
• No use limpiadores con abrasivos.
• El tazón inferior se puede guardar dentro del superior con la
tapa arriba.
• En zonas con agua dura, se pueden acumular incrustaciones en el
dispositivo de calentamiento. Si se permite que se desarrollen
incrustaciones, la vaporera podría apagarse antes de que la comida
se haya cocido. Por lo tanto, después de 7 a 10 usos, vierta 3 tazas
de vinagre blanco en el depósito de agua y luego llene con agua
hasta la marca “MAX”. No coloque la tapa, los tazones ni la
bandeja colectora cuando realice este procedimiento.
• Conecte la unidad y programe el cronómetro en 20 minutos.
Cuando se complete el tiempo, desconecte el cable del
tomacorriente. Deje que la unidad se enfríe completamente
antes de vaciar el depósito de agua. Use agua fría para
enjuagar el depósito de agua varias veces.
CÓMO USAR SU VAPORERA
AJUSTE DEL CRONÓMETRO (MÁXIMO 60 MINUTOS)
Coloque el cronómetro en el tiempo de cocción recomendado
(experimente y ajuste los tiempos del vapor para alcanzar los
resultados que usted desee). La luz se encenderá y la vaporera
comenzará a funcionar. La luz se apagará cuando el tiempo de
cocción se complete y se escuchará una campanilla indicadora.

-18-
PARA RECALENTAR
PAN Y SOBRAS
1. No envuelva ni cubra el pan cuando lo recaliente.
2. Para las sobras, los tiempos de recalentado se basan en
alimentos a temperatura del refrigerador.
3. Experimente con sus propias sobras.
1. Limpie completamente las verduras. Corte los tallos; rebane,
pele o pique si es necesario. Las piezas pequeñas se cuecen más
rápido que las grandes.
2. La cantidad, calidad, frescura, tamaño/uniformidad y
temperatura de la comida congelada pueden afectar el tiempo
de cocción. Ajuste la cantidad de agua y el tiempo de cocción
según lo desee.
3. Las verduras congeladas no deberán descongelarse antes de
cocerse con la vaporera.
4. Los alimentos congelados deberán despegarse o revolverse
después de 10 a 12 minutos. Use un tenedor o una cuchara
con mango largo para separar o revolver los alimentos.
VERDURAS

-19-
PESO O TIEMPO
NÚMERO DE APROXIMADO
VARIEDAD PIEZAS (MINUTOS)
Alcachofas enteras 4 enteras, puntas recortadas 33 – 35
Puntas de espárragos 1 libra 13 – 17
Judías
Verdes/amarillas 1/2 libra 13 – 17
Cortadas o enteras 1 libra 15 – 19
Betabel (remolacha) 1 libra, cortada 28 – 31
Ramitas de brócoli 1 libra 13 – 17
Coles de Bruselas 1 libra 18 – 21
Col (repollo) 1 libra, picada 19 – 21
Apio 1/2 libra, en rebanadas finas 17 – 19
Zanahorias 1 libra, en rebanadas finas 13 – 17
Coliflor entera 1 libra 13 – 17
Elote (maíz) en mazorca 3 – 5 piezas 28 – 33
Berenjena 1 libra 19 – 21
Champiñones enteros 1 libra 28 – 33
Okra 1 libra 21 – 23
Cebollas 1/2 libra, en rebanadas finas 15 – 17
Chirivía (pastinaca o apio 1/2 libra 13 – 17
de campo)
Guisantes (arvejas) 1 libra, sin vaina 15 – 16
Pimientos o Hasta 4 medianos 15 – 16
pimentones enteros (sin rellenar)
Papas rojas enteras 1 libra, unas 6 pequeñas 38 – 48
Nabo sueco (rutabaga) 1 mediano, picado 31 – 33
Espinaca 1/2 libra 17 – 19
Calabaza
Calabacín (zuchini o zapallito) 1 libra, rebanado 15 – 17
verde o amarillo
Calabaza y calabaza moscada 1 libra 25 – 27
Nabos 1 libra, rebanados 23 – 25
Cualquier verdura congelada 10 onzas 31 – 53
NOTA: los tiempos son solo referencias. Experimente ajustando los tiempos del vapor
para alcanzar los resultados que usted desee.

-20-
1. Los tiempos de cocción al vapor enlistados en el cuadro son
para pescados y mariscos frescos, congelados o completamente
descongelados. Antes de cocer al vapor, limpie y prepare los
pescados y mariscos frescos.
2. La mayoría de los pescados y mariscos se cuecen con mucha
rapidez. Cocínelos al vapor en pequeñas porciones o en las
cantidades que se especifican.
3. Las almejas, ostras y mejillones se pueden abrir en diferentes
momentos. Abra las conchas para revisarlos y evitar cocerlos
de más.
4. Sirva directos los pescados y mariscos cocinados al vapor o
use mantequilla o margarina condimentadas, limón o sus
salsas favoritas.
5. Ajuste los tiempos para cocinar al vapor según sea necesario.
PESCADOS Y MARISCOS
Table of contents
Languages:
Other Rival Electric Steamer manuals