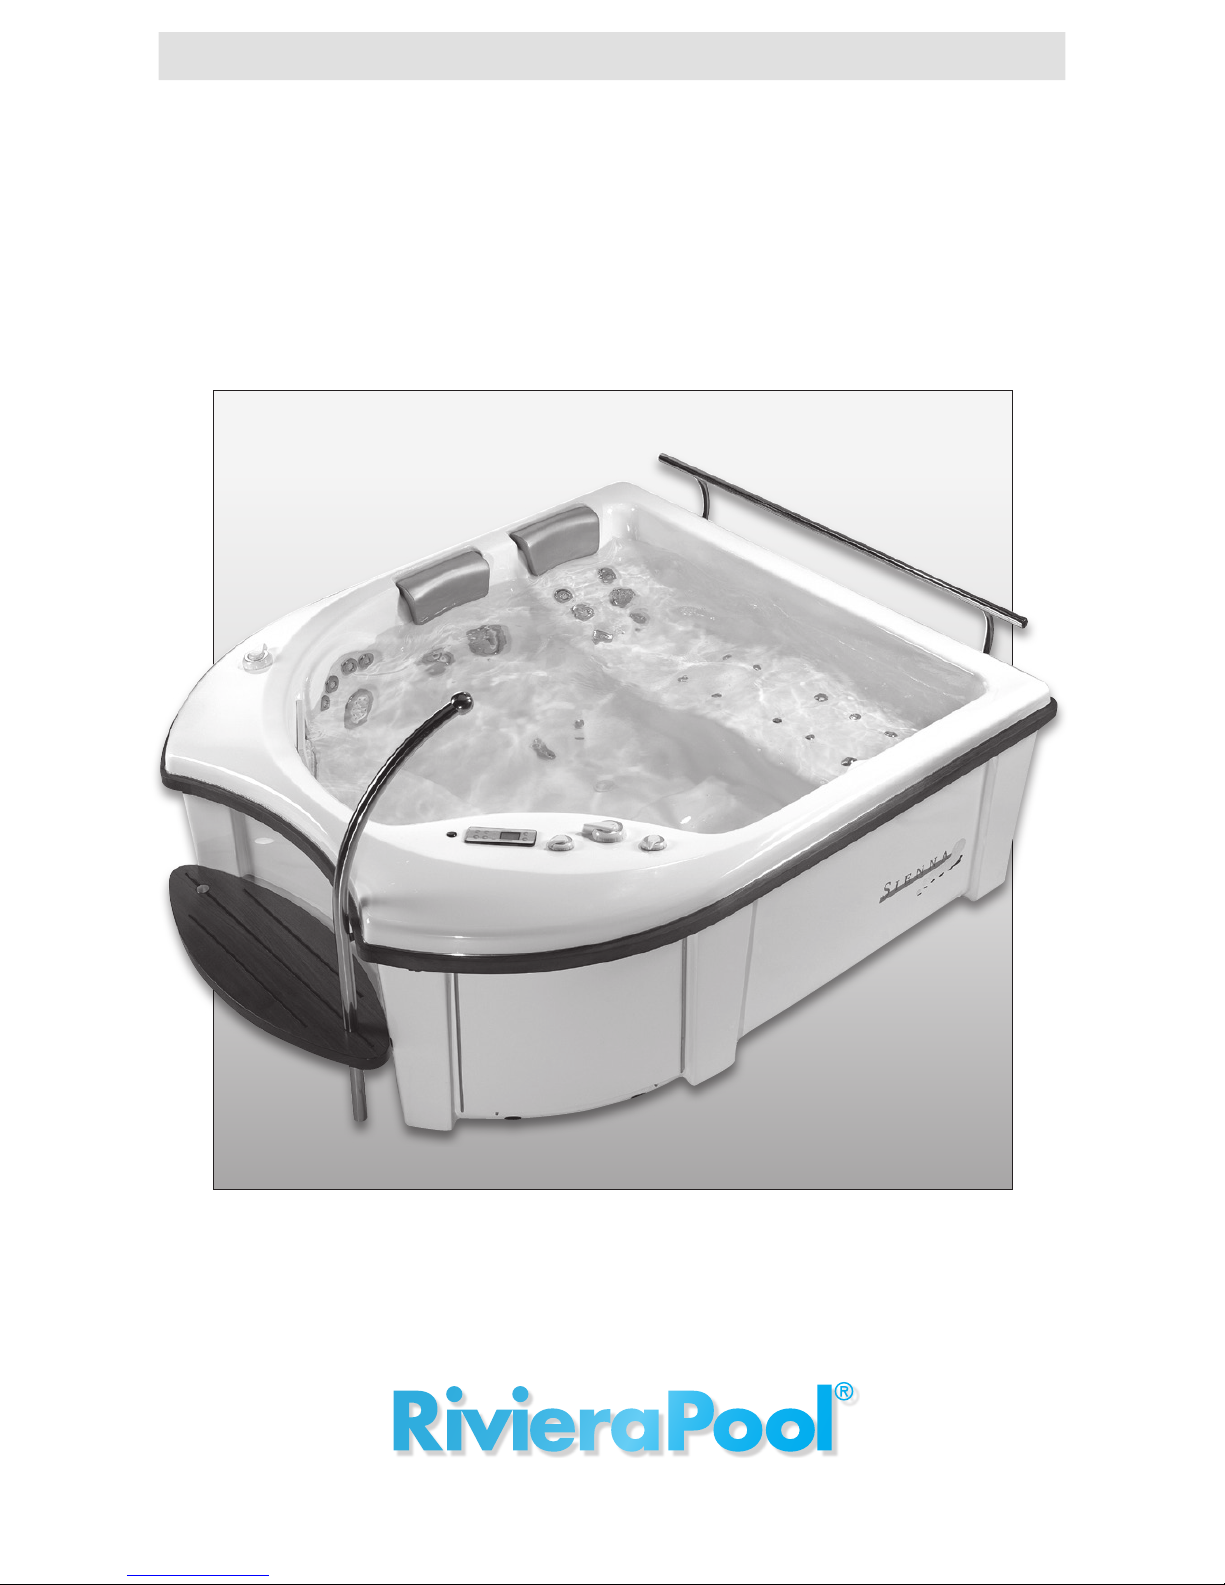
RivieraPool Vitara User manual
Technical Information WP 10 B 09/2009
PORTABLE SPAS
VITARA, VIANO, SIENNA, SIENNA XL, PENTAP
Instructions for Installation and Use
Prefabricated S wimming P oolS
.
w hirlPoolS
-English-

2
Content
1. Preconditions
1.1 Subsoil/Foundation ..............................................................................................................................................................................................................................................................Page 3
1.2 Power supply .......................................................................................................................................................................................................................................................................................... Page 3
1.3 Fresh water..................................................................................................................................................................................................................................................................................................Page 3
1.4 Waste water ...............................................................................................................................................................................................................................................................................................Page 3
1.5 Delivery ...............................................................................................................................................................................................................................................................................................................Page 3
1.6 Noise insulation .............................................................................................................................................................................................................................................................................. Page 3
2. Start up and use
2.1 Installing the whirlpool .................................................................................................................................................................................................................................................Page 4
2.2 Initial activation/Switching the power supply on and off ...............................................................................................................Page 4
2.3 Temperature setting ..............................................................................................................................................................................................................................................................Page 4
2.4 Frost protection ................................................................................................................................................................................................................................................................................ Page 4
2.5 Locking the control panel ......................................................................................................................................................................................................................................... Page 4
2.6 Locking the temperature control .............................................................................................................................................................................................................Page 4
2.7 To reverse the digits ............................................................................................................................................................................................................................................................... Page 4
2.8 Operation of pools................................................................................................................................................................................................................................................................Page 5
2.8.1 Jet 1 (jet nozzles) ...........................................................................................................................................................................................................................................................................Page 5
2.8.2 Jet 2 .............................................................................................................................................................................................................................................................................................................................Page 5
2.8.3 Reversing valve and massage jets ..........................................................................................................................................................................................................Page 5
2.8.4 Cascade ...............................................................................................................................................................................................................................................................................................................Page 6
2.8.5 Blower ....................................................................................................................................................................................................................................................................................................................Page 6
2.8.6 Lighting .............................................................................................................................................................................................................................................................................................................. Page 6
2.8.7 Operating mode ............................................................................................................................................................................................................................................................................. Page 7
2.8.8 Setting the time ............................................................................................................................................................................................................................................................................... Page 7
2.8.9 Programming the filter optimally ............................................................................................................................................................................................................Page 7
2.8.10 Preset filter cycles ........................................................................................................................................................................................................................................................................ Page 7
3. Care and maintenance
3.1 Water maintenance .................................................................................................................................................................................................................................................................. Page .....8
3.1.1 Filtration ............................................................................................................................................................................................................................................................................................................ Page .....8
3.1.2 Flocculation ............................................................................................................................................................................................................................................................................................... Page .....8
3.1.3 pH-value ............................................................................................................................................................................................................................................................................................................Page .....9
3.1.4 Use of disinfectant ..................................................................................................................................................................................................................................................................... Page .....9
3.1.5 Adding water, changing the water, emptying the whirlpool .................................................................................................... Page .....9
3.2 Cleaning and Maintenance of surface ...........................................................................................................................................................................................Page .....9
3.3 Cleaning and Maintenance of the wooden surfaces .................................................................................................................................... Page .. 10
3.4 Winter care ..................................................................................................................................................................................................................................................................................................Page .. 10
3.4.1 The pool is set on “sleep mode “ .................................................................................................................................................................................................................. Page .. 10
3.4.2 If the pool stays empty during winter ............................................................................................................................................................................................ Page .. 10
4. Instructions for bathing Page 11
5. Diagnostic messages / Regular reminders Page 12
Information:
Additional information available from our technical customer service.
We reserve the right to make changes or improvements in production, in line with technical developments.
3
1
1
1
2
2
1
2
2 x 1
2
2
Preconditions
1. Preconditions
1.1 Subsoil / Foundation
1.2 Power supply
1.3 Fresh water
1.4 Waste water
1.5 Delivery
1.6 Noise insulation
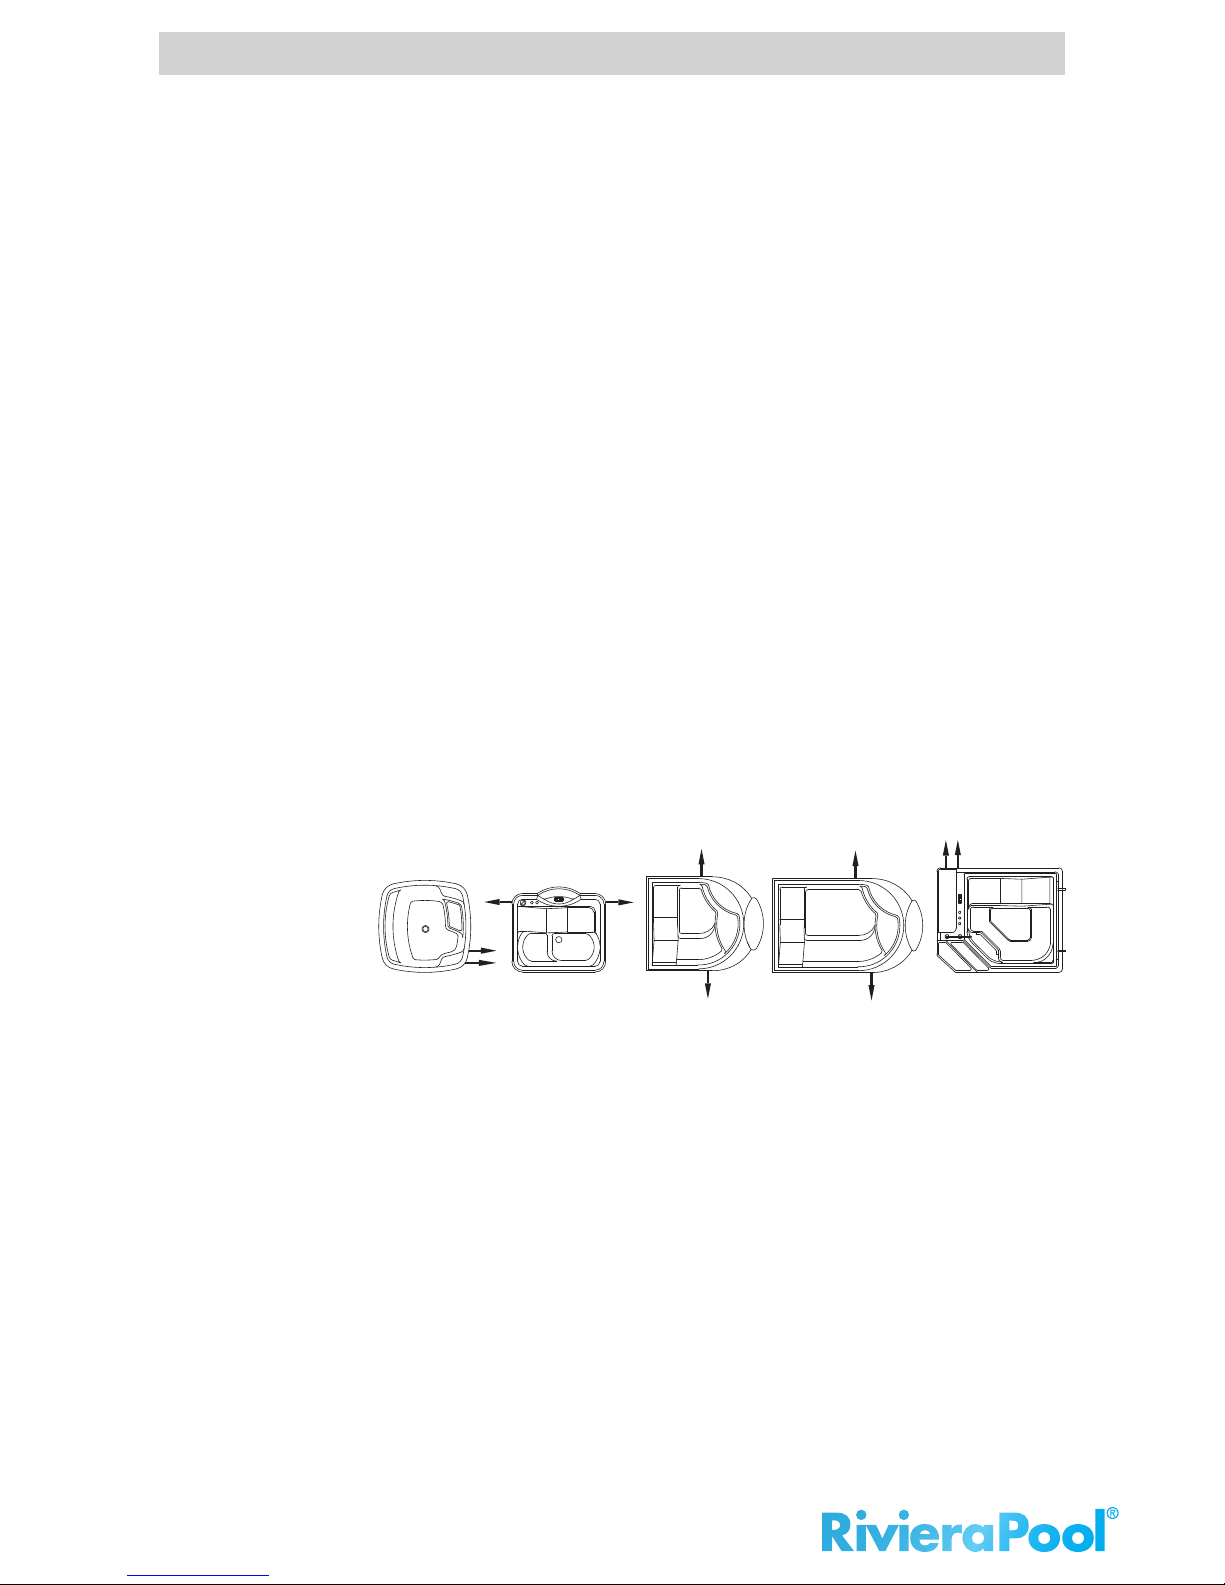
The foundation should be level, firm and have the same dimensions as
the whirlpool (see specifications for measurements). The entire base of
the whirlpool must lie absolutely flat on the ground so that its weight
is properly supported. There must be sufficient headroom above the
whirlpool for getting in and out with ease.
Total connected load: 16 A / 230 V / 50 Hz (for PentaP, Sienna XL: 2 x 16 A
230 V / 50 Hz) 30 and a 30 mA ground fault interrupter (GFI). The whirlpool
is fitted with a plug for provisional use. This should be removed once the
whirlpool is fully operational. The whirlpool must be connected to the
main power supply using a cable with a cross-section of 3 x 2.5 mm2. The
installation should be carried out by a qualified and approved electrician
and in compliance with local regulations (see diagram 1.2).
The whirlpool should be filled using a water hose supplied by the customer.
The whirlpool itself has no connection to the water supply. Only water of
drinking water quality from the mains should be used.
The whirlpool should be emptied with the help of a hosepipe.
Underneath the tub is a check valve to which the hose can be attached.
The whirlpool is delivered on a pallet. The packaging is fitted with handles/
straps for easy transportation. These handles/straps make it possible to
carry the pool either horizontally or to carry it vertically. To avoid any risk
of damage during transportation to the customer, the whirlpool should be
taken to its destination completely packaged. Immediately on arrival the
pool should be unpacked and inspected for any signs of damage.
If the pool is to be installed next to bedrooms, for example, or any other
rooms which according to DIN 4109 require special noise insulation,
additional measures will have to be taken.
1 = power connection
2 = water connection

4
Start up and use
2.1 Installing the whirlpool
2.2 Switching the power
supply on and off
2.3 Temperature setting
(26° - 40° C)
2.4 Frost protection
2.5 Locking the control panel
2.6 Locking the temperature
2.7 To reverse the digits
The whirlpool should be installed on a firm and level foundation. The
surface upon which the pool is to be placed should be checked to make
sure it is perfectly flat. Similarly, a check should be carried out with a spirit
level to ensure that the whirlpool is standing even. The valve for emptying
the whirlpool will have been closed at the factory. However, before filling
the whirlpool this should be checked again. Then the whirlpool should be
half-filled with fresh tap water. This is marked on the skimmer plate with the
words „WATERLEVEL“. Filling the whirlpool way above this level will result in
a poor skimming effect. Filling the whirlpool below this level can result in air
entering the system and the equipment will switch itself off, (error message
„DRY“). If the pool is being used by several people at the same time or by
very large people, it can be useful to keep the water level lower. Once the
pool has been filled, it should be connected to the mains.
After the pool has been connected to the mains, it will initially start up in
checking mode (shown as „PR“ in the display). This checking mode lasts
about 4-5 minutes. After that the filter pump will start up, the whirlpool
will be heated and the water temperature will be maintained at standard
level. The pool can be switched off by interrupting the electric current at
the circuit breaker. Caution: Interrupting the current supply incapacitates
the frost protection function, so always be sure to empty the pool after
switching off the power supply.
The LCD always displays the last recorded temperature. Please note that
the last recorded water temperature can only be shown with accuracy
after pump 1 has been operating for at least 2 minutes. To program the
pool to the desired temperature, press the „warm“ or „cool“ button controls
once. Every time either one of the buttons is being pressed, the temperature
rises or falls. After 3 seconds the LCD display will automatically show the
latest recorded water temperature.
If the frost protector sensor installed in the heater detects a temperature
drop to 6,7° C degrees the pump switches itself on automatically and the
system keeps working until a temperature of +/- 7, 2 ° C has been reached. In
cooler climate regions an additional sensor can be installed. Please ask your
dealer for further information.
Press the „Time“, „Jet 1“ and „Warm“ control buttons within 3 seconds.
Once the control panel has been locked, the display will show the water
temperature and the lock symbol „PL“=Panel Locked. All the buttons apart
from the time button are now locked. To unlock the control panel, press the
„Time“, „Jet 1“ and „Cool“ control buttons within 2 seconds.
The temperature control can be locked by, when entering the water
temperature and after pressing the „Warm“ or „Cool“ button within
3 seconds, the „Time“, „Jet 1“and „Warm“ buttons are being pressed. Once
the panel is locked, the middle display will show the water temperature and
the lock symbol „TL“= Temperature Locked. To unlock the control panel,
press the buttons „Cool“, „Time“, „Jet 1“, „Cool“.
By pressing „Cool“ – „ Blower“ the digits as shown on the display can be
reversed.
2. Start up and use
w
a
r
m
M
o
d
e
c
o
o
l
B
l
o
w
e
r
J
e
t
1
J
e
t
2
L
i
g
h
t
w
a
r
m
M
o
d
e
c
o
o
l
B
l
o
w
e
r
J
e
t
1
J
e
t
2
L
i
g
h
t

5
2.8.1 Jet 1 (jet nozzles)
2.8.2 Jet 2
2.8.3 Reversing valve and
massage jets
Massage pump Jet 1 will be switched on and off by pressing the Jet 1 but-
ton. Should the pump not be switched off manually it will automatically
start again after 15 minutes.
For models of the series I the filtration will be activated through the 2-speed
pump by pressing Jet 1. Die Bediensequenz ist wie folgt:
Press x 1: filtration on (if not yet set ion the display for filter cycles)
Press x 2: Jet 1 on
Press x 3: off
Jets are switched off automactically after 30 minutes.
Disinfection cycle: 60 minutes after the use of one of the massage
functions, the filter and ozone generator will switch on and run a
disinfection cycle for 30 minutes.
Pressing button „Jet 2“ switches Pump 2 on and off. If Pump 2 is not
switched off manually, the pump will be switched off automatically after
15 minutes. This button is also available when the pool has only 1 massage
pump.
The reversing valve on the side of the pool determines which jets are being
activated when the pump runs.
Mid-position: The water flows through all jets evenly. The valve should
always be in this position when the whirlpool is not in use.
Left-position: This is the massage setting for jet line 1.
Right-position: Massage setting for jet line 2.
The reversing valve can be moved in between these positions in order to
adjust the intensity of the massage individually. In order to do so, turn off the
jet pump, switch the valve, then turn on the jet pump again.
In addition, the intensity of the massage of the Super jets (and with some
models the Hydro Jets) can be adjusted by turning the nozzle.
When the pump runs on high speed, additional air can be added to the jets
while on position “Jet 1” or “Jet 2”. In order to do this, the air control on the
side of the pool needs to be opened by turning the lever. The air supply
should be closed after the pool has been used.
Start up and use
w
a
r
m
M
o
d
e
c
o
o
l
B
l
o
w
e
r
J
e
t
1
J
e
t
2
L
i
g
h
t
2.8 Start up and use
w
a
r
m
M
o
d
e
c
o
o
l
B
l
o
w
e
r
J
e
t
1
J
e
t
2
L
i
g
h
t

6
2.8.4 Cascade
2.8.5 Blower
2.8.6 Lighting
Start up and use
w
a
r
m
M
o
d
e
c
o
o
l
B
l
o
w
e
r
J
e
t
1
J
e
t
2
L
i
g
h
t
All models except the Penta P are equipped with a cascade.
The water cascade is fed by the filter pump and only operates when the filter
pump runs. The filtration time is programmed from 08:00hrs until 22:00hrs
and 18:00hrs 22:00hrs.
The cascade can be controlled by opening and closing the valve on the side.
When the pool is covered, the control valve should be closed. Otherwise, water
will be pushed under the cover and water could run over the border of the pool.
Note: the cascade can’t be closed completely. This is to avoid standing water
in the pipes. The performance of the cascade diminishes as the filter cartridge
becomes dirtier. This means that, when the water pressure becomes too little,
the cartridge should be cleaned or replaced.
By pressing this button the air blower will be switched on and off. The
blower switches itself off automatically after 15 minutes. Note: At low
outside temperatures cold air is blown into the whirlpool. The water
temperature might drop and the heater might not be able to compensate
this difference immediately. Even with normal outside temperatures the
air blown into the pool could feel cold to the skin when the bather sits or
lays directly on a jet nozzle. This button always exists even if the pool is not
equipped with a blower.
The lights are turned on by pressing this button. The lights are turned off
automatically after 4 hours. When an LED light is present, the colours and
the speed of the light change when the button „Light“ is being pressed.
w
a
r
m
M
o
d
e
c
o
o
l
B
l
o
w
e
r
J
e
t
1
J
e
t
2
L
i
g
h
t
Switching valve
(position filter)
Cascade
on/off

7
Start up and use
2.8.7 Operating mode
2.8.8 Setting the time
2.8.9 Programming the filter
optimally
2.8.10 Preset filter cycles
w
a
r
m
M
o
d
e
c
o
o
l
B
l
o
w
e
r
J
e
t
1
J
e
t
2
L
i
g
h
t
w
a
r
m
M
o
d
e
c
o
o
l
B
l
o
w
e
r
J
e
t
1
J
e
t
2
L
i
g
h
t
Mode/Prog: This control button is used to switch between the three operat-
ing modes – STANDARD, ECONOMY and SLEEP. To program the mode, press
the „Mod/Prog“ button, then press „Cool“ to switch through to the desired
mode (LCD light flashes to acknowledge), and finally „Mode/Prog“ to confirm
the choice.
Standard mode (STANDARD). In this mode the desired water temperature is
maintained. Please note that the temperature measured last only shows when
the pump has run for at least 2 minutes. „STANDARD“ remains displayed until
a different mode is selected.
Economy mode (ECONOMY). In this mode the water is only heated up to the
desired temperature during the filter cycles. „ECONOMY“ remains displayed
until a different mode is selected. By pressing „Jet 1“ in economy mode, the
system switches from standard to economy (STANDARD-In-ECONOMY): This
mode is like the standard mode, but changes automatically after one hour to
the economy mode. By pressing „Mode/Prog“ during this time, the system is
switched to economy immediately.
Sleep mode (SLEEP). In this mode the water is only heated up during the filter
cycles to within 11º C (20º F) below the desired temperature. „SLEEP“ remains
displayed until the mode is being changed.
STANDBY: By pressing „Warm“ or „Cool“ and then „Jets 2“ the whirlpool func-
tions are temporarily turned off. This is useful when a filter has to be replaced.
The whirlpool starts up again by pressing any button.
Please Note: An electrical blocking mechanism makes it impossible for the
heater to work at the same time as the massage pumps or blower. If they are
switched on, the heater automatically switches itself off. As soon as the pumps
are switched off, the heater switches itself on again. The minimum set-point
temperature is 26º C.
When the whirlpool is switched on, the „SET TIME“ message flashes in the
display. To set the time, press first
w
a
r
m
M
o
d
e
c
o
o
l
B
l
o
w
e
r
J
e
t
1
J
e
t
2
L
i
g
h
t
, then
w
a
r
m
M
o
d
e
c
o
o
l
B
l
o
w
e
r
J
e
t
1
J
e
t
2
L
i
g
h
t
and finally
w
a
r
m
M
o
d
e
c
o
o
l
B
l
o
w
e
r
J
e
t
1
J
e
t
2
L
i
g
h
t
or
w
a
r
m
M
o
d
e
c
o
o
l
B
l
o
w
e
r
J
e
t
1
J
e
t
2
L
i
g
h
t
. Once
w
a
r
m
M
o
d
e
c
o
o
l
B
l
o
w
e
r
J
e
t
1
J
e
t
2
L
i
g
h
t
or
w
a
r
m
M
o
d
e
c
o
o
l
B
l
o
w
e
r
J
e
t
1
J
e
t
2
L
i
g
h
t
has been pressed, the time changes by intervals of one minute. Press
w
a
r
m
M
o
d
e
c
o
o
l
B
l
o
w
e
r
J
e
t
1
J
e
t
2
L
i
g
h
t
or
w
a
r
m
M
o
d
e
c
o
o
l
B
l
o
w
e
r
J
e
t
1
J
e
t
2
L
i
g
h
t
again to stop the time from changing any more. Press
w
a
r
m
M
o
d
e
c
o
o
l
B
l
o
w
e
r
J
e
t
1
J
e
t
2
L
i
g
h
t
for the
system to register the new time.
Although it may not be necessary to alter the filter cycle, it can be adjusted by
pressing the control buttons
w
a
r
m
M
o
d
e
c
o
o
l
B
l
o
w
e
r
J
e
t
1
J
e
t
2
L
i
g
h
t
w
a
r
m
M
o
d
e
c
o
o
l
B
l
o
w
e
r
J
e
t
1
J
e
t
2
L
i
g
h
t
w
a
r
m
M
o
d
e
c
o
o
l
B
l
o
w
e
r
J
e
t
1
J
e
t
2
L
i
g
h
t
w
a
r
m
M
o
d
e
c
o
o
l
B
l
o
w
e
r
J
e
t
1
J
e
t
2
L
i
g
h
t
within three seconds.The display
message „SET START FILTER 1“ (AM cycle, 0.00 -12.00 hrs) will appear. To set
the starting time of the filter cycle, press the
w
a
r
m
M
o
d
e
c
o
o
l
B
l
o
w
e
r
J
e
t
1
J
e
t
2
L
i
g
h
t
or
w
a
r
m
M
o
d
e
c
o
o
l
B
l
o
w
e
r
J
e
t
1
J
e
t
2
L
i
g
h
t
button. After pressing
w
a
r
m
M
o
d
e
c
o
o
l
B
l
o
w
e
r
J
e
t
1
J
e
t
2
L
i
g
h
t
the display message „SET STOP FILTER 1“ will appear. Now enter the stop
time using the
w
a
r
m
M
o
d
e
c
o
o
l
B
l
o
w
e
r
J
e
t
1
J
e
t
2
L
i
g
h
t
or
w
a
r
m
M
o
d
e
c
o
o
l
B
l
o
w
e
r
J
e
t
1
J
e
t
2
L
i
g
h
t
buttons as described above. After pressing the
w
a
r
m
M
o
d
e
c
o
o
l
B
l
o
w
e
r
J
e
t
1
J
e
t
2
L
i
g
h
t
button, the display message „SET STOP FILTER 2“ (PM cycle, 12.00 - 24.00 hrs)
will appear. When the
w
a
r
m
M
o
d
e
c
o
o
l
B
l
o
w
e
r
J
e
t
1
J
e
t
2
L
i
g
h
t
button is pressed, the whirlpool registers the new
cycle times and displays the current water temperature.
The first filter cycle is automatically activated at 8.00 hrs (8.00 AM).
Pump 1 works at low speed until 12.00 Noon. The second filter cycle is automati-
cally activated at 18.00 hrs (6.00 PM). Pump 1 works at low speed until 22.00
hrs (10 PM). During the filtration period, the filtration pump and the ozone
generator are in operation. Before the filtration period starts the blower always
flushes the air channel system for 30 seconds.Pumps 1 and 2 are running for
1 minutes.
Switching valve
(position filter)
Cascade
on/off

8
Care and maintenance
3. Care and maintenance
3.1 Water maintenance
3.1.1 Filtration
3.1.2 Flocculation
Thorough water maintenance forms the basis for a hygienic whirlpool.
Clean and clear water is visually appealing and contributes considerably to
the overall feeling of well being. Inadequate water maintenance can have
an adverse effect on one’s health. The following elements are essential
components of good water maintenance.
Filtration: impurities which have dissolved in the water are mechani-
cally being left behind in the filter.
Flocculation: Adding a flocculant to the water causes even the tiniest
particles to bind, making them large enough to be filtered out.
pH value: Indicates when the water has reached an “equilibrium”, when
bathing is at its most pleasant and disinfectants can work best.
Disinfectant: should be used to kill any germs.
Adding fresh water: The use of disinfectants can lead to salt deposits
building up in the water. These should be kept as low as possible by adding
fresh water.
The filter should operate automatically for 6-8 hours per day. Besides
servicing the filter regularly, the cartridges should be cleaned regularly as
well.
The whirlpool’s skim filter is fitted with very fine non woven filter cartridges
which keep impurities out of the water. The cartridge itself is capable of
lasting many years but should be changed every 12 months. A set of
replacement cartridges is included in the delivery.
The filter cartridges should be cleaned at regular intervals (weekly or
monthly, depending on how often the pool is used).
The cartridges should be cleaned as follows:
• Remove the skimmer lid.
• Pull out the skimmer basket.
• Unscrew the cartridges from the skim filter and rinse
thoroughly inside and outside with a strong jet of water.
• To insert the cartridge, follow the steps in reverse. Make sure
that the cartridge is correctly locked into position.
Note: A blocked filter can prevent the flow of water in the system and result
in a reduced performance by the jets as well as a breakdown of the heating
system.
Adding flocculation agents to the water helps the finest of impurities to
bind so that they can be filtered and kept out of the whirlpool. Such tiny
particles can be seen in the beam of the underwater light, where they
appear as the smallest of bubbles. Where this is the case, a solid flocculation
agent should be used in cartridge form so that it can be placed in the water
or the skimmer basket. Do not use liquid flocculation agents, as it can be
difficult to gauge the correct dosage.

9
Care and maintenance
3.1.3 pH value
3.1.4 Use of disinfectant
3.1.5 Adding fresh water,
changing the water,
emptying the whirlpool
3.2 Cleaning and Maintenance
of the surface
The pH-value in the whirlpool should be between 7.2 and 7.4. This is the
ideal level for a disinfectant to work most efficiently and the water feels soft
to the skin and is not corrosive. The strong addition of air when the massage
jets are in use means that there can very quickly be a big increase in the pH
value. It is therefore necessary to lower the pH manually. This is done by
adding pH reducers, normally approx. 7 gr. per 1000 litres of water to reduce
the pH value by 0.1. The pH value should be measured and regulated at least
1 x week.
The installed ozone generator supports the disinfection. If the pool is
used daily by 2 persons an additional disinfection becomes necessary.
Chlorine or oxygen should be used. For the correct concentration, follow
the manufacturer’s or product recommendations. In the case of inorganic
chlorine, for example, 0.6 to 1 mg/l should be used. The disinfectant is best
applied in the form of tablets which can be placed in the skimmer baskets.
Notice: The ozone generator switches off when the massage pumps are
activated.
Through the disinfection of the water in the whirlpool, salt deposits build
up. To keep this build-up as low as possible, fresh water should be added.
This is why after every bath the whirlpool should be topped up to its normal
level, 13 cm below the rim. A complete change of water should take
place approximately every 8 weeks.
The whirlpool should be emptied as follows:
- Set the main switch to the „off „position.
- Attach the hose to the check valve.
- Open the check valve and allow all the water to drain out of the pool.
The surface of the pool is sanitary acrylic and the cabinet is made of smooth
polyester, making it easy to clean. Marks should always be removed using
plenty of lukewarm water and a soft sponge to avoid any scratches of the
surface.
Limestone and metal should be washed down with an acidic cleaner such
as a mixture of vinegar and water.
Dirt and scum marks can be removed with lye. Care must always be taken,
however, not to use foaming cleaning liquids, powders or creams on the
acrylic surface of the whirlpool as any residue could bubble up when the
whirlpool is in use.
Do not use cleaning agents in pressurized containers! Do not clean stainless
steel with acidic products!
Dull surfaces can be polished up so that they shine even after years. A
special surface polish called „Poolfinish“ is available for just this purpose.
This is applied with a soft cotton cloth and polished with gentle circular
movements. Minor scratches can also be removed this way.

10
Care and maintenance
3.3 Cleaning and Maintenance
of the wooden surfaces
3.4 Winter care
3.4.1 The pool is set on “sleep
mode“
3.4.2 If the pool stays empty
during winter
ATTENTION! Please do not use any solvent-containing cleaners as they might
affect the acrylic surface.
Dull surfaces can be polished up so that they shine even after years. A
special surface polish called „Poolfinish“ is available for just this purpose.
This is applied with a soft cotton cloth and polished with gentle circular
movements. Minor scratches can also be removed this way.
Wood is a natural product and depending on weathering its appearance
will change over the course of time. Teak only acquires its unique silvery
sheen after a certain weathering. A degree of „movement“ with wood is
unavoidable. We recommend taking precautions to keep weathering to a
minimum.
Wooden surfaces should be kept as dry as possible. They should be cleaned
with lukewarm water and a leather cloth.
If required, teak surfaces can be treated with a special varnish. This is
painted onto the wood and gives the surface a new sheen. Before treating
teak in this way, the surface must be rubbed down using fine sandpaper. A
tin of teak varnish is provided with every whirlpool.
If the Isola spa is not used during winter the following has to be observed:
The pool is set on “sleep mode“ and remains filled with water. Adjust the
temperature to 36 degrees C.
Clean the filter cartridge.
The water will now be disinfected and filtered during winter. The temperature
might fall to 11 degrees C but the frost proctection is activated.
Attention: In the event of an electricity cut-off the “ sleep mode” has to be
reset . If not done the pool might get damaged through frost.
Please check the water level in regular intervals.
To restart the operations set into “ standard mode”.The water will now be
heated to the set value 36 degrees C.
Please check the water level.
Please clean the filter cartridge.
Switch off the electricity supply. Open all the valves and drain the pool and
the piping system. Open the drainage screws of the massage pumps. Take the
cartridge out of the filter, clean it and store it in a dry place.
Place the hard top cover on the pool; if necessary remove snow.
To restart the operations close all the valves again, replace the drainage screws
into the massage pumps, refill the pool up to the mark on the skimmer and
switch on the electricity. (please see 2.2 “switching the power supply on/off”)

11
Instructions for bathing
4. Instructions for bathing
Water temperatures in whirlpools are significantly higher than those for
instance of whirlpools. This is so, because it is through the combination of
heat and the movement of the water that the desired feeling of relaxation
can be achieved. However, this may cause increased pressure on the
circulation. Therefore, in order to ensure safe bathing, always observe the
following rules and follow these instructions for water maintenance.
Water temperature
The water temperature should be set at approximately 36° C. Higher
temperatures can cause circulatory problems and lead to fatigue - lower
temperatures of, for example 32°-33° C have an invigorating and refreshing
effect. The ideal temperature will naturally depend on the constitution of
each individual.
Duration of baths
The higher the temperature of the water, the less time should be spent in
the water. If the water is 36° C the bathing time should be approximately 20
minutes, if the water is 38° C, no more than 10-12 minutes.
Taking a break
Each bath should be followed by a cool-down period of the same length of
time. This can be done either by going out into the fresh air or by taking a
swim in a cool pool.
Showering before bathing Before entering the whirlpool, be sure to
shower thoroughly. Otherwise the high temperature of the water means
that impurities in the water will have to be treated with correspondingly
high amounts of disinfectant.
Sauna and Whirlpool
The combination of sauna and whirlpool is only recommended for people
whose constitution can really tolerate it. In any event, it is important to
include a cooling off period between baths.
To be avoided
Never bathe after consuming alcohol, immediately after meals, with cold or
flu symptoms and in no circumstances if suffering from a heart condition.
Bath salts, oils or foams
should never be used in a whirlpool. These can cause excessive foaming or
remain in the pipes and jets and pollute them.

12
Diagnostic Messages / Regular Reminders
5. Diagnostic Messages / Regular Reminders
Diagnostic
message
Meaning Action required
No message displayed The power supply to the
whirlwhirlwhirlpool controls is disconnected.
Temperature not known.
The operator console remains switched off until the power is restored.The
whirlpool controls settings are stored for up to 30 days with the assistance of
a reserve battery.
0HH
"Overheat" -
The whirlpool controls have switched themselves
off.One of the sensors in the heating element has
measured 48°C.
Pointer to a defective filter pump or a block-
age in the filter circuit.
DO NOT GET INTHE WATER! Remove the whirlpool cover and allow the water
to cool.When the heating element has cooled down reset the system by
pressing any button.If the whirlpool controls will not reset,disconnect the
power and call the dealer or customer service.
Check filter pump.
OH5
"Overheat" -The whirlpool controls had switched
themselves off. One of the sensors in the heating
element had measured 43°C.
Pointer to a defective filter pump or a block-
age in the filter circuit.
DO NOT GET INTHE WATER! Remove the whirlpool cover and allow the water
to cool.At 43°C the whirlpool controls should automatically reset themselves.
If the whirlpool controls do not reset,disconnect the power and call the
dealer or customer service.
Check filter pump.
ICE
"ICE" - additional sensor senses the danger of
frost or
a sensor wire is broken
No action necessary.The pump and blower are automatically activated,
regardless of the whirlpool status.
If necessary,replace sensor
SnH
The whirlpool is switched off.The sensor
connected to temperature socket A is not
working.
If the problem persists,notify the dealer or customer service. (Usually happens
temporarily with overheating and disappears again, after the heater element
has cooled down.)
If necessary,replace sensor
Snb
The whirlpool is switched off.The sensor
connected to temperature socket B is not
working.
If the problem persists,notify the dealer or customer service (Usually happens
temporarily with overheating and disappears again, after the heater element
has cooled down).
If necessary,replace sensor
SnS
The sensors are not balanced.If this message is
alternately displayed with the water temperature,
it could be a temporary condition.If the message
blinks alone,the whirlpool controls are switched
off.
If the problem persists,notify the dealer or customer service. Check sensor
and cartridge and replace as necessary.
HFL
The temperature difference between the sensors
is more than 2.5°C which usually points to a flow
problem.
In this case it could be due to air in a newly filled
system.
Check the water level in the whirlpool.Add water as necessary.When there is
enough water ensure the pumps are rinsed. If the problem persists, notify the
dealer or customer service.
Bleed the system at the couplings on the heater.
LF
Permanent problem with too weak a flow (is
displayed when the message "HFL" is displayed
five times in 24 hours).The heating is switched
off but the other whirlpool functions are running
normally.
In this case it could be due to air in a newly filled
system.
Same procedure as with message "HFL".The heater function of the whirlpool
does not automatically reset,press any button to set it up anew.
Bleed the system at the couplings on the heater.
dr
Not enough water measured in the heater
element.
In this case it could be due to air in a newly filled
system.
Check the water level in the whirlpool.Add water as necessary.When there is
enough water ensure the pumps are rinsed. Press any button to reset.
Bleed the system at the couplings on the heater.
dr4
Not enough water measured in the heater
element (will be displayed when the message "dr"
is displayed for the third time).The whirlpool is
switched off.
In this case it could be due to air in a newly filled
system.
Same procedure as with message "dr".The whirlpool controls do not reset
automatically, press any button to reset.
Bleed the system at the couplings on the heater.
Pr
When switched on for the first time,the whirlpool
controls run in rinse mode.
The rinse mode lasts up to 4 minutes and afterwards the whirlpool is heated
and,in standard mode,the water temperature maintained.

13
Diagnosemeldungen
Reminder
messages
Frequency Action required
rPH
Every 7 days Check and set chemical content according to the manufacturer's instructions.
rSH
Every 7 days Check and set chemical content according to the manufacturer's instructions.
rLL
Every 30 days Remove filter, clean it and re-install according to manufacturer's instructions.
rL9
Every 30 days Check and reset GFCI circuit breaker according to manufacturer's
instructions.
rdr
Every 90 days Empty and refill whirlpool according to manufacturer's instructions.
rLL
Every 180 days Clean and treat covering according to manufacturer's instructions.
rLr
Every 180 days Clean and treat wood according to manufacturer's instructions.
rLH
Every 365 days Install new filter.
F1
lit up Filter time 1 activated
F2
lit up Filter time 2 activated
PL
lit up Button lock active
TL
lit up Temperature lock active
Diagnostic
message
Meaning Action required
--F
--C
Temperature not recognised. After the pump has been switched on for 2 minutes, the temperature is
displayed.
---
Current temperature not in sleep or save mode. In sleep or save mode and outside a filter cycle, the pump stays switched off,
potentially for a number of hours. To display the current temperature either
switch to standard mode or turn on "Jet 1" for at least two minutes.
Sb4
Standby mode is switched on by pressing
multiple buttons on the operator console.
By pressing any button the system leaves standby mode and switches back to
normal operation.

14
Notes

15
Notes

www.pools.de
One of the leading
German manufacturers
of prefabricated
swimming pools,
swimming pool
technology.
This manual suits for next models
4
Table of contents
Other RivieraPool Hot Tub manuals


