RJ Laser Photonic HairLaser User manual

Natural care with light
Operating Instructions
Photonic HairLaser

2
Contents
1Overview.............................................................................................................. 3
2 Introduction......................................................................................................... 4
3 Safety information .............................................................................................. 5
General information
Liability disclaimer
Safety standards
Decommissioning in the event of a hazard
Safety advice
4 Delivery contents............................................................................................... 7
5 Assembly instructions.........................................................................................8
6 Working with the touchscreen.....................................................................11
7 Service menu.....................................................................................................12
8 Error messages................................................................................................. 16
9Care and maintenance.................................................................................... 17
Cleaning and disinfection
Calibration
10 Technical description........................................................................................18
Technical data
Position and explanation of symbols
11 Warranty and disposal.................................................................................... 21
12 Manufacturer/Distributor............................................................................... 22

3
Overview 1
Fast and easy
touchscreen operation
Daily work has never
been easier.
Safe against misuse
The safety key protects
against unauthorized use.
Clear power indicator
See at a glance whether
the device is supplied with
power.
Ergonomic height
adjustment
The laser hood can be
variably adjusted for
optimal positioning
above the head.
Additional port
Ready for additional ac-
cessories.
Stable roller base
Work safely thanks to a
strong base with lock-
able wheels.
Secure locking
Safe and secure with a
single hand.
Slot for memory card
Simple software update
procedure to support
future applications.

4
Introduction
Your Photonic HairLaser
Thank you for choosing the Photonic HairLaser – the latest-generation, high-quality laser
device from Reimers & Janssen GmbH.
Reimers & Janssen has been designing and manufacturing medical devices for laser therapy
since 1982. Our experience and innovations have made us one of Europe's leading manufac-
turers in the industry.We have applied our profound knowledge of complementary therapy
methods to this product as well, which lets you achieve the best results with gentle laser
therapy across a large range of applications.
The unique technology of the Photonic HairLaser nurtures and regenerates skin and hair in
a natural way. The new therapy for satised customers.
Photonic HairLaser – Natural care with light.
2

5
Safety information
General information
Read these operating instructions thoroughly before operating the device.
These operating instructions describe the proper use of the Photonic HairLaser and indi-
cate hazards associated with its use.All individuals who use, care for, service, or inspect this
device must read and follow the instructions.
These operating instructions must always be kept with the device and must be included with
the Photonic HairLaser if given to others.
Liability disclaimer
You may use the Photonic HairLaser only for the purposes described in these operating
instructions and only under supervision!
The Photonic HairLaser must be operated only together with original accessory parts.The
manufacturer is not liable for the device and the consequences resulting from operation or
applications that are not described within these operating instructions.
The manufacturer reserves the right to make changes based on technological improvements.
Functions and safety standards
The Photonic HairLaser conforms to the following European safety standards:
EN 60825-1: Safety of laser products (2002)
EN 60601-1-2:2001: EMC Directive on electromagnetic compatibility
Class 2
3

6
Decommissioning in the event of a hazard
If you believe that the device can no longer be operated safely, it should be decommissioned
to prevent against further use and to send it to the distributor for repair.
Such cases include:
the power adapter or housing components have visible damage
the device no longer functions properly
Safety advice
Prevent unauthorized use
Your Photonic HairLaser is equipped with a safety key to prevent unauthorized use.The
laser can be operated only with the key inserted.When the Photonic HairLaser is not in use,
the key should always be removed and stored separate from the device in order to prevent
unauthorized use.
Emergency shutdown
In an emergency, unplug the power cord, or alternatively turn the safety key to "OFF".
Take care when adjusting height without the laser hood attached
The inserted stand tube is under pressure and if the laser hood is not attached, the tube can
jerk up when the main screw is loosened.
Never look directly into the laser beam
Avoid direct eye contact with the laser beam. However, if your eyes are exposed to a direct
beam for a considerable period of time, please seek medical attention immediately.
1
2

7
Delivery contents
Contents when delivered
The Photonic HairLaser is supplied partially assembled in three packages.
The stand base package contains:
Stand base
4 wheels (2 with brakes)
The stand tube package contains:
Long stand tube
Short stand tube with handle
Buttery screw with washer
The laser hood package contains:
Power adapter with connecting cable
Power cable with IEC power plug
A pair of keys for the safety key switch
Laser hood
4

8
Assembly instructions 5
Place the stand base upside down and insert the 4 wheels
until the stop. Ensure that the two wheels with brakes
are installed on the same side as shown in the illustration.
12
3
Then place the stand
on the wheels and lock
both brakes to ensure
stability.
Check that the locking screw on the long stand rod is closed. If it is not closed, close
the locking screw to ensure stability.
The Photonic HairLaser can be assembled easily in just a few minutes. No tools are
required.
Safety information
The stand rod contains a powerful spring mechanism. Caution:There is a risk of injury when
opening a tightened locking screw.

9
4
6
5
Insert the long stand
rod (with thread point-
ing downwards) down
into the stand base and
turn clockwise until
the stop.
Secure the rod to the stand base
from below using the buttery
screw (do not forget the washer).
Now attach the short stand
rod (with the shorter end
pointing downward) to the
long rod.While doing so, align
the hole in the handle with
the hole on the long rod.
Place the thread of the han-
dle into the hole and tighten
it securely.
Now place the laser
hood on the stand and
push it in up to the
mark on the rod. En-
sure that the handle on
the stand rod is point-
ing to the rear, in a di-
rect line with the laser
hood.
7

10
Information for use
If you want to adjust the height of the laser hood, use one hand to undo the locking
screw on the stand and grasp the stand handle with the other hand to move the laser
hood.
Caution:To adjust the height, use only the handle on the stand, not the handle on the
laser head, otherwise you could damage the housing of the laser hood.
8
Insert the connection cable for the power supply into the back of the laser hood and
secure the cable to the stand using the cable clips.
Once you have plugged in the power cord, your Photonic HairLaser is ready to use.You
can now simply turn the key to switch on the device.
9

11
6
The HairLaser is ready
To start a treatment,
simply press the “Ready”
button on the “Stand-by”
screen. That takes you to the
“Treatment time” screen.
Working with the touchscreen
1
Selecting the treatment time
The treatment time is factory set to 10
minutes. Use the “+” button to extend the
time, and the “-” button to shorten it.The
selected time is applied for treatments until
the device is switched off or the default
time is changed. Start treatment by pressing
the “START” button.
Stopping treatment
Treatment can be stopped at any time by
touching the “STOP” button on the touch-
screen.That takes you back to the screen
with the set treatment time (illustration 2).
23

12
Functions
The software architecture of your Photonic
HairLaser is so simple that you are immedi-
ately ready to begin working with it as soon
as the device is turned on by selecting the
“Ready” button.
You should need to access the functions
of the service menu only if you wish to
personally customize the basic settings of
your Photonic HairLaser (e.g. language,
energy saving mode, or button clicks), to
do special test functions, or to update the
software.
In the following pages, the functions of the
service menu are briey explained step-by-
step.The menu is always accessed by press-
ing the “Service” button on the “Stand-by”
screen.
From the treatment time screen, pressing
the “Stand-by” button (circled) takes you to
the “Stand-by” screen.
The “Stand-by” screen with the “Service”
button.
Service menu 7

13
You can change the language of the software
on your Photonic HairLaser here.
Setup Set 1
On the “Setup” screen you will nd all basic
settings and functions divided into three
sets.
Set 1 with language selection, version indica-
tor, button click setting, and treatment time
is initially selected by default.
Version indicator
Under “Version” you can view information
on the current version of the hardware and
software of your Photonic HairLaser.
This information can be important for ser-
vice technicians. For example, problems can
occur if operating the device with outdated
operating software.
Reimers & Janssen is constantly working
on new developments in hardware and
software so that your devices are always
up-to-date.
Key clicks
The intuitive touchscreen operation is sup-
ported by an acoustic feedback feature.
However, you can deselect this accessibility
option.
The sequence of the software version
is indicated numerically, so in this ex-
ample the HairLaser software (Laser 1) is
“PP011111B” from Tuesday, November 01,
2011.“Program” indicates the operating
software.
Key clicking is set to “On” by default.

14
The power indicator screen
Power indicator
The power indicator indicates the total time
that the Photonic HairLaser has been used
for treatment.
Setup Set 2
By default, the screensaver activates after 10
minutes of inactivity.You can save energy by
setting the screensaver to activate sooner.
By default, the screensaver activates after 10
minutes of inactivity.
The treatment time is preset here to 5
minutes.
Treatment time
On this screen, you can change the default
treatment time.
15
You receive specic instructions for a soft-
ware update.
You will automatically receive detailed
instructions for a software update with
a new SD card. If you already have an
SD card, you can also receive this up-
date conveniently by e-mail.
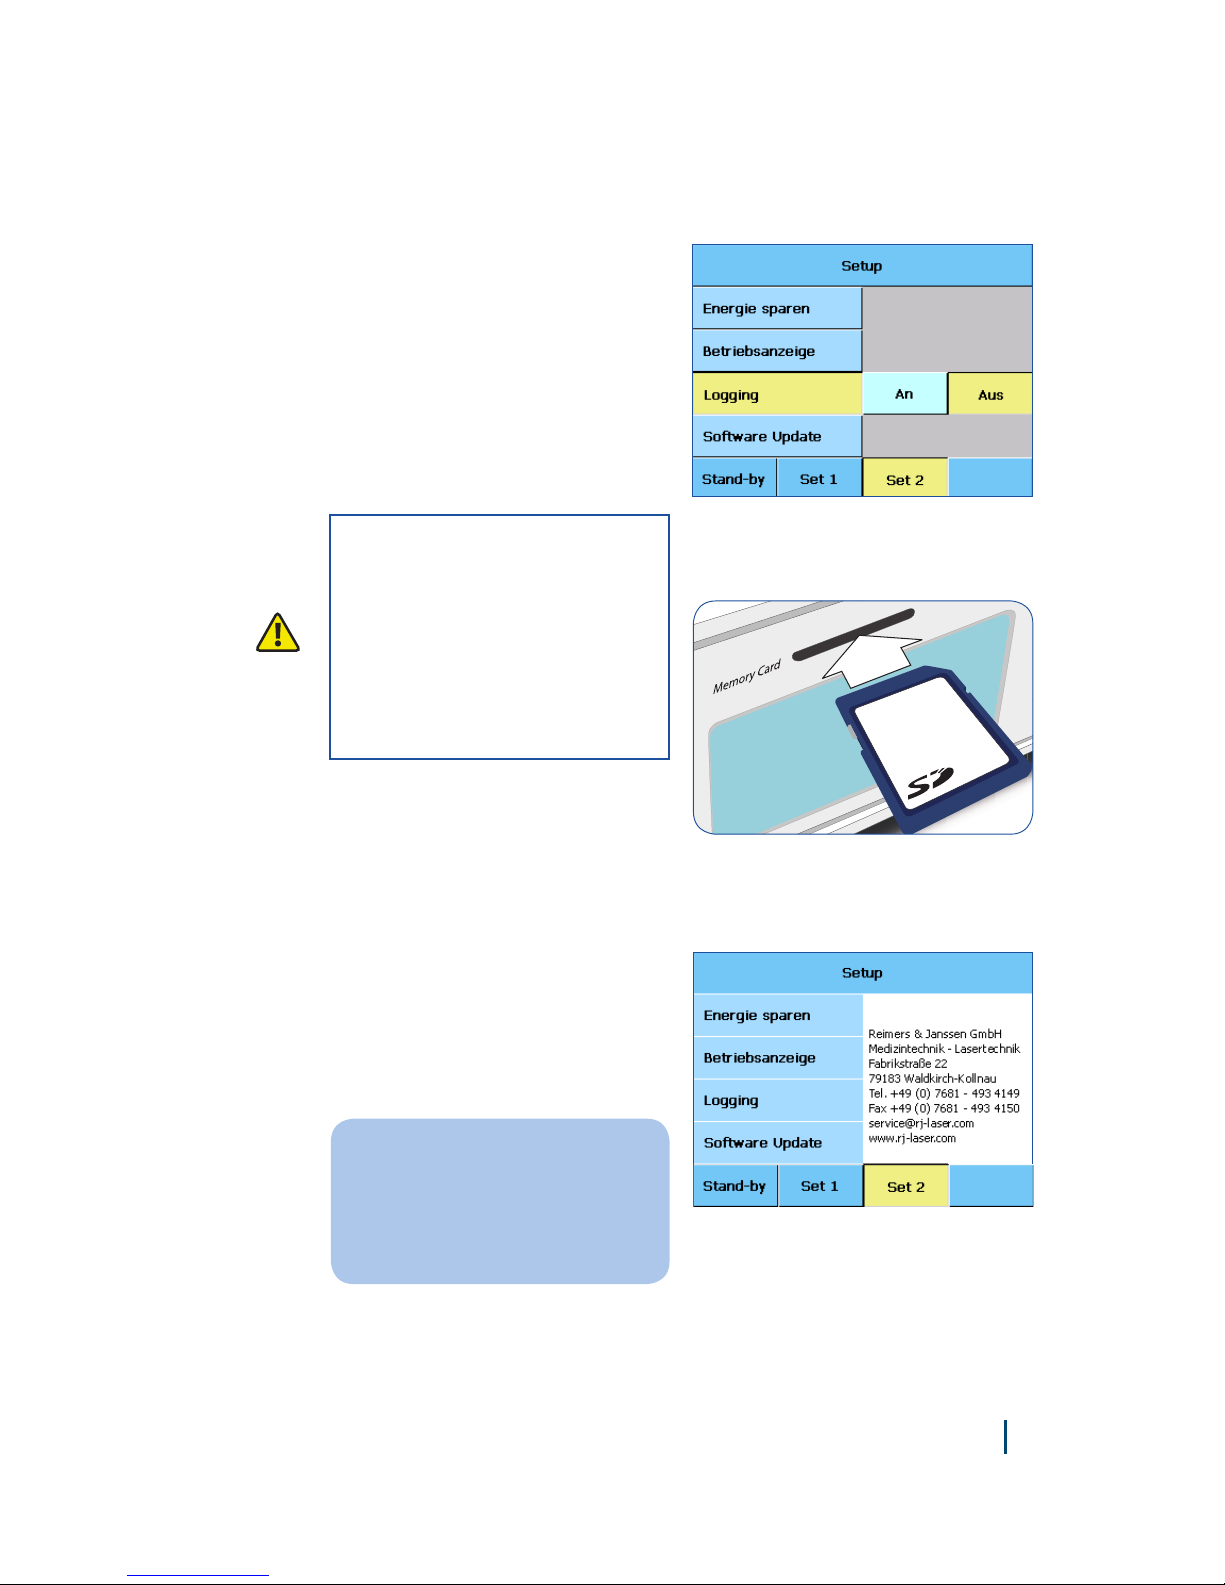
Error log
You can use the “Logging” function to save
log les to an SD card while the device is
operating.
This can help a service technician detect
errors that arise during operation that have
no obvious cause.
In order to read an error log, set the “Log-
ging” function to “On”.
Insert the SD card into the memory card
slot on your control unit until it clicks.
Before activating the “Logging” func-
tion, you must insert an SD card into
your Photonic HairLaser. Ensure that
the contact strips are facing down
and that the beveled corner is for-
ward.A correctly inserted card will
be indicated by a corresponding sym-
bol in the Stand-by screen.
Diagnosis
Charge
Software update
Please contact your distributor for a soft-
ware update.

16
Error messageOperating display not visible
If the laser diodes are not operating cor-
rectly or an additional laser probe is not
detected (due to cable problem or probe
malfunction), the screen will not display a
time setting. Please notify your distributor.
8
Error messages
If you turn on the safety key and the “Power
On” LED does not light up and no image
appears on the touchscreen, this may be be-
cause the power adapter is not connected
correctly.
Please check the power connection. If that
does not x the problem, please contact
your distributor.

17
Cleaning and disinfection
Unplug the power cord before beginning any cleaning or maintenance.
Note that harsh or caustic agents (e.g., acetone) must not be used for regular cleaning of
the plastic components. Prevent moisture from entering the housing. It is best to use a damp
cloth for cleaning.
To disinfect the device, use a soft cloth that has been dampened with a mild disinfectant.
Always use a damp cloth for cleaning and disinfection. Never ush water over the
device. Do not use solvents!
Calibration and safety check
Your Photonic HairLaser does not contain any user-serviceable internal parts or compo-
nents.There is thus no reason to open the device's housing.
The device should be checked and recalibrated once a year at the latest. Please con-
tact your distributor.
Care and maintenance 9

18
Technical description
Technical data
Class 2M laser therapy device Photonic HairLaser
Floorstanding device, corded
IP rating IPX0
Absolute uncertainty of laser power
measurement 5 %
Power supply Power adapter FRIWO FW7362M/12
100-240 V~ / 50-60 Hz / 700 mA
Weight 18 kg
Dimensions (L x W x H) Approx. 85 cm x 58 cm x 161 cm
Operating conditions
Ambient temperature +10° C to +30° C
Relative humidity 30 % to 75 %
Air pressure 700 hPa to 1060 hPa
Transport and storage
Ambient temperature -20° C to +40° C
Relative humidity 30 % to 75 %
Air pressure 700 hPa to 1060 hPa
10

19
Laser diodes
Quantity 108
Wavelength 655 nm
Power output 5 mW (max) per laser diode
Laser type Continuous wave (CW)
NOHD* 0.14 m
*) Safety margin (NOHD):The distance at which the radiation intensity or radiation is equal
to the corresponding limit for the maximum permissible radiation of the cornea (MPE =
maximum permissible exposure).
LEDs
Quantity 108 red LEDs

20
1. Laser warning label
2. Laser warning symbol
1. Rating label
2.Type label
3. Laser warning symbol
1. Laser warning labels
2. Remote control plug
3. Power supply
Position of labels on the device
Explanation of symbols and labels on the device
Pmax 108 x 5 mW
λ = 655 nm, cw
EN 60825-1:2007
Austrittsöffnung für sichtbare
und unsichtbare Laserstrahlung
Nicht dem Strahl aussetzen
12-2010
IPX0 IP21
LASERSTRAHLUNG
Nicht in den Strahl blicken
oder direkt mit optischen
Instrumenten betrachten
LASERKLASSE 2M
Reimers & Janssen GmbH Fabrikstraße 22 D-79183 Waldkirch
Use Power Supply
Globtek 10V only!
12161- 12
108 x 5 mW / 655 nm
Laser Diode Data:
Lasertherapy Device Photonic Hair
Serial-No.:
IPX0
Remote control plug
Only for 10V
Globtek Power Supply
The device complies with Eu-
ropean directives applicable
to the product.
Type label on bottom
Rating label
Laser outlet warning label
Remote control plug label
Signs on the type label
Laser warning labels at top / on side
Power supply label
Observe the accompanying
documentation.
Pmax 108 x 5 mW
λ = 655 nm, cw
EN 60825-1:2007
Austrittsöffnung für sichtbare
und unsichtbare Laserstrahlung
Nicht dem Strahl aussetzen
12-2010
IPX0 IP21
LASERSTRAHLUNG
Nicht in den Strahl blicken
oder direkt mit optischen
Instrumenten betrachten
LASERKLASSE 2M
Reimers & Janssen GmbH Fabrikstraße 22 D-79183 Waldkirch
Use Power Supply
Globtek 10V only!
12161- 12
108 x 5 mW / 655 nm
Laser Diode Data:
Lasertherapy Device Photonic Hair
Serial-No.:
IPX0
Remote control plug
Only for 10V
Globtek Power Supply
No rating against harmful
ingress of water.
2
1
2
1
3
11
2
3
Pmax 108 x 5 mW
λ = 655 nm, cw
EN 60825-1:2007
Austrittsöffnung für sichtbare
und unsichtbare Laserstrahlung
Nicht dem Strahl aussetzen
12-2010
IPX0 IP21
LASERSTRAHLUNG
Nicht in den Strahl blicken
oder direkt mit optischen
Instrumenten betrachten
LASERKLASSE 2M
Reimers & Janssen GmbH Fabrikstraße 22 D-79183 Waldkirch
Use Power Supply
Globtek 10V only!
12161- 12
108 x 5 mW / 655 nm
Laser Diode Data:
Lasertherapy Device Photonic Hair
Serial-No.:
IPX0
Remote control plug
Only for 10V
Globtek Power Supply
Pmax 108 x 5 mW
λ = 655 nm, cw
EN 60825-1:2007
Austrittsöffnung für sichtbare
und unsichtbare Laserstrahlung
Nicht dem Strahl aussetzen
12-2010
IPX0
IP21
LASERSTRAHLUNG
Nicht in den Strahl blicken
oder direkt mit optischen
Instrumenten betrachten
LASERKLASSE 2M
Reimers & Janssen GmbH Fabrikstraße 22 D-79183 Waldkirch
Use Power Supply
Globtek 10V only!
12161- 12
108 x 5 mW / 655 nm
Laser Diode Data:
Lasertherapy Device Photonic Hair
Serial-No.:
IPX0
Remote control plug
Only for 10V
Globtek Power Supply
Pmax 108 x 5 mW
λ = 655 nm, cw
EN 60825-1:2007
Austrittsöffnung für sichtbare
und unsichtbare Laserstrahlung
Nicht dem Strahl aussetzen
12-2010
IPX0 IP21
LASERSTRAHLUNG
Nicht in den Strahl blicken
oder direkt mit optischen
Instrumenten betrachten
LASERKLASSE 2M
Reimers & Janssen GmbH Fabrikstraße 22 D-79183 Waldkirch
Use Power Supply
Globtek 10V only!
12161- 12
108 x 5 mW / 655 nm
Laser Diode Data:
Lasertherapy Device Photonic Hair
Serial-No.:
IPX0
Remote control plug
Only for 10V
Globtek Power Supply
Pmax 108 x 5 mW
λ = 655 nm, cw
EN 60825-1:2007
Austrittsöffnung für sichtbare
und unsichtbare Laserstrahlung
Nicht dem Strahl aussetzen
12-2010
IPX0 IP21
LASERSTRAHLUNG
Nicht in den Strahl blicken
oder direkt mit optischen
Instrumenten betrachten
LASERKLASSE 2M
Reimers & Janssen GmbH Fabrikstraße 22 D-79183 Waldkirch
Use Power Supply
Globtek 10V only!
12161- 12
108 x 5 mW / 655 nm
Laser Diode Data:
Lasertherapy Device Photonic Hair
Serial-No.:
IPX0
Remote control plug
Only for 10V
Globtek Power Supply
Type B applied part
Table of contents


