Roav R3130 User manual

Model: R3130
51005001495 V03
User Manual
ROAV Jump Starter Pro 1000A

English 01
Deutsch 17
Español 31
Français 45
Italiano 59
日本語 73

01 English English 02
• DO NOT operate this product if it has received a sharp
blow, been dropped, or otherwise damaged in any
way; take it to a qualified service person.
• DO NOT disassemble this product; take it to a
qualified service person when service or repair is
required. Incorrect reassembly may result in electric
shock or fire risk.
• To reduce risk of electric shock, unplug this product
before attempting any maintenance or cleaning.
Turning o controls will not reduce this risk.
• Avoid long exposure to direct sunlight which may
cause damage to the device.
• Exposing this product to open flames may cause it to
explode.
• If the battery is swollen, leaking fluid, or smells bad,
discard it immediately.
• Make sure the battery connector is clean, and battery
clamp and cables are kept intact before using the
product.
• Ensure the battery clamps are fully plugged in or they may
aect functionality and cause damage to the product.
• To preserve battery lifespan, recharge the device at
least once every 6 months.
Important Safety
Instructions
SAVE THESE INSTRUCTIONS – This manual contains
important safety and operating instructions for the
ROAV Jump Starter 1000A (Model R3130).
Please read and understand all instructions before using
this product. If damage is caused by failure to follow the
instructions, the warranty does not apply.
• This product is suitable for petrol engines up to 6L
and diesel engines up to 4L. To avoid damage to
the product and potential injury to persons, do not
attempt to start an engine exceeding this capacity.
• Clear your car battery of dust and debris before jump
starting your car.
• Keep the product in a place free from exposure to any
liquid or corrosive materials.
• Use of an attachment not recommended or sold by
the manufacturer may result in a risk of fire, electric
shock, or injury to persons.

03 English English 04
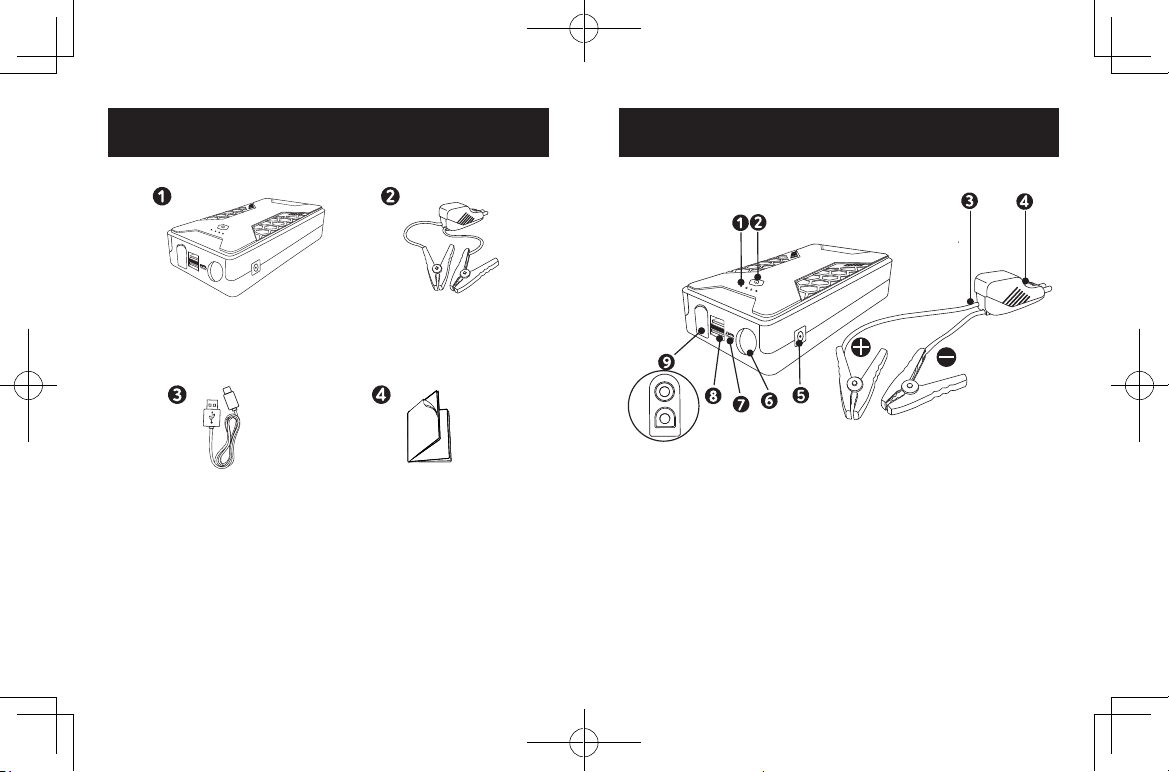
At a Glance
①LED indicators ⑥Flashlight
②Function button ⑦USB-C input port
③Jumper cables ⑧USB output ports
④LED display ⑨Jumping port
⑤12V DC output
What’s Included
ROAV Jump Starter
1000A
Jumper cables
USB cable Manual
Features
• Convenient jump starting
• Two USB 3.0 ports
• USB-C input port
• Emergency LED flashlight
• User-friendly design
05 English English 06
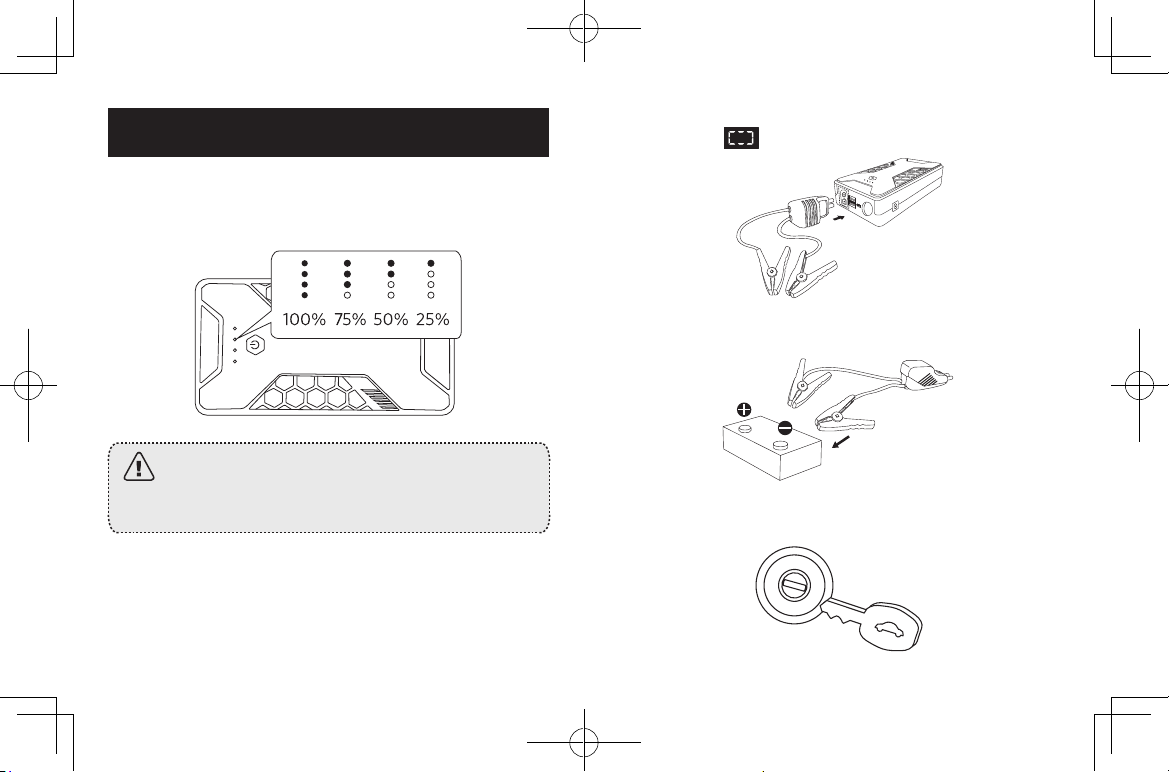
Jump Starting Your Car
1. Turn on your ROAV Jump Starter 1000A and make sure it is over
50% charged.
If the jump starter is less than 50% charged, it may
not be able to start your engine. We recommend fully
charging the battery before you use the jump starter for
the first time.
2. Plug in the jumper cables. The LED display on the jump cables
should show circulating clockwise.
3. Connect the red clamp to the positive terminal (+) and the black
clamp to the negative terminal (-) of your car battery.
4.
Start your engine. The cables’ LED display should show the current
voltage of the jump starter battery.

07 English English 08
The jump starter will halt power output after 30 seconds,
and will flash on the LED display.
5. After successfully jump starting your car, unplug the jumper
cables within 30 seconds.
• After every successful jump start, the jump starter will reset
automatically. If it fails to jump start your car, remove and
reconnect the clamps after two minutes. After the LED
display shows the voltage, start the car engine.
• DO NOT charge the device immediately after jump starting
your car. Wait at least 30 minutes before charging the
device after a jump start.
• DO NOT crank the engine for more than 3 seconds. Allow
the jump starter to cool down for at least 1 minute after
each attempt.
• If it is extremely hot or cold, wait for several minutes until
the battery works properly (0-60°C).
6. Promptly remove clamps from the car battery and put away.
To avoid serious injury to a person or damage to the
jump starter, never attempt to connect the two clamps
together when plugged into the jump starter.
LED Indicator Guide
1. The table below indicates the jump starter is working properly.
LED Display Buzzer Description
The current
voltage /The clamps are connected correctly.
Ready to start the car engine.

09 English English 10
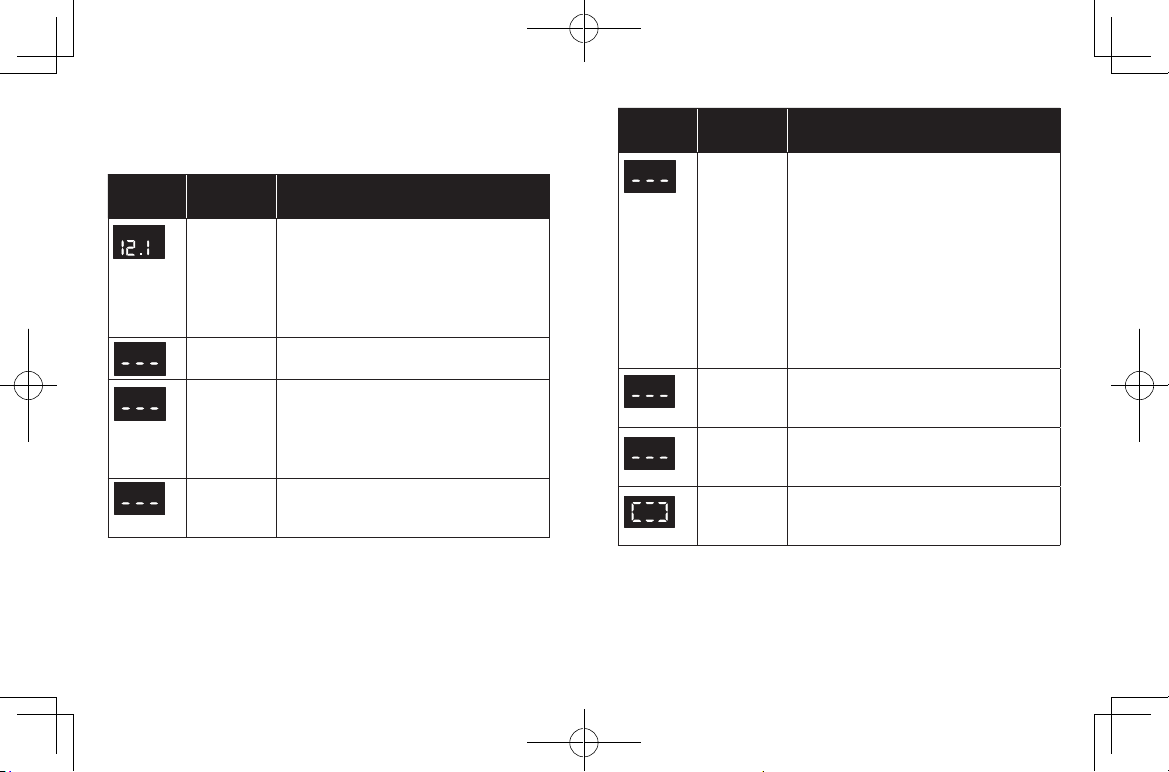
2. The table below indicates the reasons why the jump starter is not
working correctly. DO NOT force the jump starter to jump the car
engine when the LED display shows any of the messages below.
LED Display
Buzzer Description
RC
v
/• The clamps are connected to the car
battery (not to the jump starter).
• Please ensure the clamps are
connected to the jump starter before
starting your engine.
R
Beeps once
per second
• The clamps are connected to the
incorrect terminals.
RC Beeps once
per second
• The clamps are preventing the car
battery from charging the jump starter.
• We recommend removing the clamps
and then connecting them again.
SC
Beeps once
per second
• The clamps are connected together
(this may damage the jump starter).
/
• The clamps have been connected
to the car battery for more than
20 seconds.
• Car battery is working as intended.
Disconnect the jump starter and
start your car engine.
• The peak current of 1000A is not
high enough to jump-start the car
engine successfully.
LED Display
Buzzer Description
HT
Beeps once
per second
• Temperature limit exceeded. Let the
jump starter and cables cool down.
LV Beeps once
per second
• The jump starter's voltage is low.
• We recommend charging the jump
starter before proceeding.
/
• The clamps are connected to the
jump starter and are ready to be
connected to the car battery.
If one of the situations listed in the table above occurs,
unplug and plug the jumper cable until the current
battery voltage shows on the jump starter's LED display.
11 English English 12
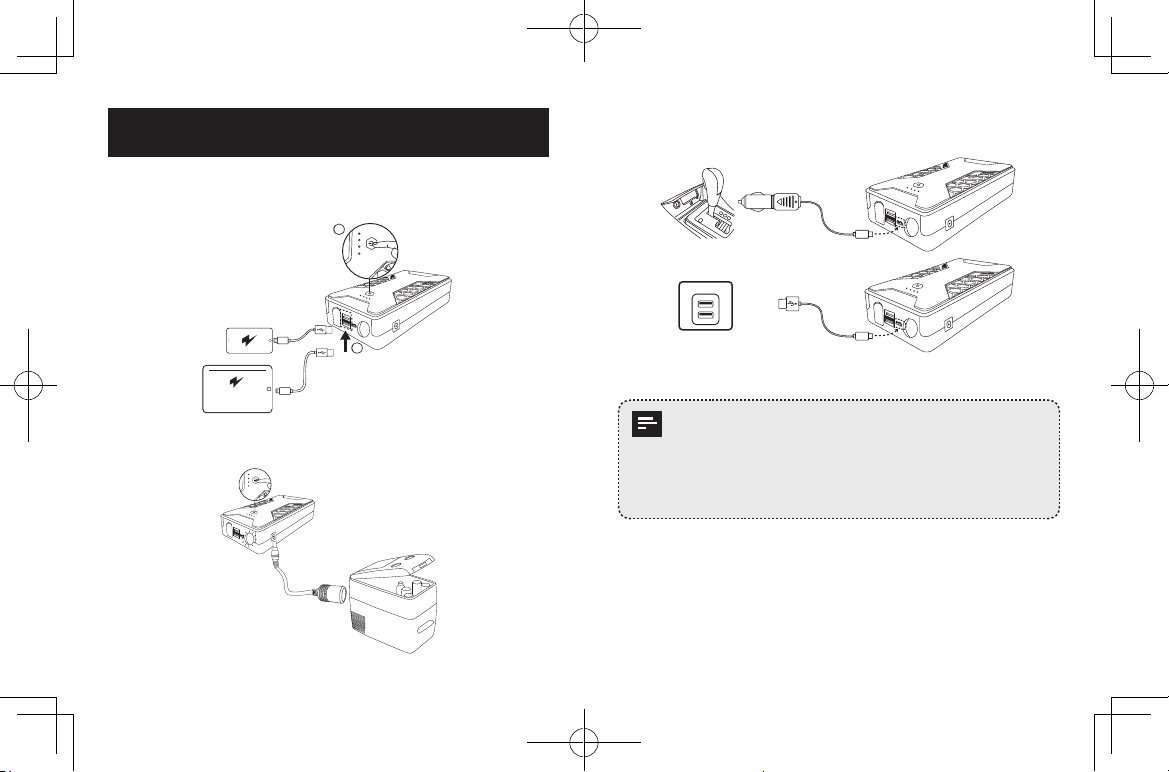
Charging and Recharging
Charge Your Phone or Tablet
1
2
USB-A
USB-A
Charge Devices that Connect to a Car Cigarette Socket
Recharge Your ROAV Jump Starter 1000A
USB-C
USB-C
1. The power adapter is not provided.
2. Simultaneous charging and recharging is not
supported.
3. DO NOT start the car engine while charging the jump
starter.

13 English English 14
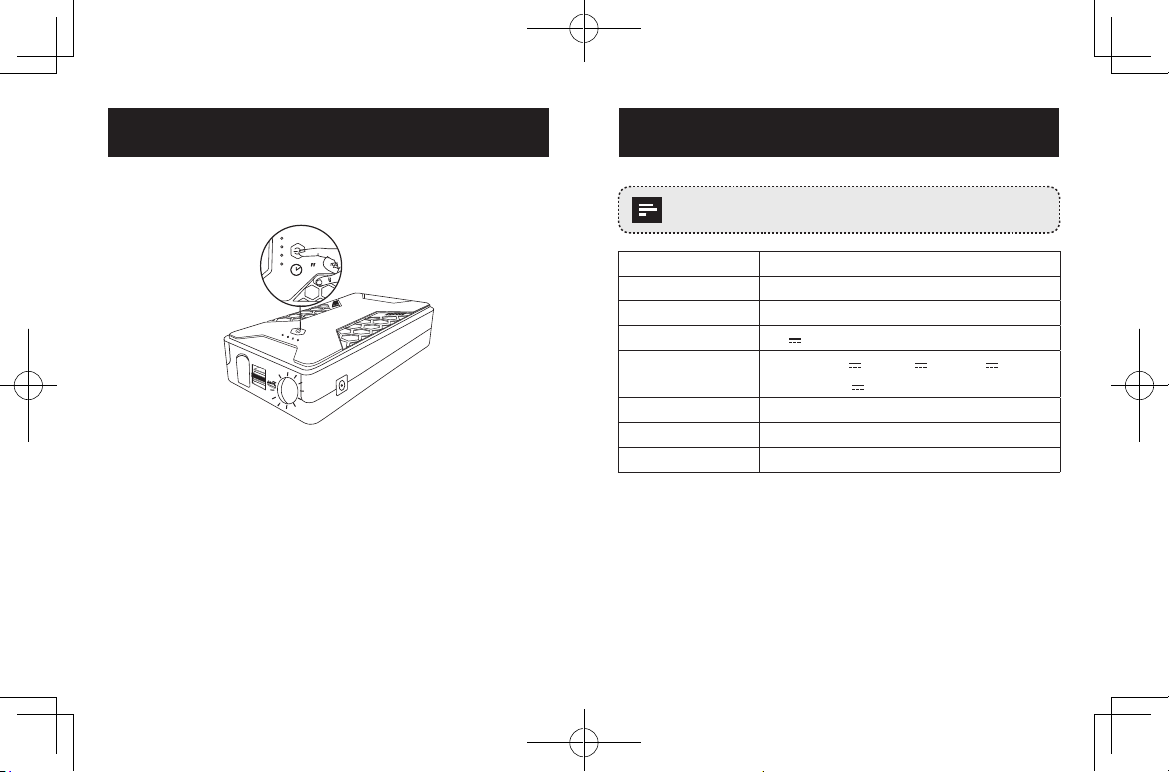
Using the Flashlight
Press and hold to Turn On / O
2
Press to Toggle Flash Modes
• Solid
• Slow flash
• Fast flash
Specifications
Specifications are subject to change without notice.
Product Name Roav Jump Starter 1000A
Capacity 12,800 mAh / 47.36Wh
Weight 575g / 20.28 oz
Size 170 x 88 x 39mm / 6.7 x 3.3 x 1.3 in
Input 5 V 3 A
USB output Output 1: 5V 3A, 9V 2A, 12V 1.5A
Output 2: 5V 2.4A
Starting current 500A
Peak current 1000A
Operating temperature 0-60°C
15 English English 16
Notice
This product complies with the radio interference
requirements of the European Community.This product can
be used across EU member states.
This product is designed and manufactured with high quality
materials and components, which can be recycled and
reused.
This symbol means the product must not be discarded as
household waste, and should be delivered to an appropriate
collection facility for recycling. Proper disposal and recycling
helps protect natural resources, human health and the
environment. For more information on disposal and recycling
of this product, contact your local municipality, disposal
service, or the shop where you bought this product.
FCC Statement
This device complies with Part 15 of the FCC Rules. Operation
is subject to the following two conditions: (1) This device may
not cause harmful interference, and (2) this device must accept
any interference received, including interference that may cause
undesired operation.
Warning: Changes or modifications not expressly approved by the
party responsible for compliance could void the user's authority to
operate the equipment.
Note: This equipment has been tested and found to comply with
the limits for a Class B digital device, pursuant to Part 15 of the FCC
Rules. These limits are designed to provide reasonable protection
against harmful interference in a residential installation.
This equipment generates, uses, and can radiate radio
frequency energy and, if not installed and used in accordance
with the instructions, may cause harmful interference to radio
communications. However, there is no guarantee that interference
will not occur in a particular installation. If this equipment does
cause harmful interference to radio or television reception, which
can be determined by turning the equipment o and on, the user is
encouraged to try to correct the interference by one or more of the
following measures:
(1) Reorient or relocate the receiving antenna.
(2) Increase the separation between the equipment and receiver.
(3) Connect the equipment into an outlet on a circuit dierent from
that to which the receiver is connected.
(4) Consult the dealer or an experienced radio / TV technician for
help.
The following importer is the responsible party.
Company Name: Fantasia Trading LLC
Address: 9155 Archibald Avenue, Suite 202, Rancho Cucamonga,
CA, 91730, US
Telephone: +1 (909) 484 1530

17 Deutsch Deutsch 18
Wichtige
Sicherheitsinformationen
DIESE INFORMATIONEN AUFBEWAHREN – Dieses Handbuch
enthält wichtige Informationen zur Sicherheit und zum
Betrieb der Kfz-Starthilfe Modell R3130.
Lesen Sie alle Anweisungen sorgfältig durch, bevor Sie
dieses Produkt verwenden. Die Garantie greift nicht,
wenn Schäden auf eine Missachtung der Anweisungen
zurückzuführen sind.
• Bewahren Sie das Produkt an einem Ort auf, der frei von
Flüssigkeiten oder ätzenden Stoen ist.
• Die Verwendung eines nicht vom Hersteller empfohlenen
oder vertriebenen Peripheriegeräts kann zu Brandgefahr,
Stromschlägen oder Personenschäden führen.
• Verwenden Sie dieses Produkt nicht, wenn es einem
harten Schlag ausgesetzt war, fallen gelassen oder
anderweitig beschädigt wurde. Bringen Sie es zu einem
qualifizierten Servicetechniker.
• Nehmen Sie dieses Produkt nicht auseinander; bringen
Sie es zu einem qualifizierten Servicetechniker, wenn eine
Reparatur oder Wartung erforderlich ist. Der inkorrekte
Zusammenbau kann einen Stromschlag oder Brandgefahr
verursachen.
• Um das Risiko eines Stromschlags zu reduzieren,
müssen Sie das Produkt ausstecken, bevor Sie es zu
reinigen oder zu warten versuchen. Das Ausschalten der
Bedienelemente reduziert das Stromschlagrisiko nicht.
• Längere direkte Sonneneinstrahlung vermeiden, da sie
Schäden am Gerät verursachen kann.
• Wenn das Produkt oenen Flammen ausgesetzt wird,
besteht Explosionsgefahr.
• Wenn der Akku aufgebläht ist, Flüssigkeit aus ihm austritt
oder er übel riecht, entsorgen Sie ihn sofort.
• Stellen Sie sicher, dass der Akkuanschluss sauber ist und
die Batterieklemme und die Kabel intakt sind, bevor Sie
das Produkt verwenden.
• Stellen Sie sicher, dass die Batterieklemme vollständig
eingesteckt ist, da anderenfalls die Funktionen
beeinträchtigt werden und Schäden am Gerät entstehen
können.
19 Deutsch Deutsch 20
Was ist im Lieferumfang enthalten
ROAV Jump Starter
1000A
Überbrückungskabel
USB-Kabel Handbuch
Funktionen
• Praktische Starthilfe
• Zwei USB 3.0-Anschlüsse
• USB-C-Eingang
• Notfall-LED-Taschenlampe
• Benutzerfreundliches Design
Auf einen Blick
①LED-Indikatoren ⑥Taschenlampe
②Funktionstaste ⑦USB-C-Eingang
③Überbrückungskabel ⑧USB-Augangsport
④LED-Display ⑨Port zum Anlassen
⑤12V DC Leistung

21 Deutsch Deutsch 22
Ihr Auto starten
1. Schalten Sie Ihre Roav Kfz-Starthilfe ein und stellen Sie sicher,
dass sie über 50% geladen ist.
Falls die Ladung weniger als 50% beträgt, ist die
Starthilfe unter Umständen nicht in der Lage, Ihren Motor
zu starten. Wir empfehlen Ihnen, den Akku vollständig
aufzuladen, bevor Sie die Starthilfe erstmals verwenden.
2. Schließen Sie die Überbrückungskabel an. Auf dem LED-Display
der Überbrückungskabel sollte sich das Symbol im
Uhrzeigersinn drehen.
3. Verbinden Sie die rote Klemme mit dem Pluspol ( + ) und die
schwarze Klemme mit dem Minuspol ( - ) Ihrer Fahrzeugbatterie.
4.
Starten Sie den Motor. Auf dem LED-Display der Kabel sollte die
aktuelle Spannung der Starthilfebatterie zu sehen sein.

23 Deutsch Deutsch 24
Die Starthilfe beendet die Stromzufuhr nach
30
Sekunden,
und auf dem LED-Display blinkt das Symbol .
5. Wenn der Motor erfolgreich gestartet wurde, entfernen Sie die
Überbrückungskabel bitte innerhalb von 30 Sekunden.
1. Nach jedem erfolgreichen Motorstart wird die
Starthilfe automatisch zurückgesetzt. Kann der Motor
nicht gestartet werden, entfernen Sie die Klemmen
und schließen Sie sie nach zwei Minuten wieder an.
Sobald auf dem LED-Display die Spannung zu sehen
ist, starten Sie den Motor.
2. Starten Sie den Motor nicht mehr als dreimal
hintereinander, da dies eine Überhitzung oder Schäden
am Produkt verursachen kann.
6. Entfernen Sie die Klemmen rasch von der Fahrzeugbatterie und
räumen Sie diese weg.
Verbinden Sie niemals die beiden Klemmen wenn diese
am Anlasser eingesteckt sind, um schwerwiegende
Verletzungen oder eine Beschädigung Ihres Anlassers zu
vermeiden.
Orientierungshilfe LED-Licht
1. Die nachfolgende Tabelle zeigt, was beim ordnungsgemäßen
Funktionieren der Starthilfe auf dem Display zu sehen ist.
LED-Display
Signalton Beschreibung
Aktuelle
Spannung /
Die Klemmen sind korrekt angeschlossen.
Der Motor kann gestartet werden.
25 Deutsch Deutsch 26
2. Die nachfolgende Tabelle zeigt den Fehlerstatus. Aktivieren
Sie die Starthilfe nicht, wenn folgende Symbole auf dem LED-
Display zu sehen sind.
LED-
Display
Signalton Beschreibung
RC
v
/• Die Klemmen sind an eine
Autobatterie angeschlossen (aber
nicht mit der Starthilfe verbunden)
• Stellen Sie sicher, dass die Klemmen
mit der Starthilfe verbunden sind,
bevor Sie den Motor starten.
REin Piepton
pro Sekunde
• Die Klemmen sind mit den falschen
Polen verbunden.
RC Ein Piepton
pro Sekunde
• Die Autobatterie versucht, die
Starthilfe zu laden, aber das Laden
wird durch die Klemmen verhindert.
• Wir empfehlen Ihnen, die Klemmen
zu entfernen und neu anzuschließen.
SC
Ein Piepton
pro Sekunde
• Die Klemmen sind miteinander
verbunden. (Dies kann den Anlasser
beschädigen.)
LED-
Display
Signalton Beschreibung
/
• Die Klemmen sind mit einer
Autobatterie verbunden, aber die
Verbindung besteht für mehr als 20
Sekunden.
• Die Autobatterie funktioniert. Es ist
nicht nötig, die Starthilfe zu verwenden.
Versuchen Sie einfach, den Motor
erneut anzulassen.
• Der Motor konnte nicht gestartet
werden, weil der Spitzenstrom
(1000 A) nicht hoch genug ist.
HT
Ein Piepton
pro Sekunde
• Temperaturlimit überschritten,
lassen Sie die Starthilfe und die Kabel
abkühlen.
LV Ein Piepton
pro Sekunde
• Niedrige Spannung auf der Starthilfe.
Wir empfehlen Ihnen, die Starthilfe
zunächst aufzuladen.
/• Die Klemmen sind mit der Starthilfe
verbunden und können an die
Autobatterie angeschlossen werden.

27 Deutsch Deutsch 28
Laden und wieder aufladen
Laden Sie Ihr Smartphone oder Tablet
1
2
USB-A
USB-A
Laden von Geräten durch die Zigarettenanzünderbuchse
Laden Sie die ROAV Kfz-Starthilfe auf
USB-C
USB-C
1. Das Netzteil ist nicht im Lieferumfang enthalten.
2. Das gleichzeitige Laden und Wiederaufladen wird
nicht unterstützt.
3. Starten Sie den Motor NICHT, während Sie die
Starthilfe laden.
29 Deutsch Deutsch 30
Die Taschenlampe verwenden
Gedrückt halten, um einzuschalten / auszuschalten
2
Drücken, um Modus zu ändern
• Leuchtet dauerhaft
• Blinkt langsam
• Blinkt schnell
Spezifikationen
Änderungen der technischen Daten ohne
Vorankündigung vorbehalten.
Kapazität 12800mAh / 47,36Wh
Gewicht 575 g
Größe 170 x 88 x 39mm
Input 5 V 3 A
USB-Output Output 1: 5V 3A, 9V 2A, 12V 1,5A
Output 2: 5V 2.4A
Startstrom 500A
Spitzenstrom 1000A
Betriebstemperatur 0-60°C

31 Español Español 32
Instrucciones de
seguridad importantes
CONSERVE ESTAS INSTRUCCIONES
: este manual contiene
instrucciones de seguridad y funcionamiento
importantes para el arrancador de baterías (modelo
R3130).
Lea y comprenda todas las instrucciones antes de utilizar
este producto. Si los daños son consecuencia de no
seguir las instrucciones, no se aplicará la garantía.
• Mantenga el producto en un lugar que no esté
expuesto a líquidos o materiales corrosivos.
• El uso de un accesorio no recomendado o vendido por
el fabricante puede suponer un riesgo de incendio,
descarga eléctrica o lesiones.
• No utilice este producto si ha recibido un golpe
fuerte, ha sufrido una caída o ha resultado dañado de
cualquier otra forma. En ese caso, llévelo a un técnico
de servicio cualificado.
• No desmonte este producto; llévelo a un técnico de
servicio cualificado si necesita mantenimiento o una
reparación. Si se vuelve a montar de forma incorrecta,
puede existir riesgo de descarga eléctrica o incendio.
• Para reducir el riesgo de descarga eléctrica,
desenchufe el producto antes de intentar realizar
cualquier tipo de mantenimiento o limpieza. Apagar
los controles no reduce este riesgo.
• Evite la exposición prolongada a la luz solar directa,
que puede provocar daños en el dispositivo.
• La exposición de este producto a llamas vivas puede
hacer que explote.
• Si la batería está hinchada, tiene fugas de líquido o
desprende mal olor, deséchela de inmediato.
• Asegúrese de que el conector de la batería está
limpio y de que las pinzas de batería y los cables se
conservan intactos antes de utilizar el producto.
• Asegúrese de que las pinzas de la batería están
correctamente conectadas; de lo contrario, el
funcionamiento podría verse afectado y el producto
podría dañarse.

33 Español Español 34
Contenido
ROAV Jump Starter
Pro 1000A
Cables de arranque
de baterías
cable USB Manual
Características
• Arranque de baterías cómodo
• Dos puertos USB 3.0
• Puerto de entrada USB-C
• Luz LED de emergencia
• Diseño intuitivo
Síntesis
①Indicadores LED ⑥Linterna
②Botón de función ⑦Puerto de entrada USB-C
③Cable de puenteo ⑧Puertos de salida USB
④Pantalla LED ⑨
Puerto de puenteo
⑤Salida: 12V DC

35 Español Español 36
Puentear tu coche
1. Encender Roav Jump Starter y asegurarse de que tenga al menos
50% de carga.
Si la carga es menor de 50%, quizás no logre puentear el
motor.Se recomienda cargar por completo la batería antes
de utilizar el arrancador de baterías por primera vez.
2. Conecte los cables de arranque de baterías. La pantalla LED de
los cables de arranque debe mostrar la imagen pasando
hacia la derecha.
3. Conecta la pinza roja al polo positivo (+) de la batería del coche
y la negra al negativo (-).
4.
Arranque el motor. La pantalla LED de los cables debe mostrar la
tensión actual de la batería del arrancador.
Table of contents
Languages:
Other Roav Remote Starter manuals

Popular Remote Starter manuals by other brands

Directed Electronics
Directed Electronics 5301 owner's guide

Polaris Power
Polaris Power Flex quick start guide

Magnadyne
Magnadyne Keypad Keyless Entry System MKE-100 user manual

Smart Start
Smart Start AS-2471TW-FM user guide

NOCO Genius
NOCO Genius genius BOOSTMAX GB500 User guide & warranty

G.I.T
G.I.T POWERStart P8U-FM owner's manual


