Rockler Table Saw Small User manual

Table Saw Small
Parts Sled Instructions
For use only on table saws with a 3/4" x 3/8" miter slot!
For safe and effective operation, read these instructions fully before use.

2
>Always confirm that you are using the most recent version
of the Instructions and safety warnings for your product. To
find the most recent version, find the product page on
Rockler.com and click on the link to the Instructions.
>For any tool used in conjunction with this product, always
read, understand and follow the instructions and safety
warningsintheowner’smanualforthattool.Ifyoudo
nothavetheowner’smanual,obtainonefromthetool’s
manufacturerbeforeusingitwiththisproduct.
>Before using this product, review and verify that all
toolstobeusedwithithavesafetyequipment
installed and are in proper working order as
definedbythetools’owner’smanuals.
>Do not use this product until you have read and
are confident you understand:
• ProductSpecificSafetyWarnings(below);
• AssemblyandSetup(pp.4-7);
• InstructionsforUse(pp.7-8).
>Remain alert and use good judgment when using
this tool. Do not use this tool if you are in any way
impairedbymedications,alcohol,drugsorfatigue.
>Dress appropriately and remove all jewelry, secure
looseclothingandtieuplonghairbeforeusing
this tool.
> Itisthesoleresponsibilityofthepurchaserofthis
product to ensure that any third party whom you
allow to use this product reads and complies with all the
instructions and safety precautions outlined in this
manual prior to use.
>Maintain these instructions and warnings as long as
youowntheproduct.Keepthisbookletinaplacewhere
itwillbereadilyavailableforreference.
>Theuserassumesallriskandresponsibilityforthe
proper use of this product and for ensuring product
suitabilityforintendedapplication.
>Always wear safety glasses in compliance with ANSI
safety standards and hearing protection and follow all
standard shop safety practices, including:
• Keepyourworkareawelllitandclean;
• Unplugallpowertoolsbeforemakingany
adjustmentsorchangingaccessories;
•Use dust collection tools and dust face masks to
reduceexposuretodust;
• Useaccessorysafetyequipmentsuchas
featherboards,pushsticksandpushblocks
wheneverappropriate;
•Do not use power tools in explosive
environments (e.g., in the presence of
flammableliquids,fumesordust);
• Keepchildrenandbystandersawayfrom
thetooloperatingarea;
•Maintain proper footing at all times and
donotoverreach;
•Do not force the tool.
>These warnings and instructions do not represent the
totalofallinformationavailableregardingtoolsafety,
useandtechnique.Pleasereadthefullmanualbefore
using this product and always seek out opportunities to
learn more and improve your skills and knowledge.
Thistoolisdesignedforspecificapplicationsasdefinedintheinstructionsandshouldnotbemodifiedand/orusedforanyother
applications.BeforeusingtheTableSawSmallPartsSled,read,understandandfollowallinstructionsandsafetyinformationpro-
vided. KEEP THESE INSTRUCTIONS FOR FUTURE REFERENCE.
GENERAL SAFETY WARNINGS
>ThisTableSawSmallPartsSledmustbeusedonly
ontablesawswith3/4"x3/8"miterslots.Useofsled
with an improperly sized miter track may result in
sliding,stickingand/orinjury.
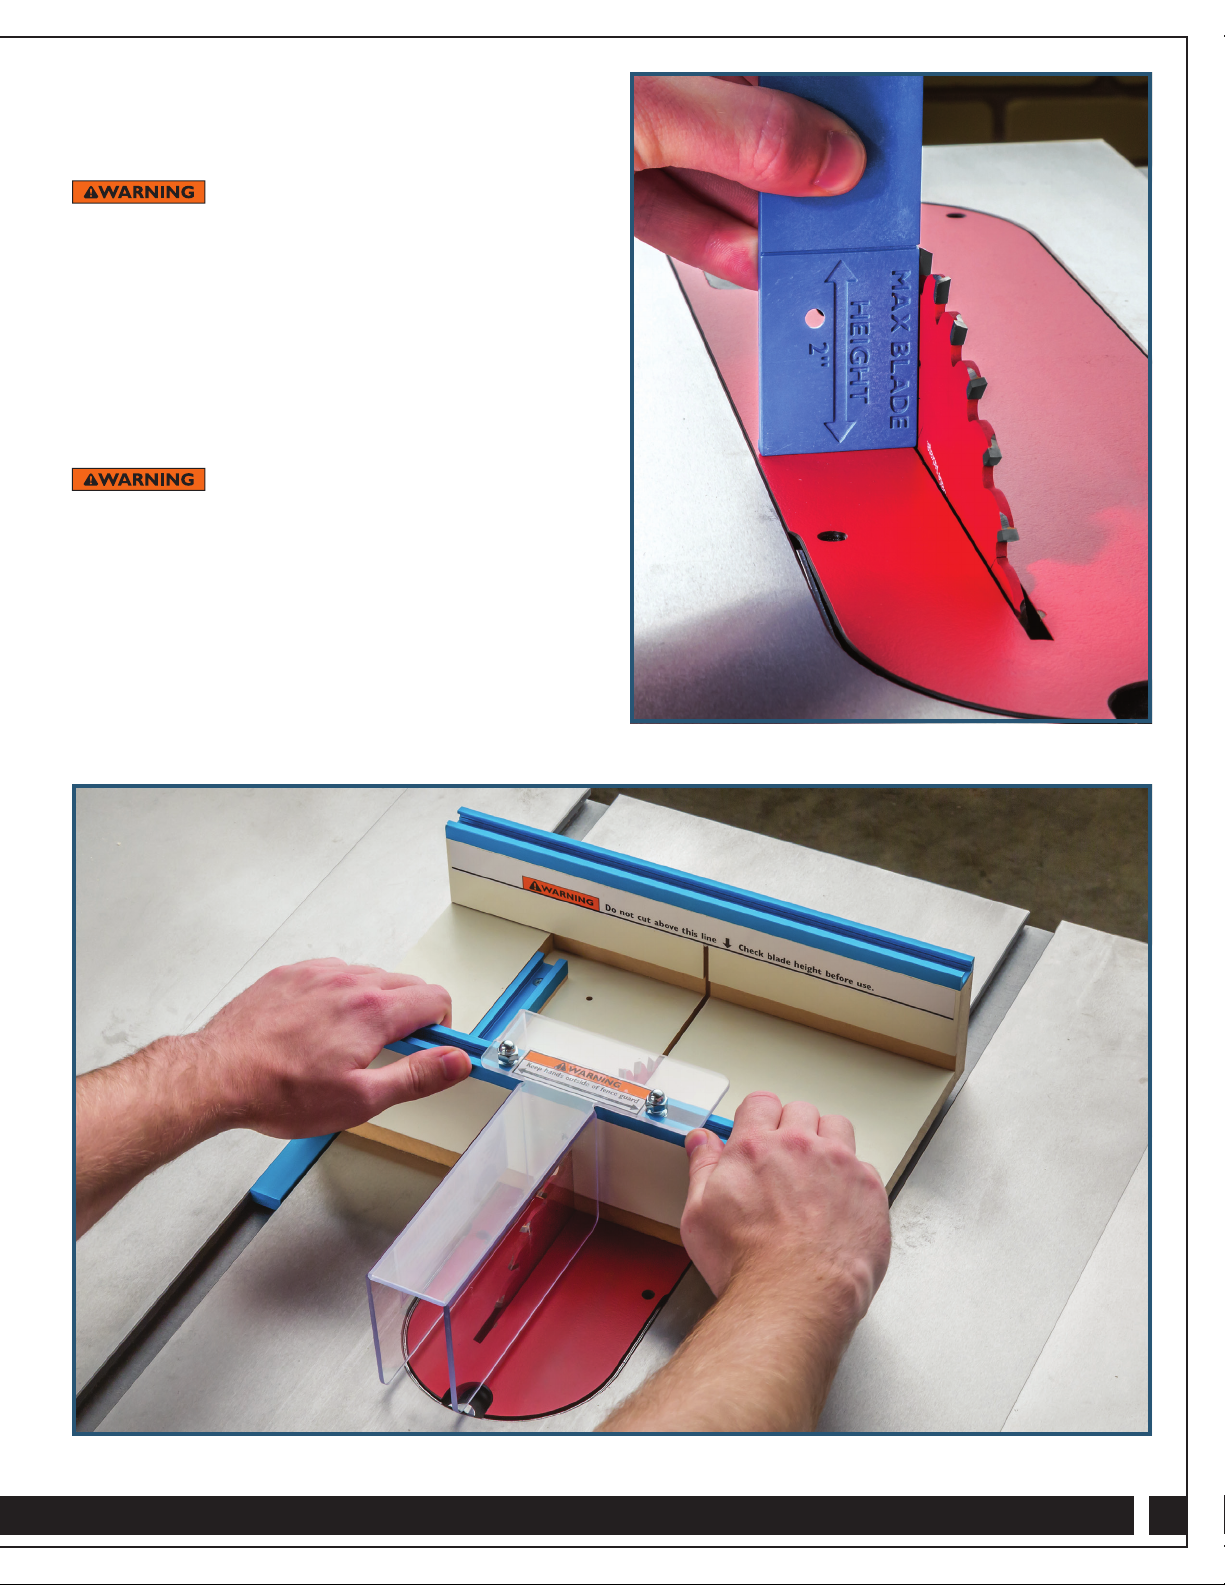
> Thebladeofthetablesawmustbesetnohigher
than2"fromthesurfaceofthetablesaw.Blades
setabove2"couldtearintothesled’supperrailing
and cause injury.
>Do not use this sled to cut stock pieces greater than
1"thickormorethan51⁄2"wide.
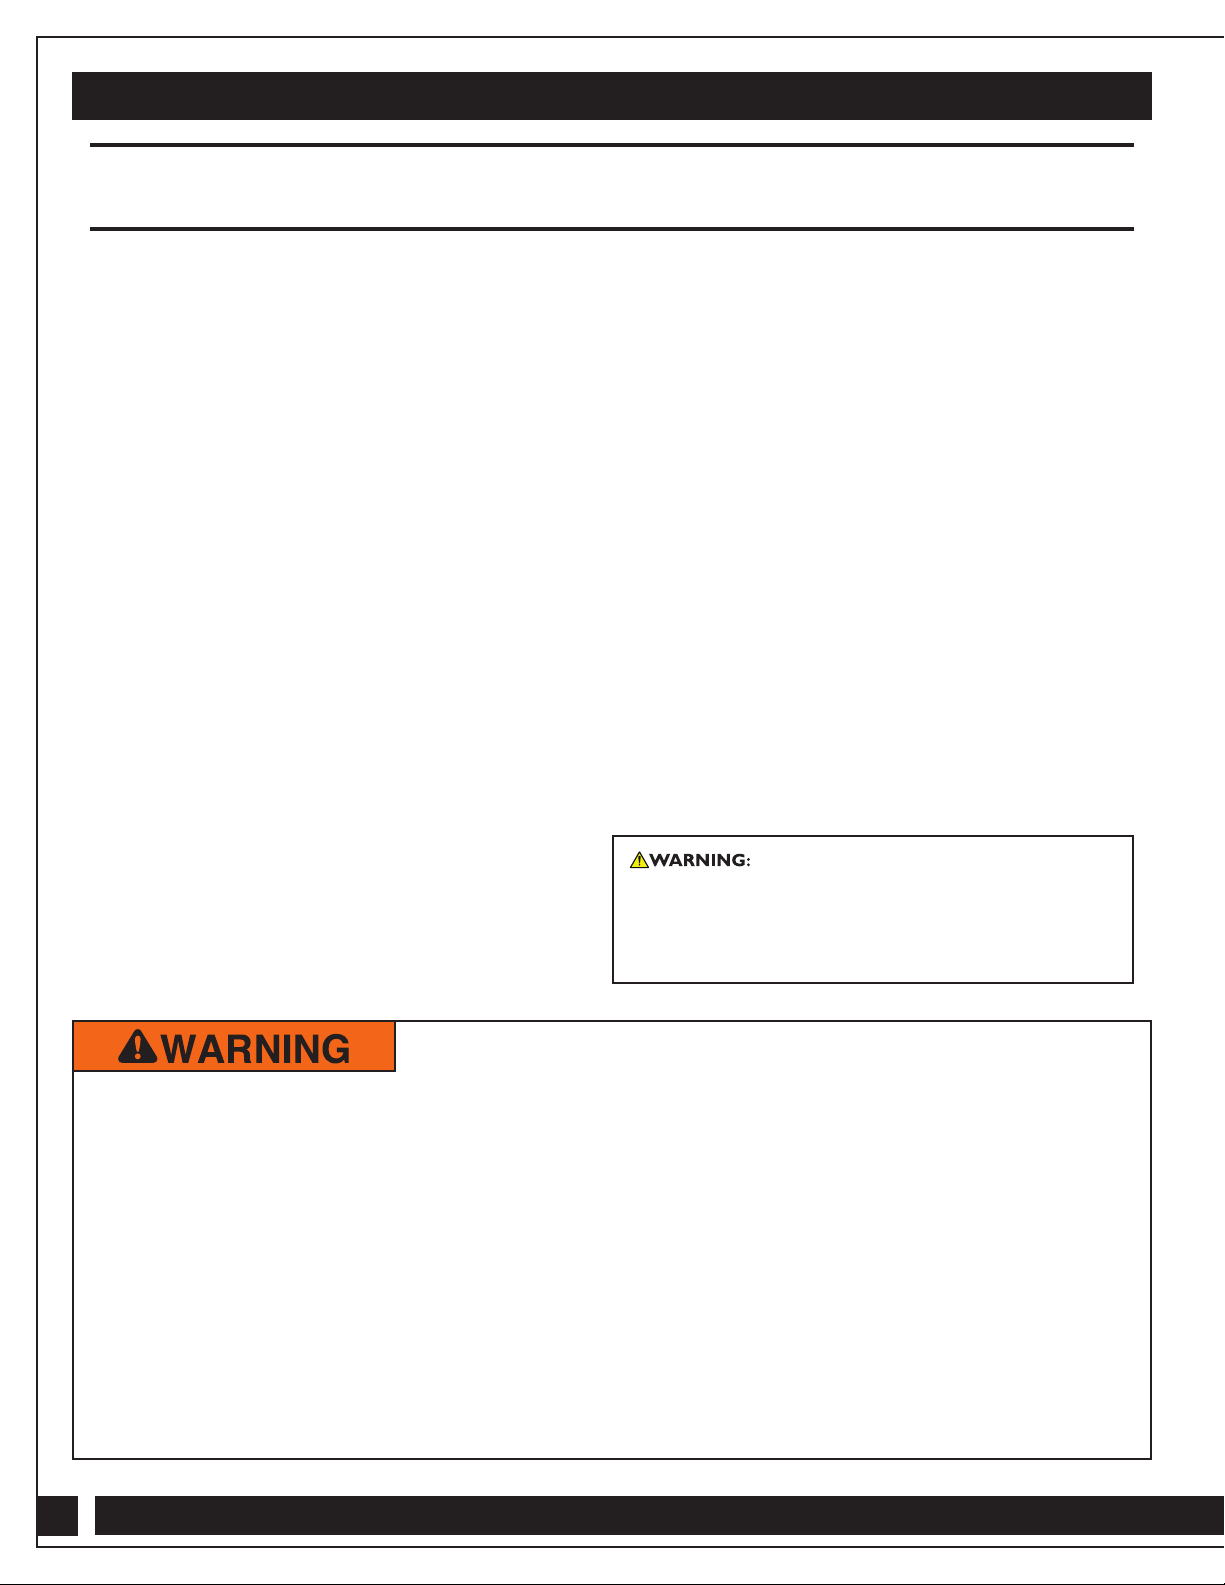
>Never use the sled without first inserting the
SafetyMiterStopinthetablesaw’smitertrack
andtighteningtheknob.TheSafetyMiterStop
shouldbepositionedinfrontofthesledsothesled
stopsinthemitertrackbeforeitmovessofarforward
thatthebladeisexposedbeyondthesled’splastic
Blade Guard.
> Removetablesawbladeguardandrivingknifeprior
touseofsledandreinstallbothaftercompleting
sled use.
>For straight 90° cuts only.
> Foruseontablessawswheretheinsidemiterslot
is over 21⁄2"fromtheblade.
PRODUCT SPECIFIC SAFETY WARNINGS
Drilling, sawing, sanding or machining wood
productscanexposeyoutowooddust,asubstanceknown
ot the State of California to cause cancer. Avoid inhaling
wood dust or use a dust mask or other safeguards for
personal protection. For more information go to
www.P65Warnings.ca.gov/wood.

3
Quantity
1 Sled Body 1
2 MDF Zero Clearance Insert 1
3 Drop-OffRamp 1
4 8-32x1/2"Flat-HeadScrews 2
5 8-32x1"Flat-HeadScrews 3
6 Blade Guard 1
7 1/4"-20CapNut 2
8 1/4"-20x1/2"HexBolt 2
9 Safety Miter Stop 1
10 5-StarKnob 1
11 5/16"-18x15⁄8"Bolt 1
12 8-32x3/4"Screw 2
13 Miter Bar 1
PARTS LIST
Safety Miter Stop must
be used or serious injury
can occur.
Insert will be cut
to size during setup
13
12
1
8
6
7
7
4
3
2
10
9
11
5

4
1. Retract your saw’s blade entirely below the table surface.
2. Set the Sled Body (1) on the saw table, with the miter bar
in the saw’s miter slot, and slide it forward. If the sled shifts
at all from side to side, turn it over and use a small slotted
screwdriver to adjust the nylon set screws in the miter bar to
eliminate excessive play. Fig. 1.
3. With the table saw turned off, position the Sled Body (1) at
the front of the saw table.
4. Install the 1/4"-20 x 1/2" Hex Bolts (8) and 1/4"-20 Cap
Nuts (7) on the plastic Blade Guard (6) with bolt heads facing
down, but don’t tighten them.
5. Slide the heads of the 1/4"-20 x 1/2" Hex Bolts (8) on the
Blade Guard (6) into the T-track atop the back fence of the
Sled Body (1) and position the Blade Guard so that the rear
channel is roughly centered over the blade path. (Use the
slot in the saw’s throat plate as a guide.) Tighten the 1/4"-20
Cap Nuts (8) to lock the Blade Guard in position. Fig. 2.
Fig. 2
Fig. 1
> Removetablesawbladeguardandrivingknifeprior
touseofsledandreinstallbothaftercompletingsleduse.
WARNING
Assembly and Setup Instructions

5
6. Slide the Sled Body (1) backward so that it will be clear
of the blade.
Blade height should be set no more than 2"
above the surface of the saw table to avoid saw blade from
contacting aluminum T-track on the fences.
7. With the saw off, raise the saw blade, using the markings on
the back of the plastic Drop-Off Ramp (3) as a guide to set
the correct maximum blade height (no more then 2" above
the table saw surface). Fig. 3.
8. With the full Sled Body (1) at the front of the saw, clear of the
blade, turn on the saw and push the sled through the blade,
stopping well before the blade emerges out the back of the
plastic Blade Guard (6). Fig. 4.
Turn off the saw and allow the blade to
stop spinning before sliding the Small Parts Sled back to the
starting point at the front of the saw.
9. With the blade still raised but the saw turned off and
unplugged, slide the sled back to the point where you
stopped in Step 8.
Fig. 3
Fig. 4

6
10. Position the Safety Miter Stop (9) in the table’s miter slot
at the back of the table saw so that it contacts the sled.
Tighten securely. Exact positioning depends on the specific
dimensions of your saw; you want to position the stop so it
prevents the sled from advancing so far that the blade
emerges out the back of the plastic Blade Guard (6). Fig. 5.
11. Return the Sled Body (1) to the starting point at the front
of the saw. Insert the MDF Zero-Clearance Insert (2) in the
grooves in the Sled Body fences and slide it until it contacts
the T-track. Fig. 6.
12. Flip the Sled Body (1) and secure the MDF Zero-Clearance
Insert (2) in place by driving two 8-32 x 1" Flat-Head
Screws (5) through the predrilled holes in the underside
of the Sled Body and into the MDF Zero Clearance
Insert (2). Fig. 7. If, by chance, you cut through the
predrilled holes because of the position of the miter slot on
your saw, drill new through holes in the Sled Body (1).
13. Return the Sled Body (1) to upright and position it at the
front of the saw, clear of the blade.
14. Turn on the saw and push the Sled through the blade until it
cuts through the MDF Zero-Clearance Insert (2). Fig. 8.
15. Turn off the saw and allow the blade to stop spinning,
then remove the offcut piece of the MDF Zero-Clearance
Insert (2).
16. Place the plastic Drop-Off Ramp (3) in position on the Sled,
opposite the MDF Zero Clearance Insert (2), with the flat
Fig. 5
Fig. 6

7
edge aligned with the kerf made by the saw blade. Drill pilot
holes, if desired, and secure the Drop-Off Ramp (3) in place
with the two 8-32 x 1/2" Flat-Head Screws (4). Fig. 9.
Instructions for Use
> DonotoperatesledwithoutSafetyMiterStop(9)inplace
withknobtightened.Seepage6,step10(andFig.5)
for proper positioning.
>Do not operate sled without plastic Blade
Guard(6)installed.
> KeephandsandfingersoutsideBladeGuard(6)and
awayfromrotatingbladetoavoidriskofseriousinjury.
> Tablesawmitertrackmustbe3/4"x3/8".Ifthetrack
is a different size, do not use with this product, or
serious injury could occur.
>Failure to maintain downward pressure could allow
thesledtoliftoutoftrack,resultinginkickbackand
serious injury.
WARNING
Important: The sled’s maximum cutting capacity is no more that
1" thick and 51⁄2" wide.
1. Remove riving knife and blade guard from your table saw.
Fig. 7
Fig. 9
Fig. 8

2. Before each use (and with the saw OFF), make sure that the
Sled Body (1) can slide in the miter track and that the blade
height is set to no more than 2".
3. Pull the Sled Body (1) to the front of the saw and position
your workpiece against the back fence, aligning your cut
mark with the edge of the saw kerf. Hold the workpiece
securely with your left hand or use a hold-down
clamp (sold separately) in the T-track on the left side
of the blade to secure it. Fig. 10.
4. Turn on the saw. Position your right hand on the sled,
making sure your hand and fingers are to the right of the
Blade Guard (6) and left hand is to the left of the Blade
Guard. Push the sled forward to make the cut, stopping when
the Safety Miter Stop (9) is contacted. Fig. 11.
5. If making repeated cuts, the sled may be pulled back to the
starting point while the saw is still running, but ONLY if:
• The offcut piece has fallen away so that it will not contact
the blade. If it has NOT fallen away, turn off the saw and
wait for the blade to stop moving before removing the
offcut and retracting the sled; and
• Your stock to the left of the blade has not shifted; and
• You maintain downward pressure on the Sled while pulling
it back to prevent the miter bar on the Sled Body (1) from
slipping out of the saw’s miter slot.
6. After using the Table Saw Small Parts Sled; reinstall the
riving knife and guard on your table saw.
7. Store this instruction booklet with your Table Saw Small
Parts Sled or in another place for easy reference.
8Distributed by Rockler Companies, Inc.
©2017 Rockler Woodworking and Hardware
55916
Rev 05/17
Fig. 11
Check Rockler.com for updates. If you have further questions, please
contact our Technical Support Department at 1-800-260-9663
or support@rockler.com Fig. 10
Shown with optional
Mini-Hold Down Clamp
(45692, sold separately)
Shown with optional
Mini-Hold Down Clamp
(45692, sold separately)
Table of contents
Other Rockler Saw manuals
Popular Saw manuals by other brands

Brandson
Brandson 303452 user manual

Parkside
Parkside PKS 1700 A1 operation and safety notes original operating instructions

EINHELL
EINHELL RT-TS 1825 U Original operating instructions

Bosch
Bosch 1-1/8 - RS7 Inch 11 Amp Receiprocating Saw Operating/safety instructions

Bosch
Bosch PKS 54 Original instructions

Anova
Anova MG246 Instruction and user's manual