Rockwell RT7876 User manual

RT7876
250W BENCH GRINDER EN


RT7876
1 2
3
4
5
8
7
6

RT7876
Max 2mm
Max 2mm
AB C
DE

5
250W BENCH GRINDER EN
COMPONENT LIST
1Eye shield
2Wheel guard xing screws
3Spark arrester / Eye shield bracket
4Grinding wheel
5Work rest
6Work rest xing screw
7Mounting holes
8On/Off switch
Not all the accessories illustrated or described are included in standard delivery.
ACCESSORIES
Work rest 2
Eye shields 2
Grinding disk: Φ150 X 20 X Φ12.7mm left #36 1
Grinding disk: Φ150 X 20 X Φ12.7mm right #60 1
We recommend that you purchase your accessories from the same store that sold you the tool. Use good quality
accessories marked with a well-known brand name. Choose the type according to the work you intend to undertake.
Refer to the accessory packaging for further details. Store personnel can assist you and offer advice.

6
250W BENCH GRINDER EN
SAFETY INSTRUCTIONS
WARNING! When using electric tools basic safety
precautions should always be followed to reduce
the risk of re, electric shock and personal injury.
Read all these instructions before attempting to operate
this product and save these instructions.
This appliance is not intended for use by persons
(including children) with reduced physical, sensory
or mental capabilities, or lack of experience and
knowledge, unless they have been given supervision
or instruction concerning use of the appliance by a
person responsible for their safety.
Children should be supervised to ensure that they do
not play with the appliance.
Safe operation
1. Keep work area clear
- Cluttered areas and benches invite injuries.
2. Consider work area environment
- Do not expose tools to rain.
- Do not use tools in damp or wet locations.
- Keep work area well lit.
- Do not use tools in the presence of ammable
liquids or gases.
3. Guard against electric shock
- Avoid body contact with earthed or grounded
surfaces {e.g. pipes, radiators, ranges,
refrigerators).
4. Keep other persons away
- Do not let persons, especially children, not
involved in the work touch the tool or the
extension cord and keep them away from the
work area
5. Store idle tools
- When not in use, tools should be stored in a dry
locked-up place, out of reach of children.
6. Do not force the tool
- It will do the job better and safer at the rate for
which it was intended.
7. Use the right tool
- Do not force small tools to do the job of a heavy
duty tool.
- Do not use tools for purposes not intended; for
example do not use circular saws to cut tree
limbs or logs.
8. Dress properly
- Do not wear loose clothing or jewellery, they can
be caught in moving parts.
- Non-skid footwear is recommended when
working outdoors.
- Wear protective hair covering to contain long
hair.
9. Use protective equipment
- Use safety glasses.
- Use face or dust mask if working operations
create dust.
10. Connect dust extraction equipment
- If the tool is provided for the connection of dust
extraction and collecting equipment, ensure
these are connected and properly used.
11. Do not abuse the cord
- Never yank the cord to disconnect it from the
socket Keep the cord away from heat, oil and
sharp edges.
12. Secure work
- Where possible use clamps or a vice to hold the
work. It is safer than using your hand.
13. Do not overreach
- Keep proper footing and balance at all times.
14. Maintain tools with care
- Keep cutting tools sharp and clean for better and
safer performance.
- Follow instruction for lubricating and changing
accessories.
- Inspect tool cords periodically and if damaged
have them repaired by an authorized service
facility.
- Inspect extension cords periodically and replace
if damaged.
- Keep handles dry, clean and free from oil and
grease.
15. Disconnect tools
- When not in use, before servicing and when
changing accessories such as blades, bits and
cutters, disconnect tools from the power supply.
16. Remove adjusting keys and wrenches
- Form the habit of checking to see that keys and
adjusting wrenches are removed from the tool
before turning it on.
17. Avoid unintentional starting
- Ensure switch is in “off” position when plugging in
18. Use outdoor extension leads
- When the tool is used outdoors, use only
extension cords intended for outdoor use and so
marked.
19. Stay alert
- Watch what you are doing, use common sense
and do not operate the tool when you are tired.
20. Check damaged parts
- Before further use of tool, it should be carefully
checked to determine that it will operate properly
and perform its intended function.
- Check for alignment of moving parts, binding of
moving parts, breakage of parts, mounting and

7
250W BENCH GRINDER EN
any other conditions that may affect its operation.
- A guard or other part that is damaged should be
properly repaired or replaced by an authorized
service centre unless otherwise indicated in this
instruction manual.
- Have defective switches replaced by an
authorized service centre.
- Do not use the tool if the switch does not turn it on
and off.
21. Warning
- The use of any accessory or attachment other
than one recommended in this instruction
manual may present a risk of personal injury.
22. Have your tool repaired by a qualied person
- This electric tool complies with the relevant
safety rules. Repairs should only be carried out
by qualied persons using original spare parts,
otherwise this may result in considerable danger
to the user.
23. If the replacement of the supply cord
is necessary, this has to be done by the
manufacturer or his agent in order to avoid a
safety hazard.
24. For tools intended to be connected to a water
supply:
- Replacement of the plug or the supply cord shall
always be carried out by the manufacturer of the
tool or his service organisation,
- Keep water clear off the electrical parts of the
tool and away from persons in the working area.
SAFETY WARNINGS FOR GRINDING
1. Do not use damaged or misshapen grinding wheels
or brushes;
2. Use only grinding wheels recommended by the
manufacturer which have a marked speed equal to
or greater than the speed marked on the nameplate
of the tool;
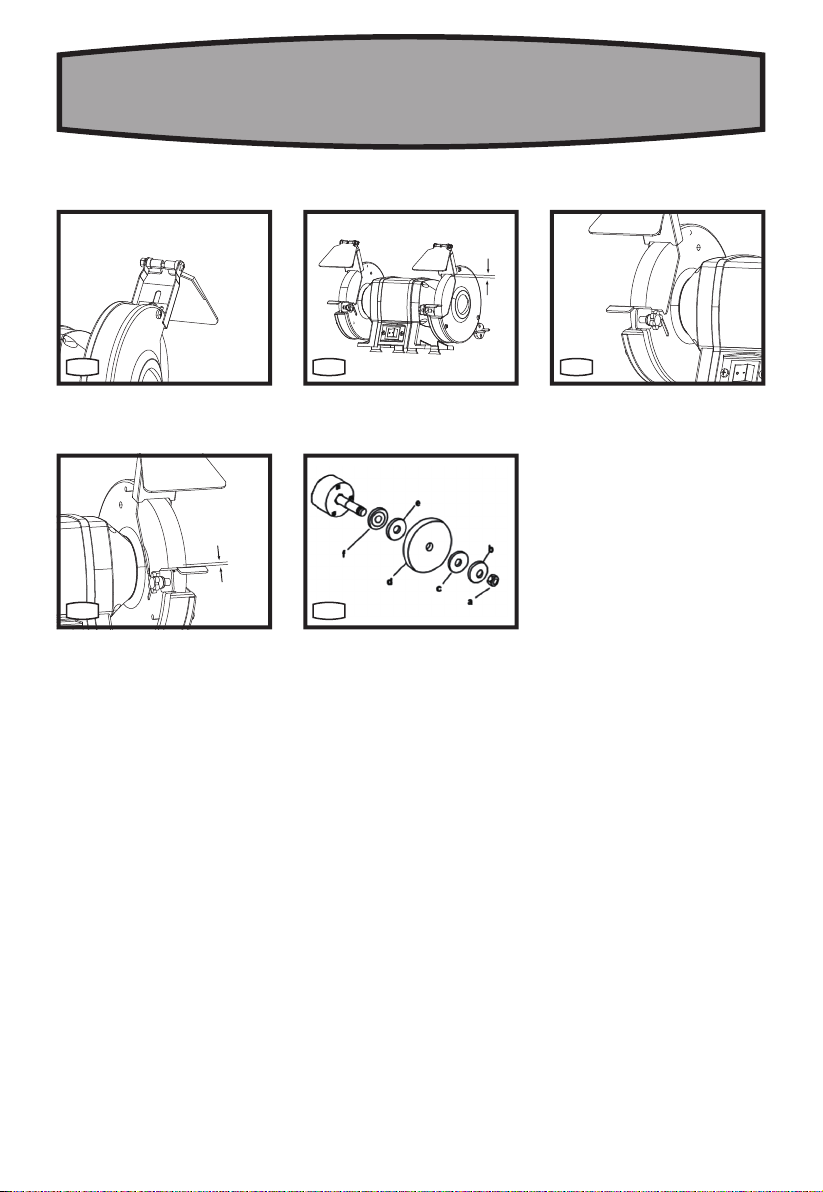
3. Adjust the spark arrestor frequently so as to
compensate for wear of the wheel, keep the
distance between the spark arrestor and the wheel
as small as possible and in any case not greater
than 2 mm;
4. The grinder must be secured to a suitable work
surface before use
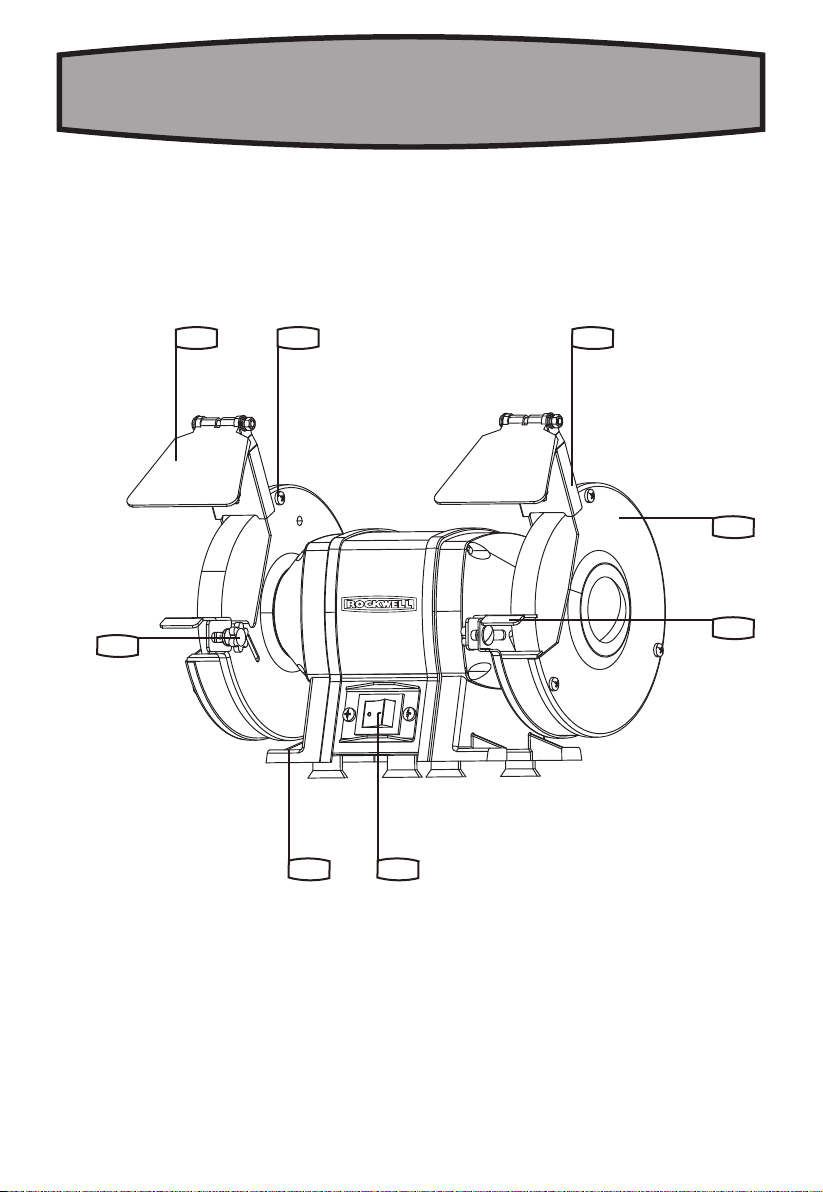
5. For bench grinders and combined bench grinders
equipped with straight-sided anges, the
recommended values of the thickness T and the
diameter of the hole see the technical data;
6. Always keep the brush assembled on the spindle
in order to limit the risk of contact with the rotating
spindle.
7. Always wear eye protection and check that the eye
shields on the grinder are properly adjusted.
8. The adjustment of the spark arrestor shall be made
frequently ,so as to compensate the wear of the
wheel, keeping the distance between the guard and
the wheel as small as possible, but in any case not
greater than 2 mm.
9. The adjustment of the work rest shall be done
gradually so as to compensate the wear of the
wheel, keeping the distance between the work rest
and the wheel as small as possible, but in any case
not greater than 2 mm.
10. Never leave the grinder until the grinding wheels
have come to a complete stop.
11. Do not use a wheel that has received a blow,
especially to the side of the wheel; Replace a
cracked or suspect wheel.
12. Always allow a new wheel to run for a few minutes
at full speed before using it. Stand to one side at
start up.
13. Check that the wheel rotates freely each time before
start up.
14. Do not use the grinder unless all the guards are
properly tted and secure.
15. Check that the work rests are properly adjusted
before commencing use.
16. Do not overload the grinder. Allow the grinder to
run at full speed, or close to full speed during use.
17. Never apply excessive pressure to the wheel. It
might shatter causing personal injury.
18. Make sure that the wheel is not in contact with the
work when you start the grinder.
19. When using the grinder, use safety equipment
including safety goggles or shield, ear protection,
dust mask and protective clothing including safety
gloves.
ADDITIONAL SAFETY
INSTRUCTIONS FOR YOUR BENCH
GRINDERS
1. Always remove the plug from the mains socket
before making any adjustments or maintenance,
including changing the wheel.
2. Always turn the grinder off when it is not in use and
never leave it unattended without rst switching
off and removing the power plug. Never leave the
grinder until the grinding wheels have come to a
complete stop.
3. Do not let anyone under 18 years operate this tool.

8
250W BENCH GRINDER EN
4. Rags, cloths, cord, string and the like should never
be left around the work area.
5. If you are interrupted when operating the tool,
complete the process and switch off before looking
up.
6. Periodically check that all nuts, bolts and other
xings are properly tightened.
7. Do not use a wheel that has received a blow,
especially to the side of the wheel.
8. Replace a cracked or suspect wheel.
9. Always allow a new wheel to run for a few minutes
at full speed before using it. Stand to one side at
start up.
10. Check that the wheel rotates freely each time before
start up.
11. Do not use the grinder unless all the guards are
properly tted and secure.
12. Check that the work rests are properly adjusted
before commencing use.
13. Do not overload the grinder. Allow the grinder to
run at full speed, or close to full speed during use.
14. Never apply excessive pressure to the wheel. It
might shatter causing personal injury.
15. Make sure that the wheel is not in contact with the
work when you start the grinder.
16. When using the grinder, use safety equipment
including safety goggles or shield, ear protection,
dust mask and protective clothing including safety
gloves.
CAUTION: ENSURE SWITCH OFF POWER BEFORE
CHANGING LAMP.
SYMBOL
To reduce the risk of injury, user
must read instruction manual
Wear ear protection
Wear eye protection
Wear dust mask
Remove plug from mains before
maintenance or if cord is damaged.
RCM marking
ABN: Australian Business Number. By this number,
business information such as entity type, status,
business location etc. can be found at website http://
abr.business.gov.au.
ABN of Positec Australia Pty Limited is 14 101 682 357
TECHNICAL DATA
Voltage 230-240V~50Hz
Power input 250 W S2:30 min
No load speed 2950 /min
Wheel size 1: Φ150 X 20 X Φ12.7mm left #36
Wheel size 2: Φ150 X 20 X Φ12.7mm right #60
Machine weight 7.3kg
OPERATING INSTRUCTIONS
NOTE: Before using the tool, read the instruction
book carefully.

9
250W BENCH GRINDER EN
1. ASSEMBLY INSTRUCTIONS
Before use, the eye shields/spark arresters must be
tted to the grinder.
Remove both eye shields from packaging, position
the shields over the two mounting brackets above the
grinding wheels with the anges of the spark arrester
facing away from you, x with the screw and washer
provided. At this stage do not fully tighten. (See Fig.A)
The next step is to adjust the eye shields/spark
arresters. To do this move the eye shields/spark
arresters so as to obtain a gap as small as possible
between the arrester and the grinder wheel, not greater
than 2mm, the screw must now be fully tightened, See
Fig.B. The gap must be maintained as the wheel wears.
2. WORK REST ADJUSTMENT
Take the work rest out of the package, x on the grinder
with the two screws and washer
provided as shown in Fig.C. The gap between the rests
and the wheels should be checked
before use. Measure the gap between the grinding
wheel and the rests; this should be as
small as possible not greater than 2 mm, if not, loosen
the two screws on each of the rests, set
the correct gap and fully tighten, see Fig.D. The gap
must be maintained as the wheel wears.
3. OPERATING
Make sure grinder is securely mounted;
mounting holes are provided in the base of the grinder
for this purpose, but the screws are not provided. Plug
in the mains supply and push the on/off switch right to
the on position. Switch off and unplug the grinder when
not in use.
4. CHANGING GRINDING WHEELS (SEE FIG.E)
To change the grinding wheels, rst unplug from mains
supply then remove the eye shield brackets, then undo
and remove the three screws holding the wheel guard
covers in place.
Remove the cover. Undo and remove the two wheels
retaining nuts (a). You may have to hold
the wheel and give the spanner a rm tap with a soft
headed hammer to release the nut, take off
the large domed washer (b), paper washer (c) and
remove the wheels (d).
NOTE: The nut on the right side of the grinder has a
standard right hand thread (turn ounterclockwise to
loosen). The one on the left side has a left hand thread
(turn clockwise to loosen).
Replace in same order, making sure both domed
washers face correct direction, check the paper
washer(c and e), if damaged replace with new paper
washer. Hold the wheel and tighten the nut rmly but do
not over-tighten.
NOTE: only replace anges with original items, these can
be supplied through a authorized dealer.
WARNING: OVERTIGHTENING CAN CRACK A
GRINDING WHEEL.
MAINTENANCE
Remove the plug from the socket before carrying out
any adjustment, servicing or maintenance.
If the supply cord is damaged, it shall be replaced
by the manufacturer or its service agent or similarly
qualied person in order to avoid a hazard.
TROUBLESHOOTING
Although your new bench grinder is really very simple
to operate, if you do experience problems, check the
following:
1. GRINDER WILL NOT START
Check that there is “mains” at the socket; test with an
electrical screwdriver or another electrical appliance;
check the connections in the plug; correct and tighten
poor connections; check the fuse; if suspect replace
with correct rating.
2. WHEEL WOBBLES OR VIBRATES
Check that the lock-nut is tight. Check that the wheel
is correctly located on the shaft and locating washer.
If excessive pressure has been used or the wheel has
“caught”, it may be damaged causing it to vibrate. If
there is any evidence that the wheel is damaged, do not
use, remove it and replace with a new wheel. Dispose of
old wheels sensibly.
3. WHEEL LEAVES ROUGH FINISH
Too much pressure on the wheel can cause a poor
surface nish. If working with aluminium or similar soft
alloy, the wheel will soon become clogged and will not
grind effectively.
There are no other users serviceable parts in your
bench grinder.

10
250W BENCH GRINDER EN
HANDY HINTS
Your bench grinder is useful for sharpening tools, e.g.
drills, chisels; refacing tools, e.g. removing burrs from
tool edges; removing material, however this is not a
heavy duty tool and is designed primarily for light home
and hobby use.
The two different types of wheel will allow the grinder to
meet various needs. Typically, use the coarse grinding
wheel for rough cutting, i.e. removing a larger amount
of material.
Use the medium wheel for nishing to leave a smoother
surface.
If the grinder is used on soft metals such as aluminium,
the wheel will soon clog and will have to be changed.
At all times, let the grinder do the work, do not force it
or apply excessive pressure to the wheel/cutter.
Try to use the tool rest for supporting and guiding the
workpiece. Do not grind using the side cheeks of the
grinding wheel as undue pressure on the side of the
wheel could cause the wheel to shatter.


POSITEC AUSTRALIA PTY LTD
ABN 14 101 682 357
MADE IN PRC
Copyright © 2018, Positec. All Rights Reserved.
Table of contents
Other Rockwell Grinder manuals