roco 10810 User manual

Art. no. 8010835923 02/ 2022
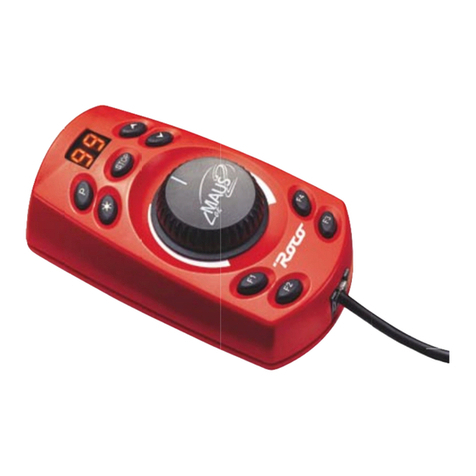
multi MAUS
Quick Guide
Model Railway Control
Z21 is an innovation from & .
A5_MultiMaus_Kurzanleitung_02.02.2022_ENG.indd 2A5_MultiMaus_Kurzanleitung_02.02.2022_ENG.indd 2 15.02.22 16:1115.02.22 16:11

Left arrow key for scrolling through
entries and settings (backwards)
Light/OK key forconrmingentries
and switching on the train lighting
Stop key for activating and
deactivating an emergency stop
Right arrow key for scrolling
through entries and settings (forward)
Control knob for setting
the direction and speed of travel
Thank you very much for choosing one of our
DIGITAL STARTER sets!
EXPLANATION OF DISPLAY SYMBOLS
Short-circuit symbolashesin
case of short circuit or overload
Shift symbol indicates key actuation
Tournout symbols
• Tournout mode:
Switch turnout
Loco symbol
• Drive or turnout mode
• Menu level: Loco menu
Light symbol
• Switch on loco light
Stop symbol ashesincase
of emergency stop and short circuit
STOP
Function icons (1-10)
• Show the activated special
loco functions
• Menu level: subordinate levels
Driving symbols
• Arrows indicate direction of travel of
the selected locomotive
• Pause indicates standstill of the loco-
motive (by controller or selective
emergency stop)
Wrench
Menu level: Settings menu
ABC lights up during text input MENU
the multiMAUS is in the menu level
Prog
• Lights up as confirmation during
programming
Menu level: Programming menu
KEYBOARD EXPLANATION
Shift key for activating
further multiMAUS functions
(key combinations)*
LC display for indication
Loco/Turnout key for switching
between locomotive and turnout control
Menu key for selecting
conguration variables (CV)*
Model Railway Control
A5_MultiMaus_Kurzanleitung_02.02.2022_ENG.indd 3A5_MultiMaus_Kurzanleitung_02.02.2022_ENG.indd 3 15.02.22 16:1115.02.22 16:11

1. LOCO SELECTION
To control your loco with the multiMAUS or to change settings, you must rst select the loco. There are two ways
to do this: the library mode or the address mode. The rst time you switch on your multiMAUS, it will start in library
mode.
1.1 Library Mode
In the library mode of the multiMAUS, your locos are sorted by their names. To select the loco you want to control, simply scroll
through the library using the arrow keys.
When you switch on your system, the multiMAUS display shows the name of the last loco used. When you
switchonforthersttime,thedisplaywillshow“LOCO1”orthefactory-assignednameofyourstartersetloco.
1.2 Address Mode
Alternatively, you can also control the locos by entering the decoder address. The decoder is located in your digital loco and
receives the control signals from your multiMAUS. All locos have preset address 3 at the factory.
• By pressing the key combination + you can switch between library mode and address mode and back.
• You can reach the desired decoder address either by using the arrow keys or by entering the address
of the loco directly.
• Todothis,rstpress+
• Theadjacentdisplay2appears.Enterthelocoaddressinthenumbereld.
• For example, to enter the loco with decoder address “3”
pressandconrmwith
def 3
*Thespeciedfunctionalitiesreferonlytothisquickreferenceguide.
Further functionalities of the multiMAUS and more information can be found
on our website: www.z21.eu
Connection to the Z21:
Thank you very much for choosing one of our
DIGITAL STARTER sets!
Loco/Turnout key for switching
between locomotive and turnout control
Menu key for selecting
conguration variables (CV)*
A5_MultiMaus_Kurzanleitung_02.02.2022_ENG.indd 4A5_MultiMaus_Kurzanleitung_02.02.2022_ENG.indd 4 15.02.22 16:1115.02.22 16:11

2. CREATING FURTHER LOCOMOTIVES
To create a new loco with the name “BR024” and address 24, proceed as follows in three simple steps:
1. Create the loco with a new name in the multiMAUS loco library.
2. Assign a new, not yet assigned decoder address in the multiMAUS.
3. Set the decoder of the loco to the new decoder address with the multiMAUS.
2.1 Creating a new locomotive in the multiMAUS
• Switch to the library mode.
• Scroll with the arrow keys until “NEW” appears in the display
• Conrmyourselectionwiththekey
• Enter the name with the numeric keypad. On the keys of the multiMAUS there are – like on an old cell phone – all letters from
AtoZ.Eachnumerickeyisassignedseveralletters.Ifyoupressonce,therstletterappears,ifyoupresstwice,thesecondletter
appears, if you press three times, the third letter appears. When you press the fourth time, the digit appears:
• Now select the possible speed levels that the decoder understands. For current decoders use 128.
– Use the arrow keys to select “128” between the values.
– Confirm your selection with the key
2.2 Changing the decoder address with the multiMAUS
Thedecoderaddressisstoredastherstcongurationvariable,CV1forshort,inthedigitaldecoderofeachloco.Withthehelpofthe
multiMAUS you can easily change this CV setting. Attention: For this programming only one loco may be on the track.
• Press the key combination + to access CV1
• Enterthedesiredlocoaddressbypressingrstandthen
• Conrmyourselectionwiththekey
Now your loco has the decoder address 24 and reacts to all commands you give it with the multiMAUS.
Art. no. 8010835923 02/ 2022
Modelleisenbahn GmbH | Plainbachstrasse 4 | 5101 Bergheim, Austria | www.eischmann.de | www.roco.cc
MENU 1
2abc 4ghi
Have a GREAT TIME with your digital system!
– Press 2 times the key for the letter “B” or, e.g., press 4 times the key for the digit “2”.
– After entering the text, confirm with
2abc 2abc
If you have any technical questions / problems, you can contact the service hotline.
Our experts will be happy to help you with tips and tricks:
▪https://www.eischmann.de/de/service/hotline/index.html ▪GRATIS: 00800 57626000 (Germany, Austria, Switzerland)
▪https://www.roco.cc/de/service/hotline/index.html ▪INTERNATIONAL: +43 820 200668
Service Hotline
>
• Next, enter the new address that the loco is to receive.
– First press , then
– Confirm your selection with the key
>
18/0113-0701
Alter/Age
14+
2abc 4ghi
A5_MultiMaus_Kurzanleitung_02.02.2022_ENG.indd 1A5_MultiMaus_Kurzanleitung_02.02.2022_ENG.indd 1 15.02.22 16:1115.02.22 16:11
This manual suits for next models
2
Other roco Control System manuals
Popular Control System manuals by other brands

Ducasa
Ducasa Smart Command Tevolve Installation and operating manual

Adtech
Adtech ADT-DK300A Manufacturer's manual

EMKO
EMKO TRANS-SYNCRO manual

Hartmann
Hartmann Altronix T1HCK3F4D installation guide

Raven
Raven CR Series installation manual

Phason
Phason AutoSort Connect Installation and getting started guide