Rohde & Schwarz SpycerNode SC User manual

For your Safety
All general safety instructions are located at the end of
this document. Please, read them rst before starting
with the installation.
Use SpycerNode SC only in its designated purpose as
described in the product documentation. Observe the
performance limits and operating conditions stated in the
specication (data sheet).
Safety information is part of the product documenta-
tion. It warns you about the potential dangers and gives
instructions how to prevent personal injury or damage
caused by dangerous situations.
Always read the safety instructions carefully. Make sure
to fully comply with them. Do not take risks and do not
underestimate the potential danger of small details.
It is also strongly recommended to follow the instructions
in the main User Manual alongside this Getting Started
manual. The User Manual is available for download
here (reqiures registration):
https://gloris.rohde-schwarz.com/
R&S®SpycerNode SC
Getting Started
Version 04
1
2
- Open the delivery box.
- Locate the two transportation handles inside
the delivery box.
X 2
- There are four transportation hooks at each
side of the casing:
- Attach the two transportation handles to the
transportation hooks.
Make sure the openings on the handles comple-
tely embrace the hooks. Also, the openings must
be attached at the narrow end, and NOT at the
wide end.
2902.5575.02 - 04

4
3
Do not attempt to lift the system by yourself, al-
ways get others to assist you. Place it on a at
surface to prepare it for mounting into the rack.
iConsult the main User Manual for the complete
installation procedure in section Mounting the
System into a Rack, chapter Installation.
6
8
7
9
- Unpack the sliding rails system from the
delivery box.
- Attach the outer rail/bracket assembly to the
frame of the rack.
5- Attach the inner rails on both sides of the
case. Lock and secure the inner rails with
the screws provided.
- Insert the case into the rack by aligning the
inner slides with the outer slides.
- Remove the top cover on the front side.
- Insert the disk drives into the associated slots.
- Arrange the disks accorinding to their numbe-
ring, as shown below:
- Place the top cover back on to close the case.
- Retract the system into the rack to prepare it for
rst use.
10 - Connect the power supply units and turn on
the system. The system requires 200-240V
power supply.

12
11
enp65s0f1
Static 10.0.0.4
IP address:
Subnet mask:
Default gateway:
Obtain an IP address automatically
Use the following IP address:
10 . 0 . 0 . 1
255 . 255 . 255 . 0
. . .
ihttp://10.0.0.4
RS Device Manager
13
14
[serial number of the device]
administrator
Login
R&S®Device Manager
10.0.0.1
15
16
17
18
19
Serial Number is located on the rear panel of the system.

22
VENICE Media Server Spycer Storage Spycer Server
Restart and shutdown
SNO-SC-00005-ASNO-000001-A
SNO-000001-A
i
Installing the Drives
Connecting the Equipment
20
21

General Safety
If this equipment is used in a manner not specied by
the manufacturer, the protection provided by the equip-
ment may be impaired.
This equipment is to be installed for operation in an en-
vironment with ambient temperature below 35°C.
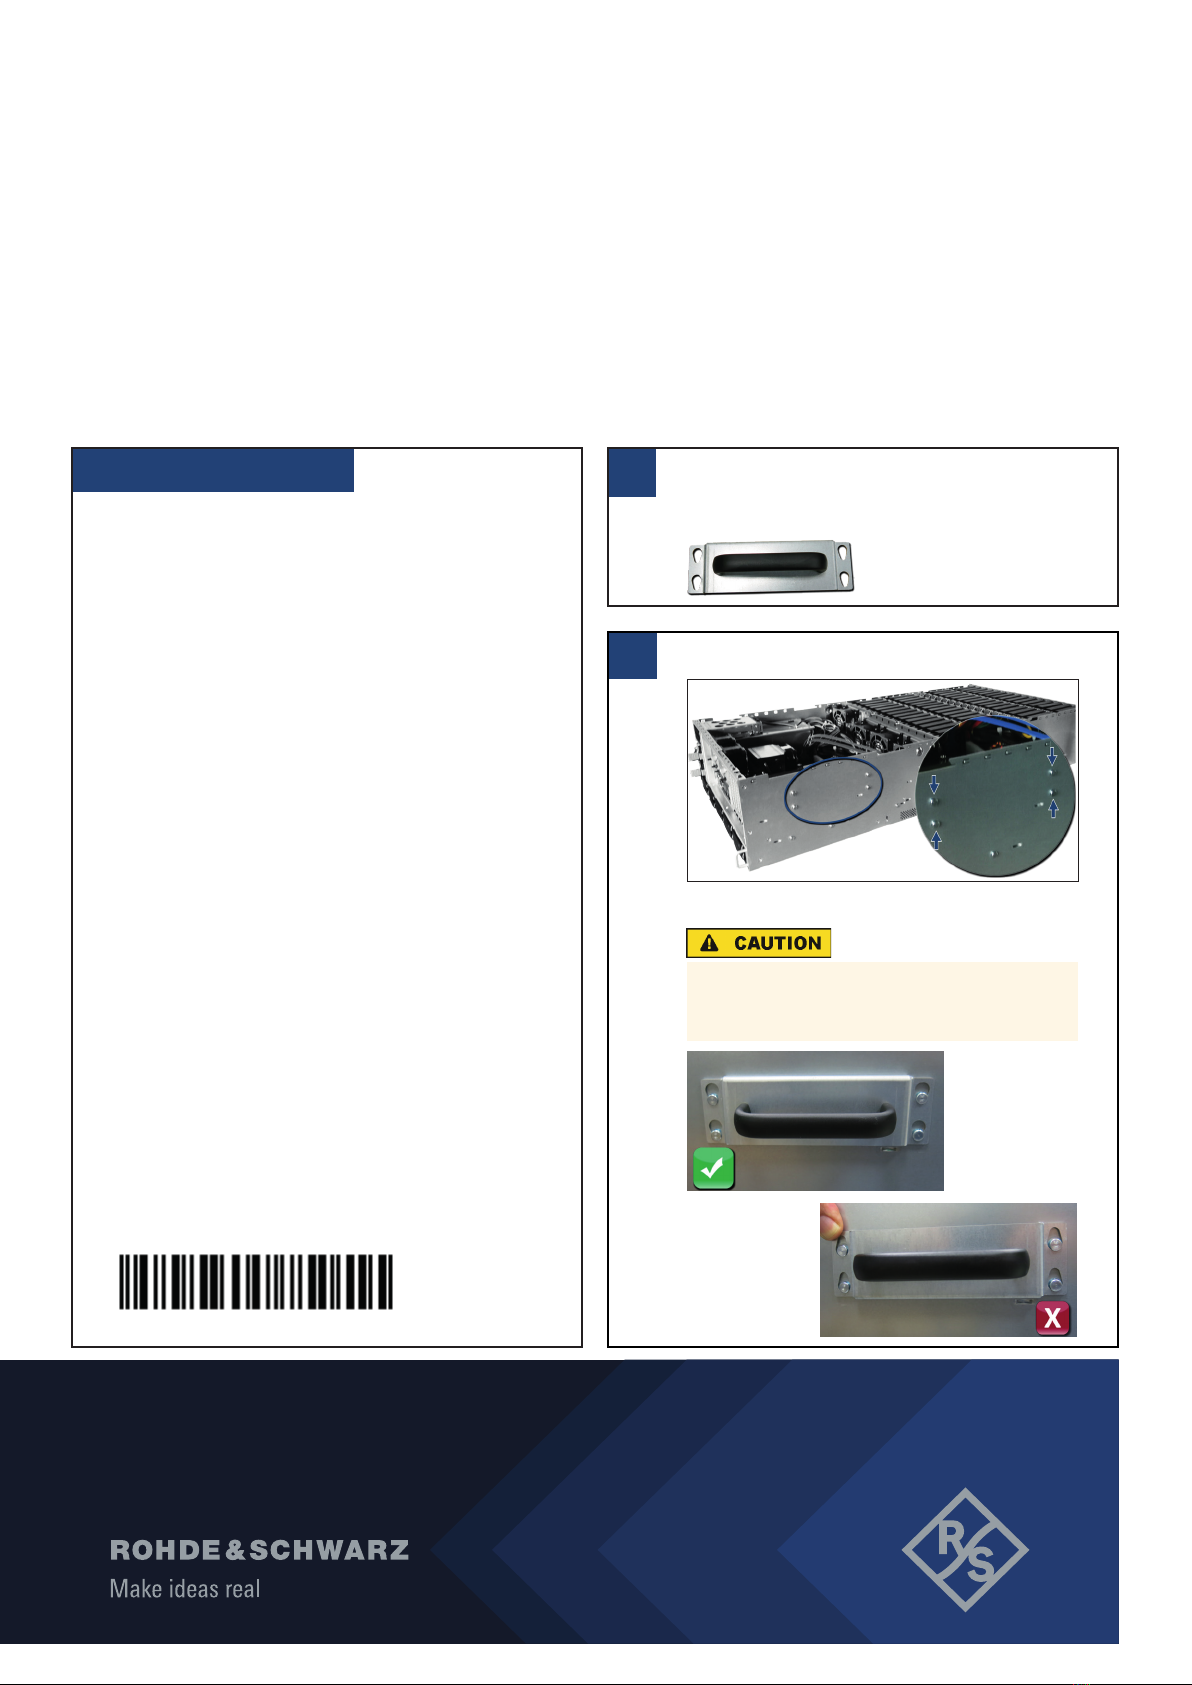
All plug-in modules and blank plates are part of the re
enclosure and must only be removed when a replace-
ment can be immediately added. The system must not
be run without all modules or blanks in place.
Unplug the system before you move it or if you think it
has become damaged in any way.
In order to comply with applicable safety, emission and
thermal requirements no covers should be removed,
and all bays must be populated with plug-in modules or
blanks.
The power connection should always be disconnected
prior to removing a PSU from the enclosure.
Do not remove cooling fans, PSUs or I/O Modules
unless you have a replacement model of the correct type
ready for insertion.
The system is to be operated only when mounted and
mechanically secured into a 19-inch rack.
The storage drives are to be installed only after having
mounted the system into the rack. Also, the storage
drives must be removed prior to dismounting the system
from the rack.
It is recommended that you t and check a suitable anti-
static wrist or ankle strap and observe all conventional
ESD precautions when handling plug-in modules and
components. Avoid contact with backplane components
and module connectors, etc.
Electrical Safety
The enclosure must only be operated from a power
supply input voltage range of 200-240 VAC. The power
supply units, as well as the cooling fans are hot-swap-
pable.
The plug on the power supply cord is used as the main
disconnect device. Ensure that the socket outlets are
located near the equipment and are easily accessible.
When powered by multiple AC sources, disconnect all
supply power for complete isolation.
A safe electrical earth connection must be provided to
the power supply cords. Check the grounding of the
casing before applying power.
Electric Shock
Opening or removing the system cover while the system
is powered on may expose you to a risk of electric
shock.
Maintenance inside the system should only be
performed by personnel qualied for handling and
testing electrical equipment. Exercise utmost care
when performing any kind of work inside the system
while it is on.
Provide a suitable power source with electrical overload
protection to meet the requirements laid down in the
technical specication.
When bifurcated power cords (‘Y’ leads) are used, they
must only be connected to a supply range of 200-240 V.
A faulty PSU must be replaced with a fully operational
module within 24 hours.
The product ratings are: voltage: 200 to 240 VAC; cur-
rent: 16A or 13A per inlet; frequency: 50 to 60 Hz. This
information can also be found on the back of the PSUs.
Network Safety
For all devices in your local area network (LAN), install
the latest rmware to reduce security risks.
For Internet or remote access, use secured connections
if applicable, such as HTTPS, SFTP, FTPS instead of
HTTP, FTP.
Ensure that the network settings comply with the security
policies of your company. Contact your local system
administrator or IT department before connecting your
product to your company LAN.
When connected to the LAN, the product may potentially
be accessed from the Internet, which may be a security
risk. For example, attackers might misuse or damage the
product.
Lithium Battery Safety
The product contains lithium polymer or lithium ion cells
or batteries. The use of the word battery in the following
always means all types. Only the battery contents are
potentially hazardous. As long as a battery is undama-
ged and the seals remain intact, there is no danger.
Impact, shock or heat can cause damage such as dents,
punctures and other deformations. A damaged battery
poses a risk of personal injury. Handle a damaged or
leaking battery with extreme care. Immediately ventilate
the area since the battery releases harmful gases. If
you come into contact with the battery uid, immediately
remove all contaminated clothing. Irritation can occur if
the battery uid comes in contact with your skin or eyes.
Immediately and thoroughly rinse your skin or eyes with
water and seek medical aid.
Do not short-circuit the battery. Do not mechanically
damage the battery. Do not open or disassemble the
battery.
Do not expose the battery to high temperatures such as
open ames, hot surfaces and sunlight.
Only use the appropriate charger to charge the batteries.
If the batteries are improperly charged, there is a risk of
explosion.
Store the battery at room temperature (approximately
20°C | 68°F) enclosed in the original packaging.
Dispose of batteries separately from normal household
waste as specied by the local waste disposal agency.

© 2021 Rohde & Schwarz GmbH & Co. KG
Hanomaghof 1, 30449 Hannover, Germany
Phone: +49 51 16 78 07 - 0
Fax: +49 51 16 78 07 200
Email: [email protected]
Internet: www.rohde-schwarz.com
Subject to change – Data without tolerance limits is not binding.
R&S® is a registered trademark of Rohde & Schwarz GmbH & Co. KG.
Trade names are trademarks of the owners.
Lithium Cell Safety Regulations
If you disregard these safety regulations, you risk
serious personal injury or even death due to explo-
sion, re or hazardous chemical substances.
When replacing a defective battery, only use the same
battery type. When returning batteries to Rohde &
Schwarz subsidiaries, choose a carrier qualied to trans-
port dangerous goods and follow the carrier’s transport
stipulations in line with IATA-DGR, IMDG-Code, ADR
or RID. If you need assistance, contact the carrier or
customer service.
Transportation Safety
Risk of Injury
Lifting the system by yourself may result in serious injury
and property damage.
Do not attempt to lift the system by yourself, always
get others to assist you.
Do not lift the casing by the handles on the rear modu-
les. They are not designed to take the weight. Only use
the transportation handles provided in the delivery box,
and the front handles to lift the system.
Important: The casing must be mounted in a rack before
rst use.
An unpopulated casing can weigh up to 48kg (106lbs).
Use appropriate lifting methods.
A fully populated casing weighs 95kg/210lbs (60 x
HDDs) or 72kg/159lbs (60 x SSDs). Do not attempt to
lift the casing when populated with drives. Mount the
system into a rack prior to installing the drives.
When closing the drawers, do so rmly, ensuring the
latches are engaged.
Other manuals for SpycerNode SC
1
Table of contents
Other Rohde & Schwarz Industrial Equipment manuals
Popular Industrial Equipment manuals by other brands

Time Electronics
Time Electronics 1053 Technical manual

Apex Tool Group
Apex Tool Group Cleco BD Series installation manual

SAMCHULLY
SAMCHULLY NC Rotary Table Series instruction manual

BITO
BITO PROFlow Series Instructions for assembly and use

Graco
Graco 17B587 instructions

Optex
Optex TSC-10-D instruction manual