ROHO THE ADAPTOR User manual

1
SUPPLIER: This manual must be given to the user of this product.
USER: Before using this product, read instructions and
save for future reference.

1
ROHO, Inc. has a policy of continual product improvement and reserves the right to amend specifications presented
in this manual.
ROHO®Cushioning Products are manufactured by ROHO, Inc.,
100 North Florida Avenue, Belleville, Illinois 62221-5429, www.therohogroup.com.
U.S.A.: 1-800-851-3449, Fax 1-888-551-3449
Outside the U.S.A.: 1-618-277-9150, Fax 1-618-277-6518
e-mail: [email protected]
© 2007-2008 ROHO, Inc.
The following are trademarks and registered trademarks of ROHO, Inc.: ROHO®, DRY FLOATATION®, MINI-MAX®,
PACK-IT®, HEAL PAD®, THE ADAPTOR®, AIR SPRING®, Yellow Rope®, shape fitting technology®.
Velcro®is a registered trademark of Velcro Industries B.V.
INTENDED USES & PRODUCT SPECIFICATIONS 2-3
CAUTIONS 4
ADJUSTMENT INSTRUCTIONS 5-6
COVER REMOVAL & REPLACEMENT 7
CLEANING & DISINFECTING YOUR PRODUCT 7
TROUBLESHOOTING 8
REPAIRS 8
RETURN POLICY 8
DISPOSAL 8
LIMITED WARRANTY 9
ESPAÑOL 2-3
FRANCAIS 4
DEUTSCH 5-6
ITALIANO 7
NEDERLANDS 7
DANSK 8
SVENSKA 8
NORSK 8
SUOMI 8
PORTUGUES 9
TABLE OF CONTENTS

2
The cushioning devices are designed to conform to a user's shape to protect skin tissue and aid in
the prevention of tissue breakdown. ROHO, Inc. recommends that a clinician such as a physician or
therapist experienced in seating and positioning be consulted to determine if the ROHO®cushioning
device is appropriate for the user's particular needs.
All devices in this manual are made of neoprene. Inflation valves are nickel plated brass.
The cover top and side materials are 100% flame resistant polyester. The bottom material is 100%
polyester reinforced PVC. A cover is not included with all products.
THE ADAPTOR®
The ADAPTOR is intended to enhance soft tissue protection, absorb shock, and protect against shear and
friction on surface shapes such as sides of wheelchairs, head and foot rests, or anywhere uncontrolled
movement may need protection. The ADAPTOR is not intended to be used as a supporting medium under the
buttocks.
The ADAPTOR sizing specifications:
Cell Height Width Depth Weight
0.5 in. 9.5 in. 13.0 in. 0.5 lbs.
(1.5 cm) (24.0 cm) (33.0 cm) (0 .2 kg)
HEAL PAD®
The Heal Pad is intended to provide a therapeutic environment which aids in the healing of heel and elbow
ischemic ulcers.
Heal Pad sizing specifications:
Cell Height Width Depth Average Weight
0.5 to 1.5 in. 11.5 in. 12.5 in. 0.75 lbs.
(1.5 to 4.0 cm) (29.0 cm) (32.0 cm) (0.3 kg)
MINI-MAX®
The MINI-MAX is intended for users who:
• Need sitting and shearing pressures minimized • Are active
• Are at low risk for skin breakdown • Need skin protection
• Require shock and impact absorbtion
MINI-MAX sizing specifications:
Cell Height Smallest Width Smallest Depth Largest Width Largest Depth Average Weight
1.25 in. 15.0 in. 15.0 in. 18.0 in. 18.0 in. 2.0 lbs.
(3.0 cm) (38.0 cm) (38.0 cm) (45.5 cm) (45.5 cm) (1.0 kg)
PACK-IT®
The PACK-IT is intended for users who:
• Require shock and impact absorbtion • Are active
• Have short term needs such as athletic competition, bathing, traveling; or scapular, sacral or lumbar
support
PACK-IT sizing specifications:
Cell Height Width Depth Weight
1.0 in. 16.0 in. 9.5 in. 1.0 lb.
(2.5 cm) (40.5 cm) (24.0 cm) (0.5 kg)
INTENDED USES & PRODUCT SPECIFICATIONS:

3
PRODUCT SPECIFICATIONS:
Note: The average weights are based on median sized cushioning devices.
Note: Refer to Customer Service for specific cushioning device sizes.
RECLINER CUSHION
The Recliner Cushion is specially made to the dimensions of the client's chair and is intended to provide back
and seating surface protection. If you are using a wheelchair with a sling seat, ROHO, Inc. recommends the
use of the ROHO Contour Base, the ROHO Solid Seat Insert, or a drop seat in conjunction with your Recliner
Cushion for best positioning results.
Recliner Cushion sizing specifications:
Contact ROHO Customer Service for details.
SHOWER/COMMODE SEAT
The Shower/Commode Seat cushion is designed to fit a shower/commode chair and is intended for users who:
• Are at moderate risk to high risk for skin breakdown • Have partial or no sensation
• Are able to perform independent weight shift
Shower/Commode Seat sizing specifications:
Cell Height Smallest Width Smallest Depth Largest Width Largest Depth Average Weight
2.5 in. 15.0 in. 15.0 in. 16.0 in. 18.0 in. 2.0 lbs.
(6.5 cm) (38.0 cm) (38.0 cm) (40.5 cm) (45.5 cm) (1.0 kg)
TOILET SEAT
The Toilet Seat cushion is designed for standard size toilets and portable bedside commodes. It is intended
to provide stability and aid in securely positioning the user while helping to protect from a potential risk of
tissue breakdown.
Toilet Seat sizing specifications:
Cell Height Width Depth Weight
1.0 to 2.5 in. 7.0 in. 15.0 in. 1.25 lbs.
(2.5 to 6.0 cm) (18.0 cm) (38.0 cm) (0.6 kg)
LUMBAR SUPPORT
The Lumbar Support cushion is intended to help provide relief from back pain or fatigue.
Lumbar Support sizing specifications:
Cell Height Width Depth Weight
4.0 in. 6.0 in. 15.0 in. 1.25 lbs.
(10.0 cm) (15.0 cm) (38.0 cm) (0.6 kg)
SACRAL SUPPORT
The Sacral Support cushion is intended to help prevent sacral sores and encourage proper positioning.
Sacral Support sizing specifications:
Contact ROHO Customer Service for details.

4
CAUTIONS
THE ADAPTOR AND DRY FLOATATION CUSHIONING DEVICES:
• CHECK INFLATION AT LEAST ONCE A DAY!
• WEIGHT LIMIT: The cushioning device should be correctly sized to the user. No weight limit on neoprene ROHO
products if the product has been correctly sized to the user.
• CUSHIONING DEVICE ORIENTATION: Product must be used with the air cells facing the user. For products with
a provided cover, if the cover is not used correctly or if the cover is the wrong size, it may reduce or eliminate the
cushioning device's benefits and could increase risk to the skin and other soft tissue.
• PUNCTURE: Keep your cushioning device away from sharp objects, which may puncture the air cells and cause it to
deflate.
• HEAT/FLAME: DO NOT expose your cushioning device to high heat, open flames or hot ashes.
• DO NOT use on top another cushioning product.
• OBSTRUCTIONS: DO NOT place any obstructions between the user and the cushioning device, as it will reduce product
effectiveness.
• HANDLING: DO NOT use any valve as a handle for carrying or pulling your cushioning device. Carry your cushioning
device either by the yellow nylon carrying rope (when applicable), the cover’s carrying handle, or by holding the
cushioning device's base.
• SOLUTIONS: DO NOT allow oil-based lotions or lanolin to come in contact with your cushioning device, as they may
degrade the material.
• OZONE GENERATORS: Prolonged exposure to ozone will degrade materials used in your cushioning device and
may affect the performance of your product and invalidate the product warranty. Avoid prolonged exposure of the
cushioning device to direct sunlight or other sources of ultraviolet (UV) light.
• PRODUCT USE: DO NOT use your cushioning device as a water flotation device (e.g., a Life Preserver).
DRY FLOATATION CUSHIONING DEVICES ONLY:
• UNDER-INFLATION: DO NOT use an under-inflated cushioning device. Using a cushioning device that is under-
inflated reduces or eliminates the cushioning device’s benefits, increasing risk to the skin and other soft tissue. If
your cushioning device does not appear to be holding air, check to make sure that all valve(s) are closed by turning
the inflation valve(s) clockwise. If your cushioning device is still not holding air, contact your clinical caregiver,
distributor, or ROHO, Inc. immediately.
• OVER-INFLATION: DO NOT use an over-inflated cushioning device. An over-inflated cushioning device will not conform
to the user's shape and will reduce or eliminate the cushioning device’s benefits increasing risk to the skin and other
soft tissue.
• PRESSURE: Changes in altitude may require adjustment to your cushioning device. Check your cushioning device
when changing altitude of 1,000 feet (300 meters) or greater.
• CLIMATE: If a cushioning device has been in temperatures less than 32°F (0°C) and exhibits unusual stiffness, allow
the cushioning device to warm to 72°F (22°C), then open inflation valve. Roll up the cushioning device and then
unroll it until the neoprene is soft and pliable again. Repeat proper adjustment instructions before using.
• DO NOT use any pump, cover, or repair kit other than those provided by ROHO, Inc. Doing so may damage the
cushioning device and void your product's warranty.

5
ADJUSTMENT INSTRUCTIONS FOR:
• HEAL PAD
NOTE: DO NOT use an improperly
inflated cushioning device. Under-
inflation and over-inflation of the
air cells reduce or eliminate the
product's benefits and could increase
risk to the skin and other soft tissue.
The Heal Pad is most effective when
there is 1/4 inch (.5 cm) to 1 inch
(2.5 cm) of air between the user's
heal/elbow and the base of the
HEAL PAD.
STEP 1 Lay HEAL PAD flat, with
the cells facing up.
STEP 2 Turn valve counterclockwise to open. Slide pump's rubber
nozzle over the valve and inflate until cells are firm.
STEP 3 Pinch the pump's rubber
nozzle and turn valve clockwise
to close. Remove pump.
STEP 7 Enclose smaller pad section
around the sole of the foot and
fasten snaps on either side to form
a closed-end around heel/elbow.
STEP 8 Place foam tab over shin/
arm, loop Velcro® strap through
metal ring, and adjust strap to
desired firmness.
STEP 4 With pad in this over-
inflated condition, place the
individual’s heel/elbow on the
ADJUSTMENT INSTRUCTIONS FOR:
• THE ADAPTOR
Each of the AIR SPRING® ADAPTOR's cells is independently sealed, allowing it to be cut to fit various shapes
such as sides of wheelchairs, trays, head and foot rests, inside of helmets, or anywhere uncontrolled
movement may need protection. The ADAPTOR should be cut with scissors to the shape of the surface to
which it will be applied. Cut between the air cells when possible. Air cells that are cut will provide no
cushioning. ROHO, Inc. suggests using hook and loop fastener strips for attachment.
low height cells which make a
“V” area. The higher cells should
contact the back of the leg/arm.
STEP 5 The heel/elbow should
barely engage the low height
cells. If not, release air by turning
valve counterclockwise until
desired contact is achieved.
STEP 6 Visually or with a finger,
check to ensure that the heel/
elbow is not touching the base of
the HEAL PAD.

6
STEP 1 Place cushioning deviceon
surface,making suretheaircells
face the user(Usedirectionallabels
asaguide). Ifapplicable,secure
thecushioningdevicetothesurface
usingitsstrapsand/or snaps.
STEP 3 Slide the pump’s rubber
nozzle over the valve and inflate
the cushioning device until it
begins to arch.
STEP 4 Pinch the pump's nozzle
and turn valve clockwise
to close. Remove pump. If
applicable, repeat steps 1-4 for
remaining valves.
STEP 5 Have the user sit,
making sure the cushioning
device is properly placed. The
user should be seated in their
normal sitting position.
ADJUSTMENT INSTRUCTIONS FOR:
• MINI-MAX • PACK-IT • RECLINER CUSHION • SHOWER/COMMODE
• TOILET SEAT • LUMBAR SUPPORT • SACRAL SUPPORT
STEP 6 Slide your hand
between the cushioning
device’s surface and the
user. Feel for their boniest
prominence.
NOTE: DO NOT use an improperly inflated cushioning device. Under-inflation and over-inflation of the
cushioning device sections reduce or eliminate the cushioning device's benefits and could increase risk
to the skin and other soft tissue. Follow the specifications in theadjustment instructions.
STEP 2 Ifthe userwill siton the
cushioning device,theairvalve
should beintheuser'sfront, left
corner. Consult yourprescriber about
alternativepositionsofairvalves.
Turnvalvecounterclockwise toopen.
STEP 7 Turn valve counterclockwise to let out air, while keeping your hand
under the person’s boniest prominence. Release air until you can barely
move your finger tips – nomorethan1 inch (2.5 cm). ForMINI-MAX and
PACK-IT, no less than 1/4 inch (.5 cm), andfor ReclinerCushion, Lumbar
Support, Sacral Support,Shower/Commode, and Toilet Seat, no less than
1/2" (1.5 cm). Turn valve clockwiseto close.

7
COVER REMOVAL & REPLACEMENT:
While a cover is not required, a ROHO cover is included with every MINI-MAX, PACK-IT and Recliner Cushion to
help keep the cushioning device in place.
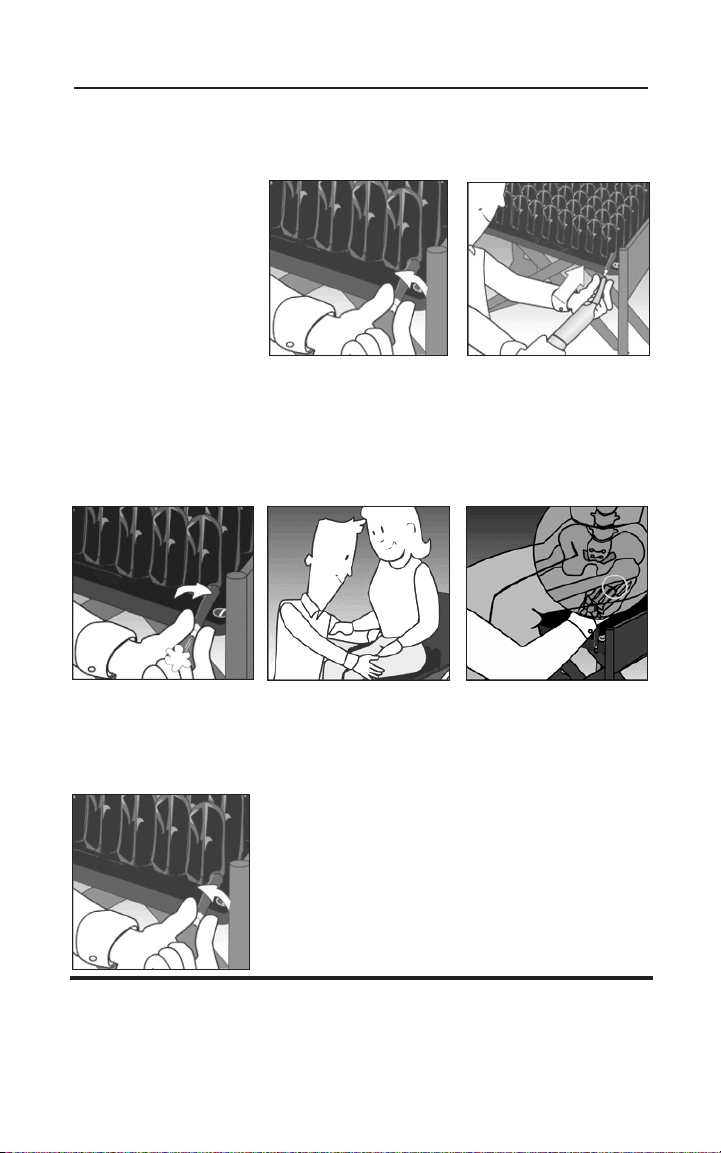
To cover your cushioning device:
1. Unfold the cover with the non-skid material facing upward and zipper facing you.
2. Insert your cushioning device into the cover with the air cells down.
3. Carefully, close the zipper and turn the cushioning device over so cells are facing up. Your cushioning
device is now ready for use as long as it has been properly adjusted (see Adjustment Instructions in this
manual).
If properly fitted, the cushioning device will lay flat on the surface (non-skid material on the bottom) with all
cells covered.
To remove the cover: Unzip and gently remove the cover from the cushioning device.
CLEANING & DISINFECTING YOUR PRODUCT:
Cleaning and disinfecting are two separate processes. Cleaning must precede disinfection. Product must be
cleaned, disinfected, and checked for proper functioning between multiple patient use.
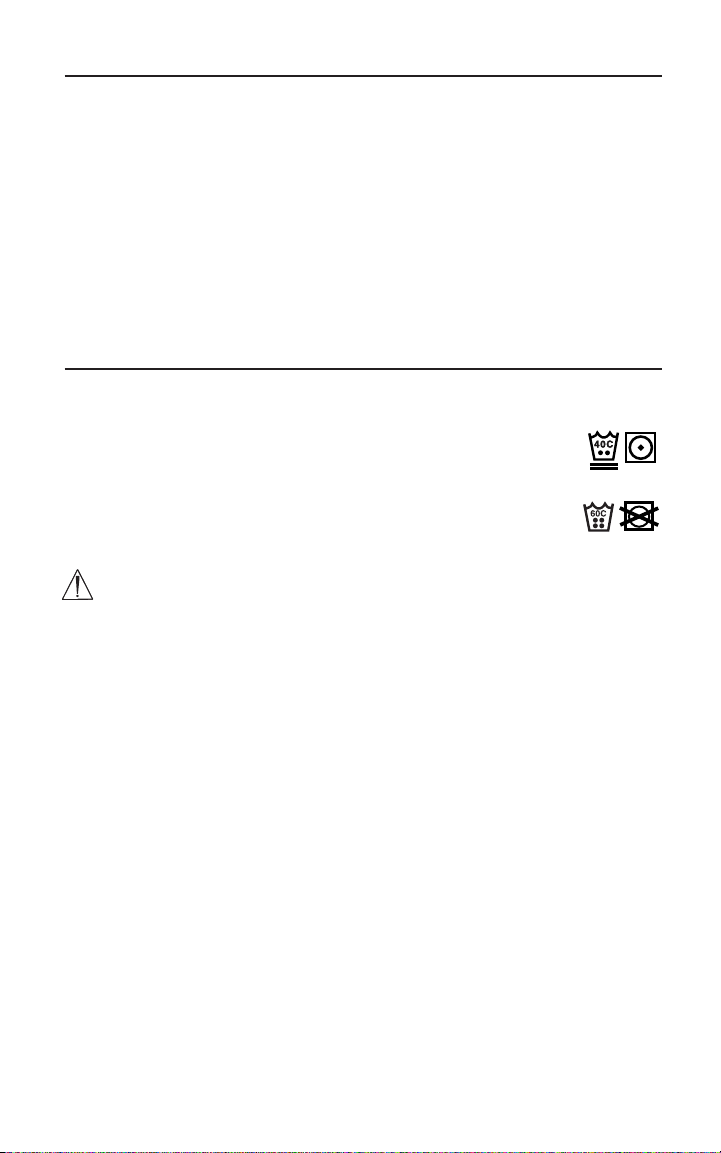
To Clean the Cover: First remove the cover from the cushioning device. Machine wash in
warm water (40°C) with mild detergent, gentle cycle, or wipe clean with neutral detergent
and warm water. Tumble dry low.
To Disinfect the Cover: Hand wash in warm water using 1/2 cup household liquid bleach per
quart of water (125 ml bleach to 1 liter of water), then rinse thoroughly. The cover can also be
machine washed in hot water (60°C) to disinfect. Air dry.
Note: Follow safety guidelines on bleach container.
To Clean the Cushioning device: Remove the cover, close valve(s) and place in large sink. Use a soft plastic
bristle brush, sponge or washcloth to gently scrub all surfaces. ROHO, Inc. suggests using a dishwashing
soap, laundry detergent, or other multi-purpose detergent used for general cleaning. For institutional
cleaning, a general housekeeping disinfectant cleaner may be used. Rinse with fresh water. Pat dry with
towel or air dry.
To Disinfect the Cushioning device: Repeat cleaning instructions above using a germicidal that meets
infection control needs (ROHO, Inc. suggests a disinfectant with tuberculocidal properties). A solution of 1/2
cup liquid household bleach per quart of warm water (125 ml bleach to 1 liter of warm water) can also be
used. Keep the clean cushioning device wet with bleach solution for 10 minutes. Rinse and dry per cleaning
instructions. Note: Most germicidal disinfectants are safe if used following the disinfectant manufacturer’s
dilution directions.
To Sterilize the Cushioning device: ROHO, Inc. highly discourages sterilization methods using temperatures
greater than 200°F (93°C). High temperatures accelerate aging and may cause damage to the cushioning
device. If institution protocol demands sterilization, open the valves and use the lowest temperature possible
for the shortest time possible. Gas sterilization is preferable to steam autoclave, but neither is recommended.
If steam autoclaving, make sure all valves are open.
NOTE: DO NOT useoil-based lotions, lanolin, or phenolic-based disinfectantson your cushioningdevices as they may
compromise the integrityof the neoprene.

8
TROUBLESHOOTING:
Not Holding Air: First, make sure all valves are closed tightly by turning valves clockwise. If still not
holding air, visibly check for holes. If no holes are visible, close the valve and immerse an inflated
section in sink or tub of water and look for air bubbles.
If ‘pin-hole,’ sized holes are found, see “Minor Repairs” below. If large holes or other leaks are found,
see “Repair Program” below.
Uncomfortable/Unstable: Make sure product is not over-inflated. (see Adjustment Instructions). Make
sure air cells and the cover’s stretch top are facing user. Make sure cushioning device is not too big or
too small for the surface. Allow the user to use the cushioning device for at least one hour to get use
to the texture of the product’s surface and immersion into the air cells.
Cushioning Device Slides: Make sure non-skid bottom of the cover is facing away from user. Use
directional labels on cushioning device and cover. Ensure straps and/or snaps are securely fastened.
REPAIRS:
MINOR REPAIRS:
If your product develops a leak, use the repair kit that came with your product and follow the repair kit
instructions. (Not included with The ADAPTOR)
DISPOSAL:
When properly used and disposed, there are no known environmental hazards associated with
the components of the products in this manual. Dispose of the product and/or components in
accordance with the applicable regulations in your jurisdiction. DO NOT INCINERATE.

9
LIMITED WARRANTY:
What is covered?
ROHO, Inc. covers any defects in materials or workmanship of the product. Any substitutions of
supplied hardware will void the warranty.
For how long?
24 months from the date the product was originally purchased with the exception of covers,
which have a 6-month limited warranty.
What we will do.
Within a reasonable amount of time after you return the product to us, we will repair any defect
in material and workmanship and ship it back to you, all free of charge.
What we will not do.
We will not repair free of charge a product if it has been misused, damaged by an accident, or
damaged from " an act of Nature", e.g., flood, tornado, earthquake, fire.
Disclaimer.
Any implied warranties, including the MERCHANTABILITY and FITNESS FOR A PARTICULAR
PURPOSE are also limited to warranties stated above from the date of original purchase
and any action for a breach of such warranties or any express warranties herein must be
commenced within this time. ROHO, Inc. shall not be responsible for any incidental or
consequential damages with respect to economic loss or injuries to property, whether as
a result of a breach of express or implied warranties, or otherwise. ROHO, Inc. will not
be responsible for the results of careless handling, unreasonable or improper use of this
product.
Your Rights and the Effect of this Warranty upon Them.
This warranty restricts the duration of all implied warranties as noted above and limits or
excludes recovery for incidental or consequential damages. Some jurisdictions do not allow
limitations on how long implied warranties will last and some jurisdictions do not allow the
exclusion or limitation of consequential or incidental damages, so those provisions may not
apply to you. While this warranty gives you specific legal rights, you may also have other
rights which vary from jurisdiction to jurisdiction.
This manual suits for next models
9
Table of contents
Other ROHO Personal Care Product manuals