manuals.online logo
Brands
  1. Home
  2. •
  3. Brands
  4. •
  5. ROLA-CASE
  6. •
  7. Indoor Furnishing
  8. •
  9. ROLA-CASE Rola-Shelf RSCSBRPM118136159 User manual

ROLA-CASE Rola-Shelf RSCSBRPM118136159 User manual

ALL DESIGN CONCEPTS ARE INTELLECTUAL PROPERTY OF ROLACASE AND ARE NOT TO BE COPIED, DISTRIBUTED OR COMMUNICATED TO UNAUTHORISED PARTIES
FOR TECHNICAL SUPPORT CALL: 1 (857) 334 0300 / EMAIL: [email protected] / WEB: www.rolacase.com
ATTENTION: PLEASE READ ALL INSTRUCTIONS BEFORE ASSEMBLING/INSTALLING THIS PRODUCT
ANY ALTERATIONS, UNINTENDED OR UNAPPROVED WORK/USE OF THIS PRODUCT COULD CREATE A
HAZARDOUS CONDITION THAT CAN CAUSE DEATH, PERSONAL INJURY OR PROPERTY DAMAGE.
WARNING
ATTENTION
IMAGES USED IN THIS GUIDE MAY VARY SLIGHTLY DEPENDING ON YOUR MODEL
BEFORE YOU BEGIN:
•THE AVERAGE EXPECTED INSTALL TIME FOR THIS PRODUCT IS 15 MINUTES
•READ ALL THE INSTRUCTIONS BEFORE ASSEMBLY & INSTALLATION
•ENSURE YOU HAVE SOME ASSISTANCE FROM A SECOND PERSON TO AVOID VEHICLE
DAMAGE OR ANY PERSONAL INJURY
•BE AWARE ON THE LOCATION OF VEHICLE WIRING, GAS TANKS, GAS LINES, BRAKE
LINES, & ANY OTHER IMPORTANT ITEMS
•ENSURE IT IS SAFE BEFORE DRILLING OR CUTTING ANYWHERE ON THE VEHICLE &
INSTALLING ANY OF OUR PRODUCTS
•CONFIRM YOU HAVE ALL THE NECESSARY PARTS, TOOLS, EQUIPMENT, & TIME
REQUIRED BEFORE COMMENCING
TOOLS REQUIRED:
Screw Drivers Cordless Drill with
Torque settings
Rachet, sockets,
and/or spanners
RSCSBRPM118136159
Please note: Deep
setbacks come in a
pair to suit left and
right sides
INSTALLATION MANUAL
RSCSBRPM118136159
(RolaCase Ram ProMaster Deep Setbacks)
PART No. RSCSBRPM118136159 suits our RSCGBRPM118136159
(sold
separately)
partition that fits the following vehicles:
•20142021 RAM PROMASTER 1500 STD & HIGH ROOF, 118”,136” & 159” W/B
•20142021 RAM PROMASTER 2500 STD & HIGH ROOF 136” & 159” W/B
•20142021 RAM PROMASTER 3500 STD & HIGH ROOF 136” & 159” W/B
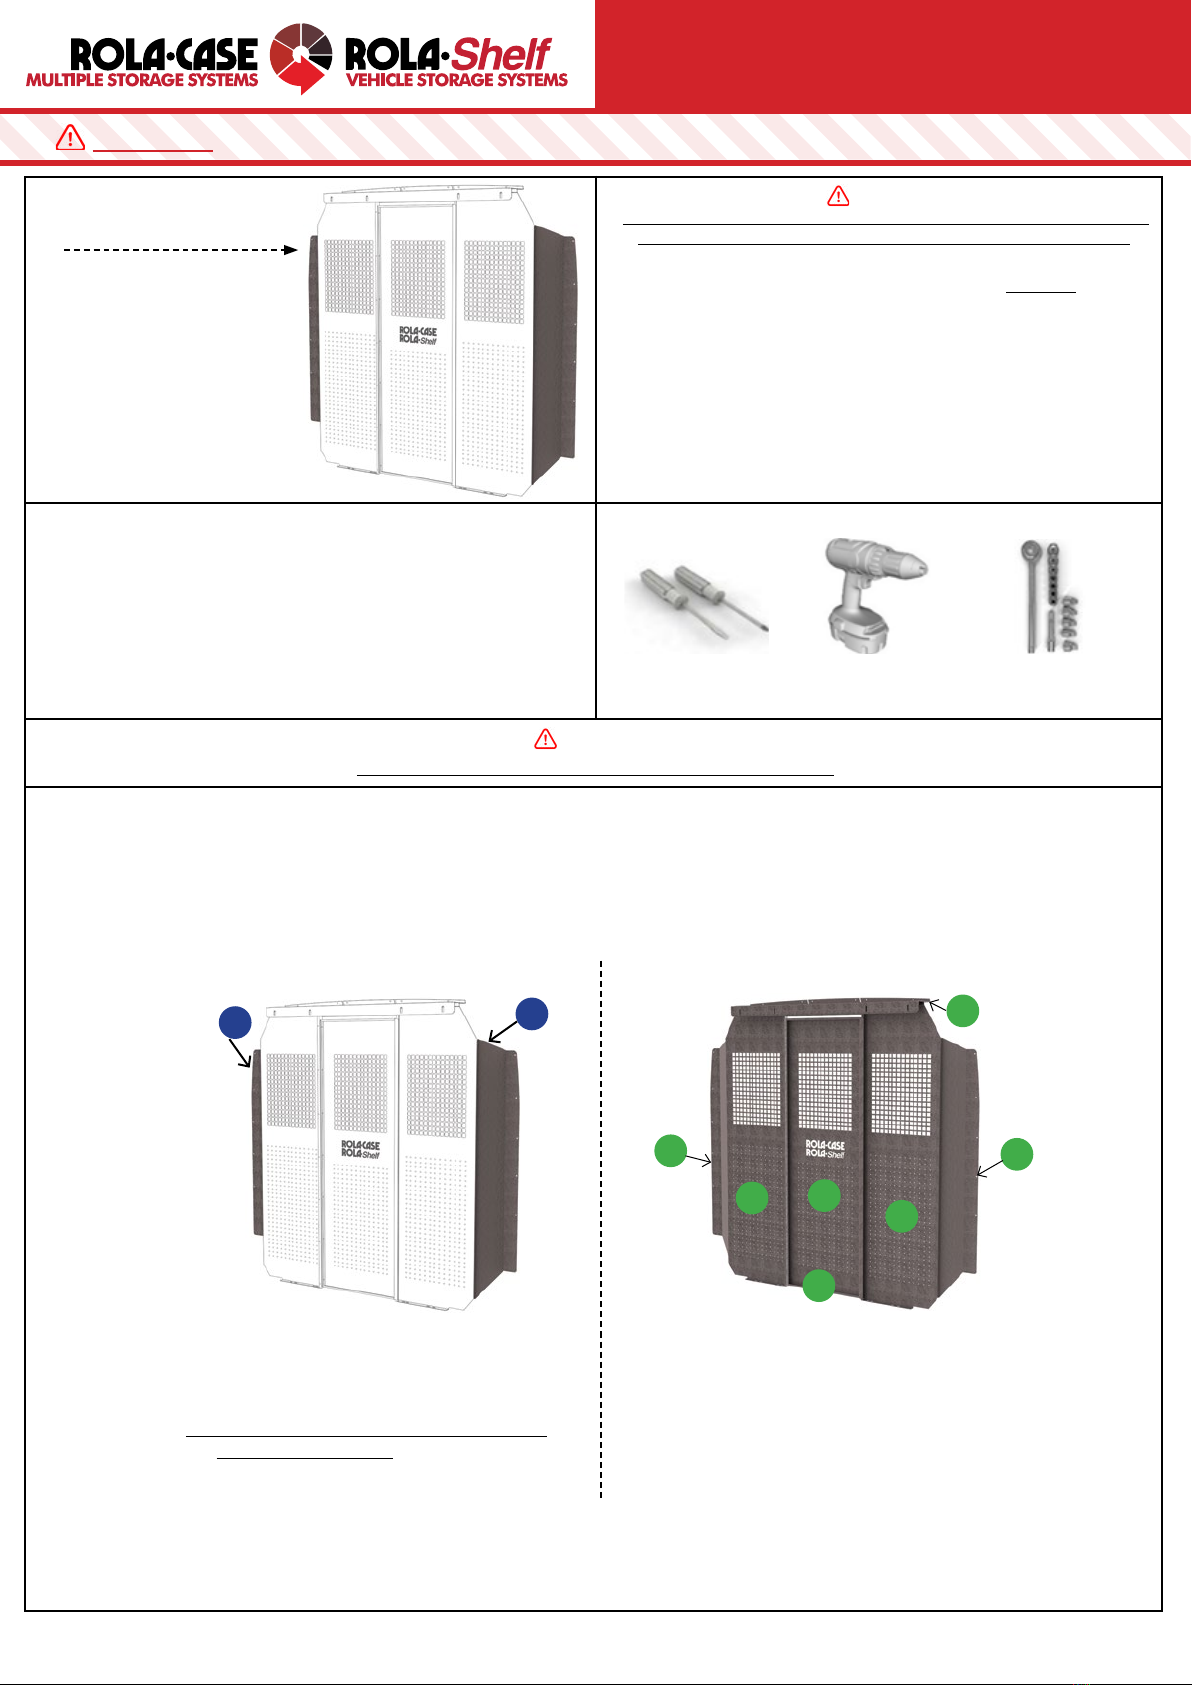
The RolaCase Ram ProMaster Deep Set-Back converts your default partition for an additional 2.5”in of cabin space which allows for a deeper seat recline and more storage
between the seats and the partition.
These deep setbacks are designed to complement the Rolacase Partition/Bulkhead for the Ram ProMaster (kit part#: RSCGBRPM118136159 -
sold separately
) below you can
see a composition for the Deep Setbacks and Partition
(sold separately)
Part #6 and #7 is simply substituted for this High Roof component using the same hardware and instructions provided in that kit. A recap of the original partition instructions
can be found on the next section.
A. R/H Standard Deep Setback
B. L/H Standard Deep Setback
BA
DEEP SETBACKS PARTS PARTITION PARTS - SOLD SEPARATELY
1. Upper Cross Mount Beam
2. Upper Mid Roof Header Panel
3. Centre Panel
4. R/H side Panel
5. L/H side Panel
6. R/H standard shallow Setback
7. L/H standard shallow Setback
8. Lower Brace
6
4
53
7
1
8
NOT VISIBLE can be
seen from cabin side
USE HARDWARE PROVIDED WITH PARTITION
RSCGBRPM118136159
SOLD SEPARATELY
A
B
ALL DESIGN CONCEPTS ARE INTELLECTUAL PROPERTY OF ROLACASE AND ARE NOT TO BE COPIED, DISTRIBUTED OR COMMUNICATED TO UNAUTHORISED PARTIES
FOR TECHNICAL SUPPORT CALL: 1 (857) 334 0300 / EMAIL: [email protected] / WEB: www.rolacase.com
ATTENTION: PLEASE READ ALL INSTRUCTIONS BEFORE ASSEMBLING/INSTALLING THIS PRODUCT
ANY ALTERATIONS, UNINTENDED OR UNAPPROVED WORK/USE OF THIS PRODUCT COULD CREATE A
HAZARDOUS CONDITION THAT CAN CAUSE DEATH, PERSONAL INJURY OR PROPERTY DAMAGE.
WARNING ATTENTION
IMAGES USED IN THIS GUIDE MAY VARY SLIGHTLY DEPENDING ON YOUR MODEL
INSTALLATION MANUAL
RSCSBRPM118136159
(RolaCase Ram ProMaster Deep Setbacks)
A Begin by locating the Upper Cross Beam and the Upper Mid or High Roof Header
Panel. Assemble the two products together using 9x “M8 x 20mm” bolts and Nyloc
nuts provided, refer to image below:
B Locate the Centre Panel, R/H side Panel, and the L/H side Panel. If you have
purchased the “Swing Door & Lock Kit”, please follow the instructions in that kit, oth-
erwise assemble the three products together using 14x “M6 x 12mm” bolts and Nyloc
nuts provided, refer to next image:
C Secure the assembled Upper Beam to the top of the assembled partition using 4x
“M8 x 20mm” bolts and Nyloc nuts provided. Ensure you assemble the partition
to the inside of face “A” on the cross beam for a standard setback. If you
have purchased the optional Deep Setbacks, assemble the partition to the
inside of face “B” on the cross beam which would be closest to the rear of
the vehicle, refer to image below:
D Locate the R/H setback Panel, and the L/H Setback Panel. Note that If you have
purchased the optional “Deep Setback Kit”, please use those Setbacks in
place of the standard ones, otherwise assemble as standard by securing the two
products to both corresponding Side Panels using 14x “M6 x 12mm” bolts and Nyloc
nuts provided. Ensure the flat washers are used on the slotted side, refer to image
below:
1
2
3
4
5
6
7 8
9
10
11
12
13
14
1
2
3
4
5
6
12
11
10
9
8
7
13
14
ALL DESIGN CONCEPTS ARE INTELLECTUAL PROPERTY OF ROLACASE AND ARE NOT TO BE COPIED, DISTRIBUTED OR COMMUNICATED TO UNAUTHORISED PARTIES
FOR TECHNICAL SUPPORT CALL: 1 (857) 334 0300 / EMAIL: [email protected] / WEB: www.rolacase.com
ATTENTION: PLEASE READ ALL INSTRUCTIONS BEFORE ASSEMBLING/INSTALLING THIS PRODUCT
ANY ALTERATIONS, UNINTENDED OR UNAPPROVED WORK/USE OF THIS PRODUCT COULD CREATE A
HAZARDOUS CONDITION THAT CAN CAUSE DEATH, PERSONAL INJURY OR PROPERTY DAMAGE.
WARNING ATTENTION
IMAGES USED IN THIS GUIDE MAY VARY SLIGHTLY DEPENDING ON YOUR MODEL
REV 1.1.1
FFor furor furthther details please goer details please go
tto wwwo www.r.rolacaseusa.comolacase.com
INSTALLATION MANUAL
RSCSBRPM118136159
(RolaCase Ram ProMaster Deep Setbacks)
E Now that the partition unit is fully assembled, use two people to lift the assembly
into the van via the side door and position into place
F Mark out the 6 positions on the factory roof beam frame that match the upper
partition header panel. Refer to the “A to F” orange bubble points in image below.
Note some models already have holes here in the correct positions
G Mark out 4 positions on the factory corrugated floor where you will secure the base
of the Left and Right side partition panels. Note that there are 4 slotted holes per side
however you will only use 2 points per side where the high ridges of the floor meets
up against the base of the partition panels. Refer to the “G to K” red bubble points in
the image below
H Use two people to temporarily move the partition out of the way
I If necessary, drill the 6 points on the factory roof beam that you previously marked
out to secure the 6x “M6” Rivet Nuts supplied, these would be the “A to F” orange
bubble points in the image below
J Drill the 4 points on the factory floor that you previously marked out to secure the
4x “M8” Rivet Nuts supplied, these would be the “G to K” red bubble points on the
next image
K Use two people to reposition the partition in the correct and final resting place
L Insert the 10x “M6 x 20mm” pan bolts and spring washers through the partition
wings and into the factory captive nuts on the “B pillar” of the vehicle. There are 5
bolts per side setback wing, 10 bolts in total. Refer to the “1 to 10” blue points in the
image above
M Insert the 6x “M6 x 20mm” pan bolts and spring washers through the header
panel and into the Rivet Nuts on the roof pillar of the vehicle. Refer to the “A to F”
orange bubble points in the image above
N Insert the 4x “M8 x 20mm” hex bolts and spring washers through the side panels
and into the Rivet Nuts on the floor of the vehicle. There are 2 bolts per side, 4 bolts
in total. Refer to the “G to K” red bubble points in the image above
O Go back through and tighten all bolts securing the partition assembly to the vehicle
1
I
K
G
H
AABBCCDDEEFF
2
3
4
5
6
7
8
9
10

Other ROLA-CASE Indoor Furnishing manuals

ROLA-CASE RSCSBFT130148MH20 User manual

ROLA-CASE

ROLA-CASE RSCSBFT130148MH20 User manual

ROLA-CASE RSPEP User manual

ROLA-CASE

ROLA-CASE RSPEP User manual

Popular Indoor Furnishing manuals by other brands

JOB LEVANTE Assembly instruction

JOB

JOB LEVANTE Assembly instruction

Safavieh Furniture AMH5737 quick start guide

Safavieh Furniture

Safavieh Furniture AMH5737 quick start guide

BIG FURNITURE WAREHOUSE NORDICA 2 DRAWER LOW COFFEE TABLE Assembly instructions

BIG FURNITURE WAREHOUSE

BIG FURNITURE WAREHOUSE NORDICA 2 DRAWER LOW COFFEE TABLE Assembly instructions

Bon Pergola Villa Pergola Double Bay User instructions

Bon Pergola

Bon Pergola Villa Pergola Double Bay User instructions

kupper 70400 Assembly instructions

kupper

kupper 70400 Assembly instructions

Next MALVERN 120816 Assembling instructions

Next

Next MALVERN 120816 Assembling instructions

realspace Broadstreet Controlled U-Shaped Desk Assembly instructions and warranty information

realspace

realspace Broadstreet Controlled U-Shaped Desk Assembly instructions and warranty information

SAFAVIEH COUTURE SFV4738 quick start guide

SAFAVIEH COUTURE

SAFAVIEH COUTURE SFV4738 quick start guide

Kettal Phone Booth Assembly manual

Kettal

Kettal Phone Booth Assembly manual

Living Spaces Scottsdale 51030862 Assembly instructions

Living Spaces

Living Spaces Scottsdale 51030862 Assembly instructions

atmosphera SLANO 184908MOD manual

atmosphera

atmosphera SLANO 184908MOD manual

Home Decorators Collection 19084-VS61-AW Assembly instructions

Home Decorators Collection

Home Decorators Collection 19084-VS61-AW Assembly instructions

American Signature VCF 57227 Assembly instructions

American Signature

American Signature VCF 57227 Assembly instructions

Lightolier ALTER METALYTE QVS2GPTOS332 specification

Lightolier

Lightolier ALTER METALYTE QVS2GPTOS332 specification

Alaterre Furniture Jasper AJJP00P0 Assembly instructions

Alaterre Furniture

Alaterre Furniture Jasper AJJP00P0 Assembly instructions

New Classic Furniture D1701-22 Assembly instructions

New Classic Furniture

New Classic Furniture D1701-22 Assembly instructions

Dormiente MORELL Assembly instruction

Dormiente

Dormiente MORELL Assembly instruction

Next MODE 450433 Assembly instructions

Next

Next MODE 450433 Assembly instructions

manuals.online logo
manuals.online logoBrands
  • About & Mission
  • Contact us
  • Privacy Policy
  • Terms and Conditions

Copyright 2025 Manuals.Online. All Rights Reserved.