Roland MC-202 User manual

^Roland®
MC-
Owner's Manua


[^Roland
MicroComposer
k
>
aaaaa
aaaa
aaaa
aaa
aaaa
aaaa
aaaa
aaaa
aaa
aaa
aaa
aaa aaaaaa
aaaaaa aa
aaaaaa aa
aaa aa
aaa aa.
aaa aa.
aaa aa^
aar aai
ar aai
aaaaaak
aaaaaaai
aaaaaaai
aaaaaaai
aaai
aaai
aaaaaaai
aaaaaaai
aaaaaaar
aaaaaar
aaaaaaai
aaaaaaai
aaaaaaai
aaaaaaai
aaa
aaa
aaa
aaa
aaa
aaa
raa
aaa
aaa
aaaaaaaaat,
aaaaaaaaaa
aaaaaaaai
aaaaaaaai
aaaaaaaaaa
a^aaaaaaaaaap
aaaaaa^
aaaaaaa
aaaaaaa
aaaaaaa
aaa
aa
aaaaaaa
aaaaaaa.
aaaaaaai
aaaaaar
aaaaaaaa
aaaaaaaa
aaaaaaaa
aaaaaaaa
OWNER'S MANUAL
UlHijit #tMVilli,
11
1
:zi JG3SCpMJI
'-?
zn .Tfmm


FEATURES
The IVlC-202 is a2channel microcom-
poser incorporating amonophonic syn-
thesizer.
Microcomposer section
You can spontaneously enter music data
just by typing the NUMBER keys or
STEP keys, or by playing the keyboard
along with the metronome.
Attributes such as Accent and Porta-
mento may be entered as apart of the
music data.
By setting up another monophonic syn-
thesizer (1V/0ct), y.ou can play 2voice
music.
The built-in Tape Interface enables you
to save the entered music data into an
ordinary cassette tape.
The MC-202 offers a total memory
capacity of 2600 steps (approx. 150
measures with 8steps in each measure).
Also, the display window tells you how
many more steps you may enter.
The Liquid Crystal Display (LCD) in-
dicates the current information (data)
or tempo, etc.
Abeep will be heard if the operation
has been correctly done.
Synthesizer section
This is ahigh quality synthesizer with
1V/Oct system.
This keyboard covers up to 9octaves by
changing the VCO range, SUB OSCand
TRANSPOSE.
Jacks and others
3DIN sockets (IN x1, OUT x2) are
provided on the MC-202 for synchroniz-
ing with an external sequencer or
rhythm machine that also includes the
same DIN jack.
The MC-202 is also provided with a
CV and aGATE jacks (IN x1, OUT
x2) to control the external keyboard
(IV/Oct), or to enter the data by an
external keyboard.
By using the Tape Sync function, you
can record the Synchro signal onto a
tape, and later dub anew part by syn-
chronizing the MC-202 with that signal.
The MC-202 is AC and Battery Powered
(AC adaptors BOSS PSA- 120, 220 or
240 are optional), and the Display
Window tells you if the batteries are
low.
Provided with an excellent VCF with
sharp cutoff slope of 24 dB.

Contents
Important Notes
Power Supply
Location
Cleaning
LCD
Cautions
How to replace the batteries
Others
Q] Introduction 8
dPanel Descriptions and
Connections 9
A. Panel Descriptions
B. Connections
DEntering data (Basic) 11
A. Setting the synthesizer
B. Entering the data with the STEP, GATE
and NUMBER keys.
1
.
Entering the Pitch •
2. Editing the Step Time and the Gate
Time
3. Editing with the STEP keys and
GATE keys
Entering the dotted notes and dotted
rests
Entering the rest
4. Playing
5. Editing the Step Time with the
NUMBER keys
6. How to return to the first step in the
first measure in the Edit mode
7. Editing the Gate Time with the
NUMBER keys
Example (1)
8. How to enter the Bars
C. Entering the data by playing the key-
board
1
.
Connections
2. Operation
Entering the Music Data other than
4/4 time
D. Entering the Pitch data by playing the
keyboard and Rhythm data by tapping
Entering the Music Data other than
4/4 time
31 Entering data (Advanced) 24
A. Entering data into the CH-2 playing
it
1
.
Connections
2. Tuning
3. Checking the Channel, Entering the
data and Playing
B. Entering Accent and Portamento
1. Entering Accent and Portamento
2. How to enter Accent and Portamen-
to
3. Assigning the Accent effect
C. Useful Functions (in Entering)
1. Moving the data forward and back-
ward
2. Transpose function
D. How to correct the data you have-
tered
1. Correcting the Pitch
2. Correcting the Step Time and the
Gate Time
Using the STEP keys and the GATE
keys
Editing with the NUMBER keys
3. Deleting and Inserting notes
How to delete the notes
How to insert the notes
SI Useful functions by bars 35
A. How to set the bars, etc.
1
.
Measure number display
2. How to forward or back the whole
measure
3. How to recall ameasure
B. Playing and Editing from the measure
you select
1. Playing from the measure you select
2. Editing from the measure you select
Editing with the STEP keys and
GATE keys
Editing by playing the keyboard or
tapping
3. How to delete the whole measure
4. Editing the bars
Adding bars
Deleting bars
Moving the bars
C. How to copy the data
UOther useful functions 41
A. Tempo display

Options 63
B. Memory Capacity Check Sound Range Diagram 59
How to read the Display Window in Case of Trouble 60
Memory Capacity Specifications ....['.'.'.'.'.'.'.'.'.'. 6^
C. Step Number Check
If the Total Step Time is not correct
D. 9and bdisplay
E. Beep sound ON/OFF
Saving the Music Data 44
A. Save, Verify, Load
B. Setting up
C. Operation
1. Save
2. Verify '
3. Load
D. The appropriate tape for saving
Preserving the data tape, etc.
E. Power Save Function
SI Applications 49
A. Integrating the set up of the MC-202
B. Rear Panel
C. Connecting to asynthesizer
1. Controlling the MC-202 by the
external keyboard
Connections
Cautions
Calibration
D. Synchronizing with an external device
1. MC-202 +Sequencer
MC-202 -f- MC-
4
MC-202 -i-CSQ- 600
MC-202 +TB- 303
2. MC-202 -I- Rhythm Machine
MC-202 +TR-808, 606, CR-8000
3. Multiple set up
4. MC-202 -H MC-202
E. Tape Sync (Multi-Track Recording)
How to set up
How to record the synchro signal
How to play the data with the synchro
signal (Multi-Track Recording)

IMPORTANT NOTES
Power Supply
The MC-202 adopts AC and Battery
Powered system.
Use only the BOSS PSA series (PSA-
120, 220 or 240) for AC operation.
Do not turn the POWER switch on
before connecting the AC Adaptor to
the MC-202.
Location
Operating the MC-202 near aneon or
fluorescent lamp may cause noise in-
terference. If so, change the angle of
the MC-202.
Avoid using the MC-202 in excessive
heat or humidity or where it may be
affected by sunlight or dust.
Cleaning
Use asoft cloth and clean only with a
neutral detergent. Do not use solvents
such as paint thinner.
LCD
View the Display from the proper
angle.
Please be careful not to damage the
window.
Cautions
The MC-202's Memory is volatile (i.e.
the data is not retained if the MC-202
is switched off). Therefore, to avoid
accidental erasure of the data, you
may be required to save the data (refer
to P. 45) before turning the MC-202
off.
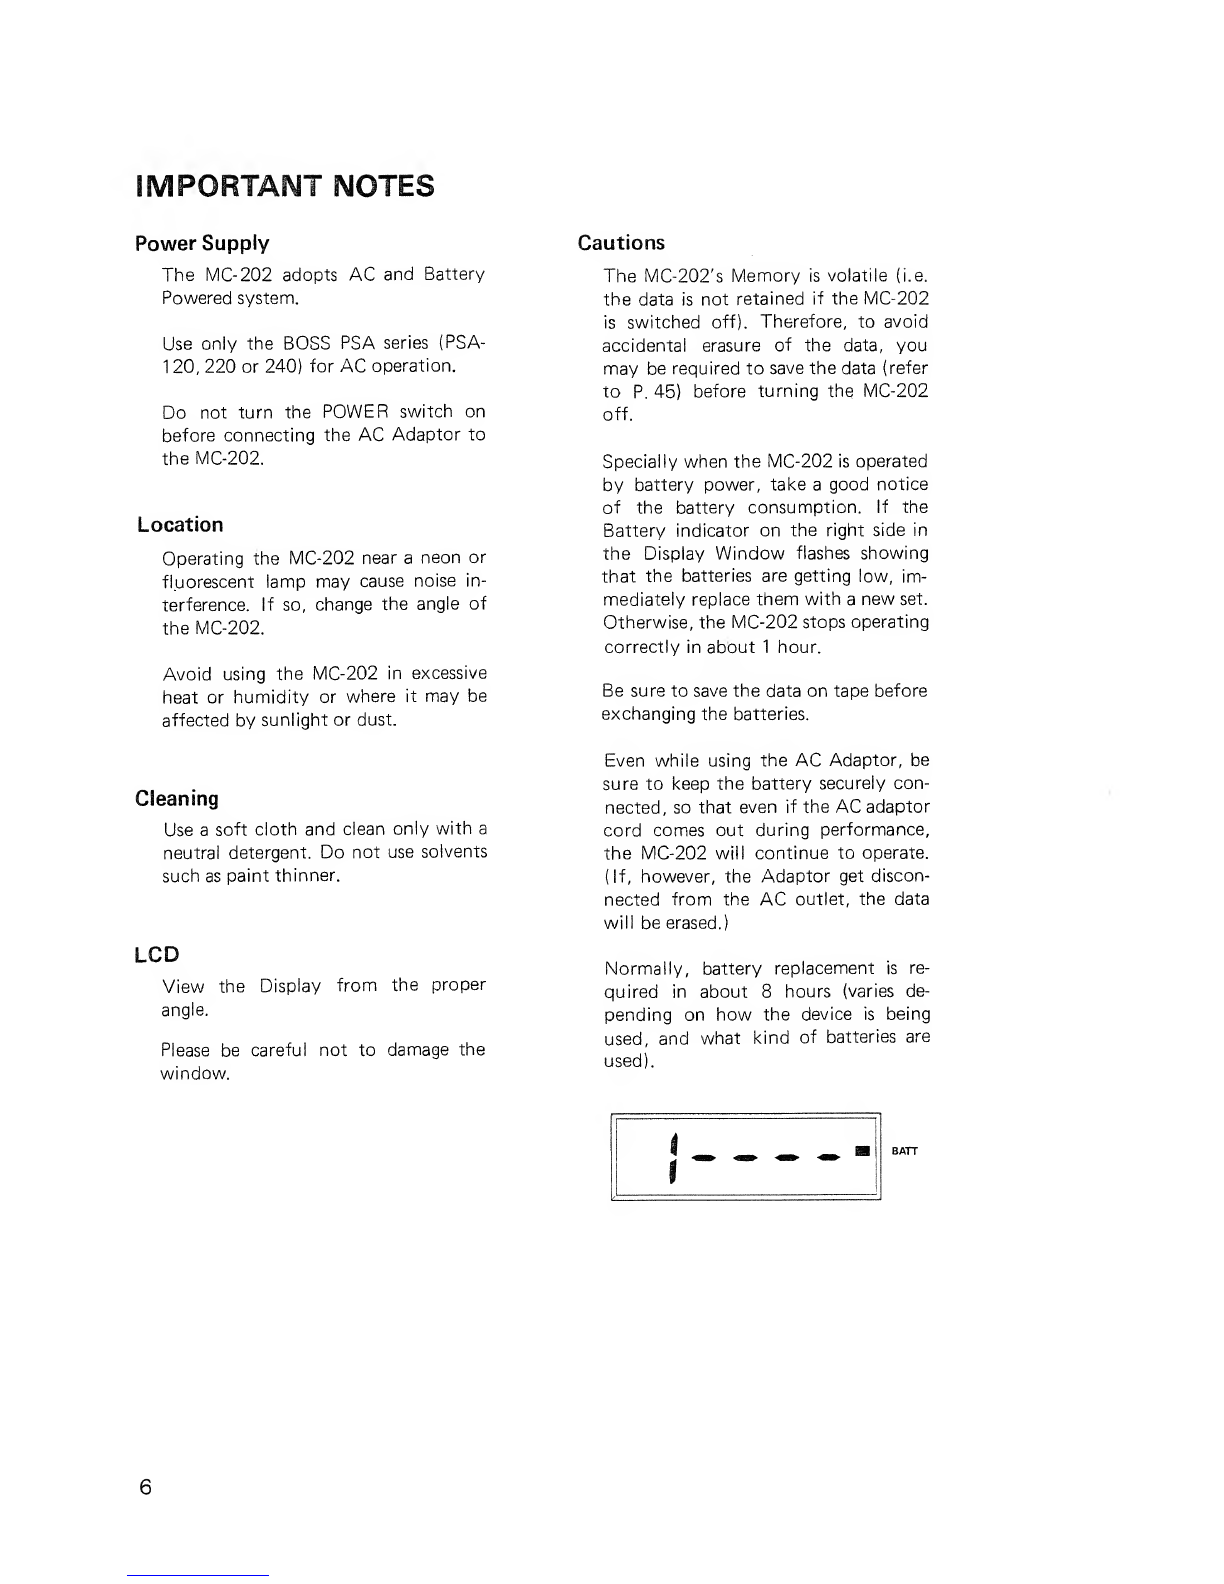
Specially when the MC-202 is operated
by battery power, take agood notice
of the battery consumption. If the
Battery indicator on the right side in
the Display Window flashes showing
that the batteries are getting low, im-
mediately replace them with anew set.
Otherwise, the MC-202 stops operating
correctly in about 1hour.
Be sure to save the data on tape before
exchanging the batteries.
Even while using the AC Adaptor, be
sure to keep the battery securely con-
nected, so that even if the AC adaptor
cord comes out during performance,
the MC-202 will continue to operate.
(If, however, the Adaptor get discon-
nected from the AC outlet, the data
will be erased.)
Normally, battery replacement is re-
quired in about 8hours (varies de-
pending on how the device is being
used, and what kind of batteries are
used).

How to replace the batteries Others
Use 6of 1.5V cells.
®Turn the MC-202 off. If using the AC
Adaptor, disconnect the cord from the
MC-202.
POWER
if the l\/lC-202 is not to be used for a
long period of time, remove the bat-
teries to prevent problems caused by
battery leakage.
When running the l\/IC-202 by battery
power, be sure to turn the power off
after use.
Remove the lid of the Battery housing.
Take the batteries out of the Battery
Housing and replace anew set.
(4) Replace the lid of the Battery Housing.

[D Introduction
The MC-202 is a2channel microcompos-
er incorporated with amonophonic syn-
thesizer. Therefore, by connecting
another monophonic synthesizer (SH-09,
SH-2, SH-101, SYSTEM lOOM, etc.),
you can enjoy aSynthesizer Duet.
There are three methods of entering
music data into the MC-202;
©Typing the STEP, GATE and NUM-
BER keys {No need to play the key-
board)
(2) Playing the keyboard
(D Playing the keyboard for Pitch entry
and tapping the TAP key for Rhythm
entry
In the MC-202, we consider that anote
includes the following three elements
(information).
Anote of agiven Step Time has alonger
Gate Time if it is legato, or shorter Gate
Time if it is Staccato. So the GateTinne
is to be set apart from the Step Time.
Refer to the figures shown below.
The MC-202 can be set to either Play or
Edit mode. The Play mode turns the
built-in synthesizer (or/and the external
synthesizer) to playing. In its Edit mode,
you can enter the data into the CH-1 and
CH-2 separately. If everything is clear so
far, you can start entering the data.
(D Pitch (entered by playing the key-
board)
(D Timing Value=Step Time (entered
with the corresponding figures)
(D Actual Sounded Value=Gate Time (en-
tered with the corresponding figures)
In Tempo
^J J} } .J
Step Time
Gate Time
(legato)
Staccato
Viennese waltz
rJJ
48 48 24, 24. 48
46 46 22 22 46 .
12 10 5510
48 50 1
•46 ,
46 .48 .44
10 n^ I
Pitch 3C 3D 3E 3F 3G
Step Time 48 48 24 24 48
Gate Time 46 46 22 22 46
8

S] Panel Descriptions and Connections
A. Panel Descriptions

B. Connections
OUT PUT jack DC INPUT socket
PHONES jack
@(o) @ @ @II(Ua^-)) (UQ.")) (t'Q
#Headphones
#AC Adaptor
BOSS PSA-100
_f
#Guitar amp.
SP SP
#Audio amp.
Headphones jack
Even if the headphones are being used,
the signal is still sent fronn the OUT-
PUT. Also, please be sure to use stereo
headphones (innp. 8Q ~30O).
The beep that is heard during opera-
tion will not be output from this jack.
DC Input socket
If using an AC adaptor, plug
this socket.
it into
Use the BOSS PSA-120, 220 or 240
depending on the voltage system in
your country. (Using any other adapt-
or may cause trouble.)
10

HEnteringCBasic)
A. Setting the synthesizer
If you enter each note listening to its
sound from the synthesizer, it is easier to
detect mistakes.
You can set the synthesizer to work
as follows.
POWER 0You may enter Pitch data into the
CH-1.
CHANNEL!
The synthesizer may now be played
You may change the setting to your taste.
OLFO VCO SOURCE MIXER VCF VGA ENV
D:: .n ISRoland
la 1 1 iia«# iasa ms
MicroComposer
11

B. Entering the data with the STEP, GATE and NUMBER keys
First of all, enter the Pitch. If arest
comes up, enter the same pitch as the one
just before.
1Entering aPitch
—
—
(
•
-<•l< r_
1IT L.
411
'M
Pitch display
-11
You can enter the Pitch data.
•Play the keys according to the score.
.You will hear the same tone played on
the keyboard, and the display window
will also show the pitch value (e. g.
Middle C:3C, jJ :upper right lights
up).
d) You can play the music.
START The START indicator lights up
CONT
STOP
(D The music data will start playing.
•This data will automatically stop after
played once. Also, the note instead of
arest is played.
•The tempo can be adjusted with the
TEMPO knob.
(4) You can stop playing in the middle, if
you like.
After checking the pitch data is all cor-
rectly entered, edit the Step Time.
12

2Editing the Step Time and the
Gate Time
When the pitches are entered, all the
notes will be autonnatically set to STEP
TIME=24 (J^ )and GATE TIME=12.
Editing the Step Time and Gate Time
will complete the data entry.
-< r.
The Pitch display of the 1st step
f
The Step Time display of the 1st step
You may edit the Pitch.
(2) You may edit the Step Time.
•The Step Time of the first step in the
first measure will be indicated in the
Display Window.
These are two ways of editing the Step
Time and the Gate Time as shown below.
How to edit the Step Time and Gate Time
(Method©)
With the GATE keys
(iVIethodd))
OREST 1STACC 2NON LEG 3LEGATO 4TIB
DDD DDDD DD DDD doorn D
JJ- ." J/J"- 1234567
With the STEP keys With the NUMBER keys
13

While editing the Step Time by using the
STEP keys, you can also edit the Gate
Time by using the GATE keys. If, how-
ever, using the NUMBER keys, you can
edit only the Step Time, so you need to
edit the Gate Time later.
The functions of the STEP keys and the
GATE keys are as shown below.
•Keys and Step Time
o=192
J=96
J=48
J^ =24
Ji =12
^=6
J, =32
T
i=16
3
^=8
Gate Keys and Gate Time
J(48)
<STEP TIME >
<GATETIIVIE >
REST
1STACC
2NON LEG
3LEGATO
4TIE
-^j. 4
12
<?
24
36
48
J^ (24)
12
24
3Editing with the STEP keys and
GATE keys
Please edit from the first step in the first
measure. You, however, do not need to
change the J* notes, as J^ =24 is auto-
matically selected (default value) when
the MC-202 is turned on.
If editing is necessary.
(STEP l<ey)
3LEGATO
1DUO
-rC ru
(Display when STEP key Jis pressed)
i3UO
Set the Step Time
(D Set the Gate Time
(GATE key) (pjgpigy when GATE key 3LEGATO is pressed)
14

ENTER
Step Time of the 2nd note
IEdit the Step Time and the Gate Time
you have set.
The Display Window shows the Step
Time of the next step.
Unless the ENTER key is pressed, the
editing is not completed. Therefore, you
may set any Step Time and Gate Time as
many times as you lil<e before pressing
the ENTER key.
If the Gate Time of the notes are all dif-
ferent, you will need to set the Gate Time
one by one, but if the note has the same
Gate Time as the one before, you just
need to press the ENTER key, so that the
same Gate Time will be automatically
selected.
Entering the dotted notes and dotted
rests
To enter dotted notes and rests, press the
BAR key instead of the ENTER key. e. g.
press )key, then the BAR key instead
of the ENTER key for J^. ,and the Step
Time will be 36.
Entering the rest
In entering arest, enter the note which
has the same length as the rest, then press
theO REST key.
Refer to the figure below.
J.= J
J-*
c
BAR C
•\
J.= BAR
•1
O=.m ,J=-
J=».;= r
^=7,
If editing is not necessary.
STEP-
The Step Time of the next step.
®Pressing the STEP FWD key will ad-
vance the step counter one step and the
Display Window shows the Step Time of
the next step.
If you have completed entering the Step
Time and the Gate Time data, turn the
MC-202 to the Play mode by pressing
the PLAY key, then the music can be
played.
15

4Playing
®The MC-202 is ready to play music.
START
)The data will now be played.
If you wish to play the same data repeat-
edly, set the MC-202 to the Cycle mode.
The SHIFT key is used to give two func-
tions to one key, i. e. by pressing akey
while holding the SHIFT key down, that
key will have the function written above
it, much like the SHIFT Key apears
on atypewriter.
How to loop play.
CONT
STOP Stop playing.
Cycle function ON
SHIFT IWSMM
1TEMPO 11-
Set to the Cycle mode.
START If you start the MC-202 in this condi-
tion, the data will be played repeat-
edly until the STOP key is pressed.
If you wish to leave the Cycle mode,
press the STOP key, then press the
CYCLE key while holding the SHIFT
key down.
16

5Editing the Step Time with the
NUMBER l<eys
You can use the NUMBER keys instead
of the STEP keys. For instance, if you
wish to enter Step Time 48, first press 4,
then 8. If you press awrong key, press
the key three times, then again enter
the correct number. Each time you press
aNUMBER key, abeep will be heard.
Again, unless you press the ENTER key,
the Step Time is not edited. So make sure
that the number displayed is correct, then
press the ENTER key, and the next step
is displayed ready to be edited. If editing
is not necessary, go ahead to the next
step by pressing the STEP FWD key.
When using the STEP keys, you will need
to select the Gate Time as well. With the
NUMBER keys. However, please just edit
the Step Time one after another. After
completing this procedure, go back to the
first step in the first measure, then edit
the Gate Time.
The following shows how to edit the Gate
Time.
6How to return to the first step in
the first measure in the Edit
mode
SHIFT (NUMBER key)
ENTER
Holding down
Press indicated keys all at once, then
release the ENTER key, then the SHIFT
key. Be sure not to release the SHIFT
key before releasing the ENTER key.
7Editing the Gate Time with the
NUMBER keys
Each time you press the EDIT key, the
Edit mode changes as follows.
When the MC-202 is in the Gate Time
editing mode, you may edit the Gate
Time in the exactly same method as the
Step Time editing.
Changing the Gate Time to zero will
make arest, and changing it into the
same value as the Step Time will make a
tie.
'
EDIT
/i
1
EDIT
\.
.
'
EDIT
\,
i-3L-
\
/
IE ?M
\/1
.1- IP
17

Example (1)
§^} JlJ S^ '^^'^J^^i'^^nj^Nj^j^;
POWER PLAY Synthesi-
zing EDIT 3C 3C 3D
»
PITCH
3E 3E 3F3G 3A3G 3E 1i»
''
3E 3G 3F3E 3D^3D 3F*•
^
JKrest ^rest
3E 3D3C 3C
^rest
Now you have completed entering the
Pitch data. Next, please check as follows.
PLAY IJSTART IA" ^^e notes are played with the same
timing.
Edit the Step Time and the Gate Time.
EDIT *l EDIT J3LEGATO ENTER FWD FWD
>
g)
fITCH STEP ;Setting th
StepTinne
B!Betting th
3ate Time
23C (F^orwardin
5C
3D
J—4 ENTER FWD ^JENTER FWD
FWD
—
&
3E 3E 3F3G 3A
FWD 3> JENTER «J^REST ENTER J
1^
3G 3E 3E(rest)
3LEGATO «ENTER FWD >FWD JENTER Jrr
^
3G 3F3E3D
REST ENTER J&3LEGATO ENTER FWD
i
FWD
^"*"
3D(rest)
a
3F3E 3D
J,ENTER J>REST ENTER
3C 3C (rest)
Note:
Now you have completed entering the
Step Time and the Gate Time. Turn to
the PLAY mode, then press the START
key, and the music data you have just
entered will be played.
18
Other manuals for MC-202
1
Table of contents
Other Roland Synthesizer manuals

Roland
Roland System-8 User manual

Roland
Roland FANTOM 6 User manual

Roland
Roland SH-32 Manual

Roland
Roland E-16 User manual

Roland
Roland JP-4 Operating and maintenance manual

Roland
Roland D-05 User manual

Roland
Roland SH-101 User manual

Roland
Roland System-8 User manual

Roland
Roland JX-10 User manual

Roland
Roland JX-3P User manual

Roland
Roland Alpha JUNO-1 User manual

Roland
Roland JV-30 User manual

Roland
Roland Fantom XR User manual

Roland
Roland RS-50 User manual

Roland
Roland E-66 User manual

Roland
Roland Fantom-Xa Manual

Roland
Roland a JUNO-2 User manual

Roland
Roland JD-990 User manual

Roland
Roland SH-7 User manual

Roland
Roland SH-3 User manual