Romed-Holland BP-1000 User manual

USER MANUAL
Fully Automatic
Blood Pressure Meter
: BP-1000

Contents
A. Specifications
1
B. Safety Instructions
2
C. About Blood Pressure
3
D. Parts Identification
5
E. Battery Installation
6
F. Time Adjustment
7
G. Erase Memories
8
H. About the Touch Key
8
I. Applying the Cuff
9
J. Measurement Procedure
10
K. Take a Measurement
11
L. Recalling Memories
12
M. Troubleshooting
13
N. Maintenance
14
Q. Explanation of Symbols on Unit
15
R. Electromagnetic Compatibility Information
16

A. Specifications
Measurement Method Oscillometric
Measurement Range 30-280mmHg
Pulse Range 40 – 199p/min
Measurement Accuracy Pressure: ±3 mmHg
Pulse: ±5%
Cuff Size 52 x 13.5cm (normal cuff)
Operating Condition +10°C ~ + 40°C / 30%RH ~ 80%RH
Storage Condition -5°C ~ +35° / 30%RH ~ 80%RH
Power Supply 4 x AA batteries
Dimensions Approx. 150 (L) x 110 (W) x 65 (H) mm
Weight Approx. 370g not including batteries
Display LCD, backlit
Touch pad key Set/clock key
ON/OFF key
Memory key
Memory 99 measurements
Can display the average of the last 2
measurements
1

B. Safety Instructions
1. This device is for household use only. It is not intended as a substitute for
consultation with your physician.
2. For users diagnosed with common arrhythmia (atrial or ventricular
premature beats or atrial fibrillation), diabetes, poor blood circulation, kidney
problems, or for users who suffered from stroke, or for unconscious users,
the device might not be suitable for use. Consult your physician in case of
any doubt.
3. This monitor should not be operated by children to avoid possible
hazardous situations.
4. The device contains high-precision assemblies. Therefore, avoid extreme
temperatures, humidity and direct sunlight. Avoid dropping or strongly
shocking the main unit, and protect it from dust.
5. Leaking batteries can damage the device. Remove the batteries when
the device is not used for a long time.
6. Do not activate the device when the cuff is not connected or the cuff is
not wrapped on your arm.
7. Do not disassemble the monitor or cuff, do not wash the cuff.
8. If the device is stored in a cold place, allow the device to acclimatize at
room temperature. Also please refer to working environment.
9. Clean the device’s body and the cuff carefully with a soft cloth. Do not
press the LCD screen, do not clean the LCD screen with alcohol or petrol.
10. To avoid inaccurate results caused by electromagnetic interference
between electrical and electronic equipment, do not use the device near a
cell phone etc.
2

C. About Blood Pressure
What is Blood Pressure?
Blood pressure is the pressure exerted on the artery tube while blood flows
through the arteries. The pressure measured when the heart contracts and
sends blood out of the heart is systolic (high pressure). The pressure
measured when the heart dilates with blood flowing back into the heart is
called diastolic (low pressure).
Why Measure Your Blood Pressure?
Among the various health problems today, problems associated with high
blood pressure are very common. High blood pressure’s dangerously
strong correlation with cardiovascular diseases has made measuring blood
pressure become more important than ever.
Blood Pressure Classification Chart
The World Health Organization (WHO) has developed a blood pressure
standard, according to which areas of low and high-risk blood pressure are
identified. This standard, however, is a general guideline as individual’s
blood pressures vary among different people and age groups, etc.
3

C. About Blood Pressure
It is important to consult your physician regularly. Your physician will tell you
your normal blood pressure range as well as the point at which you will be
considered at risk.
Blood Pressure Fluctuation
Blood pressure fluctuates all the time!
You should not be worried if you get two or three measurements at high
levels. Blood pressure changes over the month and even throughout the
day. It is also influenced by season and temperature, personal condition,
etc.
4
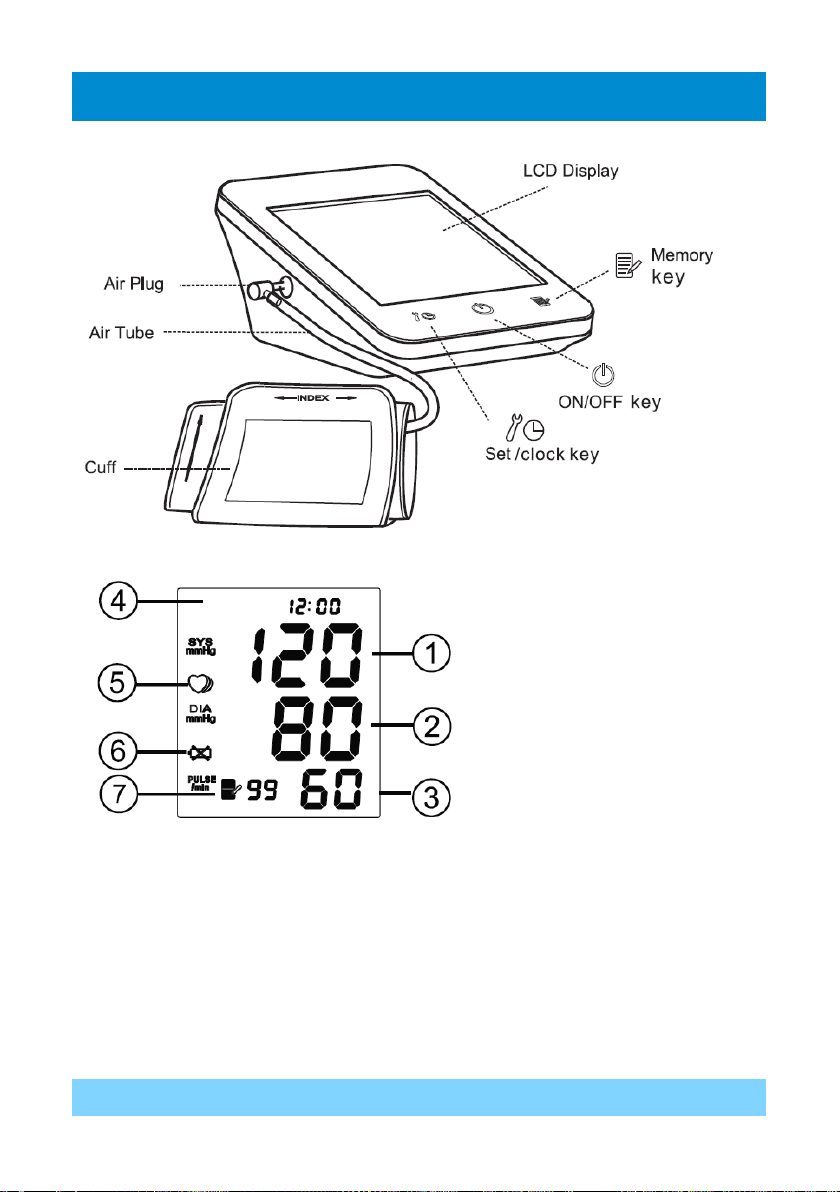
D. Parts identification
1. Systolic Pressure
2. Diastolic Pressure
3. Pulse Rate
4. Time and date
5. Heart Rate Indicator
6. Low Battery Indicator
7. Memory Number
5

E. Battery Installation
1. Press down and slide the
battery cover in the direction of the
arrow to open the battery
compartment.
2. Install or replace 4 ‘AA’ batteries
in the battery compartment, taking
care that the polarities (+) and (-)
are correct.
3. Slide the battery cover to close
the battery compartment. Do not mix old and new batteries.
4. You need to replace the batteries when:
1) The low battery icon appears on display. will not appear when
battery is full.
2) Press the “ ” key but nothing appears on the display.
Caution:
1. Battery life varies with the temperature and may be shorter at low
temperatures.
2. Batteries are hazardous waste. Do not dispose of them together with the
household garbage.
3. Use alkaline batteries to extend the batteries life.
6

F. Time Adjustment
1. In the shutdown state press key “ ”, to display
the time.
2. Press the key “ ” for more than 3 seconds to
enter “set” mode. The display will show a blinking
number showing the year. Press the key “ ” to get
the desired year.
3. Press the key “ ” again, the display will show a
blinking number showing the month. Press the key “
” to get the desired month. Then press the key “
” again to adjust the day. Press the key “ ” to get the
desired day.
4. Press the key “ ”, the display will show a blinking
number showing the hour/minute, operate according
to “step 3” to get the desired time.
5. Press key “ ” during the time adjustment
procedure to stop the time adjusting process directly.
The adjustment result will be saved.
Note:
Time adjustment only works in the “Power Off” status
Please switch the device to the “Power Off’ status
before time adjustment.
About independent clock
A built-in independent clock device could guarantee the time accurately,
when the device is without battery.
7
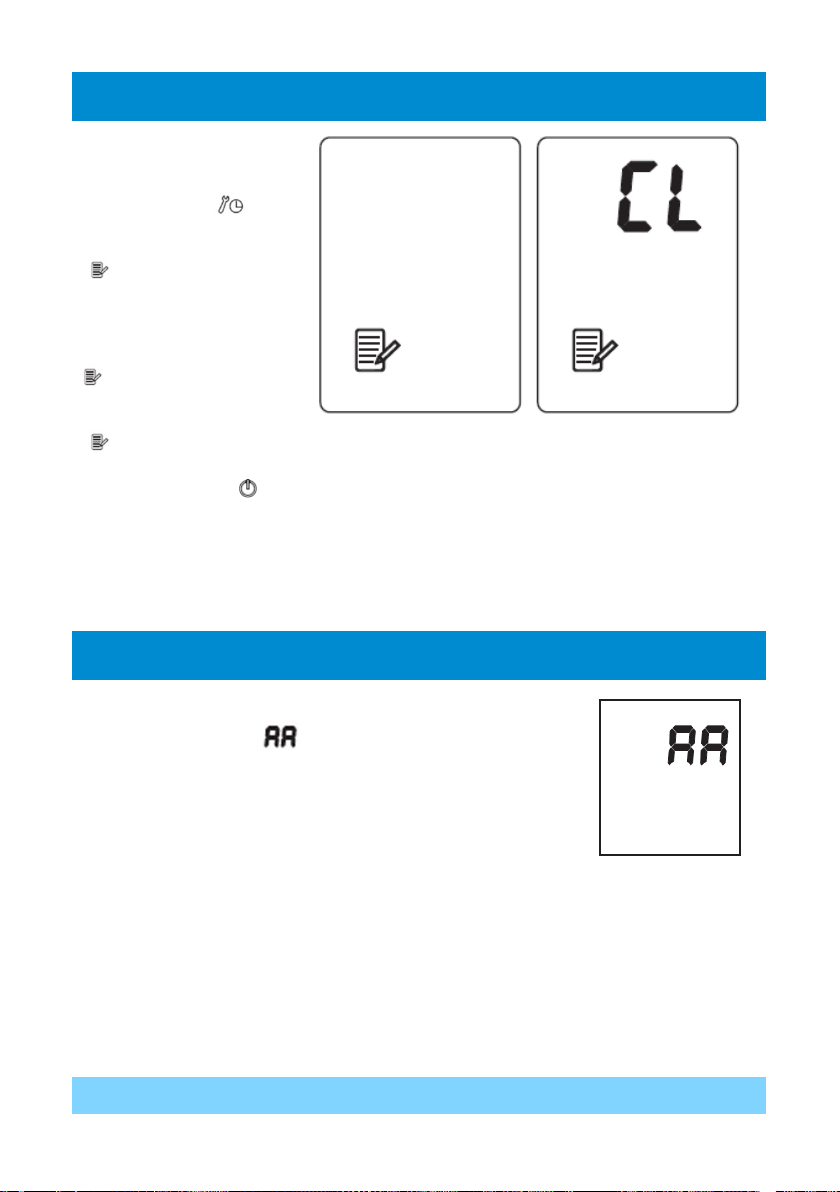
G. Erase Memories
1. In the “set” mode,
after setting the time,
press the key “ ”
again to see the symbol
“” appear on the LCD,
blinking.
2. Long press the key “
” until the LCD shows
“CL”, and press the key
“ ” again to confirm the erasing of all the measurement results
3. Press the key “ ” to get back to ‘Stand By’ status.
H. About the Touch Key
When installing the battery don’t touch the key pad. The
screen will display “ ”, and then it will go out later.
When you turn on the device by using the touch keys,
you should press the touch key for 1 ~ 2 seconds
continuously.
If the touch key doesn’t work properly, please move away your finger, wait
for 4-10 seconds, it would return to correct state.
8
Other manuals for BP-1000
1
Table of contents
Other Romed-Holland Blood Pressure Monitor manuals

Popular Blood Pressure Monitor manuals by other brands


Soehnle
Soehnle SYSTO MONITOR 100 Instructions for use

Nasco Healthcare
Nasco Healthcare Simulaids Life/form LF01095U USER HELP GUIDE

Microlife
Microlife WatchBP office instruction manual

HoMedics
HoMedics MiBody 360 instruction manual

ForaCare
ForaCare FORA P30 Plus owner's manual

JOYTECH
JOYTECH DBP-6296B owner's manual