RoMedic MiniLift200 User manual

The MiniLift200 is an electrically powered
stand-up lifter for people with impaired
mobility and strength and who are unable
to stand up unassisted. The MiniLift200 is
designed for indoor use and is designed to
be used by a caregiver who attaches the
sling to the user and operates/manoeuvres
the unit. To be able to use this Minilift200,
the user must have a degree of stability
above the knees, i.e. he/she must have
some remaining standing fuction. At the
same time, the MiniLift200 trains the user’s
leg muscles as well as their sense of bal-
ance and endurance.
The MiniLift200 is CE-marked under Medi-
cal Equipment, class 1.
Max Load: 200kg / 441lbs
Visual inspection
Inspect lift functions regularly. Check to ensure that material is free from damage.
Read instructions for all assistive devices used in connection with transfers. Keep the
manual where it is accessible to users of the product.
Do not leave the patient unattended during a lifting situation.
Checklist before use:
Make certain the lift is properly assembled.
Lifting accessories must be properly trial fitted and tested in relation to the patient’s
needs and functional ability.
Check Slingbar connection and safety latch function.
Check lift lifting function and base-width adjustment.
Under no circumstances may the lift be used by persons who have not
received instruction in the operation of the lift.
Functional inspection
Always read the instructions
Manual
Manual nr: 00874-EN ver. 2 090513
EAN no: 733176901169 7
RoMedic’s slings and lifts are part of the SystemRoMedic concept, which takes a
holistic approach to patient transfers. SystemRoMedic has four categories: transfer,
repositioning, support and lifting.
1
MiniLift200

Table of contents
Technical information 2
Important information 3
Maximum load 3
MiniLift200 Parts 4
Assembling MiniLift200 5
Measurement MiniLift200 6-7
Final inspection 8
Operation 9
Funktions on the controlbox/batteri 10
Emergency stop, emergency lowering 11
Charging 11
Trial operation of MiniLift200 12-14
Trouble-shooting 15
Other maintenance details 15
Technical information
Lifting speed: 1.5 cm/s without load
Controlbox: 24V DC, 9A
Batteries: 24V DC 2,9 Ah, IP65
Charger: Built-in charger, 100-240 VAC, 50-60 Hz, max 400 mA
Motor (mast): DC24 V, 10,5 AH. IP54. Operationtime: 10% at maximum continous running
of 2 minutes. Push: 7500 N.
Motor (base): 24 V DC, 12,3 AH, IP54. Operationtime: 10% at maximum continous opera-
tion of 2 minutes. Push: 2000N.
Material: Steel
Emergency lowering: Mechanical and electrical
Castors: Back 4”,100mm, front 3”, 80mm
IP class: IP54
A-weighted sound power level: 55,8 DBA
Approval: EN 60601-1 Confirm to UL 60601-1 and CAN/CSA-C22.2 No.601.1-M90,
ISO 10535:2006.
The device is intended for indoor use.
Type B, according to the degree of protection against electric shock.
2
www.romedic.com

Important information
•MiniLift200 must be assembled in accordance with the assembly instructions provided
by RoMedic.
• Warranty does not apply if repairs or alterations are made to the lift by personnel who
are not authorized by RoMedic.
• Batteries control box and actuator on MiniLift must not come in direct contact with
water.
• To ensure optimal function, the lift must be inspected regularly. See section on other
maintenance details.
• Only use MiniLift200 on at surfaces.
• Never move the lift by pulling on the actuator!
• Under no circumstances may max. load be exceeded. See section on technical infor-
mation and the product decal on the lift.
• Lifting accessories must be properly trial tted and tested in relation to the patient’s
needs and functional ability.
• MiniLift200 may not be charged in wet areas or used during a shower and bath.
• Lift shall not be exposed to running water.
Do not push
Maximum load:
It may be different maximum allowable loads to different products on the assembled lift
system: lift, slingbar, sling, scale, and others accesories.
It is always the lowest maximum allowable load indicated for the respective products on
the system that applies.
Always check the markings on all products in the unit and contact RoMedic representativ
if you have any questions.
3

MiniLift200 parts
1. Lifting arm.
2. Hooks for attaching the sling.
3. Hand control unit for adjusting the lifting arm and legs spread.
4. Shin pad unit.
5. Footplate.
6. Castors: Rear are braked.
7. Battery.
8. Red emergency stop button, control box.
9. Knob for adjusting the height and depth of the shin pad unit.
10. Manual down button for lowering arm. Note: the mechanical down button is
located on the actuator and is manually operated.
11. Electric down button.
12. Charging: lamp on. Fully charged: lamp off.
13. Stopper for sling loops.
14. Lock for adjusting telescope lifting arm, in and out.
15. Push bar.
4
www.romedic.com
1
2
3
4
5
6
7
8
9
10
11
12
13
14
15

Assembling MiniLift200
Check to ensure that all components are included:
Lift motor, control box and battery pack.
Base with motor.Foot rest Handset and cord.
Instructions, charging cable and power supply cord for charging.
Assembly:
Place the upper section (1) above the lower section (2) and carefully lower it onto the
lower section. Push all the way down. Insert the bolts (3) in all four tubes and tighten.
Finally, place the cap nuts (4) on the bolts.
Assemble the footplate by attaching it to the crossbar and swinging it down. Make sure
the pins (6) insert into the holes of the plate.
Attach the leg spreading cable to the control box.
5
A
DETAILA
1
2
3
4

Measurement MiniLift200
6
www.romedic.com
1
2

Measurement Mini Lift 200
Measurement Tolerance +/- 5mm
A Length 950 mm
B Width inside min. legspread 480 mm
Width indside max. legspread 930 mm
C Width outside min. legspread 590 mm
Width outside max. legspread 1030 mm
D Height 1010 mm
E Maximum reach at 600 mm (reference height) 295 mm
Max height from the base 1375 mm
F Height at base 135 mm
G Clearance at base 90 mm
H Lifting height min. 880 mm
I Lifting height max. 1500 mm
J Hoisting range 620 mm
K1 Min. distance from wall to CSP at max. Height ( legs spread) 860 mm
Minimum distance from wall to CSP at max. reach ( legs spread) 410 mm
K2 Min. distance from wall to CSP at min. height ( legs spread) 410 mm
L Footplate, clearance 50 mm
M Footplate, height 80 mm
N Inside space between bars 525 mm
O Overall length 1000 mm
P Reach from base with legs spread to 700 mm 570 mm
R Max. reach from base 425 mm
Max. load 200 kg
Total weight 52 kg
Weight loose parts ( footplate) 5 kg
Number of lifts per charge 20-25
Footplate, dimensions ( W x D) 390 x 345
Materiale frame Steel
Wheels Ø80/Ø100
Turning diameter 1050
Lifting speed unloaded 15mm/sec
Lifting speed with load 7mm/sec
7

Operation:
These instructions must be followed for correct use of the MiniLift200.
Warning:
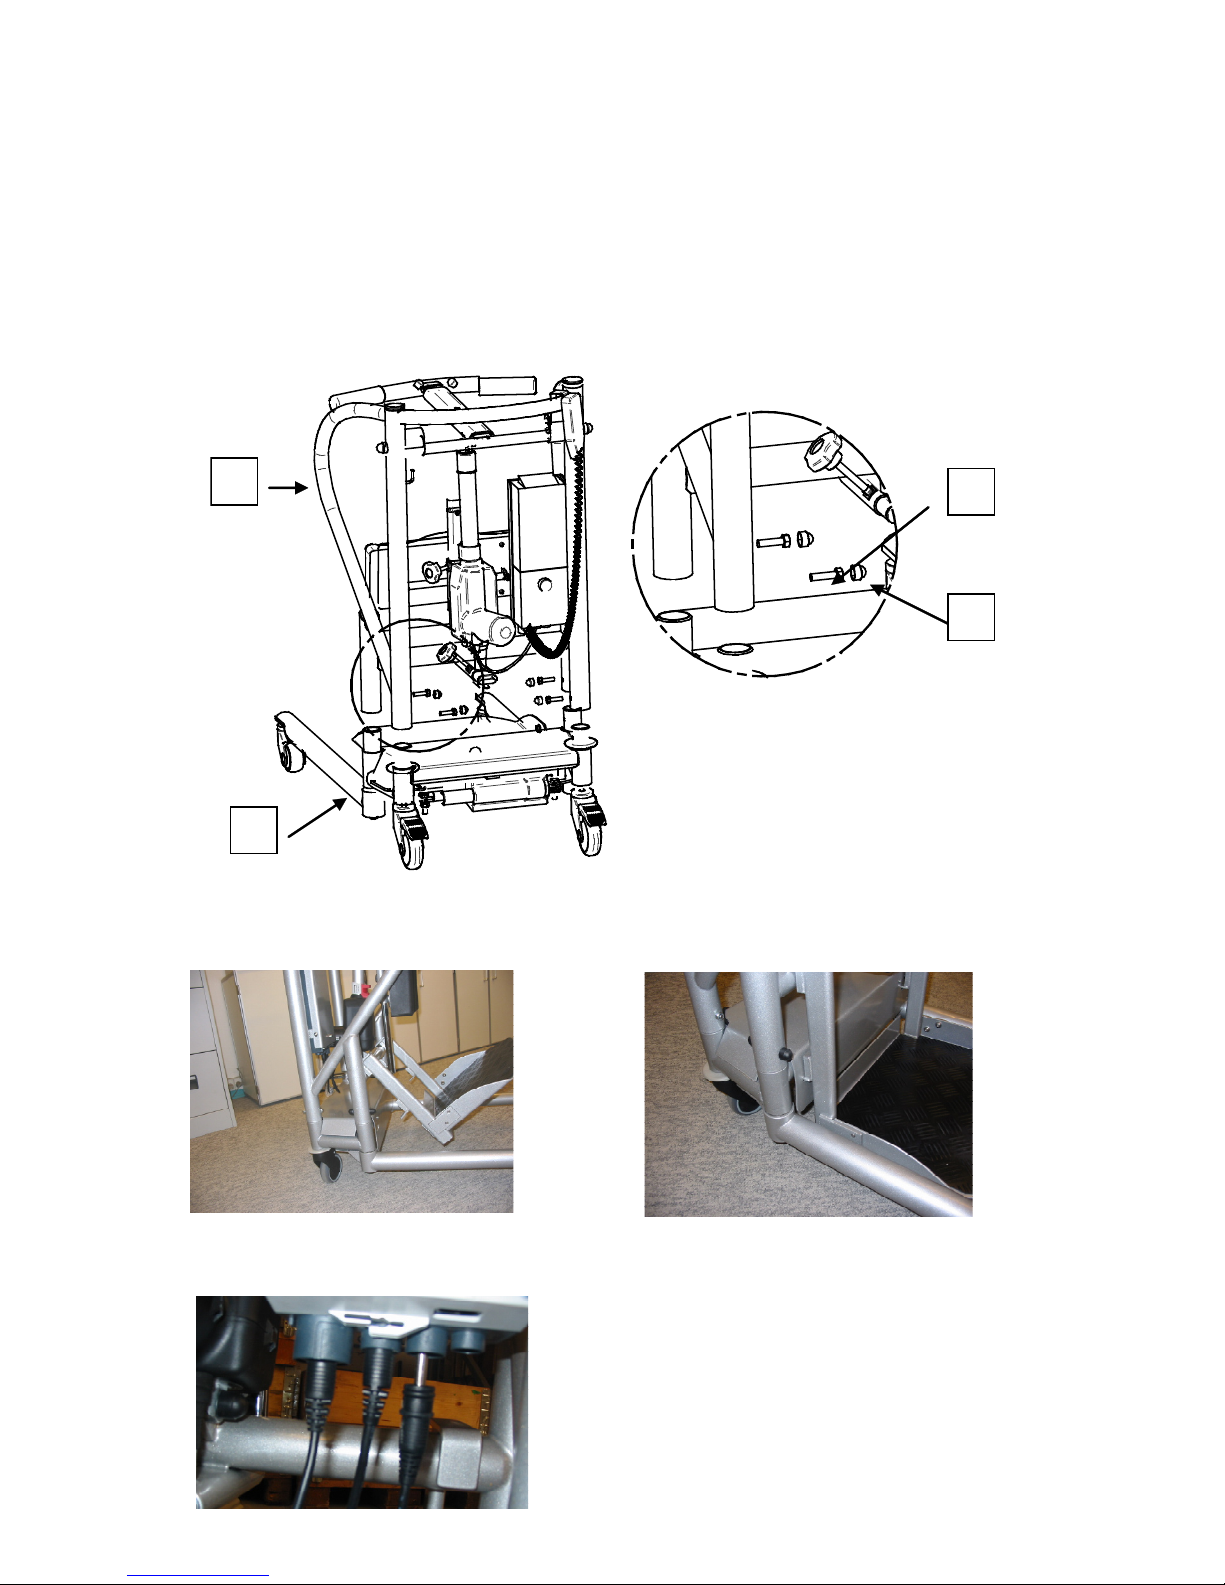
Because of the actuator’s squeeze-protector, the lifting arm can fall freely down to the
actuator position.
Press the lifting arm on the stand-up lifter downwards to make sure it supports the lift
actuator before and after all lifting operations.
This must be done, because otherwise there is a risk of injuring the user when the lifting
arm “falls” down.
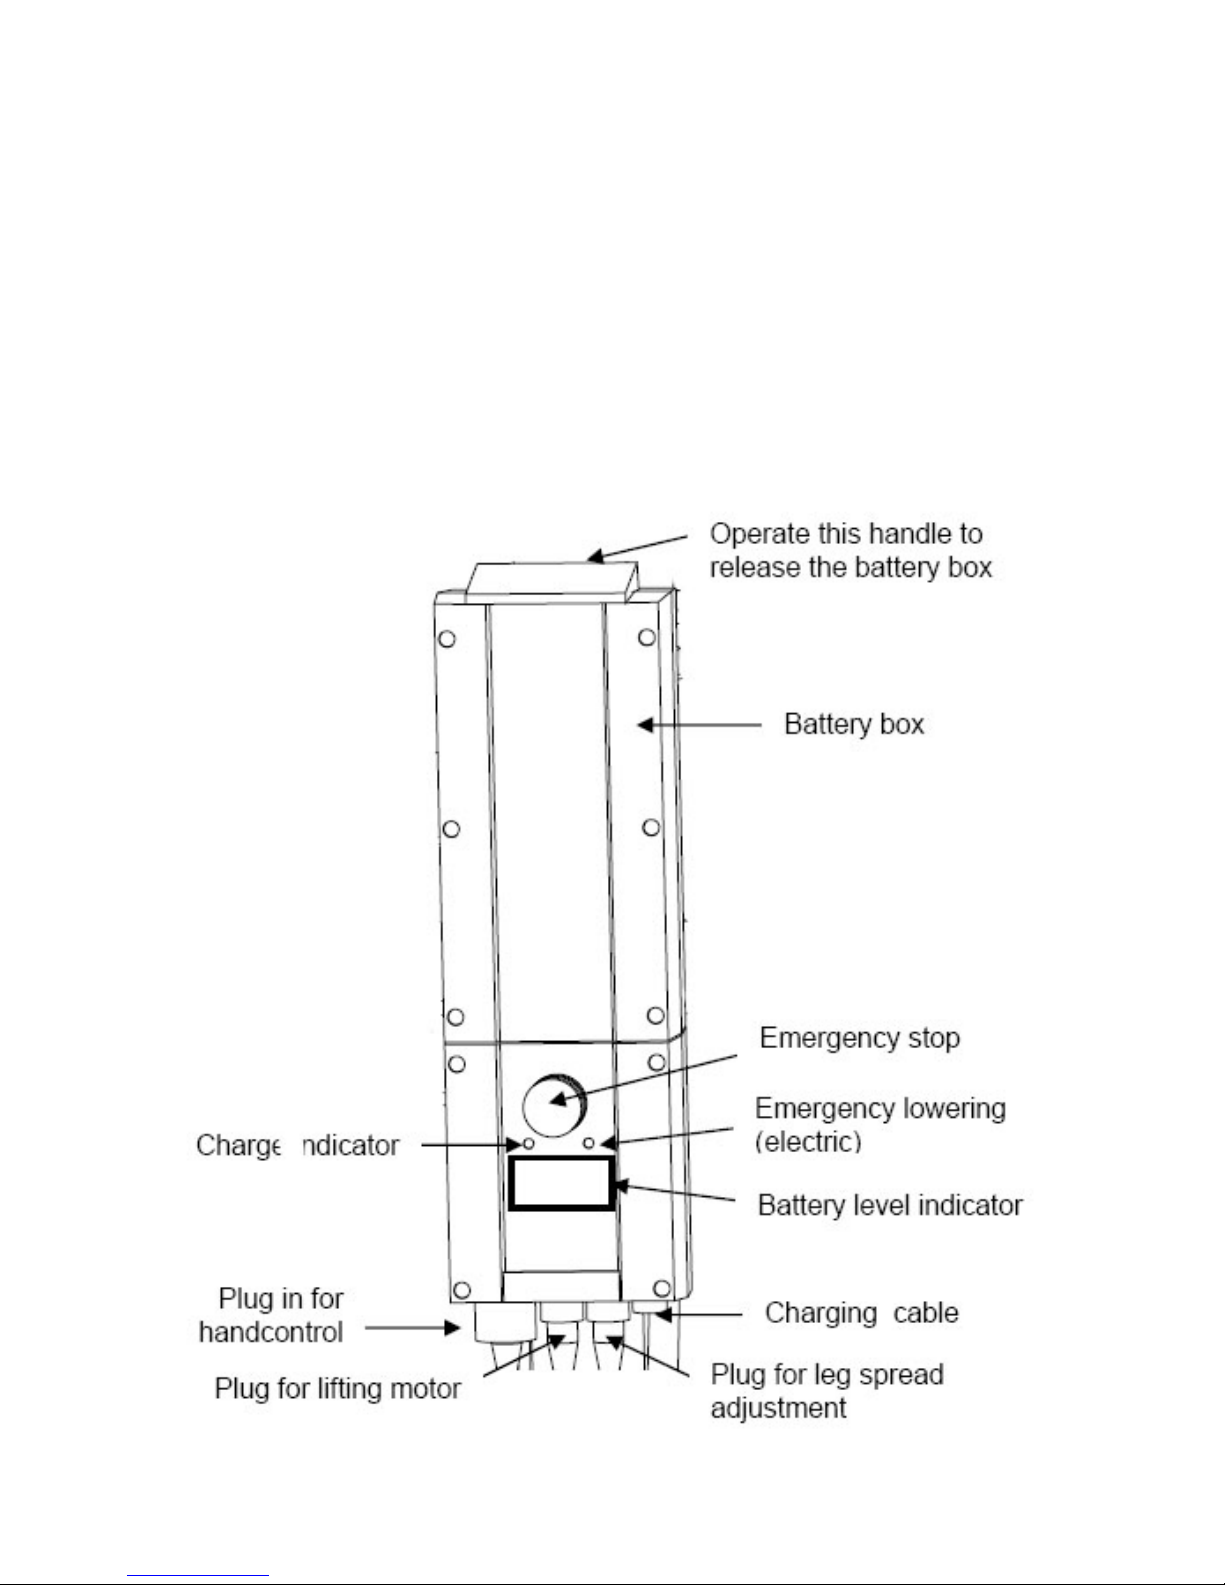
Operating the MiniLift200 via the hand control:
The MiniLift200 has four functions: up, down, out and in. Press the respective arrow but-
tons (up, down, out or in) for the desired function.
It is not possible to use two functions simultaneously.
NOTE: Make sure the emergency stop button is disengaged.
Setting the lifter in motion:
Push the push bar to set the lifter in motion. This is the safest way to move the stand-up
lifter.
NOTE: A stand-up lifter is not a means of transport.
Moving a person using the MiniLift200:
The width of the lower section must be adjusted to achieve the greatest possible stabil-
ity. This is the safest way to move the stand-up lifter.
NOTE: A stand-up lifter is not a means of transport.
Turning:
To turn the stand-up lifter, stand beside the lifter and grasp the side bar with one hand
and the push handle with the other, pushing with one hand and pulling with the other. Do
this at a calm, steady pace to prevent the user from losing their balance.
Warning: Do not place your hand by the actuator as you risk pinching your ngers.
Use:
The MiniLift200 must only be used for moving people – and only people who do not
weigh more than the specified maximum load (including sling). If the MiniLift200 is used
for loads that exceed the specified maximum load or for lifting anything other than
people, any and all product liability on the part of Handicare A/S Danmark relating to
insurance/guarantee/service will cease.
To avoid accidents or personal injury to the user of the stand-up lifter and to the opera-
tor of the stand-up lifter, the stand-up lifter must be operated as described in points 1
through 5.
8
www.romedic.com

Final inspection
Inspect the lift for signs of wear and damage. Check all four cas-
tors and castor locks.
Check all connections and fixtures including screws and bolts.
Check the packaging for any loose bolts and screws. If you find
any, locate their intended positions on the lift and replace them.
Check emergency stop function by depressing the emergency
stop, and then pressing either the Up or Down button. If nothing
happens when the Up or Down buttons are pressed, the emer-
gency stop is functioning properly.
Grasp the handset, press the Up button and run the liftarm all
the way up. Then, press the Down button and run the liftarm all
the way down.
Test lift function by lifting a person (not a patient) using an ap-
proved sling. At the same time, check the emergency lowering
function with someone on the lift.
If the equipment is satisfactory upon inspection, connect the
freestanding adaptor for charging to the lift and to a power
outlet, and then check to ensure that the charging lamp on the
control box lights up.
NOTE!
Before the lift is used for the first time, it must be charged for at
least 4 hours. See section on Charging batteries.
Place the manual where it is easily accessible near the lift.
9

The controlbox/batteri has the following functions:
Emergency stop that disconnects the power to and from the batteries.
Emergency lowering button that lowers the lifting arm if problems arise with the hand
control unit.
Visual battery indicator
Beeper which emits a signal when the batteries need to be charged.
Plug for hand control unit (see drawing)
Plug for lifting motor (see drawing)
Plug for width adjustment (see drawing)
Control box IP65
To protect the electronic equipment, the hand control unit is also furnished with a motor
protection switch for the lifting function.
10
www.romedic.com

Emergency stop
To activate emergency stop: Depress the red emergency stop
button on the control box.
Resetting: Turn the button in the direction of the arrows until
the button pops out.
Emergency lowering
To activate the mechanical lowering function, pull up on the red
handle.
Charging
Charge the lifter after each period of daily use so you are always certain the lifter is fully
operational (e.g. charge it every night).
Charging the MiniLift200:
Plug the mains cable from the control unit into an outlet. When the batteries are
charged, the charger will turn off automatically.
Remember: The emergency stop button must be disengaged / out.
Battery:
24V DC. 2,9 Ah, IP65. The average battery service life is two years, depending on the
amount of use.
11

Trial operation of MiniLift200
Only ThoraxSling must be used in combination with the
MiniLift200, as the MiniLift has a special movement of
raising the user up, and the slings are designed for the
attachment of the MiniLift only. See the manual for
ThoraxSling for application.
Next, position the MiniLift200 as close as possible to the
user. Place the user’s feet as far forward on the footplate
as possible. The knee pad unit should be all the way
back as a starting point.
Warning: When adjusting the leg width, there is a risk of
squeezing the user’s feet. Therefore, always make sure to
place the user’s feet on the footplate.
Adjust the shin pad unit so that the top of the pad is just
below the user’s kneecap and at least with enough space
to slip a hand between shin and pad.
Pull up the locking bolt.
Pull the lifting arm all the
way towards the user.
Warning! Release bolt all the way down to lock lifting arm
in fixed position.
12
www.romedic.com

Attach the sling loops to the lifting arm from below the
lifting arm.
Fasten the sling loops to the hooks on the lifting arm. N.B.
Attach loops to hooks from underneath the handle bar.
Choose the closest loop – as innermost as possible - and
attach to hook. Warning: Keep an eye on the user’s hands
during the lifting process, as there is a risk of pinching
them with the sling straps.
Push the liftarm back as much as possible and make sure
its safely locked.
Warning: Check the lifting arm is locked in position before
proceeding with the lift.
Have the user place his/her hands on the lifting arm
handle. We recommend that the caregiver stand at the
side of the user, place a hand on the user’s shoulder, and
ask the user to lean back slightly. Begin lifting to a stand-
ing or semi-standing position. Adjust the waist strap when
the user has been lifted slightly.
Note!!! The wheels on the lifter (and wheelchair, if relevant)
must be unlocked.
13

Lowering the user:
Move the MiniLift close to the chair/bed, where the user is
to be seated, so that the edge of the chair is just behind the
hollow of the knees of the user.
Lock the wheels on the MiniLift.
The user shall be guided to lean slightly back while he/she
is lowered down into sitting position.
Use the straps at both sides of the sling to guide the user
into the right position.
Pull the liftarm out in it`s longest position before removing
the loops from the hooks.
Unlock the buckle and remove the sling.
14
www.romedic.com

Other maintenance details:
The lift must undergo thorough inspection at least once per year. This must be done
by authorized RoMedic service personnel and in accordance with RoMedic’s service
manual.
Repairs and maintenance may only be done by authorized personnel using original
spare parts.
Old batteries are to be left at the nearest recycling station or given to personnel
authorized by RoMedic.
Disposal
The MiniLift200 can be seperated into metal, plastic and electronic parts for recycling
and disposal. The electronic parts must be disposed regarding the WEEE -directive.
Cleaning and disinfection
When necessary, clean the lift with warm water or rubbing alcohol and ensure that
the castors are free of dirt and hair. Do not use cleaning agents containing phenol or
chlorine.
Storage
If the lift is not to be used for some time or e.g., when transporting, we recommend
that the emergency stop button be pressed in. Store the lift at a temperature exceeding
freezing point and at normal relative humidity (about 60%).
Service agreements
RoMedic offers the possibility of service agreements for maintenance and regular test-
ing of your lift. Contact your local RoMedic representative.
Trouble-shooting
If the lift is not working properly (up or down), check the following:
Make sure the emergency stop button is not pressed in and that all cables are con-
nected. Check the battery level and check to ensure that the battery charges via the
adaptor.
If the lift is not working properly, contact RoMedic.
The lift can be raised but not lowered (or vice versa), or the base-width adjustment
only works in one direction. Check the following:
That all cables are properly and securely connected. Pull out the contact and plug it in
again firmly.
If the lift is not working properly, contact RoMedic.
If the lift makes unusual noises:
Try to locate the source of the sound, take the lift out of operation and contact
RoMedic.
15

SystemRoMedic
RoMedic’s lifts and lifting accessories are part of SystemRoMedic. This means they are
part of a holistic approach to lifting and transferring. SystemRoMedic includes four trans-
fer segments: transfer, repositioning, support and lifting.
RoMedic’s products are developed on an ongoing basis, which is why we reserve the
right to modify product designs without prior notice. Contact your RoMedic representa-
tive for information, advice and updates.
When in doubt, contact your RoMedic representative for product trials, advice or informa-
tion.
If you require additional information, contact your transfer specialist or our representative,
or visit www.romedic.com. Make sure you always have the most recent version of the
manual. Manuals are available for downloading from our website; http://www.romedic.
com
16
www.romedic.com
RoMedic AB
Veddestav. 15, Box 640 Tel: +46 (0)8-594 773 33 Internet: www.romedic.com
SWEDEN
Table of contents
Popular Fitness Equipment manuals by other brands

Care Fusion
Care Fusion Carefusion LE200 LC Original instruction

Antworks
Antworks Strong Ant IV Installation instruction

BH Hipower
BH Hipower L480 Instructions for assembly and use

Total Gym
Total Gym ELEVATE ROW owner's guide

Pro-Form
Pro-Form Light Cycle owner's manual

Protrain
Protrain PR-PT owner's manual