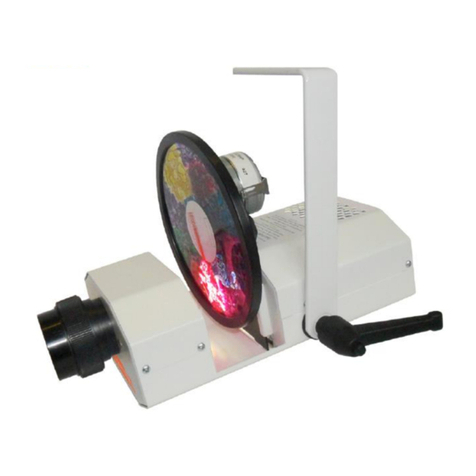
Rompa 23008 User manual

1. Product Name
LED100 Projector for Water Environments
2. Product Code
23008
3. Colour
White
4. Brief Description
Lower voltage projector adapted for environments such as bathrooms.
5. Contents
1 x LED100 Projector
1 x 85mm lens (attached)
1 x 12V DC Transformer with 1.5 metre lead
6. Snoezelen® Stimulations
Sight

7. Best Use
This product looks most effective in a smaller, darkened environment. Projections can be
made even more visually striking when used with compatible products.
8. Compatible ROMPA® Products
The LED Projector must be used with an accessory in the rear gate, typically a Wheel Rotator such
as 22614 Wireless Magnetic Wheel Rotator
This projector cannot be used with the Magnetic Wheel Rotator 22335 nor the Standard
Wheel Rotator 13170 as both these types of Wheel Rotators have a short cable from the
motor that has a 2-pin plug on the end. LED100 Projectors supplied from January 2017
onwards no longer have two pin sockets towards the front of the projector –there is no
socket to plug these older Wheel Rotators into. Each new Wireless Wheel Rotator turns
the Effect Wheel automatically.
An Effect Wheel must be used in the Wheel Rotator e.g. 22365 Underwater, 22370 Sensory etc.
Please see www.rompa.com for our extensive range of themed Effect Wheels.
Further accessories may be used with the Effect Wheels to move or multiply the effects
e.g. 22636 Panoramic Rotator, Clip on Prism 19934.
Only use accessories intended for this projector –use of an accessory not recommended
by the manufacturer could cause an accident, injury or damage. If in doubt, contact
ROMPA® for advice.
Please see www.rompa.com for our range of accessories
9. Starting Up
It is highly advisable that you read the full instructions before use.
Choose a suitably safe location.
Install securely using appropriate fixings.
Place a Wireless Wheel Rotator with a wheel into the rear gate.
Plug in power cord.
Switch on –the appliance power switch has the symbols “O” for off and “I” for on.
10. Detailed Description
Lower voltage projector adapted for environments such as bathrooms. Compact, portable
and ideally suited to the home. 20W LED-lit so low heat, low noise and minimal
maintenance. Bright yet economical to run. Requires a Wireless Wheel Rotator 22614
(two if using a Distortion Wheel) and an effects wheel. Compatible with the Clip-on Prism,
Panoramic Rotator and Wireless Wheel Rotators. The integral 20W LED lamp provides
bright, white light and typically lasts 100,000 hours.

11. Safety
Always supervise the use of this product.
Please check the item carefully for any damage that may have occurred during
shipping. If the carton appears damaged, carefully check the shipping carton for
damage and be sure all accessories necessary to operate the unit have arrived intact.
In case of any difficulties, please contact ROMPA®.
It is highly advisable that you read the full instructions before use. Keep the
instructions in a safe and accessible place so that can be read as required.
This projector has a conformal coating on the internal components. Whilst this can be
used in a damp environment, the projector should be kept dry and only used indoors -
do not expose it to rain, moisture or liquid or place near fabrics or combustible
materials. Never immerse the projector in water or liquids. Avoid damp, excessive
heat, humidity, dust and vibration.
Mount the projector in a safe and stable manner in an area that allows proper ventilation.
Do not block the air opening of the product or drop/insert anything into this opening.
The appliance should be situated away from heat sources such as radiators, heat
registers, stoves or other appliances (including amplifiers) that produce heat.
Make sure the cables do not represent a tripping hazard.
Power supply cords should be routed so that they are not pinched by items placed
upon or against them, also avoid sharp bends, pinches and contact with hot surfaces,
paying particular attention to the point that they exit from the unit. Do not allow the
power cord to be pulled.
Do not attempt to operate this unit if the power cord is frayed or broken or if the
appliance has been dropped or damaged or in the unlikely event of product
failure/malfunction.
This product is not intended to be handled –it is essentially a visual product. Some
parts can become warm with use. However, a suitably responsible adult may wish to
access the projector periodically to change effects.
Do not dismantle. Take the projector to a qualified repairer when servicing is required.
To avoid the possibility of inadvertent resetting the thermal cut-out, this appliance
must not be supplied via an external switching device, such as a timer or connected to
a circuit that is regularly switched on or off.
If using an extension cord, a cord with a current rating at least equal to that of the
appliance must be used. Cords rated for less amperage than the appliance may overheat.
Switch off and unplug after use. Pull the plug out gently and with care to disconnect –
do not yank on the cable to unplug.

12. Technical Specification
Size: 21.5L x 12.5W x 8cmH (27cmH with bracket)
Power Consumption: 24 Watts maximum
Voltage: 100 –240V adapter (1.5m lead)
Output: 12V ~ output current: 750mA maximum
Light: 20W LED Module
Average LED Module life 100,000+ hours
Weight: Projector 1.67kg, projector and transformer 1.85kg, packed: 2.4kg
Lumens: 1200 lumens from LED; 475 lumens (on screen at approx.. 2.8m) with
new module
Colour : Colour temperature 4000° K
Standard lens: 3 element 85mm f2.8 42.5mm Helical Focus Groove
Operating: Ambient temperature 10 to 35°C
Relative humidity 80%rH max.
13. Installation
Choose a suitable location for the projector, bearing in mind the following:
Please seek advice from a suitably qualified electrician regarding the safe installation
of this projector. Installation requirements will very according to the zones of the
water environment - please refer to the BS 7671: 2008+A3:2015 Requirements for
Electrical Installations 17th Edition regulations (particularly point 702.55). It may be
advisable to install this in a neighbouring room and project through a Perspex screen.
Install indoors in dry environments only.
This product requires one electrical socket.
Make sure the projection will be onto a suitable surface –a surface free of objects
and that is white or pale in colour.
The projector is a visual product and should not be handled. However, you may wish
to access the projector periodically to change effects.
There must be unrestricted airflow around the projector, especially around the air
inlet grille.
If an extension cord is necessary, a cord with a current rating at least equal to that of
the appliance must be used. Cords rated for less amperage than the appliance may
overheat.
The projector must always be connected to a grounded (earthed) electricity supply.
Only connect to a power supply with a voltage corresponding to that printed on the
projector. Use the adapter fitting that is appropriate to the country where the
projector is being used.
Do not use the projector at an angle of more than 90° from horizontal as this may
cause an effect or effect accessory to separate from the projector, fall and break
which may also cause injury.

Consider the following projection distances:

Use the projector’s bracket to mount the projector in any of the following ways:
Ensure that the projector is secured to a surface or structure able to bear the weight
of the projector and accessories, via the bracket fitted using suitable central bolt
(minimum: 14mm M10 x 20mm), washers and attachments.
A safety chain or cable must be fitted to the projector and secured to an immovable
object.
The mounting point must be able to support the weight of the projector should it fall.
Adjust the angle and position of the effects projector using the knob which connects the
bracket to the unit. Loosen the securing lever and move bracket to the desired position.
Tighten lever securely. To adjust the position of the lever press the central button, pull lever
away from the projector, turn to the desired position and release.

Place a suitable accessory in the projector e.g. Wireless Wheel Rotator (22614 Magnetic) with an
Effect Wheel. Slide the Wireless Wheel Rotator into the rear gate runners (the main effect goes
into the rear gate runners, with Distortion Wheels etc. in the front gate runners). Once the
Wireless Wheel Rotator is in place, operation will begin instantly.
Plug the round tip of the 12V transformer into the 12V socket on the rear panel. Plug the
12V transformer into a mains socket and switch on at the wall.
Then turn the projector on by the mains switch to the “I” (ON) position. “O” is the OFF position.
Focus the projected image by twisting the lens in and out until the desired focus is achieved.
During focusing beware of rotating the projection lens too far out as this can cause the lens
to separate from the projector and may drop and break or cause injury.

14. Care and Maintenance
Always switch the projector off, unplug and allow to cool before moving, storing and
before all maintenance e.g. changing a fuse. If storing, wrap the cable loosely around
the projector once completely cool.
The fixture should only be cleaned with a dry cloth, ensuring the fans are free from dust.
Use a soft tissue or lens cloth with a little methylated spirit or pure alcohol. Make sure
all parts are completely dry before refitting.
After six months (or 1000hrs) usage the optical system might need cleaning. Switch off
the projector, disconnect from the mains.
Remove the four cover plate screws and remove the cover plate. There is no need to
remove the mounting bracket.
Use a soft tissue or lens cloth with a little methylated spirit or pure alcohol to clean the
focusing lens.
Do not touch the LED module - it may fail if touched.
Carefully re-fit the cover and replace all four screws.
For any repairs, please contact ROMPA®. Do not attempt to repair this product yourself.
Once this product is eventually exhausted, please dispose of it responsibly and appropriately.

15. Troubleshooting
Problem: The Clip On Prism (or other accessory) will not fit on the front lens of the projector
• Check that the ‘click-clack’ has not been removed. This is a cylindrical piece that sits inside
the lens (shown below). Check that this is not still attached to the accessory that has
previously been removed from the projector. Reattach this part to fit an accessory onto the
front lens in order to attach an accessory.
Problem: My Wheel Rotator has a cable with 2 pins –where does this connect?
• Older Wheel Rotators are no longer compatible with this Projector. Please purchase a
Wireless Wheel Rotator (22614 or 22613) and compatible Effect Wheels
Should you need to contact us about this product, please have the serial number to hand.
This can be located as indicated below:
In the unlikely event of product failure, please contact us.
Further copies of these instructions can be downloaded at www.rompa.com
We hope you find our instructions invaluable. If you have any suggestions for improving
them further your comments will be greatly received –please contact us at
LED100 PROJECTOR 23008, May 2019
Copyright ROMPA® Ltd
Table of contents
Other Rompa Projector manuals

Rompa
Rompa Aura Projector User manual

Rompa
Rompa LED100 User manual

Rompa
Rompa 20777 User manual

Rompa
Rompa Rainbow User manual

Rompa
Rompa 20063 User manual

Rompa
Rompa 22126 User manual

Rompa
Rompa 20997 User manual

Rompa
Rompa 100 LED Mini Projector User manual

Rompa
Rompa 19548 User manual

Rompa
Rompa Super Solar 100C User manual