Rompa 20777 User manual

1. Product Name
Water Effects Projector
2. Product Code
20777
3. Colour
Black exterior
4. Brief Description
Projects a circle of colour with a rippling water effect.
5. Contents
1 x projector with integral hanging bracket
1 x power cable
6. Snoezelen® Stimulations
Sight

7. Best Use
In a darkened environment, with the effect projected onto a flat and white or pale-coloured
surface.
8. Compatible ROMPA® Products
This product could be used with other Snoezelen® multi-sensory products from ROMPA®
that have a water theme such as:
19777 –19780 Aquatic Bubble Tubes
CD641 etc. –Swimming With Dolphins CD etc.
21491 –LED Ceiling Panels
21828 –Fish Wall Stickers
21827 –Under The Sea Peel & Stick Border
9. Starting Up
Because of the nature of this Projector, it is not advisable to take any short-cuts when
installing or using this product. Please read the entire manual. Familiarise yourself with the
product before using it. Only this product as described in these instructions.
10. Detailed Description
Projects a circle of colour with a rippling water effect. Various colours and can be stopped
on one colour. Contains LEDs for minimal heat and maintenance. With built-in effects for
stand-alone mode. This product is not part of ROMPA®’s Wi Fi range as it has an internal
colour wheel rather than multi-colour LED lamps.
The internal colour wheel can be stopped at any point for both single and mixed colours.
The projector can be set to a static mode (operates the same one single colour) or colour
change mode (continually changes colour in sequence). To set the colour wheel into colour
changing mode (continually rotating), move the switch on the right hand side of the back
panel (indicated below as 03) to the ON position. To stop the rotation move the switch to
the OFF position. The internal colour wheel has four colours –red, green, blue and clear.
The colour wheel speed is pre-set and cannot be altered.
To adjust the focus rotate the lens assembly on the front of the product clockwise or anti-
clockwise to achieve a hard or soft focus.

11. Safety
Supervise the use of this product.
Cease use of the product if it becomes damaged or ceases to work.
Make sure that the power cable is never crimped or damaged. Establish a regular
checking schedule to make sure the product and the cable are not damaged.
Should this product be dropped or damaged, unplug immediately and cease use. Do not
re-use the product before a qualified and suitably experienced electrician has confirmed
that it is safe to re-use the product.
As with all electrical items with a higher voltage, misuse could result in electric shock.
For indoor use only.
Keep this product dry and away from moisture and liquids; flammable sources; and gases.
This product can become warm after prolonged use.
Unplug after use and before any maintenance and cleaning.
Do not allow the power cable to come into contact with other cables. Handle power
cables and connections with care.
Do not remove the safety warnings and information labels from the product.
Do not stare directly into the light.
This product may not be suitable for those with photosensitive epilepsy.
This product must be earthed. If any doubt, please consult a suitably qualified person.
Ensure the available voltage does not exceed the voltage given in the specification below.
If this product has been exposed to extreme temperatures and drastic temperature
fluctuations (e.g. after transportation), do not plug this product in immediately as the
resulting condensation could damage the product. Do not plug the equipment in and
switch this on till this product has reached room temperature.
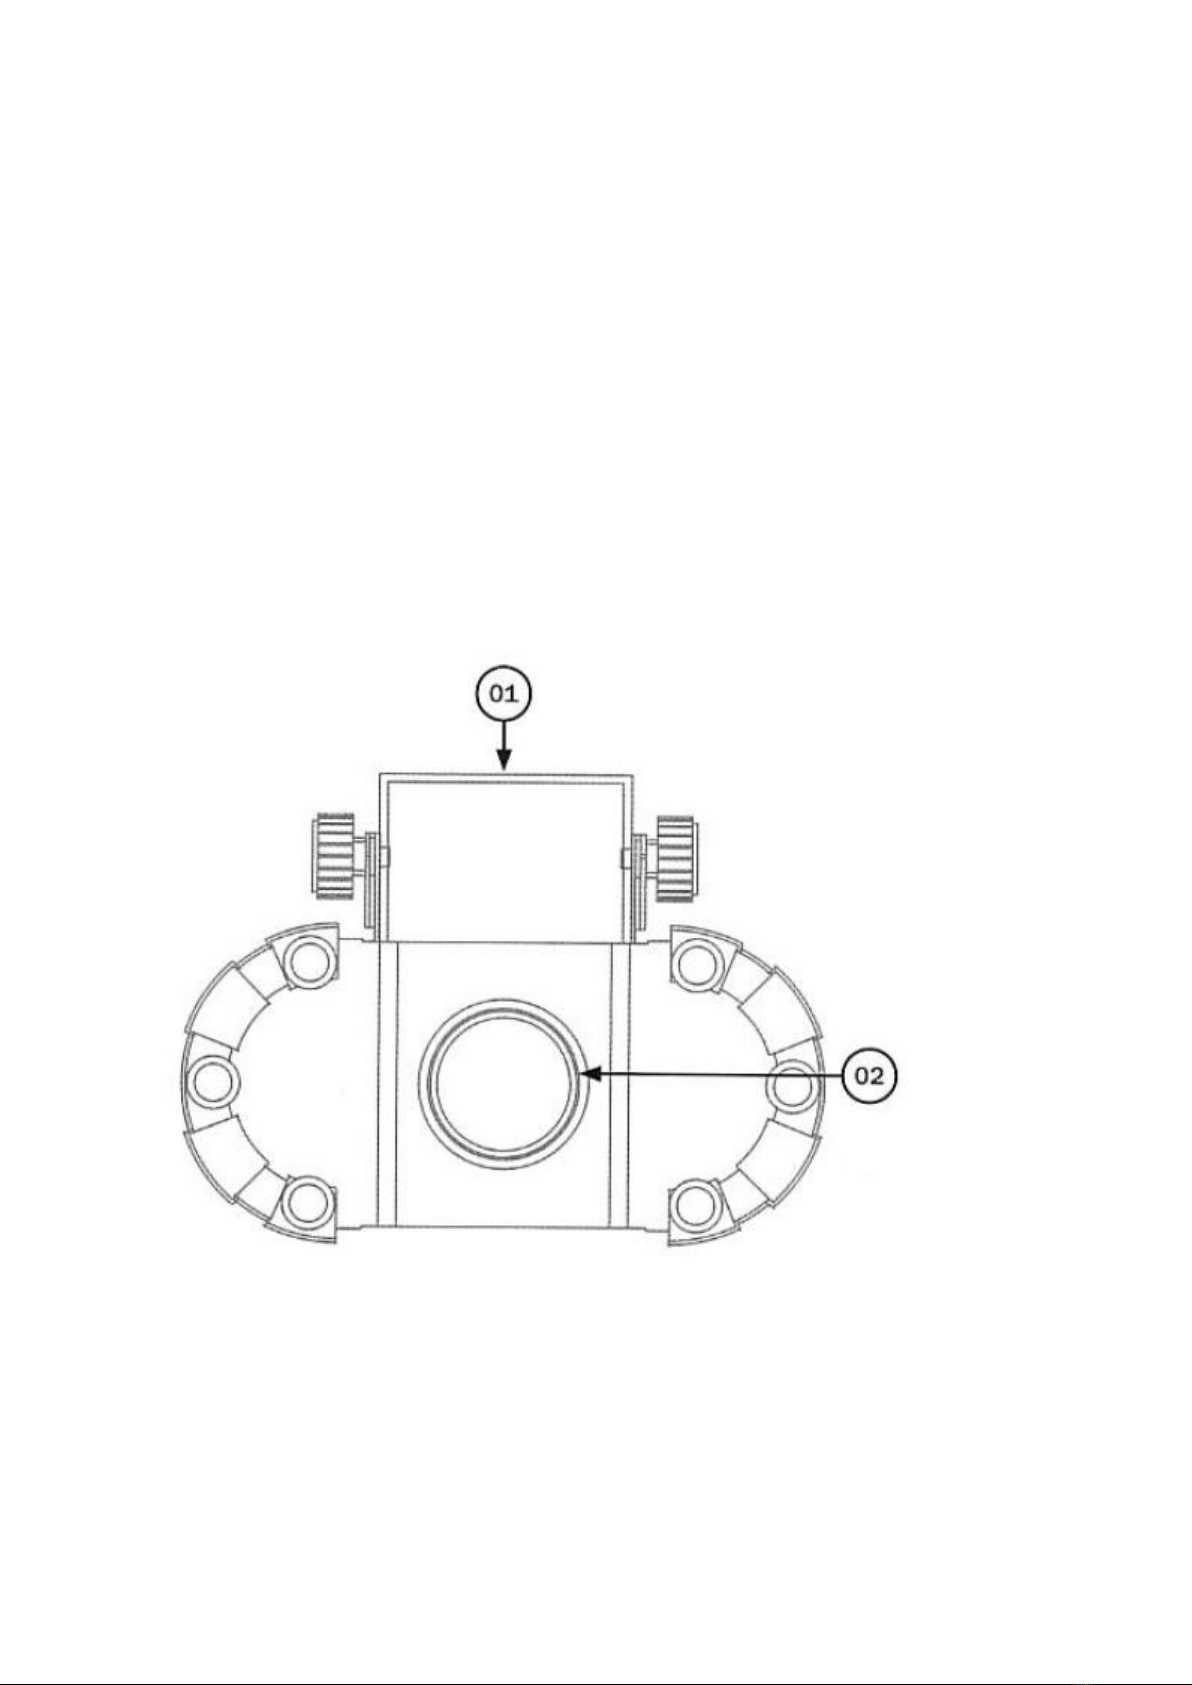
Only carry the product using the hanging/mounting bracket (never by the power cable)
Do not connect to a dimmer pack.
Do not attempt to open up or modify this product.
Do not disconnect the power supply by tugging or pulling the cord.
Do not switch the equipment on/off in short intervals as this will reduce the life of the product.
Do not view the light output with optical instruments or any device that may concentrate
the beam.
12. Technical Specification
CE: Risk Group 2 LED product according to EN62471
Power supply: 240V, 50Hz; IEC power input
Power consumption: 50W
Fuse: F2A 250V
Light: one 40W white LED
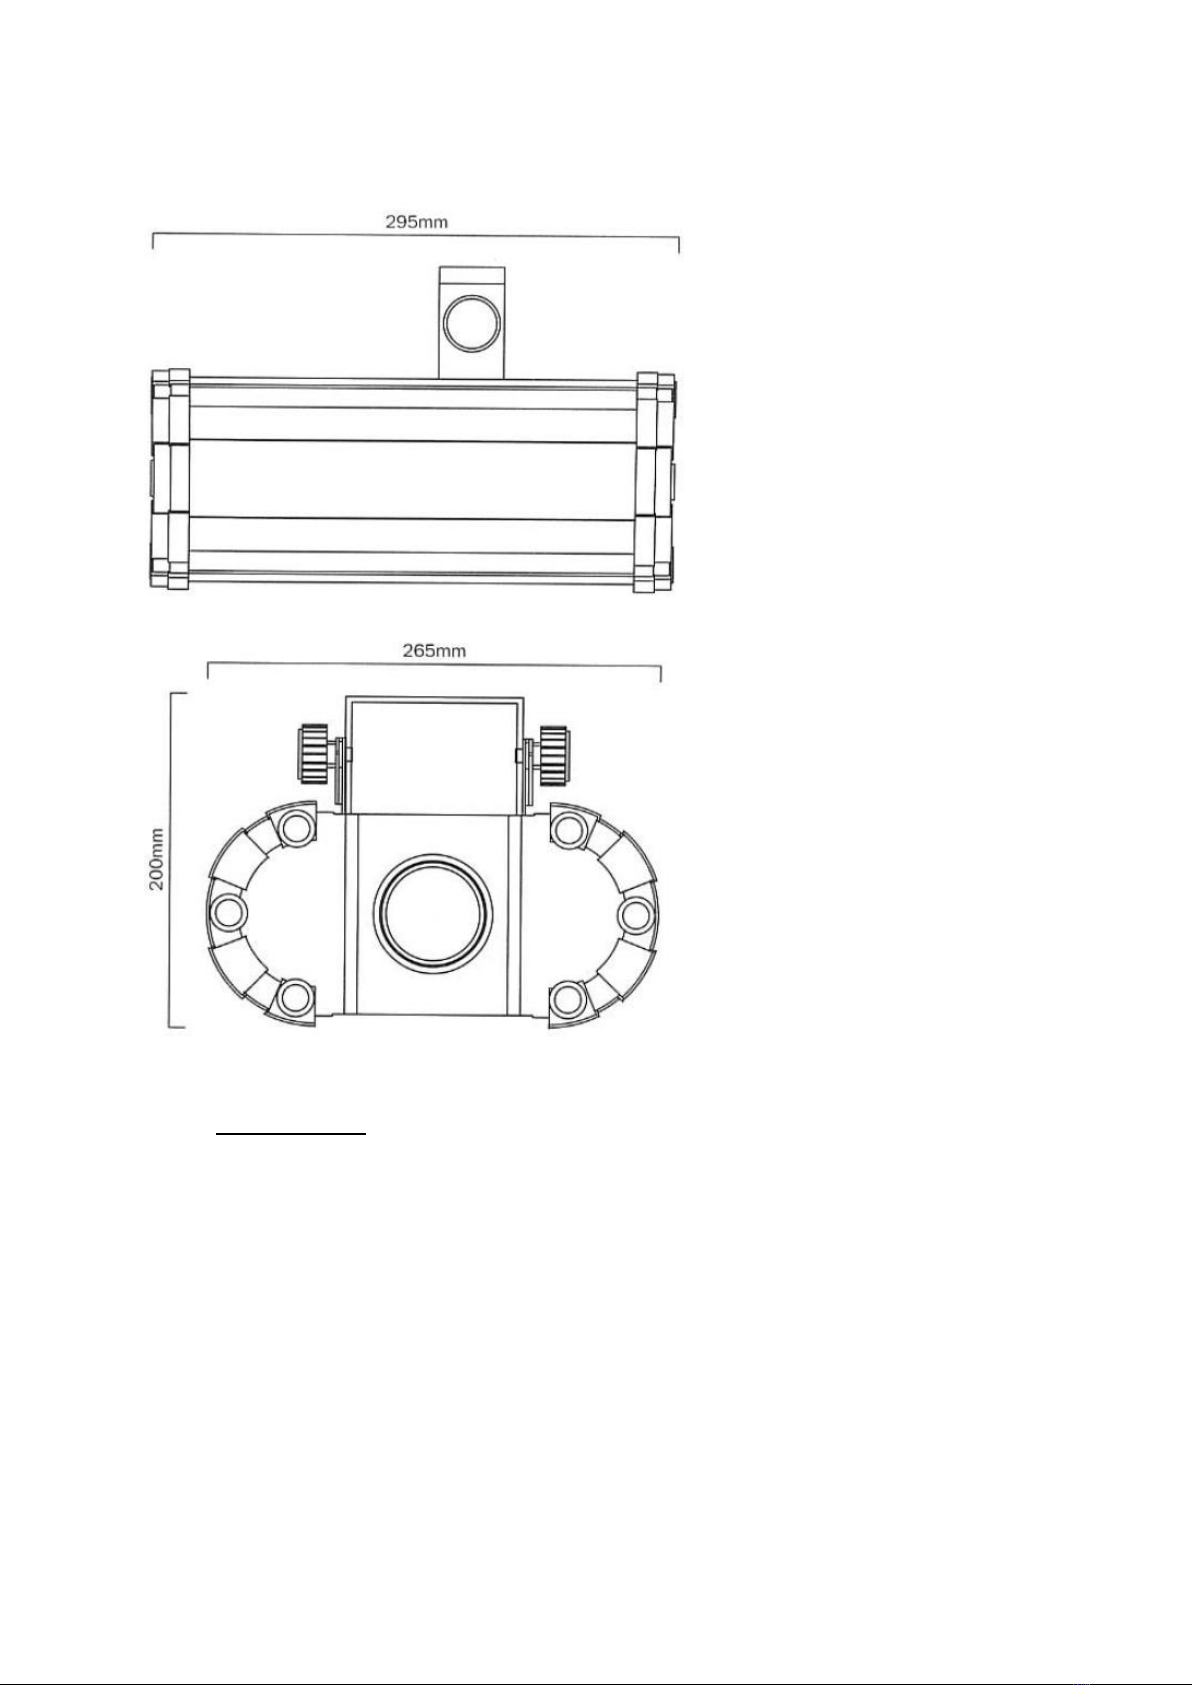
Size: 31 x 26.5 x 20cm
Weight: 4kg
Beam angle: 34°
Focus: Manual focus
Temperature: Fan cooled

13. Installation
Please read this entire manual before installing the product, paying particular attention
to the Care and Maintenance section.
It is recommended that a suitably experienced and qualified person install this projector.
Make sure that this product is safely installed before use.
This projector is not intended for domestic (household) use.
Check for any signs of damage caused during transportation.
This product is for indoor use only (<40°C). Keep the product away from moisture.
Install out of reach. This product is intended for visual purposes only –it is not
intended to be handled.
Connect the projector to the mains with the power plug supplied. Never use a different
power supply to the one supplied.

Do not connect it to a dimming pack.
Keep the air vents free at all times. Never cover the projector, even partially.
Do not switch on the projector immediately after it has been exposed to changes in
temperature. Leave the projector switched off till it has reached room temperature.
Ensure the projector has adequate ventilation. Ensure no ventilation slots are blocked.
Overhead Mounting
Install the Water Effects Projector in a suitable place, bearing in mind the following:
The construction of the ceiling the projector will be attached to should be able to
comfortably support 10 times the weight of the projector.
The projector must also be secured with a secondary attachment e.g. a safety cable or
chain.
Use appropriate fixtures (not included).
Adjust the desired inclination angle via the mounting bracket and tighten the bracket
adjustment knobs. Loosen the knob, adjust to the desired angle and tighten knob by
turning clockwise. Do not use a tool to turn, as this may cause damage.
01 = Hanging Bracket 02 = Focus lens

03 = Colour wheel rotation switch 04 = On/off switch
05 = Fuse: F2 250V 06 = IEC power input 07 = Earth point
14. Care and Maintenance
Unplug fixture from power before any maintenance.
There are no user-serviceable parts inside the projector. Do not attempt to access the
interior of the projector. In the unlikely event of product problems, please contact
ROMPA®. Repairs should only be carried out by a suitably qualified and experienced
electrician.
Protect the power cord against damage and check it regularly for signs of damage.
When replacing the fuse, be sure to replace with the same fuse source.
Check that all screws are tight and free of corrosion.
Make sure that the housing, the lenses, the mounting supports and the installation
location (e.g. ceiling) are not deformed, modified or tampered with (e.g. do not drill
extra holes in mounting supports etc.)
Make sure mechanically moving parts don’t show signs of wear and tear.
Keep the air vents free at all times. Never cover the projector, even partially.
Keep the projector away from dust and extreme heat. Use a vacuum or air
compressor and a soft brush to remove dust collected on external vents.
Allow sufficient air circulation.
Protect the projector from shocks and abuse. Handle this product with care. Use
the projector only as detailed by this manual.
Do not attempt to modify the projector.

The projector should not be left on all day, every day. Regular operation breaks will
prolong the life of the projector.
Do not stand directly below the projector when it is being installed, removed or
serviced.
We recommend that a suitable qualified person check the projector once a year.
Clean lenses when the fixture is cool with a mild solution of glass cleaner and a soft,
lint-free cotton cloth or lens tissue. Apply solution to the cloth/tissue and drag dirt
and grime to the outside of the lens carefully. Gently polish until they are free of
haze/lint. Always dry parts thoroughly after cleaning and ensure that product is
completely dry before reconnecting to power supply.
Cleaning of optical lenses must be carried out regularly to optimise light output.
Once this product is eventually exhausted, please dispose of it appropriately and
responsibly.
Only use fuses of the same type and rating.
15. Troubleshooting
In the unlikely event of product failure, please check the following:
Problem: Fuse keeps blowing
Check total load placed on the electrical circuit.
Problem: Device does not power up
Check mains power. Check power cable is plugged into the projector firmly and isn’t
loose.
Further copies of these instructions can be downloaded at www.rompa.com
We hope you find our instructions invaluable. If you have any suggestions for improving
them further your comments will be greatly received –please contact us at
WATER EFFECTS PROJECTOR 20777, July 2019
Copyright ROMPA® Ltd
Table of contents
Other Rompa Projector manuals

Rompa
Rompa Aura Projector User manual

Rompa
Rompa 20997 User manual

Rompa
Rompa 22126 User manual

Rompa
Rompa 23008 User manual

Rompa
Rompa 19548 User manual

Rompa
Rompa LED100 User manual

Rompa
Rompa 20063 User manual

Rompa
Rompa 100 LED Mini Projector User manual

Rompa
Rompa Super Solar 100C User manual

Rompa
Rompa Rainbow User manual