Ronstan BB OrbitBlock RF25109 Series User manual

RF25109 Series 20 BB OrbitBlock™ Lashing Head
User Instructions
•1.0 Lashing Options
•2.0 Becket Options
•3.0 Care & Maintenance
•4.0 Definitions
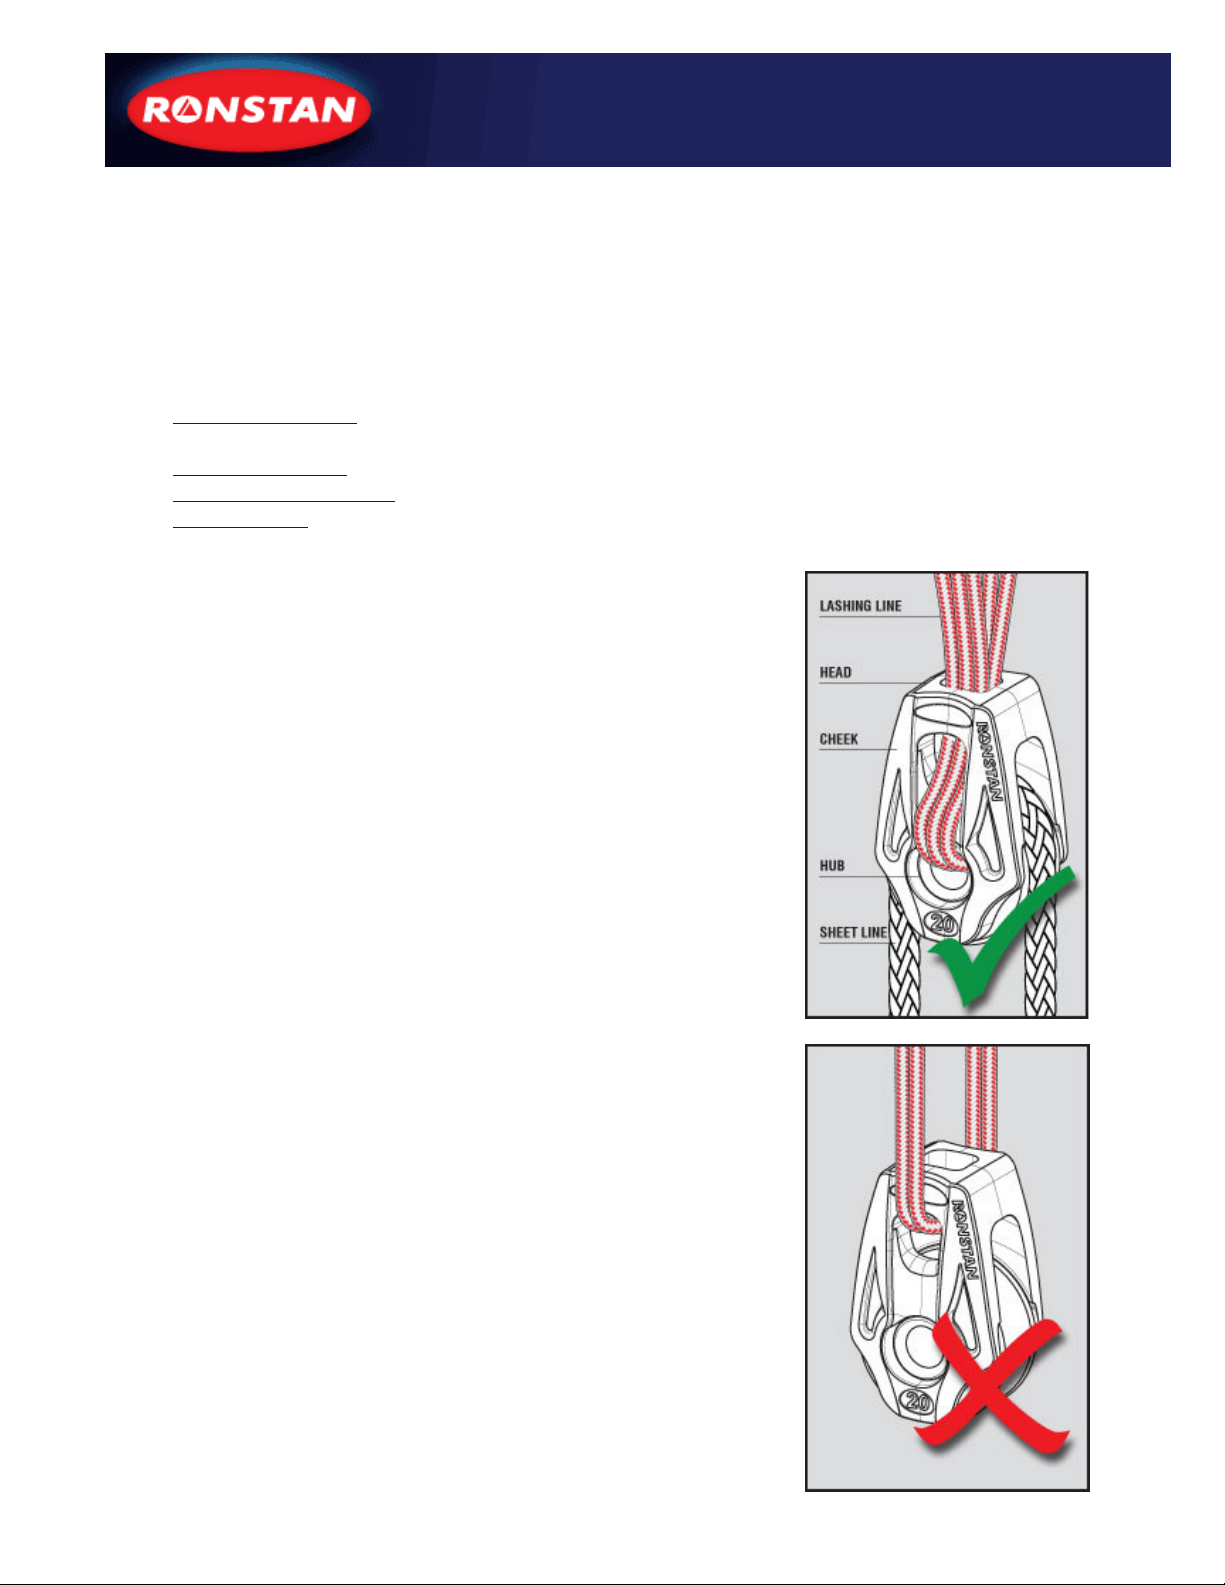
Ronstan BB Orbit Blocks™ feature a unique Lashing head. Building
on the latest trends in grand prix dinghy and ocean racing, it replaces
the steel head post and shackle arrangement of traditional blocks.
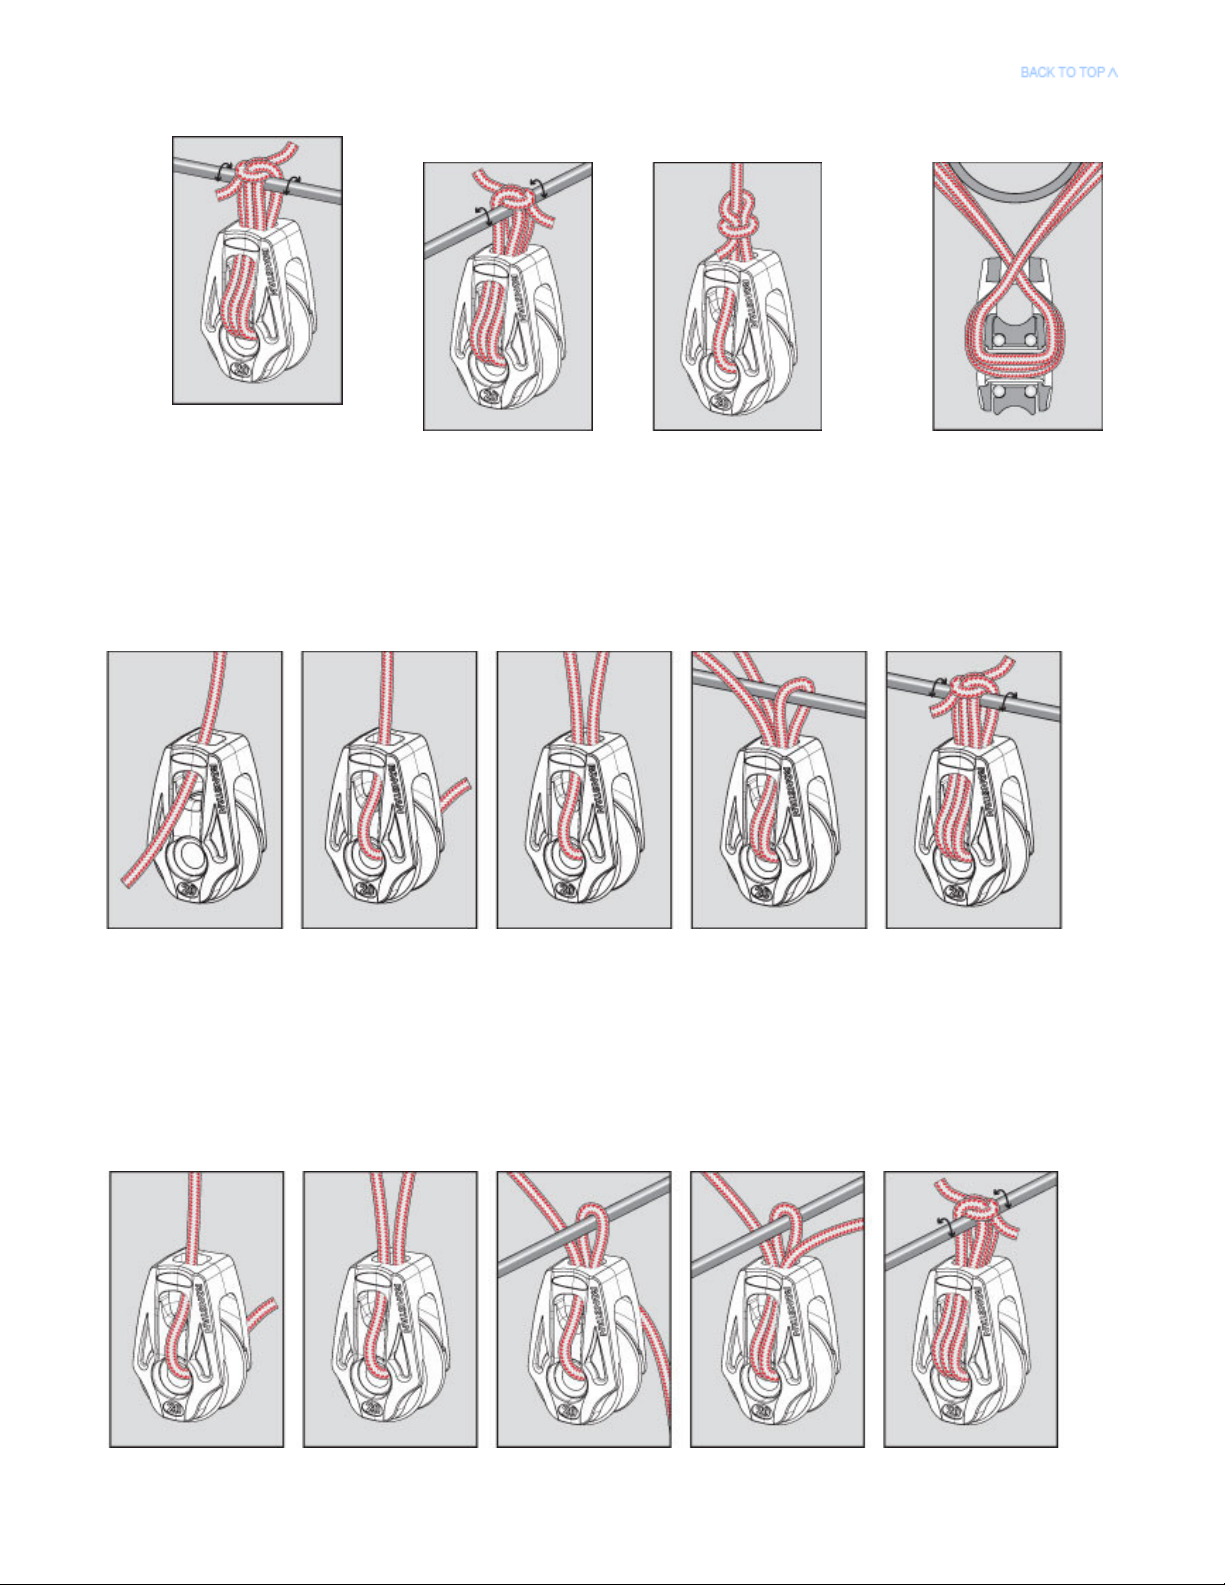
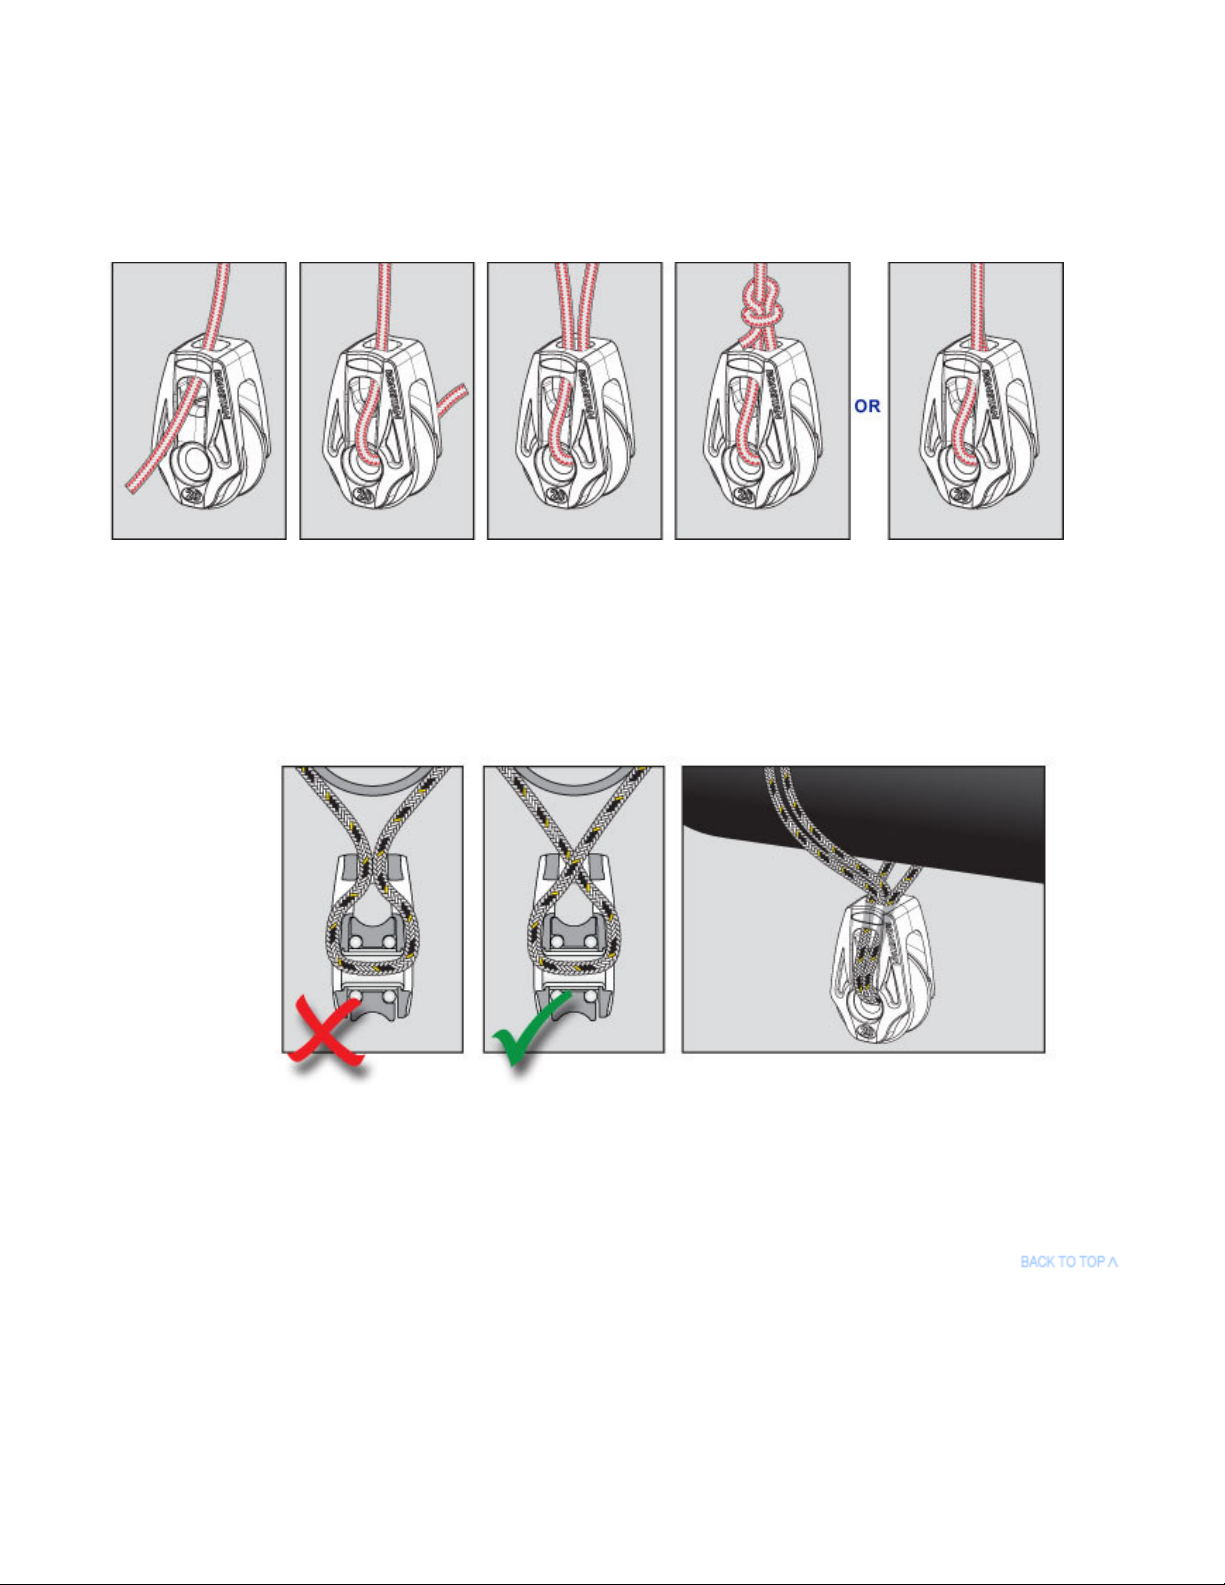
•IMPORTANT: In order to meet breaking loads this block must
be lashed with the lashing, strop or link passing through the
hub.
•The lashing must be passed down through the head, out through the
cheek, through the hub, back in through opposite cheek and back up
and out through the head. Repeat for lines, sizes that require more
than one strand to meet load rating.
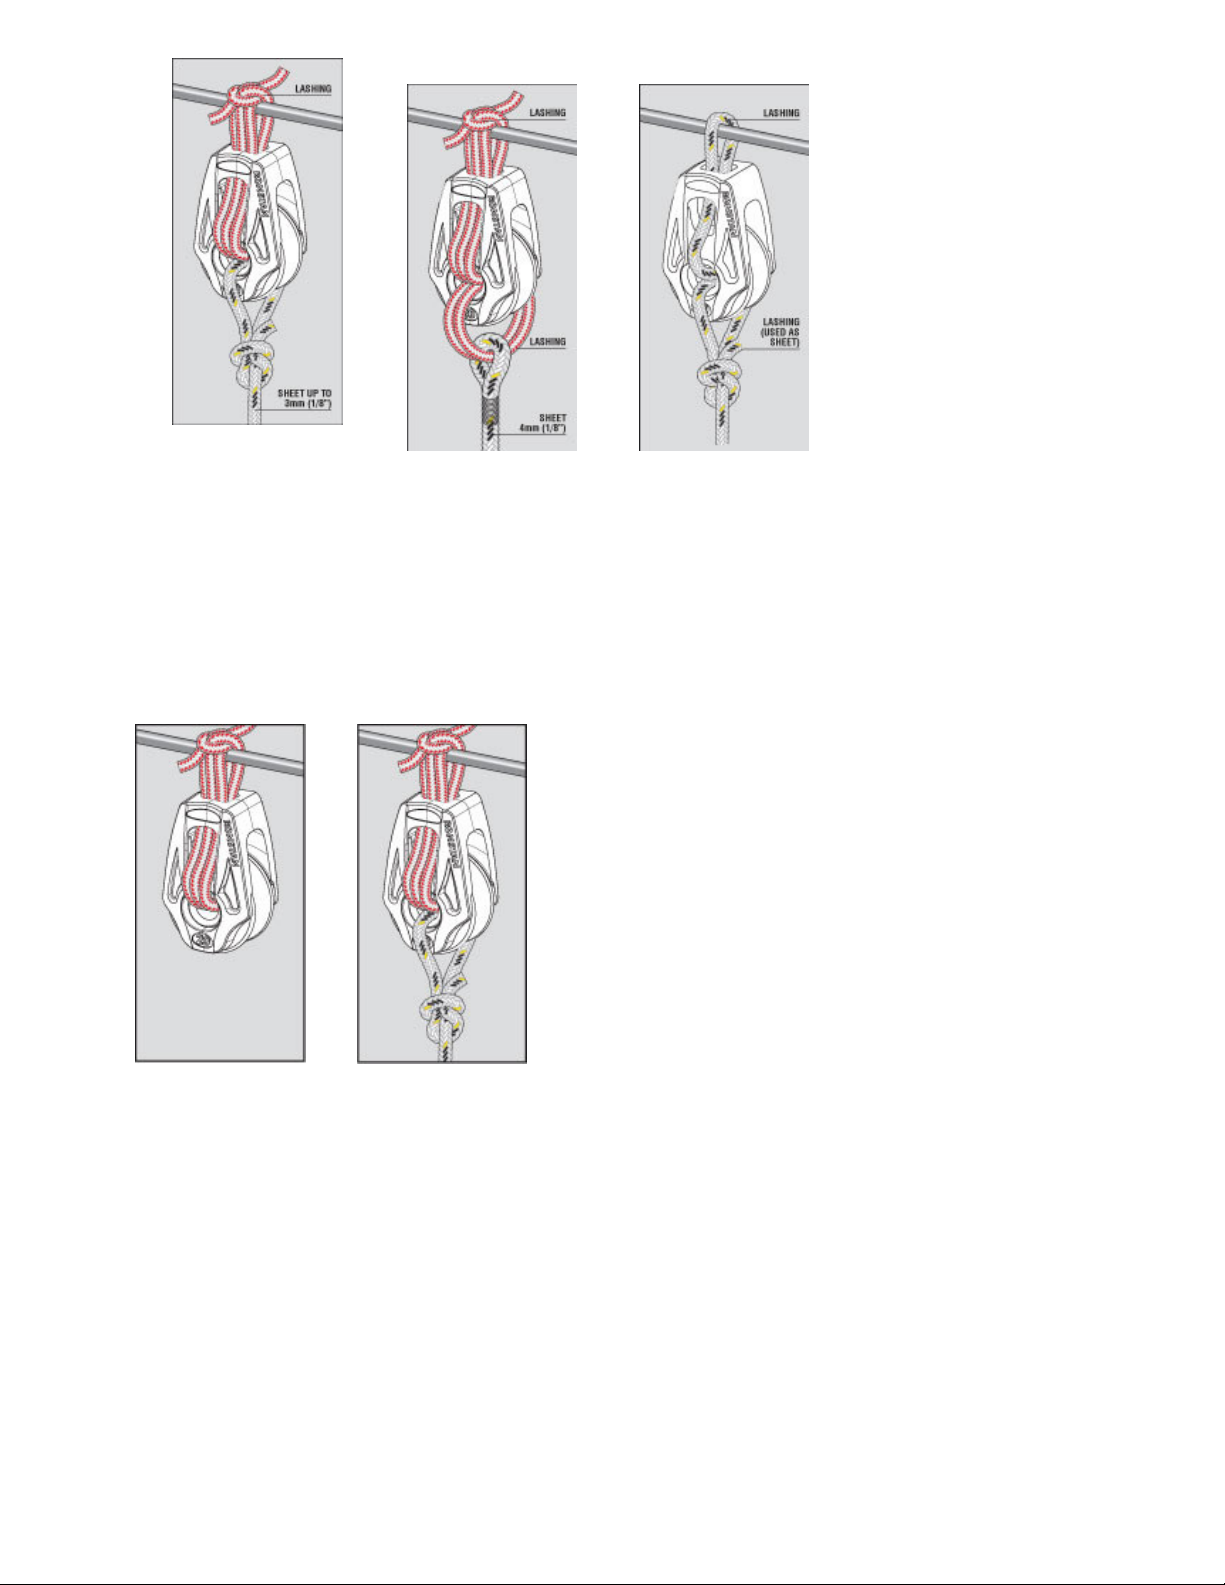
•The Maximum Working Load and Breaking Load of the assembly
(Block + Lashing) is generally limited by the strength of the rope
and the joining method. Knots, splices, stitching, etc. will generally
have a lower Breaking Load than the rope itself. It is possible to use
up to 4mm (5/32”) lashing line for lashing the RF25109 running the
lashing around as a single strand, but a neater result with more
secure knotting can be achieved by using the smaller line size
provided(e.g. 1.7 - 2mm) wound through multiple times. The
RF25109 Series 20 Orbit Block™ is supplied with 750mm (30”) of
1.7mm (1/16”) diam. covered Dyneema® lashing line.
•For best results, the lashing must be attached to a mounting point
with a smooth, well rounded profile.
•Avoid attaching directly to fittings with sharp edges or rough
surfaces that may damage the lashing through abrasion or point
loading. For this situation use a shackle with a smooth surface
between the lashing and the fitting. Regularly inspect the lashing
for damage, if found replace immediately.

1.0 LASHING OPTIONS
1.
2.
OR
OR
OR
Attachment at 0°
Attachment at 90°
Line end attachment
Large diameter
object
attachment (Must
have at least 2
strands)
1.1 Attachment at 0° (in-line)
1.1.1 Pass the
lashing line down
through the head
and out through
the cheek.
1.1.2 Pass the
lashing line
down through
the head and out
through the
cheek.
1.1.3 Pass lashing
line in through the
opposite cheek and
back up through the
head.
1.1.4 Pass lashing line
around fixing point.
Repeat
steps 1.1.1 to 1.1.3 if more
than one strand is required
to meet desired breaking
load.
1.1.5 Finish
lashing with
appropriate knot,
splice or
whipping.
1.2 Attachment at 90°
(transverse)
1.2.1 Pass the 1.2.2 Pass 1.2.3 Loop lashing 1.2.4 Pass lashing line 1.2.5 Finish

lashing line down
through the head,
out through the
cheek and
through the hub.
lashing line in
through the
opposite cheek
and back up
through the
head.
line over the fixing
point. Pass back
down through the
head and out the
same cheek it last
passed through.
through the hub, in through
opposite cheek and up
through the head. Repeat
steps 1.2.1 to 1.2.3 if more
than one strand is required.
lashing with
appropriate knot,
splice or
whipping.
1.3 End Attachment
1.3.1 Pass the
lashing line down
through the head
and out through
the cheek.
1.3.2 Pass
lashing line
through the hub.
1.3.3 Pass lashing
line in through the
opposite cheek and
back up through the
head.
1.3.4 To finish attachment
tie a bow line above the
block. Note: Knot must be
a non-slipping (non-
tightening) knot.
1.3.5 For the
ultimate clean
finish use an eye
splice.
1.4 Large Diameter Object
Attachment
1.4.1 1.4.2 1.4.3
Where attachment to a large diameter object, wider than the head of the block, is required (eg. a boom)
the lashings must cross each other between the head of the block and the object. Four strands of lashing
are required to prevent the block twisting and creating a poor lead. The strands from one side of the block
should be to the outside and the strands from the other side passing between them. See diagram 1.4.3.
2.0 BECKET OPTIONS
A through-hub can be used as a becket for up to 3mm (1/8”) lines. A take-off becket can be created with the
lashing line for use with 4-6mm (5/32” - 1/4”) sheet lines.

1.
2.
OR
OR
Through Hub Becket
For sheets up to 3mm
(1/8”).
Lashing Used
as Becket
For sheets 4mm
(5/32”) to 6mm
(1/4”).
Lashing Used as Becket and Sheet Line
For sheets up to 3mm (1/8”). It is possible for the
lashing to be used as the becket and sheet line
also.
2.1 Through-Hub Becket - for sheets up to 3mm (1/8")
2.1.1 Attach block to
fixing point as per
lashing option 1.1 to 1.4.
2.1.2 Pass the sheet
end through the hub
and secure with a
bowline or eye
splice.
2.2 Lashing Used as Becket - for Sheet Lines 4mm (5/32") to 6mm (1/4")

2.2.1 Pass the line down
through the head, out
through the rear side
cheek and through the
hub.
2.2.2 Loop under the
bottom of the block
and again though the
hub.
2.2.3 Repeat
step 2.2.2 if
more than one
loop is required
to meet the
desired breaking
load. Pass line
in through the
far side cheek
and back up
through the
head.
2.2.4 If another loop
is required to meet
breaking load, loop
the line around
fixing point, pass it
back down through
the head, out
through the near
side cheek, through
the hub, back in
through the far side
cheek and back up
through the head.
2.2.5 Finish
lashing with
appropriate knot,
splice or
whipping. Attach
the sheet to the
becket loops
using a bow line
or splice.
2.3 Single Line Used as Becket & Sheet Line - for Sheets up to 3mm (1/8")
2.3.1 Pass the line in
through a cheek, up
through the head, around
the fixing point, back
down through the head
and out through the
opposite cheek.
2.3.2 Pass both ends
through the hub in
opposite directions.
2.3.3 Finish lashing with appropriate
knot, splice or whipping. If a knot is
used it must not be a ‘slip’ knot, and
the knot must be such that it pulls
equally on each line leading up to the
hub. A bowline is ideal. Note: the
breaking load of the installed block is
dependent on the breaking load of the
line; up to a miximum B.L. of 550kg
(1210lb). Knots, splices, stitching, etc.
will generally have a lower breaking
load than the rope itself.

3.0 CARE AND MAINTENANCE
Lashing attachment
•To receive the maximum performance benefit from the Lashings, they must be used correctly installed,
inspected regularly and replaced when required.
•Lashings must be attached to a mounting point with a smooth, well rounded profile without sharp
edges or burrs. If in doubt, use a shackle with a smooth surface between the Lashing and the mounting
point.
•Lashings will eventually suffer degradation from fatigue, wear and UV exposure. Like all running and
standing rigging, Lashings should be inspected as a part of your regular boat maintenance program and
replaced if they show significant wear or fibre damage.
Orbit Blocks™
•Grit and sand will damage bearing systems. Ronstan Orbit Blocks™ have a precisely engineered
bearing system that should be kept clean and free of sand and grit to ensure optimum performance and
service life. Blocks, in particular the bearing areas, should be flushed with fresh water regularly and
periodically cleaned with a mild detergent and water.
•Dry lubricants such as Ronstan Sailfast silicon spray may be used to lubricate the bearing system.
Oil/petrochemical based lubricants must not be used.
•Ronstan Orbit Blocks™ are designed and manufactured for applications on sailboats.
•See the INFO section of the Ronstan web site and our catalogue for important customer considerations
and warranty information.
4.0 DEFINITIONS
BB = Ball Bearing
MWL = Maximum Working Load
BL = Breaking Load
Dyneema® is a trademark of Royal DSM NV.
DSM is the inventor and manufacturer of Dyneema®, the world’s strongest fibre™. “Dyneema®”, and
“Dyneema®, the world’s strongest fibre™” are trademark(s) (applications) owned by Royal DSM NV.
Table of contents
Other Ronstan Safety Equipment manuals
Popular Safety Equipment manuals by other brands

Petzl
Petzl PAD FAST manual

Honeywell
Honeywell SPACEL 3500 user guide

SafeWaze
SafeWaze 021-4072 instruction manual

TEUFELBERGER
TEUFELBERGER SIRIUS 11MM E2E Manufacturer's information and instructions for use

Honeywell
Honeywell EBI XLS MASS NOTIFICATION SYSTEM Configuration, Preset Setup, Operation

LAHTI PRO
LAHTI PRO L1520400 user manual