Roots & Branches LITTLE CREEK VKP1208 User manual

Instruction Manual
TM
LITTLE CREEK
WATER DISTILLER

Table of Contents
*For the most up-to-date manual, or for more information regarding
this product, visit our website: VKPbrands.com
Parts Diagram...............................................................................................3
Operating Precautions.................................................................................4
Instructions & Warnings.............................................................................4
Care Instructions..........................................................................................4
Multiple Uses ................................................................................................5
Overview .......................................................................................................5
Assembly & Use Instructions ....................................................................6
Distiller Assembly & Use............................................................................6
Product Warranty.........................................................................................8

3
Little Creek Water Distiller
Model VKP1208
Parts Diagram
Your complete Water Distiller includes everything shown below:
Parts List
(1) VKP1208-2 Condenser Pan
(2) VKP1140-3 Collector Pan
(3) VKP1140-6 Hose with Metal Tip
(4) VKP1140-5 Spring Clamp
(5) VKP1140-10 Water Pan
All replacement parts are available on our website, VKPbrands.com.
(1)
(2)
(3)
(4)
(5)

4
Operating Precautions
TO PREVENT PERSONAL INJURY AND TO PREVENT
DAMAGE TO YOUR WATER DISTILLER, PLEASE READ AND
FOLLOW ALL OF THE FOLLOWING
INSTRUCTIONS & WARNINGS
• Always use heat protective gloves or mitts when handling any part of
your distiller.
• Any steam produced will be hot and can cause a serious burn
injury. Use extreme caution while using your distiller.
• Check the water pan water level often. Do not let the water pan boil
dry. This will cause serious damage and warping to your distiller and
may render it unusable. Your stovetop could also be damaged if this
happens.
• Never leave your water distiller unattended while in use.
• Do not use by or near children.
• For household use only.
Care Instructions
Before rst use, wash all parts of the distiller in the dishwasher or by hand
with warm soapy water. This will help to remove any particles or residue
from the factory. Once clean, dry everything with a soft dish towel to keep
water spots from forming.
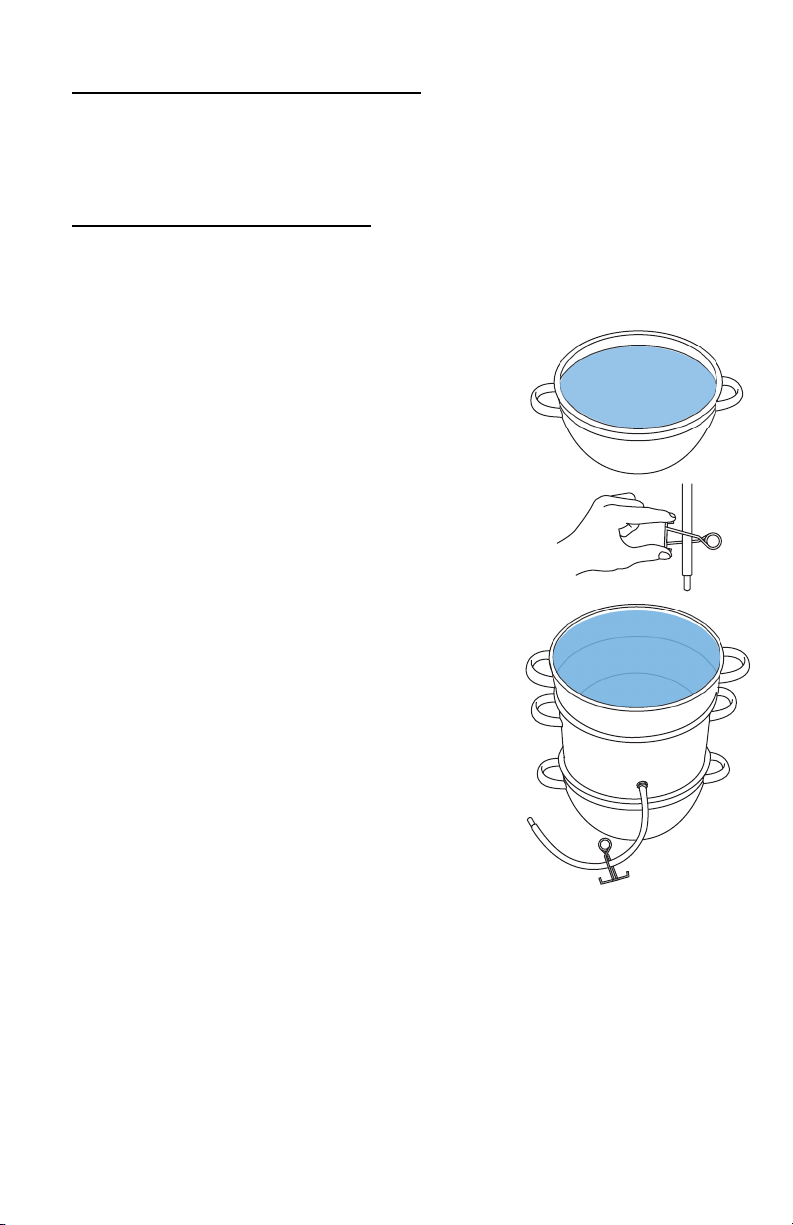
• Before rst use, ll the collector pan with water to test the hose. If
water does not freely ow, turn the metal tubing inside the pan slightly
to one side.
• As you use the distiller, minerals will be left behind inside the water pan
and condenser pan. This is normal and it is recommended that these
deposits be cleaned out to ensure optimal performance of your distiller.
They are easily cleaned by soaking the affected portion in a diluted
vinegar solution. Use ½ c. vinegar to 1 qt of water, let soak for 30-60
minutes, use a dish cloth to wash off any remaining hard water, rinse
and dry. You may need to increase the soak time and/or the amount of
vinegar used for tough stains.

5
Multiple Uses
Although the primary purpose of this item is to distill water, the parts that
make up this distiller can be used in a variety of ways.
• Double Boiler - Remove the collector pan and use only the water pan
and condenser pan and it can be used as a double boiler.
• Ice Bath - Fill the bottom pan with ice and place the condenser pan on
top and you have an ice bath.
• Stock Pot - The water pan can also be used as a stock pot
• Stainless Steel Bowls - Both the condenser pan and water pan can be
used as stainless steel bowls.
• Steam Juicer - Just replace the condenser pan with the colander and add
the lid and this can also be used as a steam juicer. The lid and colander
are available on our website VKPbrands.com
VKP1140-1 - Lid
VKP1140-2 - Colander
Overview
Cool water (condenser pan)
9 Quart Capacity
Distilled water (collector pan)
4.5 Quart Capacity
Water to distill (water pan)
7 Quart Capacity When Distilling
8 Quart Capacity as Stock Pot

6
Assembly & Use Instructions
Make sure you have read through the sections - Operating
Precautions (p. 4) and Care Instructions listed above - before
assembling and using your distiller.
Distiller Assembly & Use
1. Remove your new Water Distiller from the box and packaging and
check that all items are included and in good condition. Refer to the
diagram on p. 3 for a list of all parts.
2. Wash all parts of the distiller thoroughly by
hand, including the hose and clamp, in warm
soapy water, and rinse carefully.
3. Once clean, take the water pan and ll it with
water up to the line and place it on your stove-
top. (See diagram at right)
4. Next, place the collector pan on top of the
water pan. Squeeze the clamp and slide it to
the center of the hose. (See diagram at right)
5. Then place the condenser pan on top of the
collector pan and ll the condenser pan all the
way to the top with cold water. (See diagram at
right)
7. Do NOT place a lid or anything else on top of
the condenser pan. The water in the condenser
must be able to evaporate to provide the
cooling needed for the distiller to work
properly.
8. After correctly assembling your distiller, turn
on the burner unit to the High position.
Be sure to always use heat protective gloves or mitts while
working with your distiller. The steam is very hot and will burn
you.

7
9. Once the water has come to a rapid boil, begin turning down your
burner temperature until the water remains at a consistent rolling boil
that is not too vigorous.
10. Do not let the water pan boil dry, or damage to the water pan or your
stovetop may occur. By placing 2-3 marbles in the water pan you can
hear when the water is almost out. It is recommended that the rst time
you use the distiller, or any time it is used on a different stove, you note
how long it takes for the water pan to
almost run out of water and record that
time. Then each time you use the distiller,
you can set an alarm to notify you when
the water pan is almost boiled dry.
11. You will need a container ready for the
distilled water to drain into. Metal or
glass containers work best, as the water
will be near boiling temperature. Place it
slightly below the distiller so the hose
hangs down into the container by 3-4
inches. (See diagram at right). It will take
about 1-2 hours before there is enough
water in the collector to drain.
12. Once the distiller is up to temperature, it will distill about one quart of
water per hour; however, this will vary depending upon the stove or
heat source that is used. You can add water to both the water and
condenser pans and continue the distillation process for as long as
needed.

Product Warranty
Register your warranty online at:
VKPbrands.com/Warranty
Model VKP1208 - Little Creek Water Distiller: 5 years
We are condent in the quality of our products and back each one
with a limited warranty for the length of time specied above.
Should you experience any problems with your product, please
contact our Customer Service Department.
All warranty claims must be accompanied by a proof of purchase
and are only valid if the appliance has been operated within the U.S.
or Canada and used for its intended purposes. These products are
for household use only.
Items Not Covered:
• Return shipping costs or returned items lost in transit.
• Damages to the product due to accident, misuse, abuse,
negligence, or if the appliance has been altered in any way.
• Products used outside of the United States or Canada.
1804 Sandhill Rd
Orem UT, 84058
Phone: 866-257-4741
VKPbrands.com
Roots & Branches is a trademark of VKP Brands
© Copyright 2020 VKP Brands, all rights reserved
Table of contents