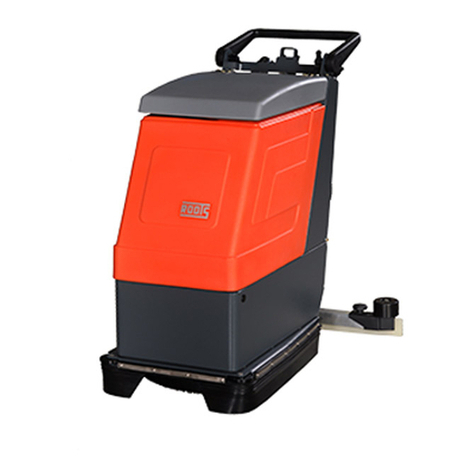
ROOTS RootsScrub E 350 User manual

RootsScrub E 350
Walk Behind Floor Scrubber Drier
Instruction Manual & Illustrated Parts List


TABLE OF CONTENTS
Introduction
Technical Specification
General Safety Instructions
First Operation
Machine Operation
Maintenance
4
5
6
8
9
10
Description Page No
3
RootsScrub E 350
Please be advised explicitly that we cannot accept any legal claims out of the contents of this manual. If
repair work has to be performed, make sure that only genuine spare parts are used since genuine spare
parts only may guarantee continuous and dependable operation of your machine.
Roots Multiclean Ltd.
RKG Industrial Estate,
Coimbatore - 641 006, India.
557310045-00, Rev - D, 01/16

INTRODUCTION
4
RootsScrub E 350
Dear Customer,
We are pleased with your having chosen the
RootsScrub E350 machine for your floor cleaning
requirements. Backed by our industry expertise that
spans across decades, we assure you that the machine
comes with our Roots promise of quality, efficiency and
performance.
We advise you to carefully read through the instructions
prior to the operation of the machine. This manual
contains detailed instructions for the proper operation of
the machine, along with important information regarding
its handling, care, maintenance and service needs.
We are sure that you will find the machine and its
performance to your utmost satisfaction. Once again, we
thank you for choosing Roots Multiclean as a trusted
partner for your cleaning requirements and solutions.
Usage and Handling
Use of the product beyond the specified scope of
functioning is deemed improper and the manufacturer
cannot be held liable for any damages which may arise
due to this.
This machine may be used only by persons who are
trained or are familiar with the machine and are aware of
the possible hazards involved. The appropriate Accident
Prevention Regulations as well as applicable general
regulations pertaining to Safety and Health at the work
place must be adhered to by the user.
Mo d i f i c a t i o n s ma d e t o m a c h i n e w i t h o ut t h e
manufacturer's consent will relieve the manufacturer of
responsibility and any possible liability for consequential
damage.
Preface
Notes on Domestic Warranty
Please refer to the Limited Warranty card supplied
along with the machine for additional information. This
Warranty Policy is applicable only for the product sold
within India. If the product requires repair or maintenance
work to be performed, please ensure that you get the
machine serviced from an authorised service centre or
dealer of RMCL to ensure that the warranty is not void.
Acceptance of the Machine
On arrival of the machine at the shipping address, please
check for any damage that may have occurred as a result
of transit. In the event of any such damage, the purchaser
is bound by responsibility to send a claim letter to the
concerned branch/dealer with a copy of the invoice. The
letter should be sent within 24 hours of receipt of the
machine.
All information contained is without obligation. RMCL
particularly reserves the right to modify any equipment,
technical specifications, colours, shapes, materials and
the like so as to adapt them to local conditions all without
previous announcement and without giving reasons.
RMCL may stop manufacturing certain models without
previous notice.
The Owner’s Manual corresponds to the latest information
available for this machine at the time it was printed. Minor
deviations resulting from enhancements of the design
cannot be entirely represented.
The Owner’s Manual is an integral part of the machine and
must not be misplaced.
Roots reserves the right to change the product or contents
of this manual without prior information.
For Battery, Motors, Engines and other OEM components
related kindly refer to their manufacturers manual supplied
along with the machine for instructions regarding usage,
maintenance and service.
The Manual
Please note down the serial number of your machine
below:
Date of commissioning:
Serial number:

TECHNICAL SPECIFICATION
5
RootsScrub E 350
Description Units Values
Scrubbing width mm 350
Effective suction width mm 450
Theoretical area coverage m2/h 1400
Working speed, up to km/h 4
Airflow rate L/sec 38
Vacuum pressure mm of H2O1563
Power supply V/Hz 230 / 50
Total power W 1340
Brush motor W 600
Vacuum motor power W 850
No. of brushes No. 2
Diameter of brush mm 100
Brush speed rpm 650
Brush load kg 19
Fresh water tank L 10
Dirty water tank L 11
Dimensions (L x W x H) mm 700 x 470 x 540
Total weight empty kg 43
Total weight ready to operate kg 53

6
RootsScrub E 350
All paragraphs in this manual referring to you personal
safety, the safety of your machine and the environment
protection are attributed one of the following warning
symbols.
Safety & Warning Symbols
GENERAL SAFETY INSTRUCTIONS - WALK BEHIND SCRUBBER DRIERS
Symbol
(Hazardous for) Description
Safety Provisions
Caution
Ecological hazard
Read Manual
(persons and goods)
(the machine)
(the environment)
Prior to first operation, read the
manual carefully and strictly
comply with the instructions
contained.
Due to us e o f s u b s t a n c e s
representing an inherent danger
to health of environment.
Important information on handling
t h e m a c h i n e i n o r d e r
to maintain operability.
Safety provisions in dangerous
situation caused by misuse
i n a c c u r a t e a d h e r e n c e o f
i n s t r u c t i o n o r p r e s c r i b e d
work routine.
General Guidelines
ŸIn addition to the information contained in this
manual, generally applicable legal provisions for
Safety and Prevention of accidents must be adhered
to.
ŸPlease go through the manual and the instructions
contained herein carefully, even if you possess prior
experience in operating similar ground cleaning
equipment.
ŸSchedule some time for the careful and thorough
perusal of the manual contents.
ŸThe responsibility of all persons in the working area
fall upon the operator of the machine.
ŸNo persons, children included, should be allowed
within the zone of danger.
ŸThe warning and instruction plates attached to the
machine carry important advice on safe operation of
the machine.
ŸLost or illegible stickers must be replaced at the
earliest.
ŸPrior to operation of the machine, the operator must
ensure that the machine and its working implements
are in proper and safe operating condition.
ŸMachines with identified and known defects must not
be used.
ŸIt is important that operators and all persons likely to
use the machine familiarize themselves with all
accessories and controls, as well as their functions,
before commencing operation.
ŸAdherence to the above general instructions will
help avoid the operator from having to read the
manual while operating the machine.
Safety during machine operation
ŸThe machine is applicable for WET scrubbing only.
ŸGround cleaning machines may be run by qualified
personnel only.
ŸThe machine may be used for cleaning such
surfaces approved by the owner or this authorized
representatives.
ŸThe machine is only suitable for use on the types of
surfaces specified in the owner’s manual.
ŸProtect the machine from frost or extremely low
temperatures.
ŸNever vacuum up explosive liquids, combustible/
explosive dusts as well as acids and solvents! This
includes diesel, petrol, kerosene, paints, paint
thinners, heating oil, etc which can generate
explosive fumes on contact with the suction air.
Acetone, undiluted acids and aggressive solvents
must not vacuumed as may cause damage to the
machine components and brooms.
ŸDo not scrub/vacuum burning or glowing debris.
ŸDo not scrub/vacuum in flooded and slushy areas.
ŸThis machine must not be operated by persons
(including children) with limited physical ability,
sensoric/mental capabilities or lack of experience,
unless such persons are supervised by the person in
charge.
ŸChildren should be prevented from playing with the
machine.
ŸThe operator must use the machine properly. The
operator must consider the local conditions and
must pay attention to third parties especially children
when operating the machine.
ŸNever leave the machine unattended when the
motor is running.
ŸThe operator must leave the machine only after the
motor has come to a complete standstill.
ŸPrior to starting work, the operator has to check the
machine’s safety devices are working properly.
ŸThe operator must wear tight fitting clothes only. The
operator should wear safety shoes only when
operating or while carrying out maintenance work.
ŸLoose fitting clothes or shoes must not be worn by
the operator or any maintenance personnel who are
intended to work on/with the machine.
7
RootsScrub E 350
Park Position
If not operated, the machine has to be stored in its park
position. This position is attained by using the support
roller located at the front of the machine as represented.
Actuate the support by a lever located above the support
roller (see Fig.) And the brush head of the machine is
lightly lifted. This is to preclude deformation of the
brushes.
Parking Position
Working Position
Transport
For easy transportation of machine, it is recommended to
lift up the brush head and squeegee as represented, prior
to transportation of the machine.
Handling of line cords
ŸMake sure that the line cords are not damaged by
running over, squeezing, dragging , etc.
ŸThe line cords must be checked regularly with regard to
damage and aging.
ŸThe machine must not be used unless the line cords
are in proper condition.
ŸUse only original extension cables, with maximum
admissible length of 25 m.
ŸWhen using or replacing line cords, it is necessary to
adhere to as specified by the manufacturer.
ŸWhen replacing coupler plugs of line cords or
connecting leads, splash-proof protection and
mechanical strength must be guaranteed.
ŸCheck the immediate surrounding prior to starting.
Ensure sufficient visibility!
ŸThe operator must always use safety gloves, safety
helmet, shoes while operating/maintaining the
machine.
ŸOn inclined/tilted surfaces, the tilt angle and the
driving direction should not exceed the values given
in this manual.
ŸDo not place any tools or metallic objects on top the
battery. Risk of short circuit and deflagration!
Ÿ Smoking or naked flames are strictly prohibited.
ŸAlways allow the machine sufficient time to cool
before carrying out any repair or maintenance work.
ŸEnsure that there is adequate ventilation for diverting
the exhaust gases/dust when operating the machine
in a closed area.
ŸDo not place hand or any object while the brushes are
running.
ŸSuitable tools must be used for cleaning and
maintenance work.
ŸDo not carry out any welding, drilling, sawing or
grinding work on the frame sections. Damaged parts
may only be changed at an authorized service center.
ŸIt is not permitted to use aggressive and corrosive
cleaning agents.
ŸUsed batteries with the recycling symbol must not be
disposed of in household waste.
ŸMaintenance work may be carried out by authorised
dealer only.
ŸAlways use appropriate tool and equipments while
working on the machine.
ŸThe cable must not chafe against anything. In the
case of defective insulation, do not use the on-board
charger.
This machine is not suitable for evacuation of
dusts, which are explosive or dangerous to
health.
Do not clean the machine by means of
vapour jet or high pressure cleaning
equipment.
ŸDo not use harsh chemicals to clean the machine.
- Do not smoke near machine.
- Do not expose machine to naked flames
or burning debris.
ŸBefore operating the machine kindly use these
safety devices:
a) Shoes
b) Gloves
X
GENERAL SAFETY INSTRUCTIONS - WALK BEHIND SCRUBBER DRIERS

Top insulation
block
Bottom insulation
block
Unpacking:
ŸThe machine is packed in a cardboard box.
ŸThe floor consists of a wooden platform where the
machine is fixed through hooks.
ŸOpen the box from its bottom side and remove it by
pulling upwards. Then unscrew the hooks from the
pallet and take the machine.
Owner's personnel are not allowed to unpack the
machine.
Before Operation:
Ÿ1. Upon delivery, the machine has been secured by
insulations blocks and hooks at the bottom to preclude
unwanted movement of the machine. After taking the
machine from the pallet
ŸOpen the cardboard box at the top side and pull
upwards to remove it.
ŸRemove the hook by loosening the screws.
ŸLift the brush head to up position by using pedal.
ŸTake the machine off the box and avoid any damage to
the machine.
ŸRemove the nut from the plank in order to remove the
Ÿbrush from the pallet.
Qualified personnel only are admitted to open
the machine; Any work such as e.g. maintenance
or repair actions at the electric components have
to be executed with adequate tools only and by
qualified personnel only.
2. After taking the machine to its park position, set the
operating handle into its working position by releasing the
button at the side. After the handle has been set into
service position, engage the button again to preclude the
handle from displacing. After operation, the handle can be
folded back again as described above. In this folded
position the handle is protected against the damages and
requires less storing space.
FIRST OPERATION
Principle of Operation
A squeegee and suitable brushes or pads are required
for wet cleaning of hard floorings. The rotating brush
scrubs the floor thoroughly, removing dirt through suds,
thereby cleaning the floor. The soiled water is drawn
during the same cycle through the squeegee. Thus, the
floor can be walked on immediately after it is dry and
clean.
Useful Tips:
ŸPrior to wet cleaning, it is necessary to clean the floor.
ŸThis way, not only is the cleaning efficiency improved,
Ÿbut wear of the brush is also substantially reduced.
ŸIf floors are particularly dirty or if wax has to be
removed (basic cleaning); the floor must be treated
twice.
ŸDuring the first cycle, the floor is scrubbed with the
cleaning agent selected according to the degree of
dirt encountered, the squeegee remaining lifted.
ŸAllow the cleaning agent to act on the floor for approx.
5 or 10 minutes, complying with the manufacturer's
instructions.
ŸScrub the floor once again while the squeegee is
lowered.
ŸToo much foam indicates excessive dosage or
improper suitability of detergent for the existing kind of
dirt.
ŸDetergent particles contained in the soiled water that
are not used will cause formation of foam.
ŸInstructions for dosage are given on the detergent
tank and must ideally adhere to manufacturer's
recommendations.
ŸThe ideal type of detergent and the perfect dosage
applicable to it will come through sustained use of the
machine.
8
RootsScrub E 350
Comply with instructions for correct dosage of
detergent. Correct dosage will help optimize
costs and also minimize impact on the
environment. Too much foam can affect the
performance of the machine.

3. Open the lateral brush head cover by loosening the
screw. Then insert the enclosed brushes into the
housing. The machine has been equipped with
screws to facilitate removal and fastening of the
brushes.
4. After folding of the lid, filling of the fresh water tank is
possible. Before filling with fresh water, take the
support roller out of its parking position.
Make sure that all covers and flaps have been
fitted before starting operation.
A damaged mains cable has to be replaced by
specific cable available at the manufacturer
or an Authorized service center.
1.Adjustable handle
2.Button for Handle
3.Squeegee Governor (forward, reverse)
4.Screw for brush removal
Operating & Indicator Elements:
OPERATING & INDICATOR ELEMENTS
Make sure that the mains cables are not damaged by
passing over them by pinching, pulling or other impacts.
Check the mains cables for ageing and damages at
regular inte r v a l s. Replace the m b y t he type
H05VVF3Gx1.5 as specified by the manufacturer. When
replacing the coupling plug of the mains cable or when
connecting lines respect the splash water protection and
the tensile strength of the components.
Handling Mains Cable Assembly
1
2
3
4
Screw
ŸBrush motor
ŸSuction motor
ŸWater pump switches
Controls
Control panel
A. Brush motor switch ON / OFF
ŸFunction in ON if switch “A” is in position “I”
B. Suction motor switch ON / OFF
ŸFunction in ON if switch “B” is in position “I”
C Water pump switch ON / OFF
ŸIn “I” position of the switch, water is steadily pumped
to the floor.
ŸIn “0” position of the switch, no water is pumped.
2. Detergent infeed
Pump Switch
ŸThe machine allows mixing of cleaning lye and fresh
water in the tank. The amount of detergent required for
cleaning can be regulated by the pump switch. If the
switch is set to the position “I” the cleaning lye is
continuously supplied. If the solution is required by
intervals only, press the switch and hold in position “I”.
This function helps to save detergent.
Knob
9
RootsScrub E 350
AC
B

OPERATION BRUSH
Forward
Reverse
1
23
1. Governing handle
2. Front squeegee
3. Rear squeegee
Squeegee Governor
Disconnect the mains plug before mounting or
dismounting the brush. Loosen the knob for fitting the
brush before use of the machine and afterwards for
removal of the brush. Change the brush position after
each use in order to preclude one-side wearing.
ŸLoosen the knob before dismounting the brush from
the machine.
ŸDismount the brush from the machine after every
use. Take the machine into the park position before
dismounting.
ŸThe front or the rear squeegee of the machine is
lowered and has contact with the floor. The operator
may change squeegee position according to the
direction of travel of the machine.
Water
ŸIf the machine is in its working position and pushed
forward, the rear squeegee has contact with the floor
while the front squeegee is lifted.
End of operation
Due to the counter-rotation of the brushes, some water
remains between the brushes at the end of operation.
Proceed thus as follows at the end of operation
ŸTake the machine into park position
ŸTurn suction motor on
ŸMove the machine a little bit forward
During this movement, the rear squeegee takes in the
water.
10
RootsScrub E 350
Mount / Dismount brushes
According to the type and degree of soiling, the machine
can be equipped with brushes from the accessories.
Mount Brush
ŸUse the support roller located at the handle side of the
machine to set the machine into its park position.
ŸRemove screw of the brush cover.
ŸFasten supplied brushes at the drive rollers at the
inside of the opposite cover.
ŸClose brush cover such that the guiding rollers and the
brushes safely catch.
When mounting, check the safe catching of
rollers and brushes.
Before cleaning or maintaining the machine as
well as before replacing parts of it, turn the
machine off and disconnect the plug.
ŸUse the support roller located at the handle side of the
machine to set the machine into its park position.
ŸLoosen screw.
ŸOpen brush cover and remove brushes. Re-close
cover and tighten screw.
Dismount Brushes
When inserting the brushes for the next
operation, make sure to change position of the
brush such that one- sided brush wearing is
precluded.
Brush maintenance
ŸRemove fresh and soiled water tanks.
ŸUse the support roller located at the handle side of the
machine to set the machine into its park position.
ŸUse the adjustment screw to set the operating handle of the
machine into vertical position, and then tilt the machine down
as represented.
Brush
Cover
Brush

OPERATION SQUEEGEE
ŸNo tools are required for dismounting the sealing
strips. Proceed as follows
ŸDismount squeegee (refer to paragraph “Dismount
squeegee” ).
1
2
ŸLoosen screw and fix the brushes manually as represented
in direction 1.
ŸOpen brush cover in direction 2.
ŸRemove brushes.
ŸClean brush compartment.
ŸInsert brushes, close brush cover and secure with screw.
ŸSet machine in upright position.
ŸUse adjustment screw to set the operating handle into
working position.
ŸSet front support roller into working position.
ŸRe-insert fresh and soiled water tanks.
Squeegee
The machine has been equipped with a squeegee of 450
mm working width. The squeegees can be lifted-out
alternately.
Check the squeegee for collected foreign
particles and for proper condition before start
of operation.
1
2
3
1. Squeegee
2. Squeegee screw
3. Squeegee holder
Mount Squeegee (Initial Fitting)
ŸLift squeegee and hold it to the squeegee holders (3).
ŸMount squeegee (1) to the squeegee holder by
means of screws (2) as represented.
ŸCheck the smooth running of the bottom sleeve at the
squeegee holders for perfect hinging.
ŸLift brush head of the machine in order to access the
squeegee screws.
ŸRemove both screws (2) as represented.
ŸPull squeegee to the bottom to remove it from the
machine.
Dismount Squeegee
Change Sealing Strips
11
RootsScrub E 350
ŸUnscrew knurled screw (1).
ŸRemove support strip.
ŸProceed to mounting of new sealing strip in reverse.
ŸTighten the knurled screws (by hand) and from the
center towards the outsides (slotted sealing strips point
to the front, plain ones to the back).
123
1. Knurled screw
2. Support strip
3. Sealing strip
The rear sealing strip can be turned round if
worn at the front edge.
Clean nozzle
The nozzle clogs after some hours of operation. It thus
required to clean the nozzle at daily intervals before start
of operation.
ŸDi s m o un t b r us h e s fr o m t h e m a c h i n e ( s e e
“Dismount/Mount Brushes”).
ŸLift machine and lay down on its back as represented.
ŸTurn the nozzle to the left.
Proceed as follows for cleaning the nozzle:
1. Remove nozzle
NOZZLE
Tighten
Loosen
ŸClean nozzle by compressed air or water.
2. Clean nozzle
3. Mount nozzle
ŸAfter cleaning, insert nozzle by screwing clockwise
make sure that the nozzle slot is as the mounting
direction of the brushes upright machine.
Nozzle Slot

50°C
max.
MACHINE OPERATION
Filling of water
ŸFill fresh water and detergent as described below
before start of operation.
ŸOpen tank lid and fold back.
ŸFill fresh water tank with water (50°C max.) And
detergent in relation to the dirt encountered and
according to the specifications by the manufacturer.
ŸFilling quantity : 10 litres max.
Use detergents suitable for automatic
machines(low foaming) in order to preclude
Damag es at the suction turbine. We
recommend Roots detergents for cleaning and care,
which are perfectly adopted to the machine. These
products fulfil the requirements of the Detergents
Act.
Operation
ŸUse the button to take the support into working
position.
ŸTurn switch “A” ON to make the brush rotate.
ŸTurn switch “C” ON to open supply of fresh water with
or without detergent.
ŸTurn switch “B” ON to start suction turbine running.
Turn all switches OFF after operation and remove the
brushes from the machine. Mount the brushes in inverse
order of dismounting before next operation. This
measure extends service life of the brushes.
Start operation of the machine by pushing
forward immediately after switching on. This
Measure extends service life of the brush
motor. When pushing in reverse direction lift the rear
squeegee with the squeegee governor. Make sure
that during the operation of the machine the mains
cable always lies behind the operator.
Turn the brush drive off before passing over
dormers of a height of 10mm and more.
Danger when passing over the mains cable with
rotating brushes. Start cleaning in the socket area
and clean by stripes. If the surface is not obstructed, start
at borders and forward counter-clockwise. Clean the
remaining surface by stripes and starting in the socket
area. Divide partly obstructed surfaces into areas in the
reach of the mains cable. Within shortest time, the
operator will know to avoid unnecessary hindrance
caused by the mains cable.
ŸTurn machine off and set it to its park position.
ŸEmpty and rinse soiled water tank (see paragraph
”Dirty and Fresh Water Tanks”)
ŸClean sealing strips of the squeegee.
ŸCheck the sieve at the inlet opening of the fresh water
tank and clean if required in order to maintain suction
performance.
At the end of cleaning:
Do not clean the machine by means of a water
jet or high-pressure cleaning equipment to
avoid endangering your safety and the opera
ability of the machine.
Dirty and Fresh Water Tanks
The machine is equipped with a dirty and a fresh water
tank (lye tank). The filling amounts to 10 litres. Do not fill
beyond the maximum mark and do not exceed a water
temperature of 50°C
A suction hose delivers the dirty water into the dirty water
tank.
12
RootsScrub E 350
Do not take in larger amounts of secondary
water (water pools). To avoid settling of
residues empty and rinse the soiled and fresh
water tanks after work on principle.
Comply with the legal provisions for disposal
of dirty water. Check and clean the suction filter
in the tank lid for soiling in regular intervals.
Clean dirty and fresh water tanks
ŸSlowly tilt the tank as represented to
drain water before cleaning the tank.
Empty Soiled water tank
ŸHold the tank as represented
ŸOpen the tank and drain water
ŸClose cap
Cap
Fresh water tank
Soiled water tank
Filter
Float

Electrical System
E. Suction motor fuse
F. Pump fuse
G. Brush motor circuit
breaker
E
G
F
ŸThe electric system of the machine operates at a
mains voltage of 230V / 50Hz. After opening the
machine top, the brush motor and the suction turbine
are well accessible
ŸA T6.3A fuse (E) protects the suction turbine and has
to be replaced by the same type if blown (T stands for
slow-blow).
ŸThe suction turbine is low-maintenance type; its
carbon brushes only have to be checked after every
200 hours of operation.
ŸThe brush motor is protected by a circuit breaker (G)
which can be manually reset. In case of tripped cut-
out, detect the cause and remedy before re-starting
the machine.
ŸThe pump is protected by a T0.5A fuse (F). Replace
by the same type of fuse.
ŸReset the cut-out by pushing down the transparent
dome of the fuse box. After tripping, wait for approx.
30 seconds before resetting.
In case of repeated fuse blowing detect the
cause. We recommend having all work at the
electric System done by qualified personnel
only.
Before starting work at the electric system,
disconnect the mains plug. After work at the
electric system is finished, proceed to a safety test.
Maintenance work
Compliance with our recommendations concerning
maintenance work will give you the certitude always
having a machine at your disposal, which is ready to work
and in good operating condition.
It is better to take precautions than to repair damages -
and less expensive! Please contact your local contract
dealer; the people there will be glad to perform that work
for you. There well trained personnel and genuine spare
parts are at your disposal. In case of any inquiries or
orders for spare parts, please always quote the
machine's serial number indicated on the nameplate.
The nameplate is located at the rear side of the machine.
Turn the machine off and disconnect the mains
plug before cleaning or maintaining the
machine.
MAINTENANCE
13
RootsScrub E 350
For safety reasons, secure the lifted tank lid against
inadvertently closing or lowering during all cleaning or
maintenance work in or at the tank. Operate the machine
only with all safety devices being fitted and in protective
position. Do not proceed to cleaning by hand but use
appropriate tools or auxiliary means. Maintenance or
repair work has to be done using appropriate tools and by
qualified personnel only. For safety reasons use genuine
spare parts.
Before proceeding to the maintenance
and/or inspection or repair works mentioned
In following, execute a functional check of all
operating elements and units in order to detect
eventual failures. After repair work has finished,
operate the machine after having performed a
safety check only.
50 100 200
Check connections, extension cable and
plug for good condition, replace defective
Empty and clean (rinse) soiled water
tank.
Check sealing strips at the squeegee for
condition.
Check squeegee for collected foreign
matters and clean if required.
Check the float for function.
Check filter sieve of the fresh water tank
and clean if required.
Check squeegee sealing strips for
wearing and replace if required.
Check the brush for tight fit and wearing
and replace if required. Clean brush
Check fresh water infeed to the brushes.
Check suction motor from carbon dust
and check carbon brushes for smooth
operation and wearing. Replace carbon
brushes if required
Clean nozzle
service hours
everyDailyMaintenance Work
Check the tank lid gasket and replace if
required.
Disconnect the mains plug before executing
maintenance or repair work. After these works
have finished, proceed to a safety check.


Roots Multiclean Ltd.
R.K.G. Industrial Estate, Ganapathy,
Coimbatore - 641 006, India.
Phone: +91 (422) 4330 330
E-mail: [email protected]
Web: rootsmulticlean.in
Toll Free: 1800 41 99 77 9
Table of contents
Other ROOTS Floor Machine manuals

ROOTS
ROOTS Rhino RD180 User manual

ROOTS
ROOTS RootsScrub B6050 User manual

ROOTS
ROOTS RootsScrub E Series User manual

ROOTS
ROOTS RootsScrub B6060 User manual

ROOTS
ROOTS RootsSweep B70 User manual

ROOTS
ROOTS Wizzard 340 Pump User manual

ROOTS
ROOTS RootsSweep RB100 User manual

ROOTS
ROOTS RHINO RD 160 Setup guide

ROOTS
ROOTS RHINO RD 160 User manual

ROOTS
ROOTS RootsScrub RB 800 User manual
Popular Floor Machine manuals by other brands

Diamond Products
Diamond Products CPG200 Operator's manual

WerkMaster
WerkMaster The BOSS Operator's manual

Pioneer Eclipse
Pioneer Eclipse PE440BU Instructions for use

Nilfisk-Advance
Nilfisk-Advance SW900 Use and maintenance

Minuteman
Minuteman M27000-00 Operation service parts care

Nobles
Nobles Marksmant 412 Specifications