ROPES RARK EQUIPMENT LOCKDCLOPS Tweezle O User manual

Tweezle O User Manual V01.01 | March 2022 | English
Tweezle O
Instructions Manual
CE 0408
UIAA 130:2021 PPE-R/11.114
EU 2016/425
Ident Ring for LockD Clips Communicating Safety System
Subject to Technical Changes !

User Manual
2
Table of Contents
List of Figures ...................................................................................................................... 2
1. Brief Description ......................................................................................................... 3
1.1. Intended Use ............................................................................................................. 3
1.2. Function ..................................................................................................................... 3
1.3. Use ............................................................................................................................. 3
2. Assembly of the Tweezle O ......................................................................................... 3
2.1. Before Installation ..................................................................................................... 3
2.2. Visual and Functional Inspection ............................................................................... 4
2.3. Proper Mounting Methods (examples) ..................................................................... 4
2.4. Improper Mounting Methods (examples) ................................................................. 5
3. Use of the Tweezle O ................................................................................................... 5
3.1. Use without shortcut ................................................................................................. 5
3.2. Use with shortcut ...................................................................................................... 6
4. Cleaning and Storage ................................................................................................... 8
4.1. Cleaning ..................................................................................................................... 8
4.2. Storage ....................................................................................................................... 8
5. Other Safety Principles ................................................................................................ 8
6. Supplemental Information .......................................................................................... 9
6.1. Conforming Standards ............................................................................................... 9
6.2. Declaration of conformity .......................................................................................... 9
6.3. Sales and Translations ............................................................................................... 9
6.4. Regular Checks ........................................................................................................... 9
6.5. Life of Product ........................................................................................................... 9
7. Annual Inspections by Qualified Individuals .............................................................. 10
7.1. Inspection Criteria ................................................................................................... 10
7.2. Inspection Procedures ............................................................................................. 10
8. Inspection Report Template ...................................................................................... 10
9. Product Markings and Labels ..................................................................................... 12
10. Your partner and direct contact for any questions ..................................................... 12
List of Figures
Figure 1: Tweezle O mounted with girth hitch on lanyard ............................................ 4
Figure 2: Tweezle O mounted with rated maillon ......................................................... 4
Figure 3: Tweezle O securely mounted on a trolley ...................................................... 4
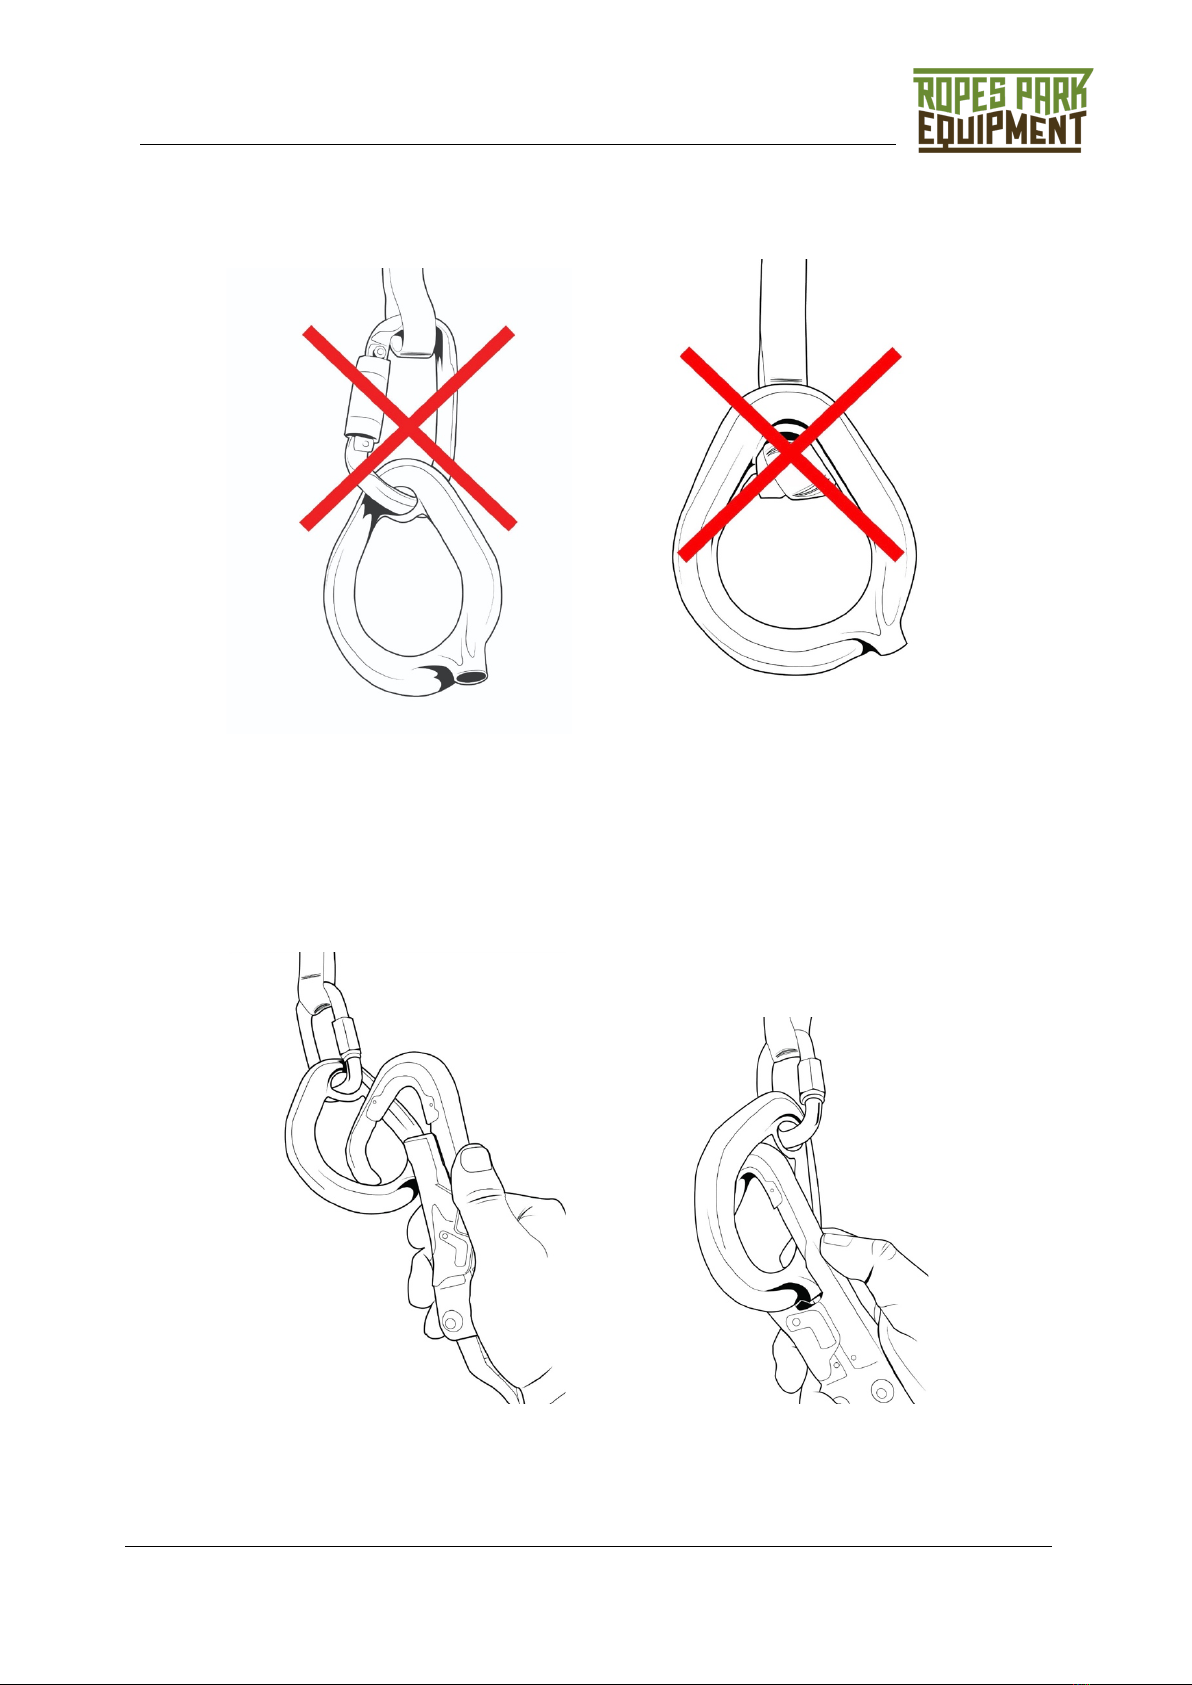
Figure 4: DANGER: Tweezle O improperly mounted on carabiner ................................ 5
Figure 5: DANGER: Tweezle O not properly connected ................................................. 5
Figure 6: Clip the unlocked carabiner of the LockD Clips system onto the Tweezle O .. 5
Figure 7: Tweezle the unlocked carabiner to lock it on the Tweezle O ......................... 5

V01.01 |March 2022 | English
3
Figure 8: Locked carabiner on Tweezle O ...................................................................... 6
Figure 9: Optionally clip the other carabiner of the LockD Clips on the Tweezle O ...... 6
Figure 10: Clip the unlocked carabiner of the LockD Clips system onto the Tweezle O 6
Figure 11: Tweezle the unlocked carabiner to lock it on the Tweezle O ....................... 7
Figure 12: Optionally clip the other carabiner of the LockD Clips on the Tweezle O .... 7
Figure 13: Connect shortcut to PPE attachment point .................................................. 7
1.
Brief Description
1.1.
Intended Use
The Tweezle O is an anchor O-ring with an integrated ident mark to lock the securing
system LockD Clips. It is intended to be used as a safe anchor point in fall-prone
situations in ropes courses and other climbing venues, such as with self-retracting
lifelines, rolling elements, Tarzan swings, etc.
To minimize loading on the LockD Clips during a fall, a shortcut connection between
the anchor point and user’s PPE can be used.
All other uses are considered improper. The manufacturer
will not be liable for any use other than stated. The
user bears the sole responsibility.
1.2.
Function
The ident mark serves to lock the securing system LockD Clips.
1.3.
Use
Anchor point O-ring for the LockD Clips fall protection equipment and other climbing
securing system.
Risk of serious injury or death - Examine and test before
each use.
2.
Assembly of the Tweezle O
2.1.
Before Installation
Anchoring equipment may only be installed by qualified persons.
Brief user instructions in the shape of a pictogram should be plainly visible where the
Tweezle O is to be used. Ensure that the safety lines, safety devices, and take-off
platforms have sufficient load capacity for their intended use.
Ensure that both children and adults can reach the Tweezle O easily. Install a footstep
to facilitate reach if necessary. Excessive bending or reaching of the LockD Clips to
reach the Tweezle O should be avoided.
Avoid confusing or frustrating users so they are not tempted to trick or manipulate the
system, such as leading users to complicated labyrinths, dead ends, etc.

User Manual
4
2.2.
Visual and Functional Inspection
Ensure that the Tweezle O is undamaged before mounting.
Test the function of the Tweezle O on the LockD Clips securing system.
2.3.
Proper Mounting Methods (examples)
The Tweezle O must only be mounted to a designated load approved/tested anchor
point. It must be securely mounted so that it cannot be removed without the use of a
tool.
The Tweezle O may move, as long as it provides safety and fall protection in all
positions.
Figure 1: Tweezle O mounted with girth hitch on lanyard
Figure 2: Tweezle O mounted with rated maillon
Figure 3: Tweezle O securely mounted on a trolley

V01.01 |March 2022 | English
5
2.4.
Improper Mounting Methods (examples)
Figure 4: DANGER: Tweezle O improperly mounted
on carabiner
Figure 5: DANGER: Tweezle O not properly
connected
3.
Use of the Tweezle O
3.1.
Use without shortcut
Figure 6: Clip the unlocked carabiner of the LockD
Clips system onto the Tweezle O
Figure 7: Tweezle the unlocked carabiner to lock it on
the Tweezle O

User Manual
6
Figure 8: Locked carabiner on Tweezle O
Figure 9: Optionally clip the other carabiner of the
LockD Clips on the Tweezle O
3.2.
Use with shortcut
Figure 10: Clip the unlocked carabiner of the LockD Clips system onto the Tweezle O

V01.01 |March 2022 | English
7
Figure 11: Tweezle the unlocked carabiner to lock it on the Tweezle O
Figure 12: Optionally clip the other carabiner of the LockD Clips on the Tweezle O
Figure 13: Connect shortcut to PPE attachment point

User Manual
8
4.
Cleaning and Storage
4.1.
Cleaning
Remove dust and debris with a dry cloth. If moisture is required for more thorough
cleaning, the metal parts can be cleaned with a damp cloth, and if needed with mild
dishwashing detergent, or dry-steamed with a commercial dry-steaming machine.
Avoid using running water or spray detergents.
Prevent immersing in water or water entering and/or accumulating in the indent
locking point of the Tweezle O, or any part of the communication system. Always clean
away from the opening of the indent locking point.
4.2.
Storage
Cleaning and lubricating should be done before any long-term storage. Store in a cool
and dry environment, away from light and heat sources. Care should be taken to
protect Tweezle O from coming into contact with any acidic or dangerous chemicals.
5.
Other Safety Principles
Risk of serious injury or death if the safety
instructions are not followed as prescribed.
• Always examine before use.
• Stop use of Tweezle O if any cracks or defects are detected or observed.
• All safety devices may only be installed and used by qualified and trained individuals,
who are aware of the dangers associated with their use.
• Accessories from other manufacturers may only be used with the approval of the
manufacturer and must not affect the functionality and safety of any other safety
system.
• Appropriate clothes and shoes must be worn, keeping safety in mind in all situations
in mind.
• PPE should be used according to manufacturer's instructions and directions, keeping
clothing layers.
• Safety equipment should only be used by a competent individual.
• Fall arrest devices/systems require specific installation and use procedures and height
clearances. Prior to use, make sure all procedures and instructions are adhered to.
• Determine possible fall clearances per jurisdictional regulations and equipment
manufacturer operations manual.
• Protect life safety lines, PPE, and all accessories from fire and heat, from sharp edges
and objects, sparks of any kind, and chemical compounds.
• Follow all insurance requirements and local employees ordinances and safety
procedures.
• Trees as structural support structures are "living bodies" and will require care and
maintenance. If left unchecked, their growth can cause changes and distortions on the
life safety lines. Check their integrity after storms, floods, and hurricanes.

V01.01 |March 2022 | English
9
• An emergency action plan (rescue and evacuation plan) must be in place and practiced
by the operation. Specific rescue plans and first aid should be in place in case of
emergencies. The manufacturer can provide guidance to creating emergency action
plans and provide staff training.
6.
Supplemental Information
6.1.
Conforming Standards
Conforms with: UIAA 130:2021 PPE-R/11.114
Product certification according to: EU 2016/425
Testing and production approvals by: TÜV Austria Services GmbH | CE0408
Deutschstraße 10
Austria | 1230 Wien
Type examination certificate number: 2447 2205-PSA22-069-Z
6.2.
Declaration of conformity
The manufacturer hereby declares that the new PPE described is in compliance with
the provisions of Directive 89/686/EEC, is identical to the PPE that was the subject of
the EC Type Examination Certificate issued by the procedure set out in Article 11 Letter
A / Letter B of the Directive 89/686/EEC and is subject to the control of the notified
body.
6.3.
Sales and Translations
Distributors and dealers must ensure that the instructions for use are supplied in the
language of the respective country of destination if German or English are not
sufficient. The translation must be authorized/approved by the manufacturer.
6.4.
Regular Checks
• Carry out visual and functional tests before each use. Remove from service
immediately if excessively worn (10% wear or more) or cracks or nicks are detected.
• Check PPE, anchors, cable/rope terminations, and all mechanical devices regularly, and
additionally by a qualified inspector at least once a year, documenting the results on
the test card.
• Wear is to be expected and will depend on amount and frequencies of use. Inspections
must be performed accordingly and the Tweezle O removed from use if excessively
worn.
6.5.
Life of Product
• Maximum service life for metal products will vary according to use, location, and other
external factors but must not exceed 10 years.
• Service life is reduced if the materials have been exposed to damaging heat,
temperatures, undue stress including excessive falls, damage due to impact, abrasion,
cuts, and chemical agents. Each of the influencing factors above can differently affect

User Manual
10
life span depending on the intensity, duration of influence and their combination. The
influences can occur during use as well as during transport or storage. The decision to
remove an item from service will have to be made by a qualified person trained in the
corresponding technical field. Intensive use and/or extreme operating conditions such
as use on sharp edges, chemical influences, etc. lead to a reduced service life. The
operator must ensure compliance.
• Document the first use of any product to facilitate compliance with its operating
requirements and maintenance.
• Using the test card included in this manual may aid documentation requirements of
course inspectors.
7.
Annual Inspections by Qualified Individuals
7.1.
Inspection Criteria
The periodic inspection of life safety devices must be performed by a qualified
inspector per jurisdictional standards of the region of use.
7.2.
Inspection Procedures
• Familiarize yourself fully with the instructions manual before performing any
inspections.
• When re-inspecting, reference previous inspections.
• The inspection report template should not be considered as encompassing all the
criteria of an inspection. Additional criteria should be noted elsewhere if needed.
• Each template may be used for inputting information for up to 4 Tweezle O units.
The following 1-4 rating system is recommended for imputing inspection results:
Legend / Inspection Information
1
No
detectable
wear
2
Minimal
wear
3
More than minimal
wear but under 1mm
worn
4
Excessive: 1mm or more
worn
Great
Good
Adequate
Needs Replacement
In case of a 3 or 4 rating, provide further information on the back of the form.
A “4” rating requires the Tweezle O unit to be immediately taken out of service,
separated, and marked for replacement.
Tweezle O cannot be repaired and must be replaced if
excessively worn or damaged. If in doubt, remove from
use and contact the manufacturer or a manufacturer’s
representative.
Inspection reports must be kept within reach of the operator and inspector, preferably
in a folder with the instructions manual.
8.
Inspection Report Template
See next page.

V01.01 |March 2022 | English
11
Inspection Report Template Please refer to the instructions for use.
Name of
inspector
Inspection
Date:
Operating manual
available?
Discard by date (10 years
from date of of purchase)
Sheet
#
Batch Number
(4 digits)
Location on course
(identification of
element)
Mounting method
(reference to
methods in
operating manual)
Abrasion (maximum
up to 1mm)
Other damage
Note: Immediately
remove Tweezle O
from service if any
cracks or nicks are
found
Corrosion
Function
Comment
Photos for
verification
(number/number)
Passed for
continued use
Inspector’s Signature

User Manual
12
9.
Product Markings and Labels
1
Breaking load
2
Reference to user manual
3
CE TÜV Austria
4
relevant standards
5
Month of production
6
Producer
7
Product name
10.
Your partner and direct contact for any questions
Ropes Park Equipment, LLC
1700 Post Rd. Suite C-16
Fairfield, CT
USA 06824
1-203-692-4644
www.ropesparkequipment.com
Ropes Park Equipment GmbH
Gaadnerstr. 90
2371 Hinterbrühl
Austria EU
www.ropesparkequipment.eu
Your partner and direct contact for all questions:
Table of contents
Other ROPES RARK EQUIPMENT Cables And Connectors manuals