Rotenso AERO A60W User manual

ENG
User
manual
AERO W
A60W

AERO W - Air purier
2User manual
AERO W - AIR PURIFIER
User manual
Contents
PRECAUTIONS ..................................................................................................................................................3
PART 1. SAFETY INFORMATION................................................................................................................................................... 4
The most important comments..................................................................................................................................................... 4
Prohibitions and warnings ............................................................................................................................................................. 4
PART 2. INTRODUCTION................................................................................................................................. 6
Technical Specication ..................................................................................................................................................................... 6
Product structure................................................................................................................................................................................ 6
PART 3. OPERATION INSTRUCTIONS ............................................................................................................ 7
Control panel and operation .......................................................................................................................................................... 7
PART 4. FILTER AND SENSOR REPLACEMENT ........................................................................................... 10
Filter Replacement............................................................................................................................................................................10
Sensor cleaning/Replacement.....................................................................................................................................................10
PART 5. CLEAN AND MAINTENANCE.......................................................................................................... 11
Clean the machine............................................................................................................................................................................11
Filter cleaning and replacement..................................................................................................................................................11
PART 6. ELECTRICAL SCHEMATIC DIAGRAM............................................................................................. 12
PART 7. TROUBLESHOOTING ...................................................................................................................... 13

AERO W - Air purier
3
User manual
PRECAUTIONS
Read the following if you use the device in European countries:
The device can not be operated by children over 7 years old, disabled people and oraz people without
experience and knowledge. Instructions should include a description of the correct and safe handling of the
device and oraz information about possible dangers. Children should not play with the device. Cleaning and
servicing should be carried out by authorized persons.
UTILIZATION:
Do not dispose of this product together with unsorted municipal waste.
It’s necessary to transfer this type of waste for special processing.
It’s illegal to throw the device together with other household waste.
There are several ways to get rid of this type of equipment:w
A. The city organizes electronic waste collection, you can pass the device without the cost.
B. When you buy a new device the seller will accept the old device without any fees.
C. Manufacturer will take the product from buyer produkt without charging it with costs.
D. Products of this type, contains valuable elements, it can be sold sprzedane on purchase of metals.
Throwing the device ,,on wild” exposes you to the risk of losing your health. Dangerous substances from the
device can penetrate to groundwater screating a danger of getting through to people’s food chain.
WARNING
Only qualied personnel should install and service the equipment. The installation, starting up, and
servicing of heating, ventilating, and air-conditioning equipment can be hazardous and requires specic
knowledge and training. Improperly installed, adjusted or altered equipment by an unqualied person
could result in death or serious injury. When working on the equipment, observe all precautions in the
literature and on the tags, stickers, and labels that are attached to the equipment.

AERO W - Air purier
4User manual
PART 1. SAFETY INFORMATION
1. THE MOST IMPORTANT COMMENTS
To avoid harm or property damage, please be sure to observe the following rules and instructions.
NOTICE
All contents of this project are related to safety. Please users must comply. The precautions in this project
are for correctly use of this product. The precautions explain the dangers, the extent of the damage and
the possible accidents.
WarningProhibition Prohibition
1. Do not use other accessories without the permission of the manufacturer, if make machine failed due to this
reason, the warranty will be automatically terminated.
2. Please check the product after open the packaging to see if damage, check the accessories if is complete.
3. Please children and incapacitated people use the product under the supervision of the guardian.
4. Once it is situation,take o power plug,do not let the detective product working.
5. This product can only be repaired by authorized repairing center. If maintenance in non-authorized repair
center, it is easily lead to other unsafe factors.
6. If the power cable damaged, in order to avoid danger, must be replaced by the manufacturer or others
professionals.
Any content with this symbol is prohibited. Otherwise, the product may be damaged or endanger
the user’s personal safety.
All the contents with this mark must be operated strictly according to the requirements, otherwise
it may result in damage to the product or endanger the user’s personal safety
All the content with this mark is the part that the user must pay attention to, or the product may be
damaged or cause other losses due to improper operation.
Do not insert ngers or foreign objects
into the air inlet or air outlet.
Do not unplug the power plug when
your hands are wet.
2. PROHIBITIONS AND WARNINGS
Do not use air puriers in environments lled with ammable gases such as hydrogen, natural gas,
and propane.

AERO W - Air purier
5
User manual
PART 1. SAFETY INFORMATION
When using spray insecticide, do not use this unit. Also do not use this machine when the room with
oil residue, incense ,smoke, ame , the air has a chemical smell or bathroom where heavy moisture.
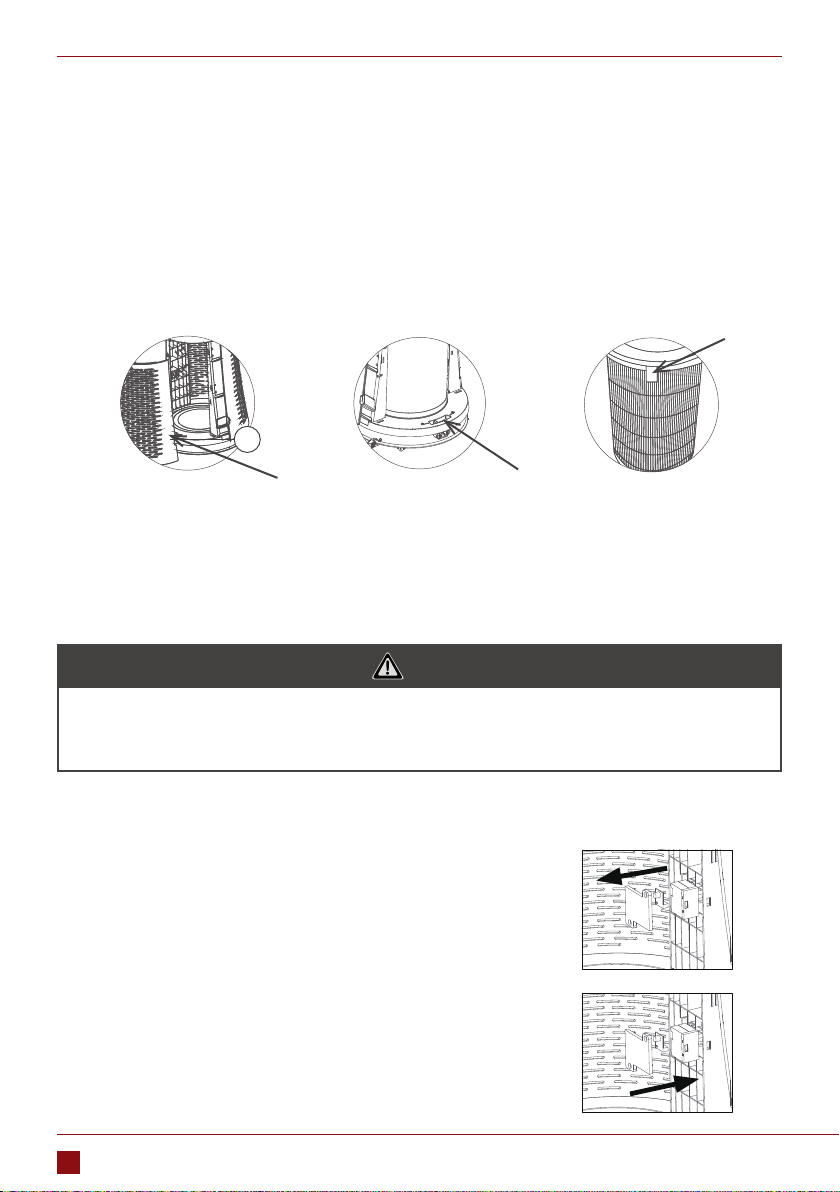
Do not operate the unit without the
lter installed. Do not block the inlet / outlet
If the power cord or plug is damaged or the
wall outlet is loose, do not use this unit.
Do not clean and reuse the high
performance composite lter.
When cleaning or not using this unit, unplug the power plug from the power outlet. Failure to do so
may result in electric shock or short circuit due to poor insulation.
When unplugging the power plug, you must hold the plug and not pull the power cord, otherwise
it may cause electric shock or a re caused by short circuit.
Please be careful when cleaning the air purier, a strong corrosive detergent will damage the
surface of the machine. Only use a soft cloth to clean the surface of the machine, otherwise the unit
may be damaged or cracked.
When using this unit, do not get near or placed on heat sources (such as a replace or a heater or a
place where it may come into contact with ammable gases).
Remove dust from the power plug,
periodically Only use 220V ~ standard socket.
Do not use an air purier when the
power cable or plug is damaged,
or loose the socket on wall.
If this air purier disrupts radio or
television reception, try one or more of
the following to correct the interference.
• Re-adjust or re-spin the receiving
antenna;
• Increasing distance from the air
cleaner and radio / TV receiver;
• Connect the unit’s power and receiver
power to dierent outlets;
• For assistance, contact your dealer or a
professional radio / TV technician
This machine is not suitable for disabled
people, people with mental retardation,
mental retardation or children’s own
operation. The supervision and guidance
provided by the safety supervisor shall
be used to assist in the operation of this
machine

AERO W - Air purier
6User manual
PART 2. INTRODUCTION
1. TECHNICAL SPECIFICATION
Model A60W
CADR m3/h 600
Dimension (W×D×H) mm 450×450×915
Weight kg 13
Rated Power W 65
Rated Voltage V-Hz 220-240~50
Coverage Area m210-120
Noise dB(A) 68
2. PRODUCT STRUCTURE
1. Controlling Panel
2. Outlet
3. Inlet
4. Decorating Bowl
5. Air Quality Indication light
6. Back Cover
7. Buckle
8. Dust Sensor
9. Filter xing lock
Pic. 1
1
Pic. 2
4
2
3
5
6
3
7
89

AERO W - Air purier
7
User manual
PART 3. OPERATION INSTRUCTIONS
1. CONTROL PANEL AND OPERATION
Connect the power
Connect the power supply under the requested voltage, the button ON/OFF will show red and enter into
standby state.
2
8
511
7
6
9
10
412
31
1. ON/OFF button
Touch ON/OFF button to start the machine, all buttons lights on control panel will turn on ,
showing in green.
2. Digital display area
At power on state, PM2.5 button ashes to show
PM2.5 concentration in the air.
Touch button (TIMER button light on), to set time from 0-12H.
Touch (SPEED button light on) to indicate dierent fan speeds, from
3-4-5-1-2 Levels.
Pic. 3

AERO W - Air purier
8User manual
CAUTIONS
When the machine is in AUTO MODE, the Odor and particle sensor will detect the current air
quality. When is excessive, the machine will automatically enter the highest fan speed. The
LED light switches to red, while the top panel raised to alert. After the current air quality has
been puried, the top panel will automatically fall down, the LED lights will switch to other
colors, and the machine enter to lower speed
PART 3. OPERATION INSTRUCTIONS
3. TIMER button
Touch this button (TIMER button light on), to set time from 0-12H.
4. AUTO MODE button
After power on, the default is auto mode, touch this key to exit auto mode and enter manual
mode. In auto mode, the wind speed will be automatically adjusted according to the air index.
5. ION button
Power on state touch this key to start on / o negative ion function (purier boot, the default
negative ion function).
6. FILTER button
When the usage time reaches 3000 hours, the lter indicator ashes, suggesting that the lter
be replaced.
7. WiFi button
Button for connecting to a wi network
8. SLEEP button
On power on state, touch this button to turn on/o SLEEP mode. All the lights light o and the
machine works at lowest speed. You can turn o “SLEEP” button by touching other buttons.
9. CHILD LOCK button
On boot state, press the child lock button for 3 seconds to open the lock function. When turn
on the child lock, all the touch keys can not operate; long press“child lock” key for 3 seconds to
quit the child lock function.
10. LIGHTING button
The default air quality indicator light is on, when not needed, touch this button to turn o the light.

AERO W - Air purier
9
User manual
PART 3. OPERATION INSTRUCTIONS
11. ELEVATOR button
Touching this key while in the manual mode, the control panel is ascended, which is
convenient for the decorative basin to be cleaned. Touch the key again to let the control board
down.
PRECAUTIONS
1. Do not place the purier in an unstable place.
2. Do not pour water into decorative pots.
12. SPEED button
Touch this button (SPEED button light on) to indicate dierent fan speeds, from 3-4-5-1-2
Levels.

AERO W - Air purier
10 User manual
PART 4. FILTER AND SENSOR REPLACEMENT
Pic. 4
To replace the lters:
1. After the purier power o, hands hold on both sides of the purier buckle position, open the purier
back cover with a little bit harder outward direction. (Pic. 4)
2. Push the lter lock to the left, unlock the lter xing device. (Pic. 5)
3. Pull the cloth tip on the top and end of the lter, take out the lter slowly for replacement (please wrap
the waste lter in a garbage bag then throw away, to prevent the contaminants from falling into the
room). (Pic. 6)
1. FILTER REPLACEMENT
Pic. 5 Pic. 6
4. Put in a new lter in and move the lter lock towards right side until it is locked, and then put on the back
cover. (Please identify the correct direction of the lter,the side with cloth tip is for upward and outward).
5. Turn on power supply, touch “ON/OFF” button to turn on the machine. Keeping touching“FILTER” button
for 3s to recount the time, keeping touching more than 10s, the services time for lter working will be
forced to be counted from zero again.
NOTICE
1. Please follow the guidance of lter replacement to keep better eect.
2. The lter to be replaced is not allowed to be used again even it is being cleaned.
3. Please reset time after replacing the new lter.
To clean/replacement the sensor:
1. Press “ON/OFF” button to turn o the machine and unplug the
power plug.
2. Open the back cover, and take the lter out.
3. Get out the screws and the sensor protection cover by tool. Take
out the sensor and take out the connecting wires.(The wire ca-
bles of sensor is small,please take out carefully) (Pic. 7)
4. Install new sensor and connect cable wires, and x the
protection cover by screws again. (Pic. 8)
5. Take on lter and the back cover.
2. SENSOR CLEANING/REPLACEMENT
Pic. 8 Pic. 7
5

AERO W - Air purier
11
User manual
PART 5. CLEAN AND MAINTENANCE
1. CLEAN THE MACHINE
1. Wipe the stain with a soft cloth.
2. For the stubborn stains that can’t be easily cleaned,please use the a soft cloth and dip a little bit neutral
detergent to clean.
Note: When maintenance,please do not use hard material to scratch the machine cover . Please operate under
the instructions before take o the front cover, and do not damage the machine parts.
2. FILTER CLEANING AND REPLACEMENT
Filter”button light will ash to remind to replace the lter. But due to the actual application of dierent levels
of pollution, the use of lter life cycle will be dierent, according to the size of the machine to produce sound
and smell to determine timely replacement.
Suggestion:
1) When the surface of the composite HEPA lter is dusty, the dust can be cleaned by vacuum cleaner to
prolong the lter service life. (it is recommended to clean every 1 months)
• Please note that the replacement time of lter is quite dierent because of the dierent using of the
environment.
• Please solve the used lter as non combustible waste treatment.
2) Please do not wash the HEPA lter with water.
WARNING
Before the maintenance,the power supply must be turned o.

AERO W - Air purier
12 User manual
PART 6. ELECTRICAL SCHEMATIC DIAGRAM
CN1
CN4
CN6
CN3 CN2
CN1
CN14
CN12
CN13
CN10 CN11 CN5 CN9 CN8
CN3 LED strip light
Sensor Magnetic spring switch Anion
Motor
Stepper motor
Operating area
control panel
Power PCB Speed
adjusting
PCB

AERO W - Air purier
13
User manual
Phenomenon Solution
Machine not turning on
1. Check if the power cord is connected properly.
2. Check if the front panel is closed properly.
3. Check if the machine is placed at on the ground.
Wind is very small from outlets
1. The lter bag is not removed: Remove the bag, and re-install
the lter.
2. There are foreign objects blocked into the air inlet or outlet:
Remove the blockage.
3. The lter is dirty: Clean or replace the lter.
Dust cleaning eect is not signicant, air
quality improvement is no signicant
1. The machine did not install the lter; please install the lter.
2. The room windows or doors often open. In rooms with slow
air ow, it takes longer to purify the room air due to the entry
of dirty outside air.
3. The machine is placed in a small place or near obstacles,
aecting the purication eect.
4. The lter dirty, aecting the purication eect; clean or
replace the lter.
Here is smell from outlet
1. Because many people smoking, barbecue etc in the room,
causing a lot of smell. It is recommended to ventilate the
room.
2. The lter has been seriously dirty; replace the new lter.
The air quality status indicator always
shows the air in poor quality (red
or yellow), and the PM 2.5 particles
displaying numbers no changing for a
long time.
1. The lter is dirty replace the lter.
2. Particle sensor lifespan has over replace the sensor.
NOTE
If after the above inspection still can not solve problems, Please contact Customer Service Center to
provide repair outlets or technical service center. Do not disassemble and repair, avoid danger and
damage to the machine.
PART 7. TROUBLESHOOTING

NOTES
.......................................................................................................................................................................................................
.......................................................................................................................................................................................................
........................................................................................................................................................................................................
........................................................................................................................................................................................................
........................................................................................................................................................................................................
........................................................................................................................................................................................................
.......................................................................................................................................................................................................................
.......................................................................................................................................................................................................................
......................................................................................................................................................................................................................
......................................................................................................................................................................................................................
......................................................................................................................................................................................................................
......................................................................................................................................................................................................................
......................................................................................................................................................................................................................
.......................................................................................................................................................................................................................
.......................................................................................................................................................................................................................
......................................................................................................................................................................................................................
......................................................................................................................................................................................................................
......................................................................................................................................................................................................................
......................................................................................................................................................................................................................
......................................................................................................................................................................................................................
........................................................................................................................................................................................................................
........................................................................................................................................................................................................................
........................................................................................................................................................................................................................
........................................................................................................................................................................................................................
.......................................................................................................................................................................................................................
.......................................................................................................................................................................................................................
.......................................................................................................................................................................................................................

www.rotenso.com
email: info@rotenso.com
Installer stamp
Table of contents
Other Rotenso Air Cleaner manuals