manuals.online logo
Brands
  1. Home
  2. •
  3. Brands
  4. •
  5. RST
  6. •
  7. Outdoor Furnishing
  8. •
  9. RST Original Orbital OP-0L04-B User manual

RST Original Orbital OP-0L04-B User manual

The Original OrbitalTM Lounger Assembly Instructions
Instrucciones de Ensamble del Camastro Orbital El Original
Chaise Longue Orbitale– Instructions De Montage
Model/Modelo/Modèle OP-0L04-B
The Original OrbitalTM Lounger
Camastro Orbital El Original
La Chaise Longue Originale Orbitale
TO IEW ASSEMBLY IDEO / PARA ER EL IDEO DE ENSAMBLE / ISIONNEZ LA IDEO DE MONTAGE:
http://www.rstout oor.com/Contemporary-Designs/Orbital-Zero-Gravity-Design-Lounger
Imported and Distributed by:
Importados y Distribuidos por:
Importé et Distribué par:
Red Star Traders
www.rstoutdoor.com
1775 West 2300 South
Salt Lake City, tah 84119
(801) 924-2090
Care an Use Instructions:
To enter the chair: Straddle the lounger while facing away from the chair. Hold the hand rails with both hands. Slowly ease your way onto the Orbital
Lounger and sit down. Please use caution when climbing on and off the chair.
Adjust your lounging position by shifting your weight. Lean back to recline, lean forward for more upright sitting position.
To clean: Simply wipe down with a damp cloth. Use mild soap or cleaner.
WARNING!: Should only be used by people with good balance and coordination. DO NOT rock excessively.
Improper use could result in injury. Tighten all screws before use.
For additional help or parts support, please contact customerservice@re startra ers.com
Instrucciones e Uso y Cui a o:
Para entrar en la silla: Súbase al camastro mientras esté de espaldas hacia la silla. Sostenga las barandillas con las dos manos. Lentamente acomódese en
el Camastro Orbital y sientése. Por favor tenga cuidado al subirse y bajarse del camastro.
Ajuste la posición descansando por medio de desplazar el peso. Inclínese hacia atrás para reclinarse, inclínese hacia adelante
para sentarse más verticalmente.
Para limpiar: Simplemente limpie con un paño húmedo. Use un jabón suave o limpiador.
¡ADVERTENCIA!: Debe ser utilizado sólo por personas con un buen equilibrio y coordinación. NO se balancee en exceso.
Un uso inadecuado puede provocar lesiones. Apriete todos los tornillos antes de su uso.
Para ayuda o piezas de repuesto en E.U.A., por favor póngase en contacto con customerservice@re startra ers.com
Instructions 'utilisation et ’entretien:
Avant de vous asseoir dans la chaise, agrippez les accoudoirs de la chaise avec les deux mains, et asseyez-vous soigneusement dans la chaise longue.
euillez être prudents lorsque vous vous asseyez et lorsque vous vous déplacez hors de la chaise longue.
Ajustez votre position en déplaçant votre poids/inclinant votre position. Inclinez vers l’arrière pour vous détendre ou inclinez vers l’avant pour réajuster
la chaise vers l’avant pour une position assise plus droite selon désirée.
Utilisez un chiffon humide pour nettoyer la chaise. Utilisez un savon ou un nettoyant doux.
AVERTISSEMENT!: La chaise devrait être utilisée uniquement par des personnes ayant un bon équilibre et une bonne
coordination. NE PAS faire balancer la chaise de façon excessive. Une utilisation incorrecte peut entraîner des blessures.
Assurez-vous de bien serrer toutes les vis avant l’utilisation.
MADE IN CHINA / HECHO EN CHINA / FABRIQUE EN CHINE
Imported and Distributed by:
Importados y Distribuidos por:
Importé et Distribué par:
Red Star Traders
www.rstoutdoor.com
1775 West 2300 South
Salt Lake City, tah 84119
(801) 924-2090
Assembly Instructions / Instrucciones e Ensamble / Instructions De Montage
Assemble the lounge body by connecting the metal strips in the center.
Locate the opening through the mesh and use the small screws to connect the
two halves of the lounger body.
Ensamble el cuerpo del camastro conectando las tiras de metal en el centro. Localice
la abertura a través de la malla y use los tornillos pequeños para unir las dos mi-
tades del cuerpo del camastro.
Assemblez la pièce principale de la chaise longue en attachant
les bordures en métal par le centre. Trouvez les ouvertures à travers
le matériel maillé et utilisez les petites vis pour attacher les deux pièces de la
chaise longue.
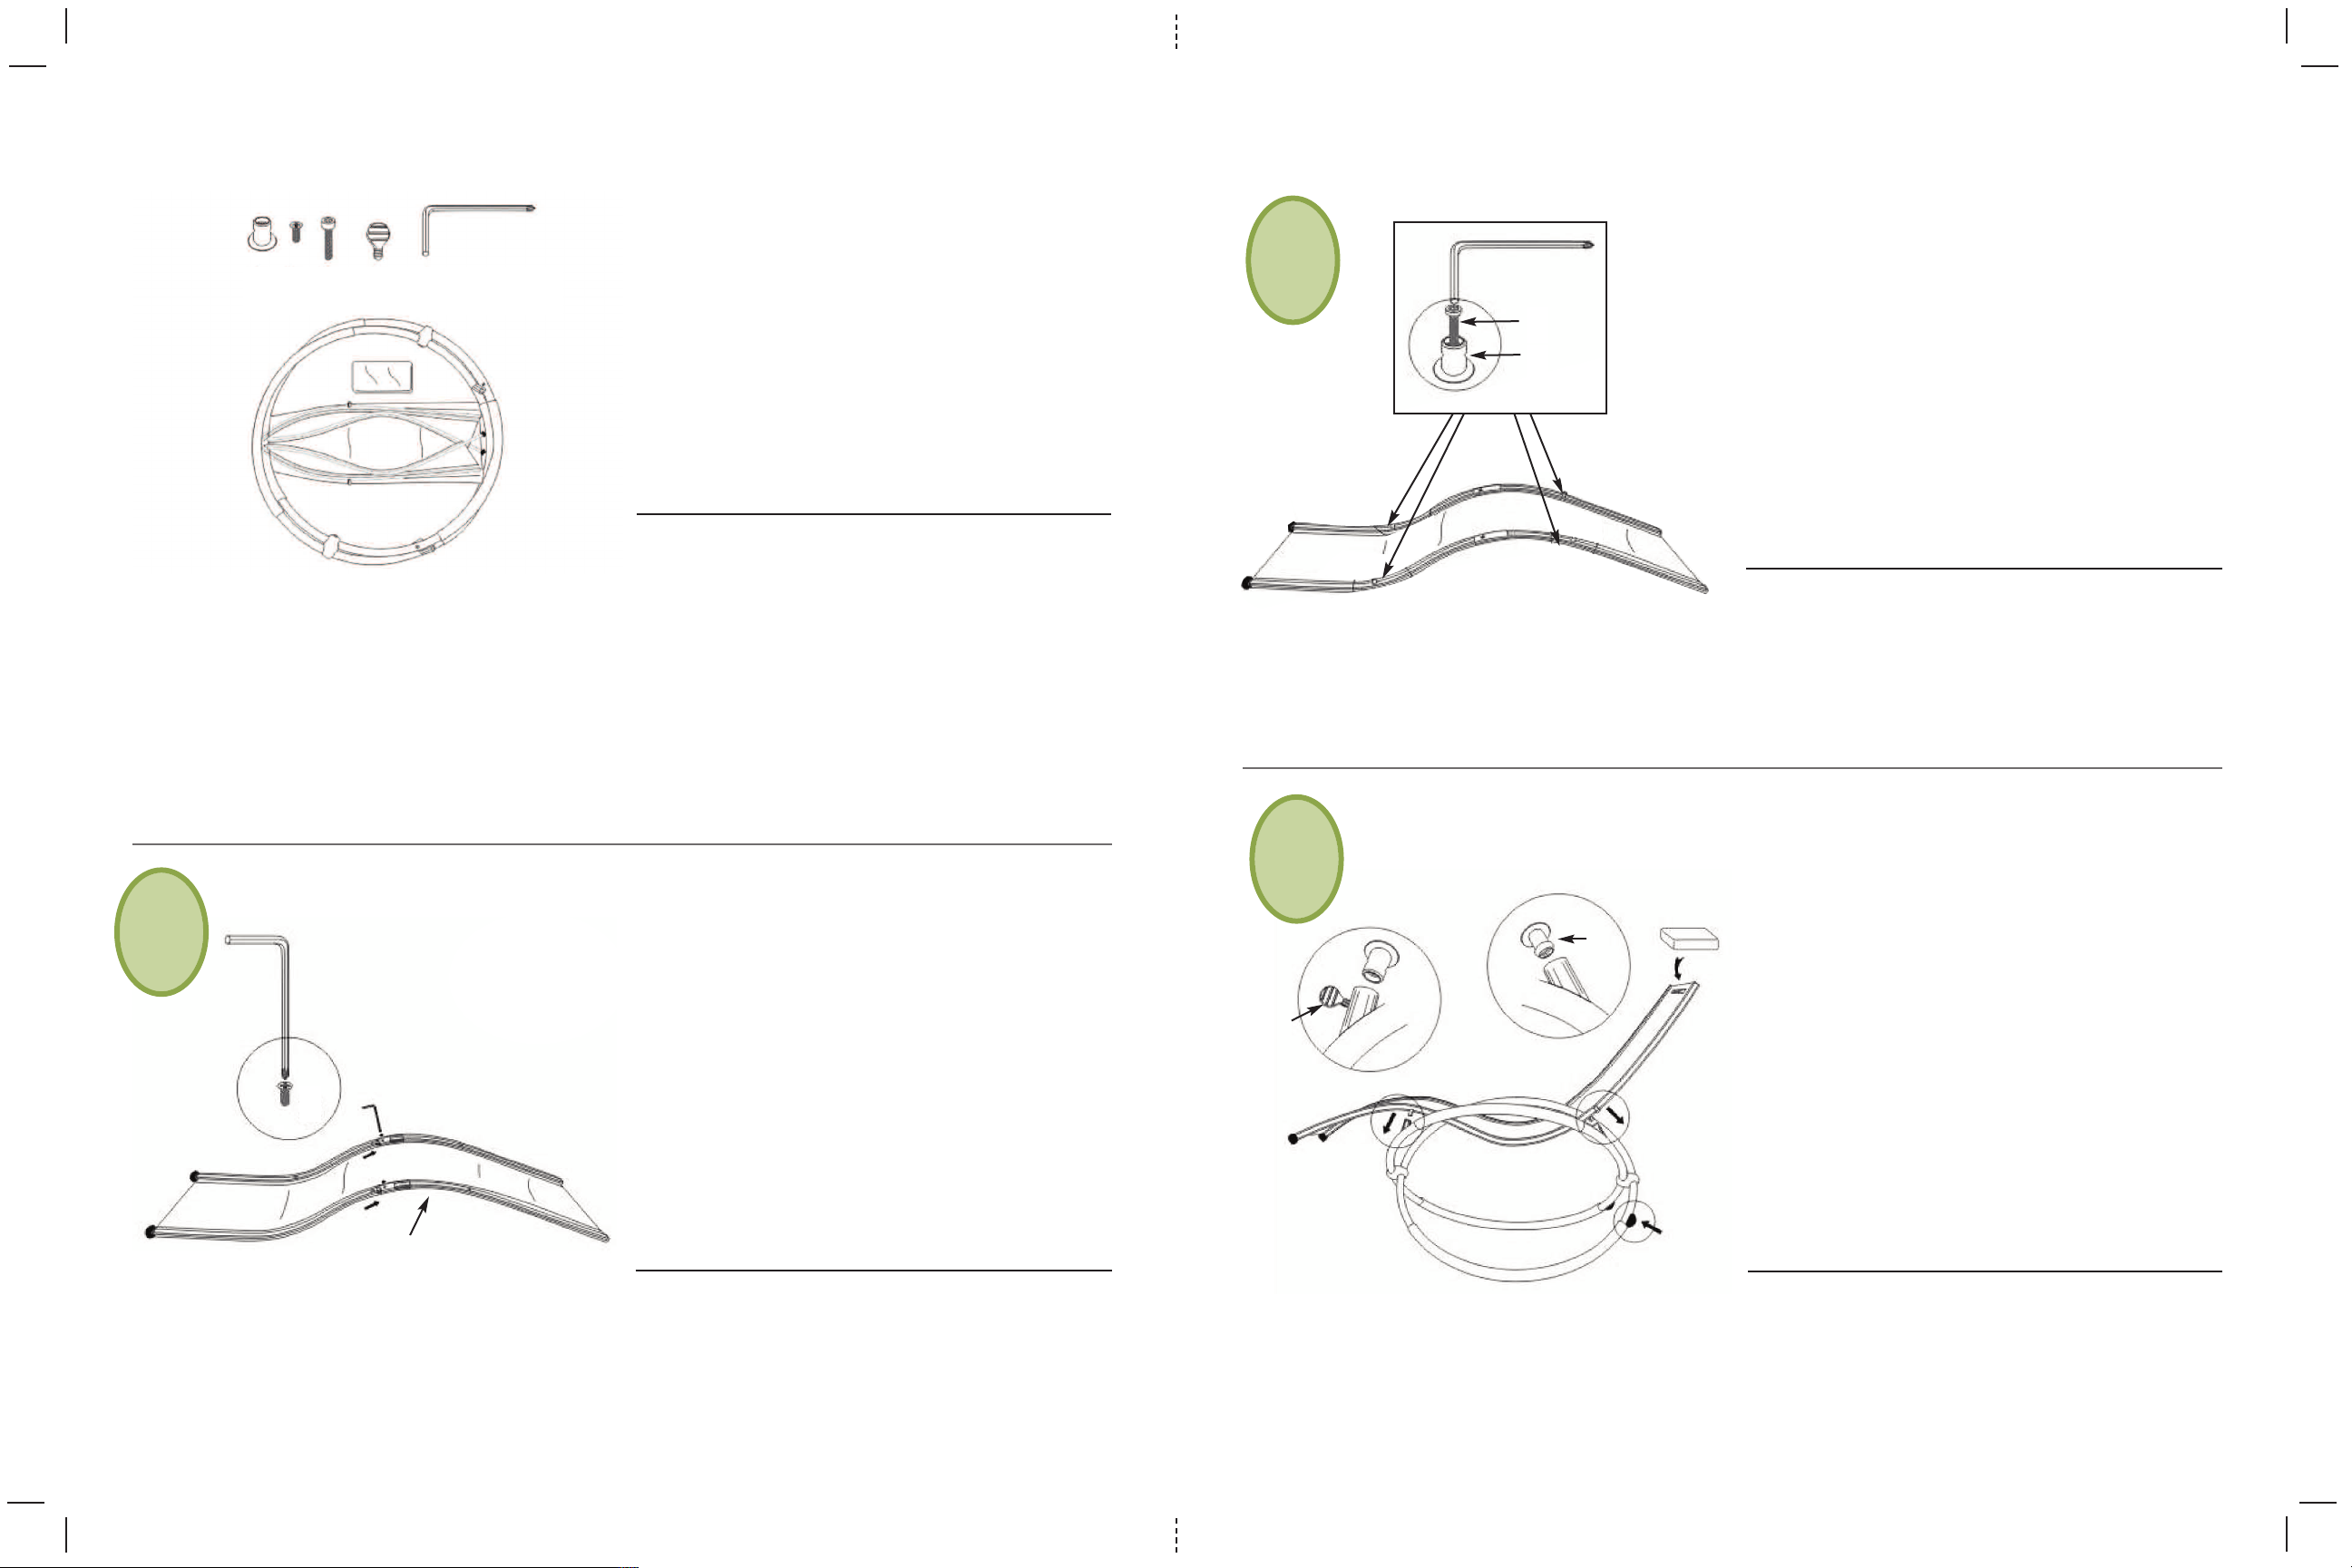
Using the Allen screws, secure the base plugs to the frame body.
Tighten the Allen screw through the base plug and screw into the frame.
Note: Some of the base plugs might be alrea y attache .
Con los tornillos Allen asegure los tapones de la base al marco.
Apriete el tornillo Allen a través del tapón de base y atornille en
el marco.
Nota: Algunos tapones e base pue en ya estar en ensambla os
En utilisant la clé Allen, fixez les bouchons de base au châssis.
Serrez les vis Allen à travers les bouchons de base et insérez les
vis dans la membrure.
Remarque: Certains es bouchons e base pourraient être éjà
en place.
1
2
Secure the lounger to the orbital frame. Push the base plug all
the way into frame openings and secure in place using the
thumb screws.
Asegure el camastro al marco orbital. Empuje el tapón de la base completamente
en las aberturas del marco y asegúrelos en su lugar con los tornillos.
Fixez la chaise longue au châssis orbital. Insérez les bouchons de base à fond dans
les ouvertures de châssis et fixez-les en place à l'aide des vis à oreilles.
3
Please ouble check an i entify the following parts:
A. Orbital Frame
B. Lounger mesh body (2 sections)
C. Pillow
D. (4) Base Plugs (used to attach lounger body to frame)
E. (2) Small Screws (used to assemble the two lounger body sections)
F. (4) Allen Screws (used to attach Base Plugs to Frame)
G. (4) Thumb screws (used to attach lounger base to frame)
H. (1) Allen / Phillips screwdriver tool
Make sure all of these parts are present an in goo con ition
Por favor revise e i entifique las siguientes partes:
A. Marco de Orbital
B. Malla del camastro (2 secciones)
C. Almohada
D. (4) Tapones de base (se utiliza para unir el cuerpo del camastro
al marco)
E. (2) Tornillos pequeños (se utiliza para ensamblar las dos secciones
del cuerpo del camastro)
F. (4) Allen Tornillos (usado para conectar enchufes base al marco)
G. (4) Tornillos de mano (se usa para fijar la base del camastro al marco)
H. (1) Destornillador Allen / Phillips
Asegúrese e que to as estas partes están presentes y en
buenas con iciones
SVP veuillez vérifier et i entifier les pièces suivantes:
A. Châssis orbital
B. Matériel/Pièces principales de chaise longue (2 sections)
C. Oreiller
D. (4) Bouchons de base (utilisés pour attacher la pièce principale de la
chaise longue au châssis)
E. (2) Petites vis (utilisées pour assembler les deux parties principales
de la chaise longue)
F. (4) is six pans creux (utilisé pour attacher Fiches de base au cadre)
G. (4) is à oreilles (utilisées pour fixer la base de chaise longue
au châssis)
H. (1) Clé Allen / Phillips
Assurez-vous que toutes ces pièces sont présentes et en bon état.
4x 2x 4x 4x 1x
(D) (E) (F) (G) (H)
E
B
F
D
D
G
A
C
H
(A) (B)
(C)

Other RST Outdoor Furnishing manuals

RST Portofino Casual OP-PELS2-PORV User manual

RST

RST Portofino Casual OP-PELS2-PORV User manual

RST Portofino OP-ACRSOF48-PORIV-SGRY User manual

RST

RST Portofino OP-ACRSOF48-PORIV-SGRY User manual

RST Cantina OP-WH01-RH02-CAN-K User manual

RST

RST Cantina OP-WH01-RH02-CAN-K User manual

Popular Outdoor Furnishing manuals by other brands

Salsbury Industries Regency 3308R installation instructions

Salsbury Industries

Salsbury Industries Regency 3308R installation instructions

Primos SCAR 62601 Assembly

Primos

Primos SCAR 62601 Assembly

Sunjoy A101011200 manual

Sunjoy

Sunjoy A101011200 manual

Hussey Seating Metro Assembly instructions

Hussey Seating

Hussey Seating Metro Assembly instructions

Hanover TRADDNS9PCSW2-BE manual

Hanover

Hanover TRADDNS9PCSW2-BE manual

Blumfeldt 10031011 manual

Blumfeldt

Blumfeldt 10031011 manual

Safavieh Outdoor PAT1512 quick start guide

Safavieh Outdoor

Safavieh Outdoor PAT1512 quick start guide

Coopers of Stortford H311 Assembly instructions/Instructions for use

Coopers of Stortford

Coopers of Stortford H311 Assembly instructions/Instructions for use

Lippert 2021123289 Installation and owner's manual

Lippert

Lippert 2021123289 Installation and owner's manual

Sunjoy A104000900 instruction manual

Sunjoy

Sunjoy A104000900 instruction manual

MyOUTDOORKITCHEN HUI-SSA20-V Assembly and operating manual

MyOUTDOORKITCHEN

MyOUTDOORKITCHEN HUI-SSA20-V Assembly and operating manual

Systems Trading Corporation GZ3D Assembly instructions

Systems Trading Corporation

Systems Trading Corporation GZ3D Assembly instructions

True DN 3000 Assembly instructions

True

True DN 3000 Assembly instructions

AmazonBasics 4-Piece Patio PE Rattan Wicker Sofa Set manual

AmazonBasics

AmazonBasics 4-Piece Patio PE Rattan Wicker Sofa Set manual

Lyfco Hollviken Assembly manual

Lyfco

Lyfco Hollviken Assembly manual

Alice's Garden ORLANDO XTP150R6 manual

Alice's Garden

Alice's Garden ORLANDO XTP150R6 manual

A&L Furniture Cedar Pergola Assembly instructions

A&L Furniture

A&L Furniture Cedar Pergola Assembly instructions

Safavieh PAT2004A quick start guide

Safavieh

Safavieh PAT2004A quick start guide

manuals.online logo
manuals.online logoBrands
  • About & Mission
  • Contact us
  • Privacy Policy
  • Terms and Conditions

Copyright 2025 Manuals.Online. All Rights Reserved.