manuals.online logo
Brands
  1. Home
  2. •
  3. Brands
  4. •
  5. Rule
  6. •
  7. Water Pump
  8. •
  9. Rule 403C Manual

Rule 403C Manual

Tournament Series
Livewell/Baitwell Pumps
Description
Powerful and long lasting, Rule Tournament Series Cartridge
Pumps offer outstanding performance as well as the versatility of
replacing the motor cartridge if the motor expires. The cartridge
feature also allows complete access to the impeller for easy
cleaning and maintenance. Replacing the motor cartridge only
allows the fittings and hose to remain totally intact.
To Change Motor Cartridge
1. Block off the thru-hull before removing the motor cartridge
2. Disconnect wiring
3. Press cartridge button, twist counterclockwise and pull
motor cartridge straight up
4. Reconnect wire to new motor cartridge
5. Align the arrows and press the new motor cartridge down
firmly. Twist motor housing clockwise until cartridge locks
in place
Instruction Guide
Models 401C, 403C, 405C, 401STC,
403STC, 405STC, 401FC, 403FC, 405FC
Replacement motors 45DR, 46DR,47DR
This pump is designed for
use with fresh and salt
water. Use with any other medium, including
particularly hazardous, caustic or corrosive
substance, could result in damage to the pump, the
surrounding environment and injury to persons or
property, including possible exposure to hazardous
substances. This pump is for water applications only.
WARNING
Model # Description Required GPH at GPH at
Fuse Size (A) Open Flow 3.35 ft.
401 C 500 GPH Livewell Pump with Angled Pickup Tube 2.5 500 340
403 C 800 GPH Livewell Pump with Angled Pickup Tube 5 800 490
405 C 1000 GPH Livewell Pump with Angled Pickup Tube 61000 710
401STC 500 GPH Livewell Pump with Straight Pickup Tube 2.5 500 340
403STC 800 GPH Livewell Pump with Straight Pickup Tube 5 800 490
405STC 1100 GPH Livewell Pump with Straight Pickup Tube 6 1100 790
401 FC 500 GPH Livewell Pump with 1" Straight Pickup Tube 2.5 500 340
403 FC 800 GPH Livewell Pump with 1" Straight Pickup Tube 5 800 490
405 FC 1100 GPH Livewell Pump with 1" Straight Pickup Tube 6 1100 790
Replacement Motors
45DR 500 GPH Replacement Motor 2.5 500 340
46DR 800 GPH Replacement Motor 5800 490
47DR 1000 GPH Replacement Motor 6 1100 790
Press Cartridge
Release Button
To remove motor cartridge:
Twist Cartridge
Counterclockwise
Pull Cartridge
Straight Up
a.
b.
c.
c
a
b
Models
Dimensions in inches (mm)
B
A
A
B
2.76 (70)
2.76 (70)
2.76
(70)
2.76
(70)
CC
E
E
E
C
D
D
D
Models
401 STC
403 STC
405 STC
Models
401 FC
403 FC
405 FC
Models
401 C
403 C
405 C
Model A B C D E
401C 4.0 (102) 5.87 (149) 3/4-14NPSM 1/2-14NPT 3/4-14NPSM
403C 4.0 (102) 5.87 (149) 3/4-14NPSM 1/2-14NPT 3/4-14NPSM
405C 4.0 (102) 5.87 (149) 1-11.5NPSM 1/2-14NPT 3/4-14NPSM
401STC 4.33 (110) 5.84 (148) 3/4-14NPSM 1/2-14NPT 3/4-14NPSM
403STC 4.33 (110) 5.84 (148) 3/4-14NPSM 1/2-14NPT 3/4-14NPSM
405STC 4.33 (110) 5.84 (148) 1-11.5NPSM 1/2-14NPT 3/4-14NPSM
401FC 5.87 (149) 3/4-14NPSM 1/2-14NPT 3/4-14NPT
403FC 5.87 (149) 3/4-14NPSM 1/2-14NPT 3/4-14NPT
405FC 5.87 (149) 1-11.5NPSM 1/2-14NPT 3/4-14NPT
Mounting the Pump
(Models 401C, 403C, 405C, 401STC,
403STC 405STC)
1. Drill a 1” diameter hole through the transom or hull
bottom. If drilling through the transom, make sure the
hole inside the boat is beneath the waterline outside the
boat when the boat is standing still.
2. Place the pump into the hole with the gasket in place on
the inside of the boat.
3. Tighten the nut on the outside of the hull until you are sure
the gasket ring is tightly sealed. Be careful not to over-
tighten. Make sure outlet is at least parallel with boat
bottom. This helps prevent airlocks.
4. Saw off the excess length of the pickup tube so it is flush
with the outside surface of the nut. In the event you are
using a strainer (Rule Model 73), leave 1/2” beyond the
nut. Make sure the cut is square and the threads de-
burred to allow the debris strainer to fit smoothly.
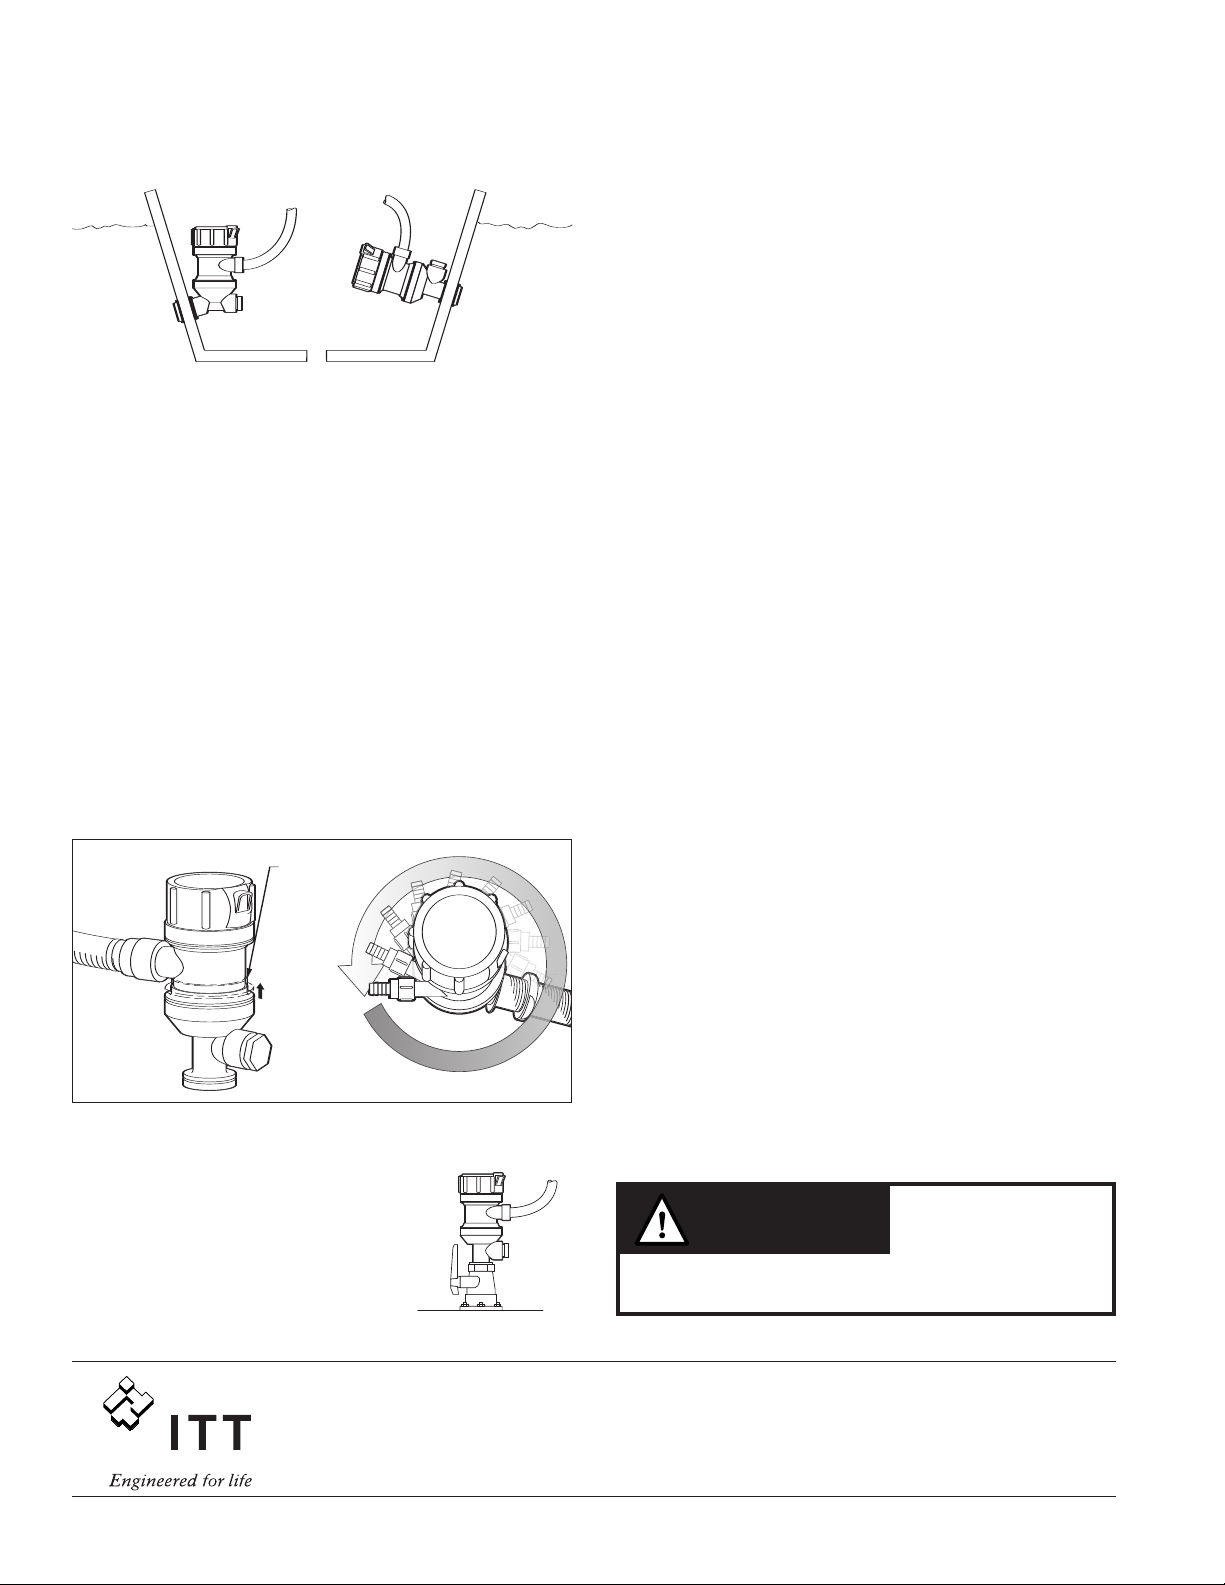
By lifting the locking ring, you can rotate the position of the
discharge nozzle so that the discharge is facing toward the
tank (see diagram below).
(Models 401FC, 403FC 405FC)
Seacock applications
1. Drill a 1” diameter hole through the
transom or hull bottom. If drilling
through the transom, make sure
the hole inside the boat is beneath
the waterline outside the boat
when the boat is standing still.
2. Install a thru-hull pickup tube with a filter grate to prevent
debris from entering the seacock and the pump. Use a
marine sealant on the flat surface of the thruhull where it
will be in contact with the outside surface of the boat and
around the threaded tube on both sides of the hull. Install
the seacock and pump using pipe tape or sealant on all
threaded connections.
3. Screw the pump into the seacock until it is hand tight. Do
not over-tighten.
4. If the pump is mounted horizontally, the output must be
pointed upward to allow air to vent.
KEEP SEACOCK VALVE CLOSED WHEN LIVEWELL IS
NOT IN USE
Electrical
WIRE: Normal installations require 16 gauge wire.
POLARITY: Brown pump wire connects to the positive (+)
side of the battery. Black pump wire connects to the negative
(-) side of the battery.
FUSE: Install proper size fuse & holder in the positive (+)
brown wire between the pump and the battery.
500 GPH pumps (Models 401C, 401STC, 401FC) -
INSTALL A 2.5 AMP FUSE
800 GPH pumps (Models 403C, 403STC, 403FC) -
INSTALL A 5.0 AMP FUSE
1100 GPH pumps (Models 405C, 405STC, 405FC) -
INSTALL A 6.0 AMP FUSE
IMPORTANT - THIS PRODUCT SHOULD BE
INSTALLED WITH THE RECOMMENDED FUSE SIZE
NOTE: Keep all wire connections and joints above highest
possible water level.
Seal wire connections with a marine sealant to prevent
corrosion.
Hose Connection
Dual Port Option
Each pump is fitted with an additional 1/2” NPT female port
and Hex Plug. This feature allows you to add your washdown
pump without adding another thru-hull fitting.
•Use a marine ribbed hose that will not kink with bends and
is rated for below water line use.
• Hose should run uphill evenly from pump to livewell tank.
You may use a control valve to regulate the flow.
•
Use hose clamps when making connections to pump and valve.
Pump Discharge
Can Rotate 360°
Raise Ring to
Allow Pump
to Rotate
THE PUMP IS BELOW
THE WATERLINE.
WATER CAN COME
INTO THE BOAT THROUGH THE PUMP IF THE
HOSE IS NOT CONNECTED TIGHTLY TO THE PUMP.
CAUTION
© Copyright 2006, ITT Industries All Rights Reserved Form: 950-0213 Rev. A 06/2006
Rule
1 Kondelin Road
Gloucester, MA 01930
Tel: 978-281-0573
Fax: 978-283-2619
Made in China www.rule-industries.com

This manual suits for next models

8

Other Rule Water Pump manuals

Rule 174D User manual

Rule

Rule 174D User manual

Rule rule User manual

Rule

Rule rule User manual

Rule 97a User manual

Rule

Rule 97a User manual

Rule Ev4000 User manual

Rule

Rule Ev4000 User manual

Rule GPH Series User manual

Rule

Rule GPH Series User manual

Rule iL500 Plus User manual

Rule

Rule iL500 Plus User manual

Rule A53S Manual

Rule

Rule A53S Manual

Rule RAIN PERFECT User manual

Rule

Rule RAIN PERFECT User manual

Rule iL500Plus Kit User manual

Rule

Rule iL500Plus Kit User manual

Rule AquaCharge User manual

Rule

Rule AquaCharge User manual

Popular Water Pump manuals by other brands

Liberty Pumps 441-10A installation manual

Liberty Pumps

Liberty Pumps 441-10A installation manual

laguna PRESSURE-FLO instruction manual

laguna

laguna PRESSURE-FLO instruction manual

Everbilt ZE00804 Use and care guide

Everbilt

Everbilt ZE00804 Use and care guide

CET PFP-20HPHND-2D instruction manual

CET

CET PFP-20HPHND-2D instruction manual

Mody Pumps G 900 Series OPERATING INSTRUCTIONS, INSTALLATION & MAINTENANCE MANUAL INCLUDING SPARE PARTS LIST

Mody Pumps

Mody Pumps G 900 Series OPERATING INSTRUCTIONS, INSTALLATION & MAINTENANCE MANUAL INCLUDING SPARE PARTS LIST

Chemyx FUSION 4000-X OEM user manual

Chemyx

Chemyx FUSION 4000-X OEM user manual

Davey Firefighter 5148YEV Installation and operating instructions

Davey

Davey Firefighter 5148YEV Installation and operating instructions

Enerpac of 150 instruction sheet

Enerpac

Enerpac of 150 instruction sheet

Angelo Decor Pond Building AD41500 quick start guide

Angelo Decor

Angelo Decor Pond Building AD41500 quick start guide

Wilo DrainLift SANI-XL Installation and operating instructions

Wilo

Wilo DrainLift SANI-XL Installation and operating instructions

Malmbergs SVQ250F instruction manual

Malmbergs

Malmbergs SVQ250F instruction manual

VERDER HI-CLEAN VA-2H80HE Operation

VERDER

VERDER HI-CLEAN VA-2H80HE Operation

Edelbrock 63-8814 installation instructions

Edelbrock

Edelbrock 63-8814 installation instructions

Vetus EHPA12R2 installation manual

Vetus

Vetus EHPA12R2 installation manual

Manta Boiler Performance BOSS PULCE FI instruction manual

Manta

Manta Boiler Performance BOSS PULCE FI instruction manual

Cembre B68M-P18A-KV-RC2 Operation and maintenance manual

Cembre

Cembre B68M-P18A-KV-RC2 Operation and maintenance manual

Lutz B1 PP 25-L SL Translation of the original instructions

Lutz

Lutz B1 PP 25-L SL Translation of the original instructions

Aussie Traveller 7.6LPM owner's manual

Aussie Traveller

Aussie Traveller 7.6LPM owner's manual

manuals.online logo
manuals.online logoBrands
  • About & Mission
  • Contact us
  • Privacy Policy
  • Terms and Conditions

Copyright 2025 Manuals.Online. All Rights Reserved.