Russell Hobbs 13559-56 User manual

mode d’emploi 2 istruzioni per l’uso 10
instructies 4 Bedienungsanleitung 12
instrucciones 6 instructions 14
instruções 8

Lisez les instructions et gardez-les. Si vous redistribuez l’appareil, n’oubliez pas la notice. Retirez
l’emballage, mais gardez-le le temps de vérifier l’était de l’appareil.
précautions importantes
Prenez des précautions essentielles comme:
1 Cet appareil doit uniquement être utilisé par ou sous la supervision d’un adulte responsable.
2 N’immergez pas l’appareil dans un liquide, ne l’utilisez pas dans une salle de bains,
à proximité d’une source d’eau ou à l’extérieur.
3 Ne pas ranger l’appareil à un endroit où il est directement exposé aux rayons de
soleil ou à une lampe fluorescente.
4 Pour éviter des interférences, gardez l’appareil à au moins un mètre de distance de tout
équipement électronique (ordinateur, T.V., radio, téléphone, etc.).
5 N’utilisez pas l’appareil à d’autres fins que celles décrites dans ce mode d’emploi.
6 N’utilisez pas l’appareil s’il est endommagé ou s’il ne fonctionne pas correctement.
pour un usage domestique uniquement
utilisation de la balance
1 Placez la balance sur une surface plane stable et ouvrez l’écran.
2 Des vibrations et des courants d’air peuvent affecter la précision.
3 Retirez le couvercle de la balance.
4 Retournez le couvercle et l’utiliser comme bol.
5 Mettez l’article à peser au milieu de la balance.
6 Appuyez sur le bouton T pour allumer l’écran.
7 L’écran s’allumera et affichera ensuite 0g.
8 Il est possible de changer de g (grammes) en oz (onces) en appuyant sur le bouton “g/oz” . “g”
ou “oz” s’affichera sur la droite de l’écran.
tare
9 Appuyez sur T pour remettre l’écran à zéro.
10 Utilisez cette fonction pour déduire le poids du récipient ou le poids des ingrédients
disponibles :
a) Mettez le bol sur la balance.
b) Lorsque “HOLD” apparaît en bas à droite de l’écran, la lecture est correcte.
c) Appuyez sur T pour remettre l’écran à zéro.
d) Ajoutez le premier ingrédient et attendez que “HOLD” s’affiche.
e) Appuyez sur T pour remettre l’écran à zéro.
f) Ajoutez l’ingrédient suivant et attendez que “HOLD” s’affiche.
g) Appuyez sur T pour remettre l’écran à zéro.
h) Répétez jusqu’à ce que vous ayez pesé tous les ingrédients.
11 La balance est limitée à 7.5kg. Si vous dépassez ce poids, l’écran affichera “O-Ld”.
2

3
12 Lorsque vous retirez le bol de la balance le signe “–” s’affiche au-dessus du “HOLD”.
13 Appuyez sur T pour remettre l’écran à zéro puis continuez.
éteindre
14 La lumière derrière l’écran s’éteindra après environ 10 secondes d’inactivité.
15 Elle se rallumera si vous ajoutez quelque chose sur la balance.
16 Après environ deux minutes d’inactivité, l’écran s’éteindra automatiquement.
17 Pour le rallumer appuyez sur T.
soins et entretien
18 Nettoyez l’extérieur de l’appareil avec un chiffon humide. Si nécessaire, utilisez un liquide
nettoyant pour ôter les taches tenaces.
remplacer les piles
19 Utilisez une pile alcaline de 9 volts, type 6F22, de la même taille qu’un PP3.
20 Mettez la balance à l’envers.
21 Appuyez le loquet vers le milieu afin de relâcher le couvercle du compartiment à piles.
22 Attachez le connecteur aux terminaux des piles.
23 Glissez les piles dans le support à l’intérieur du couvercle du compartiment à piles.
24 Replacez le couvercle.
25 Remettez la balance à l’endroit.
26 Ne laissez pas de piles vides dans l’appareil, elles risquent de couler.
27 À moins que vous utilisiez la balance régulièrement il est préférable de retirer les piles.
28 Ne pas jeter de piles usagées dans le feu ou un incinérateur.
29 Ne pas essayer de recharger des piles si ce ne sont pas spécifiquement des piles
rechargeables.
30 Ne jetez pas les piles vides avec les ordures ménagères. Mettez les au rebut de manière
respectueuse de l’environnement. Contactez les authorités locales responsables qui vous
indiqueront le lieu approprié.
attention
Vous ne devez pas vous débarrasser de cet appareil avec vos déchets ménagers.
Un système de collecte sélective pour ce type de produit est mis en place par les communes,
vous devez vous renseigner auprès de votre mairie afin d’en connaître les emplacements.
En effet, les produits électriques et électroniques contiennent des substances dangereuses qui
ont des effets néfastes sur l’environement ou la santé humaine et doivent être recyclés.
mode d’emploi

4
Lees de instructies en bewaar ze op een veilige plaats. Als u het apparaat aan iemand doorgeeft,
geeft u dan ook de instructies mee door. Verwijder alle verpakkingsonderdelen, maar gooi ze
pas weg als u zeker weet dat het apparaat goed functioneert.
belangrijke veiligheidsmaatregelen
Volg de gebruikelijke veiligheidsmaatregelen, zoals:
1 Dit apparaat mag uitsluitend worden gebruikt door of onder toezicht van een volwassene.
2 Dit apparaat mag niet in vloeistoffen worden ondergedompeld of in de badkamer,
in de buurt van water of in de open lucht worden gebruikt.
3 Bewaar het apparaat uit de buurt van direct zonlicht en, zo mogelijk, uit de buurt
van TL-verlichting.
4 Houd het apparaat ten minste één meter uit de buurt van elektronische apparatuur
(computer, tv, radio, telefoon, etc.) om storing te voorkomen.
5 Gebruik het apparaat niet voor andere doeleinden dan degene die in deze
gebruiksaanwijzing worden beschreven.
6 Gebruik het apparaat niet indien het beschadigd is of een defect vertoont.
uitsluitend voor huishoudelijk gebruik
het gebruik van de weegschaal
1 Plaats de weegschaal op een stabiele, vlakke ondergrond en ontvouw het scherm.
2 Trillingen en bewegingen in de lucht zullen de nauwkeurigheid beïnvloeden.
3 Verwijder het deksel van de weegschaal.
4 Draai het deksel om en gebruik het als kom.
5 Plaats te wegen element in het centrum van de schaal.
6 Druk op de T toets om het scherm in te schakelen.
7 Het scherm licht op, laat rusten bij 0g.
8 U kunt het scherm omschakelen tussen g (grams) en oz (ounces) met de “g/oz” toets. “g” of
“oz” verschijnt rechts op het scherm.
tarra
9 Druk op T om het scherm op nul te herstellen.
10 Gebruik deze functie om het gewicht van een container in mindering te brengen of om
bestaande ingrediënten te wegen:
a) Plaats de kom op de weegschaal.
b) Indien “HOLD” onderin rechts van het scherm verschijnt, is de meting correct.
c) Druk op T om het scherm op nul te herstellen.
d) Voeg het eerste ingrediënt toe en wacht tot “HOLD” verschijnt.
e) Druk op T om het scherm op nul te herstellen.
f) Voeg het volgende ingrediënt toe en wacht tot “HOLD” verschijnt.
g) Druk op T om het scherm op nul te herstellen.
h) Herhaal dit tot u alle ingrediënten gewogen hebt.

5
11 De weegschaal is beperkt tot 7.5kg. Als u dit gewicht overschrijdt, verschijnt: “O-Ld” op het
scherm.
12 Wanneer u de kom van de schaal verwijdert, verschijnt een “–” teken boven “HOLD”.
13 Druk op T om het scherm op nul te herstellen; daarna kunt u verder gaan.
uitschakelen
14 De achtergrondverlichting van het scherm schakelt uit na 10 seconden van inactiviteit.
15 Het schakelt opnieuw aan als u iets toevoegt op de weegschaal.
16 Na ongeveer twee minuten van inactiviteit schakelt het scherm automatisch uit.
17 Om dit opnieuw in te schakelen, drukt u op T.
zorg en onderhoud
18 Maak de buitenzijden van het apparaat schoon met een vochtige doek. Indien noodzakelijk
kunt u een beetje vaatwasmiddel gebruiken op hardnekkige vlekken.
de batterij vervangen
19 Gebruik een 9 volt alkaline batterij, type 6F22, dezelfde afmeting als een PP3.
20 Draai de weegschaal om.
21 Druk het veerslot naar het midden van de weegschaal om het deksel van het
batterijcompartiment los te maken.
22 Sluit de connector aan op de terminals van de batterij.
23 Schuif de batterij in de houder aan de binnenzijde van het deksel van het
batterijcompartiment.
24 Vervang het deksel van het batterijcompartiment.
25 Draai de weegschaal correct om.
26 Laat geen lege batterij in het apparaat zitten want deze kan lekken.
27 Tenzij u de weegschaal regelmatig gebruikt, raden we aan de batterij volledig te verwijderen.
28 Gooi geen oude batterijen op vuur of in een vuilverbrander.
29 Probeer de batterijen niet op te laden, tenzij ze specifiek ontworpen zijn om opgeladen te
worden.
30 Gooi de oude batterij niet weg met het normale huishoudelijke afval. Ze moet op een
milieuvriendelijke wijze weggegooid worden. Neem contact op met uw lokale autoriteit voor
de correcte afhandeling van de batterij.
instructies

6
Lea las instrucciones y guárdelas en un lugar seguro. Si da el aparato a otro, pase también las
instrucciones. Quite todo el embalaje, y guárdelo hasta que sepa que el aparato funciona bien.
seguridad importante
Siga las precauciones básicas de seguridad, incluyendo:
1 Este aparato deberá ser usado por, o bajo la supervisión de, un adulto responsable.
2 No ponga el aparato en líquido, no lo use en un cuarto de baño, cercano al agua, o
al aire libre.
3 Guarde el aparato fuera de la luz solar directa, y, si es posible, fuera de la luz fluorescente.
4 Mantenga el aparato a como mínimo un metro de distancia del equipo electrónico
(ordenador, TV, radio, teléfono, etc.), para evitar interferencia.
5 No use el aparato para ningún fin distinto a los descritos en estas instrucciones.
6 No use el aparato si está dañado o si no funciona bien.
sólo para uso doméstico
uso del peso
1 Coloque el peso sobre una superficie nivelada y estable y despliegue el visualizador.
2 La vibración y el movimiento de aire afectarán a su precisión.
3 Retire la tapa del peso.
4 Ponga la tapa boca abajo y utilícela como recipiente.
5 Coloque el elemento a pesar en el centro del peso.
6 Pulse el botón T para encender el visualizador.
7 El visualizador se encenderá; ajuste en 0g.
8 Puede cambiar el visualizador entre g (gramos) y oz (onzas) pulsando el botón “g/oz”. Se
mostrará “g” u “oz” a la derecha del visualizador.
tara
9 Pulse T para volver a colocar el visualizador en cero.
10 Utilice esta función para deducir el peso del contenedor o el peso de ingredientes existentes:
a) Coloque el recipiente sobre el peso.
b) Cuando aparezca “HOLD” en la parte inferior derecha del visualizador, la lectura es
correcta.
c) Pulse T para volver a colocar el visualizador en cero.
d) Añada el primer ingrediente y espere hasta que aparezca “HOLD”.
e) Pulse T para volver a colocar el visualizador en cero.
f) Añada el primer ingrediente y espere hasta que aparezca “HOLD”.
g) Pulse T para volver a colocar el visualizador en cero.
h) Repita la operación hasta que haya pesado todos los ingredientes.
11 El peso está limitado a 7.5kg. Si excede este peso, el visualizador mostrará “O-Ld”.

7
12 Cuando retire el recipiente del peso, aparece el signo “–” sobre “HOLD”.
13 Pulse T para volver a colocar el visualizador en cero y proceda con la operación.
apagar
14 La luz detrás del visualizador se apagará tras a los 10 segundos de no realizar ninguna
actividad.
15 Se volverá a encender si añade algo más en el peso.
16 Tras unos dos minutes de inactividad, el visualizador se apagará.
17 Para volverlo a encender, pulse T.
cuidado y mantenimiento
18 Limpie las superficies exteriores del aparato con un paño húmedo.
sustituir la batería
19 Utilice una batería de alcalina de 9 voltios tipo 6F22, el mismo tamaño que un PP3.
20 Gire el peso hacia abajo.
21 Pulse la pestaña hacia el centro del peso para liberar la tapa del compartimento de la batería.
22 Conecte el conector a los terminales de la batería.
23 Deslice la batería en el soporte dentro de la tapa del compartimento de la batería.
24 Sustituya la tapa del compartimento de la batería.
25 Gire el peso hacia arriba.
26 No deje una batería muerta en el aparato, ya que podría gotear.
27 Salvo que utilice el peso con regularidad, conviene retirar la batería.
28 No ponga las pilas viejas en el fuego o incinerador.
29 No trate de cargar las pilas, a menos que sean pilas específicamente diseñadas para ser
recargadas.
30 No tire la batería antigua con los desechos domésticos normales. Debe desecharse de forma
que se respete el medioambiente. Póngase en contacto con su autoridad local, que le
indicará cómo desecharla.
instrucciones

8
Leia atentamente todas as instruções e guarde-as num local seguro. Se passar o aparelho a
alguém, forneça também as instruções. Retire todo o material de embalagem, mas guarde-o até
verificar que o aparelho funciona.
medidas de precaução importantes
Siga as precauções básicas de segurança, incluindo as seguintes:
1 Este aparelho só deve ser utilizado por um adulto ou sob a vigilância de um adulto
responsável.
2 Não mergulhe o aparelho em líquidos, nem utilize em casas de banho, próximo de
água ou ao ar livre.
3 Guarde o aparelho ao abrigo da luz solar directa e, se possível, de luz fluorescente.
4 Mantenha uma distância de pelo menos 1 metro entre o aparelho e equipamento electrónico
(computador, televisão, rádio, telefone, etc.), para evitar interferência.
5 Não utilize a máquina para quaisquer outras finalidades senão as descritas nestas instruções.
6 Não utilize o aparelho se estiver danificado ou se o seu funcionamento for defeituoso.
apenas para uso doméstico
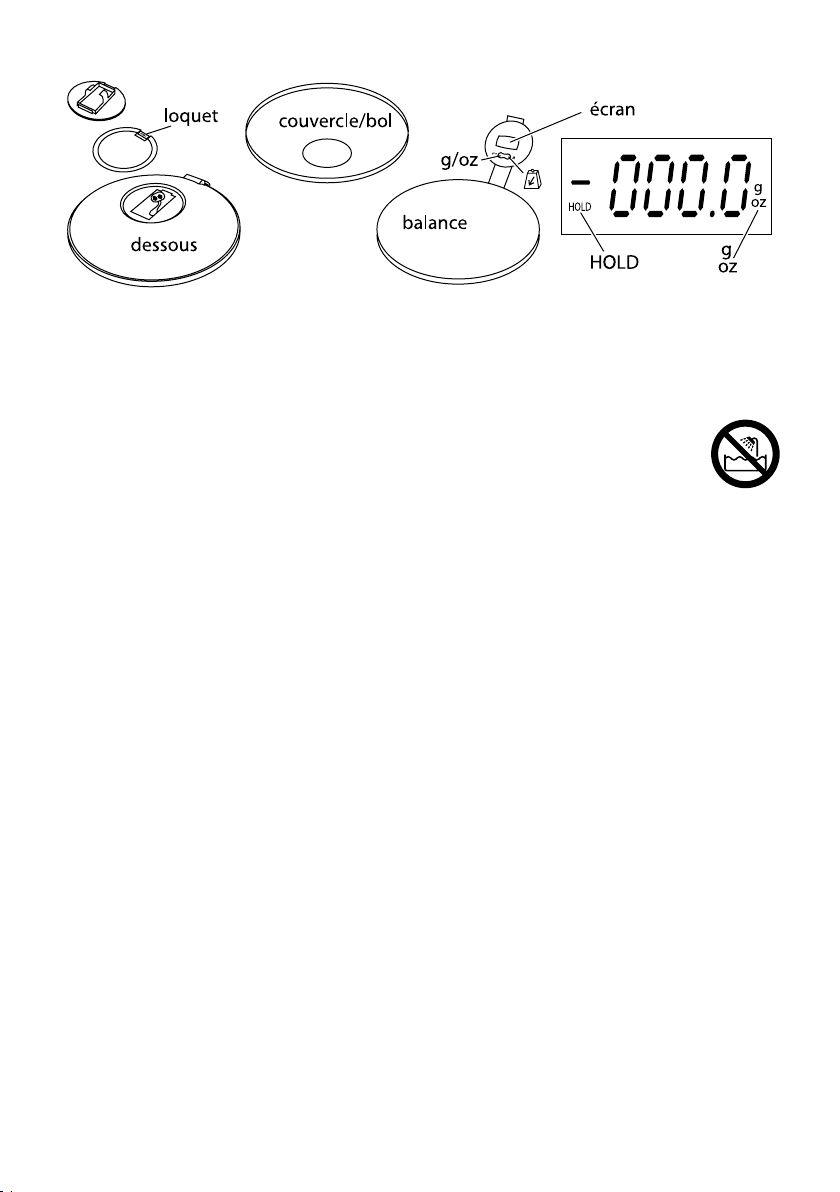
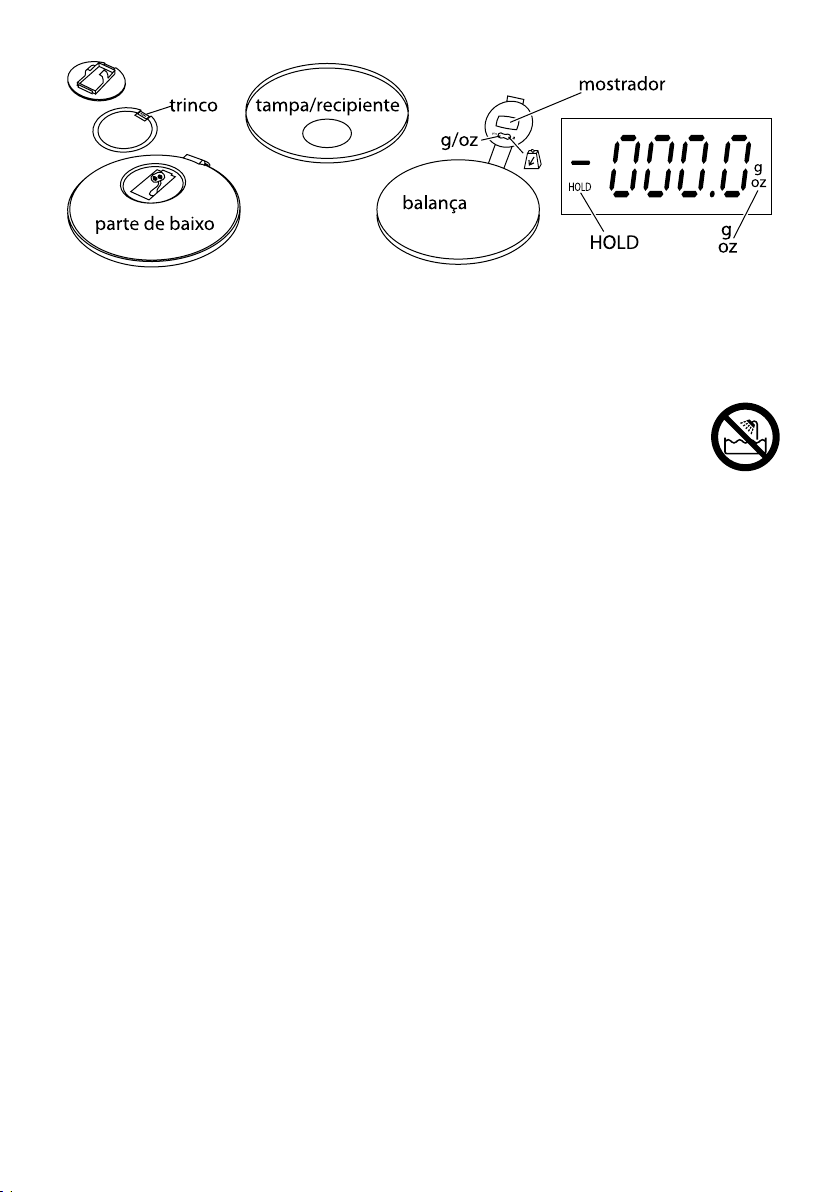
utilizar a balança
1 Coloque a balança numa superfície nivelada e estável e abra o mostrador.
2 A vibração e a deslocação do ar irão afectar a sua precisão.
3 Retire a tampa da balança.
4 Vire a tampa ao contrário e utilize-a como recipiente.
5 Coloque o que necessita ser pesado no centro da balança.
6 Pressione o botão T para ligar o mostrador.
7 O mostrador acender-se-á, e depois apresentará a informação 0g.
8 Pode seleccionar a apresentação da informação no mostrador em g (gramas) ou oz (onças),
pressionando o botão “g/oz”. No mostrador aparecerá, do lado direito, a indicação “g” ou “oz”.
tara
9 Pressione T para recolocar o mostrador a zeros.
10 Utilize esta função para deduzir o peso do recipiente, ou o peso dos ingredientes já existentes:
a) Coloque o recipiente na balança.
b) Quando a palavra “HOLD” (manter) aparecer no canto inferior direito do mostrador, a
leitura encontra-se correcta.
c) Pressione T para recolocar o mostrador a zeros.
d) Adicione o primeiro ingrediente e aguarde até que a palavra “HOLD” apareça.
e) Pressione T para recolocar o mostrador a zeros.
f) Adicione o seguinte ingrediente e aguarde até que a palavra “HOLD” apareça.
g) Pressione T para recolocar o mostrador a zeros.
h) Repita até ter pesado todos os ingredientes.
11 A balança só pesa até 7.5kg. Caso este peso seja excedido, o mostrador apresentará a
mensagem “O-Ld”

9
12 Quando remover o recipiente da balança, aparecerá o sinal “–“ por cima de “HOLD”.
13 Pressione T para recolocar o mostrador a zeros.
desligar
14 A luz por trás do ecrã apaga-se após 10 segundos de inactividade.
15 Voltará a acender-se, caso entretanto seja adicionado mais peso à balança.
16 Após cerca de dois minutos de inactividade, o ecrã desliga-se automaticamente.
17 Para o voltar a ligar, pressione Para o voltar a ligar, pressione T.
cuidados e manutenção
18 Limpe as superficies exteriores do aparelho com um pano húmido. Caso seja necessário,
pode utilizar um produto de limpeza ligeiro para remover manchas mais persistentes.
substituir a bateria
19 Utilize uma bateria alcalina de 9 voltes do tipo 6F22, do mesmo tamanho que uma PP3.
20 Vire a balança ao contrário.
21 Pressione o trinco em direcção ao centro da balança, para soltar a tampa do compartimento
da bateria.
22 Ligue o conector aos terminais da bateria.
23 Deslize a bateria para o suporte no interior da tampa do compartimento da bateria.
24 Volte a colocar a tampa do compartimento da bateria.
25 Vire a balança novamente para a sua posição correcta.
26 Não deixe dentro do aparelho uma bateria usada, pode ter fugas.
27 A menos que utilize a balança com frequência, é melhor retirar a bateria durante longos
períodos de não utilização.
28 Não ponha pilhas velhas numa lareira ou incinerador.
29 Não tente recarregar as pilhas, a menos que sejam concebidas especificamente para serem
recarregadas.
30 Não coloque baterias usadas no seu lixo comum. Devem ser descartadas de uma forma
ecológica. Contacte as suas autoridades locais, que lhe saberão informar onde as poderá
colocar.
instruções

10
Leggere attentamente le istruzioni e conservarle. Se l’apparecchio viene ceduto a terzi, passare
anche le istruzioni. Rimuovere tutto il materiale d’imballaggio, ma conservarlo fino a quando si
è certi che l’apparecchio funzioni.
norme di sicurezza importanti
Osservare le precauzioni fondamentali di sicurezza, e in particolare quanto segue:
1 Questo apparecchio deve essere usato solo da un adulto responsabile, o sotto il suo controllo.
2 Non immergere l’apparecchio in acqua; non utilizzarlo in bagno o vicino all’acqua e
non utilizzarlo all’aperto.
3 Riporre l’apparecchio lontano dalla luce diretta del sole e, se possibile, delle
lampade fluorescenti.
4 Per evitare interferenze, tenere l’apparecchio ad almeno un metro di distanza da
apparecchiature elettroniche (computer, TV, radio, telefono, ecc.).
5 Non usate l’apparecchio per usi diversi da quelli per i quali è stato progettato, che vengono
descritti in questo manuale di istruzioni.
6 Non usare l’apparecchio se è danneggiato o funziona male.
solo per uso domestico
come usare la bilancia
1 Posizionare la bilancia su una superficie stabile e uniforme. Distendere il display.
2 Le vibrazioni e i movimenti d’aria influenzano la precisione di lettura.
3 Togliere il coperchio dalla bilancia.
4 Capovolgere il coperchio e usarlo come ciotola.
5 Posizionare il prodotto da pesare al centro della bilancia.
6 Premere il tasto T per accendere il display.
7 Il display si accende e si imposta su 0g.
8 È possibile selezionare la visualizzazione di g (grammi) e oz (once) sul display premendo il
tasto “g/oz”. Il simbolo “g” o “oz” appare sulla destra del display.
tara
9 Premere T per azzerare il display.
10 Usare questa funzione per detrarre il peso del contenitore o degli ingredienti presenti:
a) Posizionare la ciotola sulla bilancia.
b) Se il simbolo “HOLD” appare in basso a destra sul display, la lettura è corretta.
c) Premere T per azzerare il display.
d) Aggiungere il primo ingrediente e attendere fino a quando appare il simbolo “HOLD”.
e) Premere T per azzerare il display.
f) Aggiungere l’ingrediente successivo e attendere fino a quando appare il simbolo “HOLD”.
g) Premere T per azzerare il display.
h) Ripetere fino a completare la pesatura di tutti gli ingredienti.
11 La bilancia ha un limite di 7.5kg. Se si eccede questo peso, il display mostra il simbolo “O-Ld”.

11
12 Quando si rimuove la ciotola dalla bilancia, il simbolo “–” appare sopra “HOLD”.
13 Premere T per azzerare il display e continuare.
spegnimento
14 Le spia dietro il display si spegne dopo circa 10 secondi di inattività.
15 Si riaccende mettendo qualcos’altro sulla bilancia.
16 Dopo circa due minuti di inattività, il display si spegne automaticamente.
17 Per riaccenderlo, premere T.
cura e manutenzione
18 Pulire le superfici esterne dell’apparecchio con un panno umido. Se necessario utilizzare un
detersivo per rimuovere le macchie più difficili.
sostituzione della batteria
19 Usare una batteria di tipo alcalino da 9 V formato 6F22, formato PP3.
20 Capovolgere la bilancia.
21 Premere sulla chiusura a scatto per aprire il coperchio dello scomparto batterie.
22 Collegare il connettore ai terminali della batteria.
23 Inserire la batteria facendola scorrere nel supporto all’interno del coperchio dello scomparto
batterie.
24 Riposizionare il coperchio dello scomparto batterie.
25 Riportare la bilancia nella posizione corretta.
26 Rimuovere la batteria esaurita dall’apparecchio per evitare perdite di liquido.
27 Se la bilancia non è usata con regolarità, rimuovere la batteria.
28 Non gettare sul fuoco o in un inceneritore le batterie scariche.
29 Non tentare di ricaricare le batterie, a meno che siano specificatamente del tipo ricaricabile.
30 Non gettare la batteria vecchia con i normali rifiuti domestici. Provvedere allo smaltimento
ecologicamente corretto, contattando l’ente o l’autorità locale competente.
istruzioni per l’uso

12
Lesen Sie die Bedienungsanleitung und bewahren Sie diese gut auf. Wenn Sie das Gerät
weitergeben, geben Sie bitte auch die Bedienungsanleitung weiter. Entfernen Sie alle
Verpackungsmaterialien, aber heben Sie diese auf, bis Sie sicher sind, dass das Gerät
funktioniert.
Wichtige Sicherheitshinweise
Beachten Sie bitte folgende grundlegende Vorsichtsmaßnahmen:
1 Dieses Gerät ist nur von einem oder unter der Aufsicht eines verantwortlichen Erwachsenen
zu benutzen.
2 Gerät keinesfalls in Flüssigkeit tauchen, in einem Badezimmer, nahe Wasser oder im
Freien benutzen.
3 Das Gerät so aufbewahren, dass es vor direktem Sonnenlicht und möglichst vor Neonlicht
geschützt ist.
4 Bei diesem Gerät ist zu elektronischen Geräten (Computer, Fernseher, Radio, Telefon usw.) ein
Abstand von mindestens einem Meter zu wahren, damit keine Störung auftritt.
5 Benutzen Sie das Gerät ausschließlich zu den in diesen Anweisungen beschriebenen
Zwecken.
6 Benutzen Sie das Gerät keinesfalls, wenn es beschädigt ist oder Fehlfunktionen zeigt.
Nur für den Gebrauch im Haushalt
Bedienung der Waage
1 Stellen Sie die Waage auf eine stabile ebene Oberfläche und klappen Sie die Anzeige hoch.
2 Vibrationen und Luftbewegungen beeinflussen die Genauigkeit.
3 Entfernen Sie die Abdeckung von der Waage.
4 Drehen Sie die Abdeckung um und verwenden Sie sie als Schüssel.
5 Platzieren Sie die zu wiegenden Dinge in der Mitte der Waage.
6 Drücken Sie die Taste T, um die Anzeige einzuschalten.
7 Die Anzeige leuchtet auf und stellt sich auf 0g ein.
8 Sie können die Anzeige zwischen g (Gramm) und oz (Unzen) umschalten, indem Sie die „g/oz“
Taste drücken. “g” bzw. “oz” wird rechts auf der Anzeige eingeblendet.
Tara
9 Drücken Sie T, um die Anzeige auf Null zu stellen.
10 Folgen Sie folgenden Schritten, um das Gewicht des Behälters oder das Gewicht von bereits
hinzugefügten Zutaten abzuziehen:
a) Platzieren Sie die Schüssel auf der Waage.
b) Wenn “HOLD” unten rechts auf der Anzeige erscheint, ist der angezeigte Wert korrekt.
c) Drücken Sie T, um die Anzeige auf Null zu stellen.
d) Geben Sie die erste Zutat hinzu und warten Sie bis “HOLD” erscheint.
e) Drücken Sie T, um die Anzeige auf Null zu stellen.
f) Geben Sie die nächste Zutat hinzu und warten Sie bis “HOLD” erscheint.

13
g) Drücken Sie T, um die Anzeige auf Null zu stellen.
h) Wiederholen Sie diese Schritte, bis Sie alle Zutaten abgewogen haben.
11 Die Waage ist auf 7.5kg beschränkt. Wenn Sie dieses Gewicht überschreiten, wird „O-Ld“
angezeigt.
12 Wenn Sie die Schüssel von der Waage entfernen, wird das Symbol “–” über „HOLD“ angezeigt.
13 Drücken Sie T, um die Anzeige auf Null zu stellen und fahren Sie fort.
Ausschalten
14 Die Beleuchtung der Anzeige geht nach ca. 10 Sekunden Inaktivität aus.
15 Sie schaltet sich wieder ein, wenn Sie etwas auf der Waage hinzufügen.
16 Nach ungefähr zwei Minuten Inaktivität schaltet sich die Anzeige selbst aus.
17 Um sie wieder einzuschalten, drücken Sie T.
Pflege und Instandhaltung
18 Reinigen Sie die äußeren Oberflächen des Geräts mit einem feuchten Tuch. Sie können bei
Bedarf etwas Spülmittel verwenden, um hartnäckige Flecken zu entfernen.
Batteriewechsel
19 Verwenden Sie eine 9 Volt Alkali-Batterie vom Typ 6F22 in PP3-Größe.
20 Drehen Sie die Waage um.
21 Drücken Sie den Verschluss in der Mitte der Waage, um die Batteriefachabdeckung zu öffnen.
22 Stecken Sie die Anschlüsse auf die Batterie auf.
23 Schieben Sie die Batterie in die Halterung in der Innenseite der Batteriefachabdeckung.
24 Setzen Sie die Batteriefachabdeckung wieder ein.
25 Stellen Sie die Waage richtig herum hin.
26 Lassen Sie keine leeren Batterien in dem Gerät, da diese auslaufen können.
27 Wenn Sie die Waage nicht regelmäßig verwenden, sollten Sie die Batterie entfernen.
28 Alte Batterien niemals ins Feuer werfen oder in einen Abfallverbrennungsofen geben.
29 Bitte versuchen Sie nicht, Batterien wieder aufzuladen, es sein denn, es handelt sich um
Batterien, die zum Wiederaufladen geeignet sind.
30 Geben Sie alte Batterien nicht in den normalen Hausmüll. Sie müssen auf umweltfreundliche
Weise entsorgt werden. Erkundigen Sie sich bei Ihren Abfallentsorgern, wo Sie Batterien
umweltfreundlich entsorgen können.
Bedienungsanleitung

14
Read the instructions and keep them safe. If you pass the appliance on, pass on the instructions
too. Remove all packaging, but keep it till you know the appliance works.
important safeguards
Follow basic safety precautions, including:
1 This appliance must only be used by or under the supervision of a responsible adult.
2 Don’t put the appliance in liquid, don’t use it in a bathroom, near water, or outdoors.
3 Store the appliance away from direct sunlight, and, if possible, from fluorescent light.
4 Keep the appliance at least one metre away from electronic equipment (computer, TV, radio,
telephone, etc.), to avoid interference.
5 Don’t use the appliance for any purpose other than those described in these instructions.
6 Don’t use the appliance if it’s damaged or malfunctions.
household use only
using the scale
1 Sit the scale on a stable level surface, and unfold the display.
2 Vibration and air movement will affect its accuracy.
3 Remove the cover from the scale.
4 Turn the cover upside down, and use it as a bowl.
5 Put the item to be weighes in the centre of the scale.
6 Press the T button to switch the display on.
7 The display will light up, then settle at 0g.
8 You may toggle the display between g (grams) and oz (ounces) by pressing the “g/oz” button.
“g” or “oz” will show on the right of the display.
tare
9 Press T to return the display to zero.
10 Use this function to deduct the weight of the container, or the weight of existing ingredients:
a) Put the bowl on the scale.
b) When “HOLD” appears on the bottom right of the display, the reading is correct.
c) Press T to return the display to zero.
d) Add the first ingredient, and wait till “HOLD” appears.
e) Press T to return the display to zero.
f) Add the next ingredient, and wait till “HOLD” appears.
g) Press T to return the display to zero.
h) Repeat till you’ve weighed all the ingredients.
11 The scale is limited to 7.5kg. If you exceed this weight, the display will show “O-Ld”.
12 When you remove the bowl from the scale, a “–” sign appears above “HOLD”.
13 Press T to return the display to zero, then carry on.
switching off
14 The light behind the display will go off after about 10 seconds of non-activity.
15 It will come on again if you add something else to the scale.

15
16 After about two minutes of non-activity, the display will switch itself off.
17 To switch it on again, press T.
care and maintenance
18 Clean the outside surfaces of the appliance with a damp cloth. If necessary, you may use a
little washing-up liquid to remove stubborn stains.
replacing the battery
19 Use a 9 volt alkaline battery, type 6F22, the same size as a PP3.
20 Turn the scale upside down.
21 Press the latch towards the centre of the scale, to release the battery compartment cover.
22 Attach the connector to the battery terminals.
23 Slide the battery into the holder on the inside of the battery compartment cover.
24 Replace the battery compartment cover.
25 Turn the scale the right way up.
26 Don’t leave a dead battery in the appliance, it may leak.
27 Unless you’re using the scale regularly, it’s best to remove the battery altogether.
28 Don’t put old batteries in a fire or incinerator.
29 Don’t try to recharge batteries unless they’re specifically designed to be recharged.
30 Don’t put the old battery out with your normal household rubbish. It must be disposed of in
an environmentally friendly way. Get in touch with your local authority, who will have
arrangements for its disposal.
instructions

16
439-648
Table of contents
Languages:
Other Russell Hobbs Scale manuals